Transcription
enInstallation InstructionsfrNotice d’installationesInstrucciones de instalaciónCustomer Service:1-800-944-2904These instuctions are intendedfor use by qualified installers only
2
Safety Definitions! WARNINGThis indicates that death or serious injuries may occur as a resultof non-observance of this warning.! CAUTIONThis indicates that minor or moderate injuries may occur as aresult of non-observance of this warning.NOTICEThis indicates that damage to the appliance or property may occur as aresult of non-compliance with this advisory.Note: This alerts you to important information and/or tips.Table of ContentsSafety Instructions. . . . . . . . . . . . . . . . . . . . . . . . . . . . . . . . . . . . . . . . . 4Avoiding General Hazards. . . . . . . . . . . . . . . . . . . . . . . . . . . . . . . . . . . 5Tools & Materials. . . . . . . . . . . . . . . . . . . . . . . . . . . . . . . . . . . . . . . . . . 6Pre-Install Checklist. . . . . . . . . . . . . . . . . . . . . . . . . . . . . . . . . . . . . . . . 9Enclosure Requirements. . . . . . . . . . . . . . . . . . . . . . . . . . . . . . . . . . . 10Attach Water Inlet and Drain Hose. . . . . . . . . . . . . . . . . . . . . . . . . . . . 12Electrial Connections. . . . . . . . . . . . . . . . . . . . . . . . . . . . . . . . . . . . . . 14Positioning the Dishwasher. . . . . . . . . . . . . . . . . . . . . . . . . . . . . . . . . 17Installation of Mounting Brackets. . . . . . . . . . . . . . . . . . . . . . . . . . . . . 18Water Inlet Connection. . . . . . . . . . . . . . . . . . . . . . . . . . . . . . . . . . . . . 21Drain Connection. . . . . . . . . . . . . . . . . . . . . . . . . . . . . . . . . . . . . . . . . 23Attaching the Toe Panel. . . . . . . . . . . . . . . . . . . . . . . . . . . . . . . . . . . . 25Customer Service. . . . . . . . . . . . . . . . . . . . . . . . . . . . . . . . . . . . . . . . . 263
Important Safety Instructions:Please READ and SAVE this informationTo avoid possible injury or property damage, OBSERVE ALL WARNINGSAND CAUTIONS.WARNING:These instructions are intended for use by qualified installers only. Thedishwasher must be installed by a qualified service technician or installer. In addition to these instructions, the dishwasher shall be installed tomeet all electrical and plumbing codes and ordinances (both nationaland local).Read these installation instructions completely and follow them carefully.They will save you time and effort and help to ensure safety and optimumdishwasher performance.IMPORTANT The dishwasher drain hose must be installed with a portion of it at least33″ (84 cm) off the cabinet floor; otherwise the dishwasher may notdrain properly. This dishwasher is intended for indoor residential use only, and shouldnot be used in commercial food service establishments. This dishwasher is designed to be enclosed on the top and both sidesby cabinetry. NEW INSTALLATION - If the dishwasher is a new installation, ensure allconnections are properly made before the dishwasher is moved intoplace. REPLACEMENT - If the dishwasher is replacing another dishwasher,check the existing dishwasher connections for compatibility with thenew dishwasher, and replace parts as necessary. This appliance has been found to be in compliance with CAN/CSA-C22.2No. 167/UL 749. It is the responsibility of the owner and the installerto determine if additional requirements and standards apply in specificinstallations. 4Not for outdoor use.
WARNINGAvoiding General HazardsTo reduce the risk of electric shock, fire, or injury to persons, the installermust ensure that the dishwasher is completely enclosed at the time ofinstallation.Do not use the dishwasher until it is completely installed. When opening thedoor on an uninstalled dishwasher, carefully open the door while supportingthe rear of the unit. Failure to follow this warning can cause the dishwasherto tip over and result in serious injury.Before installing the supplied counter top mounting brackets, decide whichmethod will be used to secure the dishwasher into its opening. Once thesemounting brackets are installed on the dishwasher, removing them is difficult and will damage the mounting brackets and the dishwasher.In some conditions, hydrogen gas can form in a hot water system thathas not been used for weeks. Hydrogen gas is explosive. Before filling adishwasher from a system that has been off for weeks, run the water froma nearby faucet in a well ventilated area until there is no sound or evidenceof gas.Removing any cover or pulling the dishwasher from the cabinet can exposehot water connections, electrical power and sharp edges or points. Handlewith care.Proposition 65 Warning:This product may contain a chemical known to the State of California, whichcan cause cancer or reproductive harm. Therefore, the packaging of yourproduct may bear the following label as required by California:STATE OF CALIFORNIA PROPOSITION 65 WARNING:WARNINGCancer and Reprodutive Harm - www.P65Warnings.ca.govInspect the DishwasherAfter unpacking the dishwasher and prior to installation, thoroughly inspectthe dishwasher for possible freight or cosmetic damage. Report any damageimmediately. Cosmetic defects must be reported within 30 days of installation.NOTE: Do not discard any bags or items that come with the original packageuntil after the entire installation has been completed.5
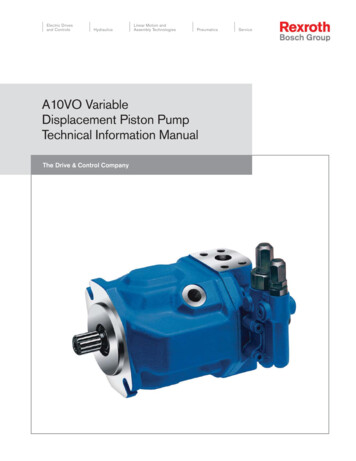
Tools and Materials Neededø1/16 in(2 mm)2½” Hole SawDrillAdjustable Wrench(x2)Phillips ScrewdriverFlat ScrewdriverPliersTapeMeasureNeedle Nose PliersLevelElbow connection with 3/4” female hose threads onone end and fits your water supply line (copper tubing,compression fitting, or braided hose) on the other.Hot Water Supply Line - Minimum 3/8″ O.D. coppertubing or metal braided dishwasher supply line.Only needed if house water supply line is not sufficient.Shut-off valve and fittings appropriate for hot watersupply line (copper tubing/compression fitting, orbraided hose).6
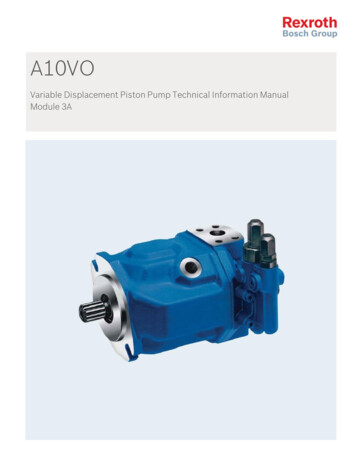
Materials supplied (All Models)AMounting Bracket Screws Ø 4x13mmBClamp (for drain hose)Screw Clamp (for drain hose)CDX5EFGScrewsMetal toe panel screwsX2Drain hoseMounting BracketsHMetal Toe Panel (used with E)7
Materials Supplied(Model Dependent; for fully integrated dishwashers only)Installation Guide for Fully IntegratedDoor Panel8
IMPORTANT!Before you begin, you must read the safety instructions.PRE-INSTALL CHECKLIST1.2.3.4.5.6.7.8.9.10.11.12.13.Unpack unit. Retain packing material until successful installation iscomplete.Remove all packing material from inside the dishwasher.Inspect parts to ensure you have all the necessary materials.Flush household hot water supply for at least two minutes.Measure the enclosure area. Is the opening at least 34" (863.6 mm)high and 24" (609.6 mm) wide?Is the opening near enough to the sink for the water line and drainhoses to access plumbing?Will the unit be installed close enough to the sink so that drain hoselength does not exceed 92" (2336.8 mm) and so that a portion of thedrain hose is raised at least 33" (840 mm) above the floor?Do the openings for electric cable, water line, and drain hose routingthrough cabinet fit within the shaded area in Figure 3?Are the openings sanded smooth if wood or covered by a protectivegasket if metal?Is your water heater set at 120 F (49 C) and does water pressuremeasure 15-145 psi (1-10 bar)?If installing in a corner, will the dishwasher door clear cabinet hardware?Determine mounting method based on dishwasher model and countertop type (see Figures 11-14).Only use included hardware for install. If replacing dishwasher, disposeof old hose and other equipment properly.9
Enclosure Requirements! WARNINGTo Avoid Scalding or Electrical Shock Hazard!Make sure the water supply and electrical supply are shut offbefore installation or service.To Avoid Electrical Shock/Fire Hazard!Do not allow the electrical and supply lines to touch.1min 24"(610 mm)min 34"(864 mm)235/8" - 241/4"(600 - 616 mm)Note: This dishwasher is designed to be enclosed on the top, back andboth sides by standard residential kitchen cabinetry. Select a location as close to the sink as possible for easy access towater supply and drain lines. For proper dishwasher operation and appearance, ensure that theenclosure is square and has the dimensions shown.2 10If the dishwasher is to be installed in a corner, ensure that there isadequate clearance to open the door as shown.
37"(177.8 mm) After locating the proper place for your dishwasher, create requiredopenings in your cabinets in order to allow for water, drain andelectrical lines on the appropriate side.The holes should be cut within the 7 x 2.5" area shown.If the opening is made through wood, sand it smooth.If the opening is made through metal, use the Edge Protector withPower Cord clips Kit SMZEPCC1UC.11
Attaching Water Inlet and Drain Hose4 Carefully flip the unit over. Remove the toe panel from the front of theunit and retain for attachment to the front at a later time. Loosen the leglevelers slightly.5 Attach elbow joint to dishwasher as shown. Do not overtighten.Attach hot water line to elbow. Use two wrenches to tighten to avoidputting stress on the water inlet valve.NOTICEAvoid cross-threading! It will cause leaks. After attaching hose, temporarilyhook up the water supply then turn on water to check for leaks.12
6GBBG Flip unit back upright, making sure the waterline is not pinched.Orient the drain hose toward direction of sink.IMPORTANT: Route hose toward sink PRIOR TO connection. Do not turnafter attachment. Attach drain hose elbow (Part G) to back of unit using pliers to install the spring clamp (Part B).7D Pre-level unit before positioning under counter by turning feet clockwiseto raise or counter-clockwise to lower. Maximum height the unit can beraised with feet fully extended is 34.5" (876.3 mm).Position unit under counter to verify that it is level. If adjustment is needed,remove unit from under counter and adjust as necessary.Once the unit is at a satisfactory height, insert leg leveler locking screw(Part D) in back foot. Step 10 will complete the leveling process.13
Electrical Connection! WARNINGAvoid Electrical Shock Hazard!Do not work on an energized circuit. Doing so could result inserious injury or death. Only qualified electricians should performelectrical work. Do not attempt any work on the dishwasherelectric supply circuit until you are certain the circuit is deenergized.To avoid possible injury or property damage, care should be exercised when the dishwasher is installed or removed to reduce thelikelihood of damage to the power cord.Avoid Fire Hazard!Make sure electrical work is properly installed and checked byqualified electricians.Make sure there are no loose electrical connections. Make sureall electrical connections are properly made.Loose and improperly installed electrical connections canresult in overheating!To avoid risk of fire, observe the following precautions:Wall Socket Connections:Only use the provided power cord for wall socket connections.DO NOT attach an extension cord or any type of modified cord oradapter with this appliance.DO NOT cut or splice the power cord.DO NOT alter the power cord in any way.Permanent Wire Connections (in addition to the warnings above):Only use the junction box power cord, sold as Accessory kit#SMZPCJB1UC.Carefully review the terminal block installation instructions.DO NOT remove, alter or bypass the terminal block.14
Electrical SupplyThe customer has the responsibility of ensuring that the dishwasher electrical installation is in compliance with all national and local electrical codesand ordinances. The dishwasher is designed for an electrical supply of120V, 60 Hz, AC, connected to a dishwasher-dedicated, properly groundedelectrical circuit with a fuse or breaker rated for 15 or 20 amps.Dishwasher Electrical RatingVolts Hertz12060Amperes12Watts1,440(max)Grounding InstructionsThe dishwasher must be properly grounded before operating. This appliance must be connected to a grounded metal permanent wiring systemor an equipment grounding conductor must be run with the circuit conductors and connected to the equipment grounding terminal or lead onthe dishwasher.Do NOT use an extension cord.Make sure that the dishwasher is connected to a suitable ground incompliance with all local codes or, in the absence of a local code, withthe NATIONAL ELECTRICAL CODE in the United States or the CANADIANELECTRIC CODE C22.1-latest edition in Canada as well as any provincial/state or municipal or local codes that apply.Note: Installations requiring hard wiring and terminal block - Theaccessory terminal block/junction box model, SMZPCJB1UC, designedfor permanent wire connection, is not included but can be orderedthrough Customer Service by calling 1-800-944-2904. Follow theinstructions included with the kit.15
8 Plug the end of the supply cord securely into the back of thedishwasher, looping it through the hooks on the base.The outlet for the power supply cord should be located in a cabinetor wall adjacent to the dishwasher cabinet. Do not plug dishwasher inuntil all the steps of installation are complete.Note: Only use the included power cord. If cord is missing order kitSMZPC002UC through Customer Service.Note: If clips are required for the power cord use the Edge Protector withPower Cord clips Kit SMZEPCC1UC.16
Positioning the Dishwasher9 Orient the hoses and power cord so they go towards the sink and thepower outlet.NOTICEDo not leave coils of hoses or wires behind the dishwasher. Be sure topull the hoses all the way into the adjacent cabinet while pushing thedishwasher in. Otherwise, the hoses can fold, kink or break, potentiallycausing obstructions or leaks.17
10D(2)(1) 18Level the dishwasher horizontally by turning feet (1) clockwise to raise orcounter-clockwise to lower front of unit. Once level, (2) insert leg levelerlocking screws (Part D) and tighten.
Installation of Mounting Brackets! WARNINGAvoid Tip Over Hazard!Do not use the dishwasher until it is completely installed.When opening the door on an uninstalled dishwasher,carefully open the door while supporting the rear of the unit.Failure to follow this warning can result in serious injury.Note: Before installing the supplied counter top mounting brackets,decide which method of securing the dishwasher into its enclosure willbe used.Once the mounting brackets are installed on the dishwasher, removingthem is difficult and will damage the mounting brackets and thedishwasher.If you have a Fully Integrated Panel, do not attach mounting brackets untilafter attaching the panel to the door.11abGrasp mounting bracket (G) with pliers and fold bracket at the perforationover onto itself as shown in 11a. Mount brackets on the top if your countertop is wood or other materialthat can easily be drilled into. (see figure 11b) Mount brackets on the sides if your countertop is stone or any very hardmaterial that cannot be easily drilled into. (see figure 11b)19
Wood Countertop/Top MountStone Countertop/Side Mount12 20Attach mounting brackets to the frame with included screws (D).
13A14 ADrive the mounting screws (A) through the holes in the mounting bracketsas shown for Top ( figure 13) or Side Mount (figure 14). Remove upperrack before inserting screws on the sides.21
Water Inlet Connection! WARNINGScalding Hazard!Do not perform any work on a pressured hot water line.Serious injury could result. Only qualified plumbers shouldperform plumbing work. Do not attempt any work on the dishwasher hot water supply plumbing until you are certain the hotwater supply is shut off.NOTICETemperatures required for soldering and sweating will damage thedishwasher. If plumbing lines are to be soldered or sweated, keep theheat source at least 6 inches (152.4 mm) away from the dishwasher.Hot Water SupplyThe hot water heater should be set to deliver approximately 120 F (49 C)water to the dishwasher. Water that is too hot can cause some detergentsto lose effectiveness. Lower water temperatures will increase run times. Thehot water supply pressure must be between 15 - 145 psi (1 - 10 bar).IMPORTANT NOTES: 22If using a solder joint instead of a compression fitting, be sure to completeall solder connections before connecting the water supply line to thedishwasher.Make sure there are no sharp bends or kinks in the water line that mightrestrict water flow.Always use appropriate seals when making plumbing connections.Before connecting the water supply line to the dishwasher, flush theincoming water line for approximately 5 minutes to clear any foreignmaterial.Properly tighten all water connections. Not doing so could result in a leak.Check local plumbing codes for approved plumbing procedures andaccessories. All plumbing should be done in accordance with nationaland local codes.If using copper tubing or other material not depicted in this manual forwater supply, defer to a licensed plumber for proper installation.
15 Connect the dishwasher water supply line to the water shut off valve.If one isn’t already in the supply line, install one (not provided).You will need to use an approved dishwasher water supply line withthe correct fittings for this connection.After all connections are made, turn on the hot water and check forleaks.23
Drain ConnectionIMPORTANT NOTES about your drain connection: If local ordinance require an air gap, install it according to themanufacturer’s instructions. If the dishwasher drain hose is to be connected to a disposerdishwasher drain connection, remove the plug from the disposer’sdishwasher drain connection. The dishwasher drain hose must have one place along its length that issecurely attached 33″ (84 cm) above the floor. The drain hose length can be extended if necessary. Use kit#SGZ1010UC. The maximum length of the drain hose, including thehose leading to the air gap, is 150″ (380 cm).NOTE: Place hose clamp (C) around end of drain hose BEFORE connectingto the plumbing.16baC C The dishwasher drain hose may be connected to the drain plumbing usingan air gap in one of two ways:- Connect to the under sink dishwasher drain connection (16a).- Connect to a disposer dishwasher drain connection (16b).24
min 33” (84 cm)max 43” (110 cm)CCmin 33” (84 cm)max 43” (110 cm)dcThe dishwasher drain hose may be connected to the drain plumbing usinga high loop in one of two ways:- Connect to the under sink dishwasher drain connection (16c).- Connect to a disposer dishwasher drain connection (16d).17 Use the clamp provided (C) to attachthe drain hose to the house plumbingas shown.C NOTE: If your dishwasher came with a fleece kit, follow thedirections supplied in that kit to install the fleece.25
Attaching the Toe Panel18HE Attach the metal toe panel (Part H) with screws (Part E) so it is flushwith the floor.Plug the unit in.Success! Your installation is now complete.Fully Integrated Door PanelIf your dishwasher is a fully integrated unit, please see the included instructions and template for installing a fully integrated door panel.26
Customer ServiceYour dishwasher requires no special care other than that described in theCare and Maintenance section of the Use and Care Manual. If you arehaving a problem with your dishwasher, before calling for service pleaserefer to the Troubleshooting section in the Use and Care Manual. If serviceis necessary, contact your dealer or installer or an authorized service center.Do not attempt to repair the appliance yourself. Any work performed byunauthorized personnel may void the warranty. If you are having a problemwith your dishwasher and are not pleased with the service you havereceived, please take the following steps (in the order listed below) until theproblem is corrected to your satisfaction:1.2.3.Contact your installer or the Authorized Service Contractor in your area.Write us at the address below:BSH Home Appliances Corporation1901 Main StreetIrvine, CA 92614Call us at the Customer Service phone number before calling retailerfor technical problems :1-800-944-2904Please be sure to include (if you are writing), or have available (if you arecalling), the following information: Model number (SH )Serial number ( )Date of original purchase (mm/dd/yyyy)Date the problem originated (mm/dd/yyyy)Explanation of the problemDaytime phone number where you can be reached.Please make a copy of your invoice and keep it with this manual.Proof of purchase may be requested to verify warranty coverage.BOSCHCust. Service (SERVICE CLIENTÈLE): 1-800-944-2904120 VMODEL NUMBER (NUMERO DE 0011M0,2 kW12,0 A60 Hz1,2 kWMade in the USA of USand imported parts(Fabriqué aux É. -U. depiéces É. -U. et importées)CNSFUSRLISTED (LISTÉ )ENERGYVERIFIED BYÉMERGÉTIQUEVÉRIFIÉ PARResidential(RESIDENTIEL)76x6Certified residential dishwashers are notDISHWASHERintended for licensed food establishments.(LAVE-VAISSELLE) Les lave-vaisselle residentiels certifies neE103022som pas destines aus etablissmentsEP3132762almentaires agrees.27
Indications de sécurité! AVERTISSEMENTCeci indique des risques de blessures grave ou mortelles en casde non-respect de cette mis en garde.! ATTENTIONCeci indique des risques de blessures mineures ou de gravitémoyenne en cas de non-respect de cette mis en garde.AVISCeci indique un risque d’endommagement de l’appareil ou de biens encas de non respect de ces consignes.Note: Ceci vous signale des informations et/ou indications importantes.Table des MatièresConsignes de sécurité importantes. . . . . . . . . . . . . . . . . . . . . . . . . . . . 2Prévention des dangers d’ordre général. . . . . . . . . . . . . . . . . . . . . . . . 3Outils et pièces . . . . . . . . . . . . . . . . . . . . . . . . . . . . . . . . . . . . . . . . . . . 4Checklist de préinstallation . . . . . . . . . . . . . . . . . . . . . . . . . . . . . . . . . . 7Exigences d’encastrement. . . . . . . . . . . . . . . . . . . . . . . . . . . . . . . . . . . 8Connecter le tuyau d’alimentation et celui de vidange . . . . . . . . . . . . 10L’installation électrique. . . . . . . . . . . . . . . . . . . . . . . . . . . . . . . . . . . . . 12Positionner le lave-vaisselle. . . . . . . . . . . . . . . . . . . . . . . . . . . . . . . . . 15Installation des pattes de fixation. . . . . . . . . . . . . . . . . . . . . . . . . . . . . 17Raccordements d’arrivée d’eau. . . . . . . . . . . . . . . . . . . . . . . . . . . . . . 20Raccordements d’évacuation. . . . . . . . . . . . . . . . . . . . . . . . . . . . . . . . 22Fixation du panneau de pointe. . . . . . . . . . . . . . . . . . . . . . . . . . . . . . . 24Service après-vente. . . . . . . . . . . . . . . . . . . . . . . . . . . . . . . . . . . . . . . 25fr-1
Consignes de sécurité importantes:Veuillez LIRE et CONSERVER ces informationsAfin d’éviter toute possibilité de blessures ou de dommages matérielsVEUILLEZ OBSERVER TOUS LES AVERTISSEMENTS ET PRÉCAUTIONS.ADVERTISSEMENT :Ces instructions sont destinées uniquement à l’usage des installateurs qualifiés. L’installation du lave-vaisselle doit être effectuée par un technicien demaintenance ou un installateur qualifié. Outre ces instructions, l’installation du lave-linge doit être effectuéeconformément à tous les codes et ordonnances nationaux et locaux enmatière d’électricité et de plomberie.Lire cette notice d’installation entièrement et s’y conformer scrupuleusement. Cette notice vous permettra d’économiser du temps et desefforts et vous aidera à assurer la sécurité et l’efficacité optimale de votrelave-vaisselle.IMPORTANT Le tuyau de vidange du lave-vaisselle doit être installé de façon à cequ’une partie du tuyau soit à 33 pouces (84 cm) minimum au-dessusdu plancher de l’armoire ; autrement, le lave-vaisselle risque de ne passe vidanger correctement. Ce lave-vaisselle est destiné à un usage domestique uniquement et nedoit pas être utilisé par des établissements de service alimentaire commerciaux. Ce lave-vaisselle est conçu pour être fermé sur le dessus et les deuxcôtés par des armoires. NOUVELLE INSTALLATION - Si le lave-vaisselle est installé pour lapremière fois, la plupart des travaux d’installation doivent être réalisésavant que l’appareil ne soit mis en place. REMPLACEMENT - Si le lave-vaisselle est installé en remplacementd’un autre, vérifier les raccordements du lave-vaisselle existant pourvous assurer qu’ils sont compatibles à ceux du nouveau lave-vaisselle,et remplacer les pièces qui doivent l’être. Cet appareil a été trouvé conforme à la norme CAN/CSA-C22.2 n 167/UL 749. Le propriétaire et l’installateur ont la responsabilité dedéterminer si des exigences et normes supplémentaires s’appliquent àdes installations spécifiques. Non pour l’usage en extérieur.fr-2
AVERTISSEMENTPrévention des dangers d’ordre généralPour réduire le risque de choc électrique, d’incendie ou de blessures,l’installateur doit s’assurer que le lave-vaisselle est complètement enferméau moment de l’installation.Ne pas utiliser le lave-vaisselle tant que l’installation n’est pas complètementterminée. Pour ouvrir la porte d’un lave-vaisselle dont l’installation n’est pasterminée, agir avec prudence et en soutenant la partie arrière de l’appareil.Le non respect de cet avertissement peut entraîner le basculement du lavevaisselle et provoquer de graves blessures.Avant d’installer les pattes de fixation pour comptoir en « L » (certains modèles)fournies, déterminer la méthode à utiliser pour fixer solidement le lave-vaisselledans l’ouverture. Une fois les pattes de fixation installées sur le lave-vaisselle, ilsera difficile de les retirer sans les abîmer ainsi que le lave-vaisselle.Sous certaines conditions, un chauffe-eau peut produire de l’hydrogènes’il n’a pas été utilisé pendant plusieurs semaines. L’hydrogène est ungaz explosif. Avant de remplir un lave-vaisselle en utilisant de l’eau fourniepar un chauffe-eau qui n’a pas fonctionné pendant plusieurs semaines,faites couler l’eau d’un robinet situé à proximité, dans un endroit bien aéré,jusqu’à ce qu’il n’y ait plus de bruit et qu’aucun dégagement de gaz ne semanifeste de façon visible.Le retrait d’une paroi ou le fait de tirer le lave-vaisselle hors de son encastrement peut exposer les conduites d’eau chaude, l’alimentation électrique et certains rebords et angles tranchants. Effectuer ces manœuvres avec prudence.Avertissement issue de la proposition 65 de l’État de la Californie :Ce produit pourrait contenir un produit chimique reconnu par l’État de laCalifornie comme cancérigène ou ayant des effets nocifs sur la reproduction. Par conséquent, l’emballage de votre produit pourrait porter l’étiquettesuivante, comme requis par la Californie :AVERTISSEMENT ISSUE DE LA PROPOSITION 65 DE L'ÉTAT DELA CALIFORNIE :: AVERTISSEMENTCancer et dommages à la reproduction www.P65Warnings.ca.govInspection du lave-vaisselleAprès avoir déballé le lave-vaisselle et avant son installation, examinezle attentivement pour déceler d’éventuels dégâts esthétiques ou liés autransport. Signaler immédiatement tout dégât. Les défauts esthétiquesdoivent être signalés dans un délai de 30 jours à compter de l’installation.REMARQUE : ne pas jeter les sacs ou les éléments contenus dansl’emballage d’origine avant d’avoir complètement terminé l’installation dufr-3lave-vaisselle.
Outils et pièces nécessairesø1/16 in(2 mm)Clé ajustable (x2)PerceusePhillips TournevisScie cylindrique2½ poPinceTournevisRuban à mesurerPince à bec aiguilleNiveau à bulleCoudé avec filets femelle 3/4 po sur une extrémité,dont la dimension s’a juste a la canalisationen eau(tuyau encuivre/raccord à compression ou tuyau bridé)sur l’autre extrémité.Conduite d’alimentation en eau chaude - tube de cuivreau minimum de 95 mm (3/8 po) de diamètre extérieuren polyéthylène réticulé ou conduite d’alimentationpour lave-vaisselle en métal tressé. Nécessaire seulement si la canalisation d’alimentation en eau de lamaison est insuffisante.Soupape d’arrêt et raccords appropriés pour conduitesd’eau chaude (tube de cuivre/raccord de compression,ou tuyau tressé).fr-4
Matériel fourniVis des pattes de fixation Ø 4x13mmABPince pour tuyau de vidangeCollier à vis (pour flexible)CDes visDX5EVis pour le panneau de plintheX2FTuyau de drainageGPattes de fixationHPanneau de plinthefr-5
Matériel fourni(selon le modèle)Guide d’installation pour un panneaude porte pleinement intégréfr-6
IMPORTANT !Avant de commencer l’installation, vous devez lire les règles desécurité figurant au dos de cette page.VÉRIFICATIONS AVANT aller le lave-vaisselle. Conserver le matériel d’emballage jusqu’àce que l’installation soit parfaitement terminée.Retirer tout le matériel d’emballage qui se trouve à l’intérieur du lavevaisselle.Vérifier chaque pièce pour être sûr de bien avoir tout le matérielnécessaire.Faire couler le robinet d’eau chaude pendant au moins deux minutes.Mesurer les dimensions de l’emplacement dans lequel sera placé lelave-vaisselle. Cet emplacement a-t-il une hauteur minimum de 34po (863.6 mm) et une largeur minimum de 24 po (609.6 mm) ?Cet emplacement est-il assez près de l’évier afin de faciliter l’accèsau tuyau d’alimentation en eau et au tuyau de vidange?Le lave-vaisselle sera-t-il placé assez près de l’évier afin que le tuyaude vidange n’excède pas une longueur de 92 po (2336.8 mm) etqu’une partie de ce tuyau soit surélevée d’au moins 33 po (840 mm)par rapport au niveau du sol ?Est-ce que l’espace à travers lequel vont passer le câble électrique,le tuyau d’alimentation en eau et le tuyau de vidange est assez grand? Il doit correspondre à la zone grisée du schéma 3.Si le placard est en bois, cet espace est-il correctement poncé ou, sile placard
cal installation is in compliance with all national and local electrical codes and ordinances. The dishwasher is designed for an electrical supply of 120V, 60 Hz, AC, connected to a dishwasher-dedicated, properly grounded electrical circuit with a fuse o