Transcription
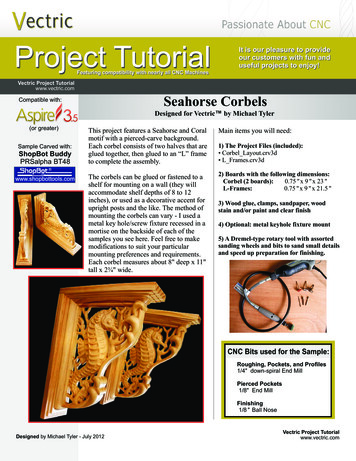
Project TutorialIt is our pleasure to provideour customers with fun anduseful projects to enjoy!Featuring compatibility with nearly all CNC MachinesVectric Project Tutorialwww.vectric.comSeahorse CorbelsCompatible with:Designed for Vectric by Michael Tyler(or greater)Sample Carved with:ShopBot BuddyPRSalpha BT48This project features a Seahorse and Coralmotif with a pierced-carve background.Each corbel consists of two halves that areglued together, then glued to an “L” frameto complete the assembly.Main items you will need:1) The Project Files (included): Corbel Layout.crv3d L Frames.crv3d www.shopbottools.comThe corbels can be glued or fastened to ashelf for mounting on a wall (they willaccommodate shelf depths of 8 to 12inches), or used as a decorative accent forupright posts and the like. The method ofmounting the corbels can vary - I used ametal key hole/screw fixture recessed in amortise on the backside of each of thesamples you see here. Feel free to makemodifications to suit your particularmounting preferences and requirements.Each corbel measures about 8" deep x 11"tall x 2¾" wide.2) Boards with the following dimensions:Corbel (2 boards):0.75 " x 9 " x 23 "L-Frames:0.75 " x 9 " x 21.5 "3) Wood glue, clamps, sandpaper, woodstain and/or paint and clear finish4) Optional: metal keyhole fixture mount5) A Dremel-type rotary tool with assortedsanding wheels and bits to sand small detailsand speed up preparation for finishing.CNC Bits used for the Sample:Roughing, Pockets, and Profiles1/4" down-spiral End MillPierced Pockets1/8" End MillFinishing1/8 " Ball NoseDesigned by Michael Tyler - July 2012Vectric Project Tutorialwww.vectric.com
Seahorse CorbelsSTEP 1 - Open and Review the Project FilesStart your Aspire software and open the project files.(fig. 1)(cont.)STEP 2 - Run the ProjectWhen you are satisfied with your tool settings, save thetoolpaths to the appropriate Post Processor for yourmachine, place your material on your machine bed andproceed to run the project.(NOTE: the Corbel Layoutwill be run twice to yield two complete corbels.(fig. 2a, 2b, 2c, 2d)Corbel Layout.crv3dfig. 2afig. 1L Frames.crv3dfig. 2bCarefully review all the toolpaths and make anynecessary changes to suit your particular bits andmachine. The toolpaths are currently set with feed andspeeds that were used in creating the original sample.Please don’t use them directly until you review themfor your own setup.You can edit the tools and change the settings to yourown preferences and requirements. It is veryimportant to recalculate all toolpaths after makingany edits/changes. Once you have recalculated foryour own machine and bits, reset the preview, thenpreview all toolpaths again to visually verify theproject outcome on-screen.fig. 2cThe project is designed with tabs to hold parts in placeduring the final part cut outs. You may delete the tabs ifyou use some other reliable hold-down method.fig. 2d(cont.)Page 2Vectric Project Tutorialwww.vectric.com
Seahorse CorbelsSTEP 3 - Release PartsSeparate all the parts from the boards with a utilityknife or small saw. (fig. 3)(cont.)Remove the clamps, then sand off the tab remnants andsand carving details to remove any “fuzzies” andundesirable toolmarks. Use a Dremel-type tool withvarious abrasive wheels/tips to make detail sanding gofaster. (fig. 4c, 4d, 4e)fig. 3STEP 4 - Assemble and Final Sand PartsGlue the corbel halves together and clamp until dry.(fig. 4a, 4b)fig. 4cfig. 4afig. 4dfig. 4bfig. 4e(cont.)Page 3Vectric Project Tutorialwww.vectric.com
Seahorse CorbelsSTEP 4 - Assemble and Final Sand Parts (cont.)Glue the L-Frames together and clamp until dry.(fig. 4f)(cont.)STEP 5 - Apply FinishApply your choice of finish. I had originally planned toapply an antique metallic finish to my corbel samples,but decided to wait a few days before my final verdict!Here’s what I used (so far) on the Seahorse Corbelsmade from Select Pine: Two coats of thinned Zinnser Bulls Eye Seal Coat(50% denatured alcohol and 50% Seal Coat), sandingafter each coat Two coats full-strength Zinnser Bulls Eye Seal Coatfig. 4f Several coats of Krylon Crystal Clear Acrylic glossfig. 4gNOTE: You may wantto plan your mountingstrategy at this time. Icreated a mortise on thebackside of the L-framefor metal key holemounts. (fig. 4g)IN CONCLUSIONI hope you enjoyed making the Seahorse Corbels andthat this project may have inspired you to create yourown custom corbel designs!Happy Carving!Glue the corbel assemblies onto the L-Frames. (fig. 4h)fig. 4hPage 4Vectric Project Tutorialwww.vectric.com
Materials Source Page 3M Radial Bristle Discs from www.mcmaster.com(stack 3 discs at a time on your rotary tool mandrel)80-grit: part # 4494A19220-grit: part # 4494A18Krylon Clear Gloss Acrylicfrom WalMart Miscellaneous Items Purchased at Home Depot Zinnser Bulls Eye Seal Coat Denatured Alcohol Paint Rags and disposable brushes Metal Keyhole Fixture Mount and ScrewsPage 5Vectric Project Tutorialwww.vectric.com
Additional ResourcesRESOURCES.There are numerous resources for Vectric software owners to make their experience with their products moreenjoyable. The Vectric website includes video tutorials and more, to provide a good overview of the softwareproducts and how to use them. Please visit the Support page for a complete listing of available resources for you.Vectric Support: http://support.vectric.com/Vectric User ForumEvery owner should join the Vectric User Forum (http://www.vectric.com/forum/) where fellow users share theirexperience and knowledge on a daily basis. It is a FREE service that you will surely appreciate. A handy SearchFeature helps you find answers to any questions you may have. There are Gallery sections as well, where you canpost and view photos of projects created with Vectric software.The trademarks, service marks and logos used and displayed in this document are registered and unregistered Trademarks of Vectric and others.Page 6Vectric Project Tutorialwww.vectric.com
Feel free to make modifications to suit your particular mounting preferences and requirements. Each corbel measures about 8" deep x 11" tall x 2¾" wide. Vectric Project Tutorial Main items you will need: 1) The Project Files (included): Corbel_Layout.crv3d L_Frames.crv3d 2) Boards with the following dimensions: 3) 5) A Dremel-type rotary tool with assorted sanding wheels and bits to .
![Unreal Engine 4 Tutorial Blueprint Tutorial [1] Basic .](/img/5/ue4-blueprints-tutorial-2018.jpg)
