Transcription
www.gracobaby.comContender 65Child RestraintOwner’s ManualREAD THIS MANUAL.Do not install or use this child restraintuntil you read and understand theinstructions in this manual.FAILURE TO PROPERLY USE THISCHILD RESTRAINT INCREASES THERISK OF SERIOUS INJURY OR DEATH INA SUDDEN STOP OR CRASH. 2013 GracoPD250304A10/13US
TABLE OF CONTENTSPlacing Child in Child Restraint.28-31Operations and Adjustments.32-43s (ARNESS 3TRAPS 32s #HEST #LIP 33s "UCKLE 33s#ROTCH 3TRAP !DJUSTMENT 34-35s2ECLINE&LIP&OOT 36s ,EVEL )NDICATOR 37s 2EMOVING LATCH FromVehicle Anchor Points.38s 2EMOVING 4ETHER &ROMVehicle.38sLATCH Storage.39s LATCH Belt Routing forRear-Facing Mode.40-41s LATCH Belt Routing forForward-Facing Mode.42-43Before You BeginImportant Information.4-6Warnings.7-10Basic Information.11What is LATCH?.12-13LATCH System.14UseHeight & Weight ith LATCH.20-21Forward-Facing InstallationWith LATCH.22-23Rear-Facing InstallationWith Vehicle Seat Belts.24-25Forward-Facing InstallationWith Vehicle Seat Belts.26-272
TABLE OF CONTENTSVehicle Seat Belts.44-51s,OCKING#LIP 49-50Additional Information.52-59s4ETHER 3TORAGE 52s"ODY3UPPORT ONCERTAINMODELS 53s(EAD 0ILLOW ON CERTAIN MODELS 54s (ARNESS #OVERS ON CERTAIN MODELS 54s#AREAND#LEANING 55-57s"UCKLE#LEANING0ROCESS 58s!IRCRAFT5SE 59s3ECOND(AND#HILD2ESTRAINT 59Replacement Parts.60s,OCKING#LIP3TORAGE 60s)NSTRUCTION-ANUAL3TORAGE 603
IMPORTANT INFORMATIONNo child restraint can guarantee protection from injury in everysituation, but proper use helps reduce the risk of serious injury or death.READ THIS MANUAL CAREFULLY. Read and understand instructionmanual and child restraint labels. )NFANTS LESS THAN LBS KG mustuse child restraint rear-facing.Infants or toddlers 20 to 40 lbs. KG TO KG may be rear-facing. Do not use child restraint rear-facingIN VEHICLE SEAT WITH AIR BAG Secure children in rear seat ofVEHICLE WHENEVER POSSIBLE 4 .EVER LEAVE CHILD UNATTENDED Install child restraint securely withVEHICLE SEAT BELT OR LATCH belt. Do not use after the useful life dateSHOWN ON BACK OF CHILD RESTRAINT O NOT ALLOW ANYONE BABYSITTERRELATIVES ETC TO USE CHILD RESTRAINTwithout first understanding allinstructions.
IMPORTANT INFORMATION CONTINUEDRegistration InformationModel Number:Date of Manufacture:Purchase Date:Register Your Child Restraint0LEASE lLL IN THE ABOVE INFORMATION 4HE MODEL NUMBER AND DATE OFmanufacture can be found on a label on the child restraint. Fill out the prepaidregistration postcard attached to the harness and mail it today.Child restraints could be recalled for safety reasons. You must register thisRESTRAINT TO BE REACHED IN A RECALL 3END YOUR NAME ADDRESS AND THE RESTRAINT Smodel number and date of manufacture to:Graco Children’s Products, Inc.Attn: Customer Service, 3 Glenlake Parkway Atlanta, GA 30328or call 1-800-345-4109 or register online athttp://www.gracobaby.com/carseatregistration5
IMPORTANT INFORMATION CONTINUEDFor recall information:#ALL THE 5 3 'OVERNMENT S 6EHICLE 3AFETY (OTLINE AT 449 n n n OR GO TO http://www.NHTSA.govIf You Need Help:)N THE 5 3 ! PLEASE CONTACT OUR #USTOMER 3ERVICE EPARTMENT WITH ANYQUESTIONS YOU MAY HAVE CONCERNING PARTS USE OR MAINTENANCE 7HEN YOUCONTACT US PLEASE HAVE YOUR PRODUCT S model number and date ofmanufacture READY SO THAT WE MAY HELP YOU EFlCIENTLY 4HESE NUMBERS CAN BEFOUND ON A STICKER ON THE BACK SIDE OF YOUR CHILD RESTRAINT 1-800-345-4109 or check.org6
WARNINGS - Prevent serious injury or death:NEVER PLACE THIS CHILD RESTRAINT IN AVEHICLE SEATING LOCATION THAT HAS AFRONT AIR BAG. If an air bag inflates, it canhit the child and child restraint with greatforce and cause serious injury or death toyour child. Refer to your vehicle owner’smanual for information about side air bagsand child restraint installation.7
WARNINGS - Prevent serious injury or death:(continued)Failure to follow theseinstructions and child restraintlabels can result in childstriking the vehicle’s interiorduring a sudden stop or crash.Secure child restraint with avehicle seat belt or LATCH that isproperly routed as shown in thismanual.Serious crippling injury or deathcan result if infant faces front ofvehicle.The American Academy ofPediatrics (AAP) recommends thatchildren be rear-facing until age 2or until they reach the maximumrear-facing height and weightrating for their seat.Select a suitable location for thechild restraint in your vehicle.Vehicle seat belt system MUSThold child restraint securely. Notall vehicle seat belts can be usedwith a child restraint.Choose the correct mode of usefor the child restraint dependingon your child’s size. Infants lessthan 20 lbs. (9.1kg) must use thischild restraint rear-facing.If vehicle seat belt does not holdchild restraint securely, read“Vehicle Seat Belts” section.8
WARNINGS - Prevent serious injury or death:(continued)Never put a child restraint in afront vehicle seat unlessrecommended by vehicle owner’smanual. National Highway TrafficSafety Administration (NHTSA)alerts vehicle owners thataccording to accident statistics,children are safer in the rear seat.For vehicles with air bags, refer tovehicle owner’s manual for childrestraint installation information.If child restraint is in a crash, itmust be replaced. DO NOT use itagain! A crash can cause unseendamage and using it again couldresult in serious injury or death.DO NOT use child restraint if it isdamaged or missing parts.DO NOT use accessories or partsother than those provided byGraco. Their use could alter theperformance of the child restraint.Rear-facing child restraint must beproperly leveled:s 4OO RECLINED CAN RESULT INinjury or ejection.s 4OO UPRIGHT CAN RESULT INbreathing difficulties.9
WARNINGS - Prevent serious injury or death:(continued)Never attach twoLATCH connectorsto one vehiclelower anchorpoint unlessspecificallyallowed by thevehicle manufacturer.Never leave child unattended,even when sleeping. Child maybecome tangled in harness strapsand suffocate or strangle.DO NOT remove LATCH systemfrom child restraint. If usingvehicle seat belt to secure childrestraint, LATCH connectors mustbe stored. (see section “LATCHstorage”)10
Certification4HIS CHILD RESTRAINT MEETS OR EXCEEDS ALLapplicable requirements of Federal-OTOR 6EHICLE 3AFETY 3TANDARD FORUSE IN MOTOR VEHICLES AND AIRCRAFT Child Restraint Useful LifeSTOP using this child restraint andTHROW IT AWAY YEARS AFTER THE DATE OFmanufacture. ,OOK FOR THIS STICKER ONrear of child restraint:MODELDate of ManufactureDangerous Vehicle SeatsDo not use child restraint on rear-facingOR SIDE FACING VEHICLE SEATS yearmonthdayGRACO CHILDREN'S PRODUCTS, INC.ATLANTA, GA 303281-800-345-4109Made in ChinaUnoccupied Child RestraintAlways secure child restraint to LATCHOR A VEHICLE SEAT BELT EVEN WHENUNOCCUPIED )N A CRASH AN UNSECUREDchild restraint can injure passengers.NAMEPD206938ABASIC INFORMATIONVehicle Seat Protection0ROTECT VEHICLE SEAT 5SE A CHILD RESTRAINTMAT TOWEL OR THIN BLANKET UNDER ANDbehind child restraint.Warm Weather#HILD RESTRAINT PARTS CAN GET VERY HOTin the sun or warm weather. To avoidburns, always check before putting child in child restraint.11
WHAT IS LATCH?5NITED 3TATES &EDERAL -OTOR 6EHICLE3AFETY 3TANDARDS HAVE DElNED Asystem for installing child restraints inVEHICLES 4HE SYSTEM IS CALLED LATCH.LATCH stands for:)F VEHICLE IS EQUIPPED WITH LATCH THEVEHICLE LOWER ANCHOR POINTS MAY BEVISIBLE AT THE VEHICLE SEAT CREASE )F NOTVISIBLE THEY MAY BE MARKED WITH Asymbolor a colored dot.Lower Anchors and Tethers for CHildren.#HECK VEHICLE OWNER S MANUAL FOR VEHICLETOP TETHER ANCHOR LOCATIONS 4HEY MAYbe identified using one of the anchorsymbols.LATCH IN THE VEHICLE CONSISTS OF A TOPtether anchor point and two loweranchor points.3OME VEHICLE OWNER MANUALS USE THEterm ISOFIX to identify the new childRESTRAINT ANCHOR SYSTEM 4HIS CHILDrestraint with LATCH can also be usedIN VEHICLE SEATING POSITIONS EQUIPPEDwith ISOFIX.EWER VEHICLES MAY HAVE ONE ORmore seating positions equipped withLATCH anchor points.5SE VEHICLE BELT NOT LATCH CONNECTORSfor installations with children weighingMORE THAN LBS KG NOTE: 3OME VEHICLE MANUFACTURERSHAVE LOWER MAXIMUM WEIGHT RATINGSfor LATCH ANCHORS SO YOU MUST CONSULTYOUR VEHICLE OWNER S MANUAL OR CALL THEVEHICLE MANUFACTURER TO CONlRM THELIMITS ON YOUR VEHICLE S LATCH anchors.12
WHAT IS LATCH? CONTINUEDVehicle Top TetherAnchor Points4YPICAL SEAT IN APASSENGER VEHICLE /THER VEHICLE TYPESMAY HAVE DIFFERENTLATCH locations.VehicleLower AnchorPointsSee your vehicleowner’s manual forexact locations,anchor identification,and requirementsfor use with a childrestraint.VehicleSeat Crease13
LATCH SYSTEMLATCH consists of a permanentlyattached lower anchor belt and a toptether strap.ONLY use LATCH in a seating positionRECOMMENDED BY VEHICLEmanufacturer.LATCH BELT IN REAR-FACINGMODELATCH BELT IN FORWARDFACING MODEVehicle TopTetherAnchorPointVehicleLowerAnchorPointsChild RestraintTop TetherLower AnchorBelt14LowerAnchor BeltVehicle LowerAnchor Points
HEIGHT & WEIGHT LIMITS LBS 2.2kg)REAR-FACING20 lbs.(9.1kg)40 lbs.(18.1kg) LBS (29.5kg)FORWARD-FACING v BELOWRear-facing: 5 to 40 lbs. (2.2kg-18.1kg)red handles )NFANTS WHO WEIGH LESS THAN LBS KG MUST berear-facing.s )NFANTS OR TODDLERS TO LBS KG TO KGmay be rear-facing.s (ARNESS HEIGHT MUST BE at or just below CHILD Sshoulders.s #HILD S HEAD MUST BE AT LEAST v BELOW THE RED HANDLE IMPORTANT: 4HIS CHILD RESTRAINT IS CERTIlED FOR USE rear-facing with children upTO LBS KG (OWEVER SOME CHILDREN APPROACHING LBS KG MAY BEtoo tall to fit rear-facing. Child should use child restraint forward-facing only ifCHILD IS OVER LBS KG AND CAN SIT UPRIGHT UNASSISTED SEE !MERICAN !CADEMY OF 0EDIATRICS !!0 RECOMMENDATIONS ONP AND P 15*
HEIGHT & WEIGHT LIMITS CONTINUEDForward-facing: 20 to 65 lbs. (9.1kg to 29.5kg)s #HILD MUST NOT EXCEED INCHES CM s 4ODDLERS TO LBS KG TO KG WHO ARE CAPABLE OFsitting upright unassisted may be forward-facing. If unable toSIT UNASSISTED USE rear-facing.s 4ODDLERS TO LBS KG TO KG AND UP TO INCHES CM TALL MUST be forward-facing.s (ARNESS HEIGHT MUST BE at or just above CHILD S SHOULDERS s #HILD S HEAD MUST BE AT LEAST v BELOW THE RED HANDLE 3EE P FOR !MERICAN !CADEMY OF 0EDIATRICS !!0 RECOMMENDATIONS 16
Preterm orLow Birthweight Infants*A preterm infant or low birth weight infant PREEMIES MAY BE AT SPECIAL RISK IN A VEHICLEor aircraft.According to the American Academy of0EDIATRICS !!0 THESE INFANTS MAY SUFFERbreathing difficulties if improperly reclined ina child restraint.When installing the child restraintrear-facing USE CORRECTED AGE FOR PREEMIES SEE PG FOR MORE INFORMATION 'RACO ADVISES THAT YOU HAVE YOURPHYSICIAN OR HOSPITAL STAFF EVALUATEyour infant and recommend the proper childrestraint or car bed before you and your infantLEAVE THE HOSPITAL 17
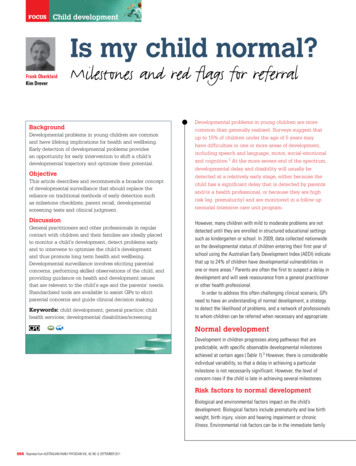
FEATURESHead supportadjustment pLATCH storage barHarnessreleaseLEVERHarnessadjustment strapReclineFlipFootLATCH belt STORED5NITED 3TATES &EDERAL -OTOR 6EHICLE 3AFETY3TANDARDS HAVE DElNED A SYSTEM FOR INSTALLING CHILDRESTRAINTS IN VEHICLES 4HE SYSTEM IS CALLED LATCH.LATCH may ONLY be used IN PLACE of vehiclebelt if vehicle is equipped with LATCH anchorpoints. Please refer to vehicle owner’s manualfor LATCH locations in vehicles.18
FEATURES6EHICLES ARE NOW OR CAN BE EQUIPPEDwith tether anchor points behind someseats. A tether anchors the top of the childRESTRAINT TO THE BODY OF THE VEHICLE 7HENUSED PROPERLY WITH THE VEHICLE SEAT BELT ORLATCH A TETHER HELPS REDUCE INJURY IN Asudden stop or crash.Harnessstraps4ETHER STRAP4ETHER STORAGEbar4ETHER HOOKSplitter plateHarnessCOVER PLATE,OCKING CLIPstorageInstructionmanual storage19LATCH adjusterrelease button
REAR-FACING INSTALLATION WITH LATCH 2ECLINE mIP FOOT MUST BE IN REAR&!#).' position (a) )F IT IS NOT SEEPAGE 2ECLINE &LIP &OOT 2. LATCH belt must be routed throughTHE OPENING IN CHILD RESTRAINT MARKEDas 2%!2 &!#).' with a ",5% label(b) )F IT IS NOT SEE PAGE LATCH"ELT 2OUTING &OR 2EAR &ACING -ODE 0LACE rear-facing ON VEHICLE SEATequipped with LATCH anchors. ForEASE OF INSTALLATION EXTEND LATCHBELT TO ITS MAXIMUM LENGTH 4. Attach LATCH connectors toVEHICLE LOWER ANCHORS (c). Belt mustLIE mAT AND NOT BE TWISTED 0ULL CONnectors to be sure they are securelyattached to the anchor points. (d). 0RESS DOWN lRMLY IN CENTER OF CHILDrestraint while pulling on the tail ofthe LATCH belt to tighten (e).baCLICK!ce20d
Hold seat and pULL FRONT TO BACK AND LEFT TO RIGHT AT BELT PATHTO CHECK FOR SECURE INSTALLATION (f) 4HE CHILD RESTRAINT SHOULDNOT MOVE SIDE TO SIDE OR FORWARD MORE THAN INCH CM #HECK THAT THE LOWER ANCHOR BELT STAYS TIGHT AND DOES NOTSLIP FROM THE TIGHTENED POSITION )F IT DOES NOT STAY TIGHT TRYANOTHER SEATING POSITION OR CONTACT #USTOMER 3ERVICE f #HECK LEVEL INDICATOR ON CHILD RESTRAINT (g).Vehicle must BE ON LEVEL GROUND and child inCHILD RESTRAINT WHEN CHECKING LEVEL INDICATOR Ball MUST be entirely in blue zone (g). IfNECESSARY PLACE ROLLED TOWELS UNDER CHILDRESTRAINT AT VEHICLE SEAT CREASE UNTIL ENTIRE BALL ISgIN BLUE ZONE 4HEN RE CHECK LEVEL INDICATOR SEEPAGE s DO NOT use tether rear-facing 4ETHER must beSTORED SEE h4ETHER 3TORAGEv PAGE s 0ERIODICALLY CHECK THAT CHILD RESTRAINT IS SECURELYINSTALLED AND PROPERLY LEVELED ADJUST IF NECESSARY s 4O REMOVE LATCH SEE h2EMOVING LATCH from6EHICLE !NCHOR 0OINTSv P ,!4#(21
FORWARD-FACING INSTALLATION WITH LATCH 2ECLINE mIP FOOT MUST BE IN FORWARD&!#).' position (a) )F IT IS NOT SEEPAGE 2ECLINE &LIP &OOT 2. LATCH belt must be routed throughTHE OPENING IN CHILD RESTRAINT MARKED ASa&/27!2 &!#).' with an /2!.'%label (b) )F IT IS NOT SEE PAGE LATCH Belt Routing For Forward-Facing-ODE 5NHOOK TETHER FROM TETHER STORAGE SEEcPAGE 4. Place forward-facing ON VEHICLE SEATequipped with LATCH anchors. For easeOF INSTALLATION EXTEND LATCH belt to itsMAXIMUM LENGTH !TTACH LATCH CONNECTORS TO VEHICLElower anchors (c) "ELT MUST LIE mAT AND enot be twisted. Pull connectors to besure they are securely attached (d).22bCLICK!df
0RESS DOWN lRMLY IN CENTER OF CHILD RESTRAINT TO COMPRESSVEHICLE SEAT CUSHION WHILE PULLING ON THE TAIL OF THE LATCHbelt to tighten (e). (OLD SEAT AND PULL FRONT TO BACK AND LEFT TO RIGHT AT BELTPATH TO CHECK FOR SECURE INSTALLATION (f) 4HE CHILD RESTRAINTSHOULD NOT MOVE SIDE TO SIDE OR FORWARD MORE THAN INCH CM #HECK THAT THE LOWER ANCHOR BELT STAYS TIGHTand does not slip from the tightenedPOSITION )F IT DOES NOT STAY TIGHT TRY ANOTHERseating position or contact Customer3ERVICE !TTACH TETHER STRAP HOOK (A) to anchorhardware (B) and tighten adjustment beltTO REMOVE ANY SLACK (g) "ELT MUST LIE mATAND NOT BE TWISTED 0ERIODICALLY CHECK THATCHILD RESTRAINT IS SECURELY INSTALLED ADJUST IFnecessary.ABgPull to4IGHTEN4ETHER,!4#(s 4O REMOVE LATCH SEE h2EMOVING LATCH FROM 6EHICLE !NCHOR 0OINTSv P 23
REAR-FACING INSTALLATION WITH VEHICLE SEAT BELTSWARNINGLATCH belt MUST be stored whenUSING VEHICLE SEAT BELT TO INSTALL CHILDrestraint.ab0LEASE REFER TO P h6EHICLE 3EAT "ELTSvTO DETERMINE WHAT TYPE OF VEHICLE SEATBELT IS IN YOUR VEHICLE 3TORE LATCH belt as shown (a).2ECLINE mIP FOOT MUST BE IN REARcd&!#).' position (b).2. Place rear-facing ON VEHICLE SEAT 4HREAD VEHICLE SEAT BELT THROUGHrear-facing openings under the seatPAD AND BUCKLE BELT (c). Be sure toeROUTE THE VEHICLE SEAT BELT IN BETWEENTHE HARNESS BUCKLE SLOTS (d). Press down firmly in center of child restraint toCOMPRESS VEHICLE SEAT CUSHION WHILE TIGHTENING VEHICLE SEAT BELT (e).24
(OLD SEAT AND PULL FRONT TO BACK AND LEFT TO RIGHT AT THE BELTPATH TO CHECK FOR SECURE INSTALLATION (f) 4HE CHILD RESTRAINTSHOULD NOT MOVE SIDE TO SIDE OR FORWARD MORE THAN INCH CM 6EHICLE LAP BELT MUST STAY TIGHT )F NOT SECURE SEEh6EHICLE 3EAT "ELTSvPAGE f #HECK LEVEL INDICATOR ON CHILD RESTRAINT Vehicle must be onLEVEL GROUND and child in child restraint whenCHECKING LEVEL INDICATOR "ALL MUST be entirely in blue zone (g). IfNECESSARY PLACE ROLLED TOWELS UNDER CHILDRESTRAINT AT VEHICLE SEAT CREASE (h) UNTIL ENTIREBALL IS IN BLUE ZONE 4HEN RE CHECK LEVELgindicator SEE PAGE .DO NOT use tether rear-facing 4ETHER must beSTORED SEE h4ETHER 3TORAGEv PAGE 0ERIODICALLY CHECK THAT CHILD RESTRAINTis securely installed andPROPERLY LEVELED ADJUST IFnecessary.4OWELh25
FORWARD-FACING INSTALLATIONWITH VEHICLE SEAT BELTSWARNINGLATCH belt MUST be stored whenUSING VEHICLE SEAT BELT TO INSTALL CHILDrestraint.ab0LEASE REFER TO P h6EHICLE 3EAT "ELTSvTO DETERMINE WHAT TYPE OF VEHICLE SEATBELT IS IN YOUR VEHICLE Store LATCH belt as shown (a). 2ECLINE mIP FOOT MUST BEin &/27!2 &!#).' position (b).c 5NHOOK TETHER FROM TETHER STORAGE SEE PAGE 0LACE forward-facing ON VEHICLE SEAT 4HREAD VEHICLE SEAT BELT THROUGH forward-facing OPENINGS AND BUCKLE BELT (c).26
0RESS DOWN lRMLY IN CENTER OF CHILDRESTRAINT TO COMPRESS VEHICLE SEATCUSHION WHILE TIGHTENING VEHICLE SEATbelt (d).d (OLD SEAT AND PULL FRONT TO BACK ANDLEFT TO RIGHT AT BELT PATH TO CHECK FORAsecure installation (e) 4HE CHILDRESTRAINT SHOULD NOT MOVE SIDE TO SIDEBPull toOR FORWARD MORE THAN INCH CM 4IGHTENVehicle lap belt MUST stay tight. If not fSECURE SEE h6EHICLE 3EAT "ELTSv PG !TTACH TETHER STRAP HOOK (A) to anchorhardware (B) and tighten adjustmentBELT TO REMOVE ANY SLACK (f) )F VEHICLEDOES NOT HAVE ANCHOR POINTS TO ATTACH4ETHERTETHER HOOK TETHER HOOK SHOULD BESTORED SEE h4ETHER 3TORAGEv PAGE "ELT MUST LAY mAT AND NOT BE TWISTED 0ERIODICALLY CHECK THAT CHILD RESTRAINT ISSECURELY INSTALLED ADJUST IF NECESSARY 27eInstallation withLap/ Shoulderbelt
PLACING CHILD IN CHILD RESTRAINTCheck Harness SystemWARNINGREAR-FACINGs LBS KG KGs (ARNESS HEIGHT MUST BE ATOR JUST BELOW CHILD Sshoulders. Body supportMUST be used if shouldersare below lowest harnessSETTING SEE PAGE s #HILD S HEAD MUST BE ATLEAST v BELOW THE REDhandle.To prevent serious injuryor death:s Keep harness straps snug andpositioned on shoulders withCHEST CLIP AT ARM PIT LEVEL s O NOT USE STRAP COVERSBLANKETS CUSHIONS OR PADDINGunder harness straps or childUNLESS PROVIDED BY 'RACO FORWARD-FACINGs Child should be dressed inclothing that does not interfere s LBS KG KGHarness height must beWITH BUCKLING THE HARNESS AT OR JUST ABOVE CHILD Ss Failure to properly adjust theshoulders.harness straps for your childs#HILD S HEAD MUST BE ATINCREASES THE RISK OF SERIOUSLEAST v BELOW THE REDINJURY OR DEATH IN THE EVENT OF ASHARP TURN SUDDEN STOP OR CRASH handle.*28*
Adjusting Head Supports BEFORE ADJUSTING THE HEAD SUPPORT HEIGHT HAVEyour child lean forward slightly.s 3QUEEZE AND PULL UP THE RED HEAD SUPPORT ADJUSTMENThandle (a) ON TOP OF SEAT UNTIL IT LOCKS INTO ONE OF THE HEIGHT POSITIONS 4HERE WILL BE AN AUDIBLE CLICK AND THE ared head support adjustment handle will return to itsoriginal position (b).s 4O LOWER SQUEEZE RED HEAD SUPPORT ADJUSTMENT HANDLEand push head support down.s 7HEN HEAD SUPPORT IS IN LOWEST POSITION ALWAYS PULL FLAPforward as shown. (c).bRear-facings (EAD SUPPORT SHOULD BE POSITIONED SO THE HARNESS STRAPSARE AT OR JUST BELOW THE SHOULDERS AND CHILD S HEAD MUSTBE AT LEAST v BELOW THE RED HANDLE s -AKE SURE THE HEAD SUPPORT DOES NOT TOUCH THE FRONTVEHICLE SEAT Forward-facings (EAD SUPPORT SHOULD BE POSITIONED SO THAT THE HARNESSSTRAPS ARE AT OR JUST ABOVE THE CHILD S SHOULDERS LBS KG KG cRefer to page 28 for harness strap placement.29CLICK!Flap
PLACING CHILD IN CHILD RESTRAINT CONTINUED 0LACE CHILD IN CHILD RESTRAINTWITH CHILD S BACK mAT AGAINSTBACK OF CHILD RESTRAINT 0LACE HARNESS STRAPS OVER CHILD SSHOULDERS AND INSERT TONGUE SINTO BUCKLE SEE PAGE ChestClip0ULL UP ON TONGUE S TO BE SURETHEY ARE LOCKED "UCKLE #LOSE CHEST CLIP 0OSITION CHESTCLIP AT ARMPIT LEVEL SEE PAGE CrotchStrapHarnessAdjustmentStrap30
4. Adjust harness straps to be snug.CHECK that the harness is snug. Youshould not be able to pinch theharness if it is snug. A snug strapSHOULD NOT ALLOW ANY SLACK )T LIES IN ARELATIVELY STRAIGHT LINE WITHOUTsagging. It does not press on theCHILD S mESH OR PUSH THE CHILD S BODYinto an unnatural position (a)a#HECK THAT HARNESS STRAPS ON chestand thighs are snug. ! ROLLED TOWEL CAN BE USED ON EACHside to support small children (b).Be sure towels do not interfere withHARNESS SYSTEM 4OWELS SHOULD NOTbe placed under child.b31
OPERATIONS & ADJUSTMENTSs 4O TIGHTEN 0ULL HARNESS ADJUSTMENT STRAP (a)s 4O LOOSEN ,IFT LEVER (b) while pulling shoulderharness straps (c).aHarness StrapChest Clip"UCKLEbHarnessAdjustmentStrap32c
Chest Clip:s 4O OPEN 0RESS TABS AND PULL APART (d)s 4O CLOSE 3NAP HALVES TOGETHER -AKE SURE THE CHEST CLIP IS LOCKEDby pulling out on each half. (e)deBuckle:s 4O BUCKLE )NSERT BOTH TONGUES INTOBUCKLE 0ULL UP ON TONGUES TO BESURE THEY ARE LOCKED (f).f4O TIGHTEN 0ULL HARNESS ADJUSTMENTstrap (g)s 4O UNBUCKLE ,OOSEN BY LIFTING LEVER ANDpulling shoulder harness straps (h).Press in the red button (i) andPULL TONGUES OUT OF BUCKLE (j)hj33CLICK!gi
OPERATIONS & ADJUSTMENTS CONTINUEDCrotch Strap Adjustment:Check the crotch strap: Choose theposition that is closest to but not under your child.s 2ECLINE mIP FOOT MUST BE IN forward-facing position (k).s &ROM BOTTOM OF CHILD RESTRAINT ROTATE METAL RETAINER TO SIDE IN ORDER TOpush it through slot easier (l).s 0ULL CROTCH STRAP FROM CHILD RESTRAINT AS SHOWN (m).s 7HEN CHANGING CROTCH BUCKLE LOCATION LATCH belt must pass between theLATCH belt lines as shown (n).s )NSERT CROTCH STRAP INTO DESIRED SLOT (o). Pull up on crotch strap to be sureit is secure.34
kmlRear CrotchStrap PositionFront CrotchStrap Positiono35n
OPERATIONS & ADJUSTMENTS CONTINUEDRecline Flip FootFor Rear-Facing: 2OTATE mIP FOOT (a) torear-facing position (b).s "ALL IN LEVEL INDICATOR MUST BEentirely in blue (c) 3EE PAGE FOR PROPER LEVEL INDICATOR USE )FNECESSARY USE A POOL NOODLE ORTIGHTLY ROLLED TOWEL FOR LEVELING (d).s 6EHICLE MUST BE ON LEVEL GROUNDand child in child restraint whenCHECKING LEVEL INDICATOR NOTE: Level indicator is forrear-facing use only.For Forward-Facing: 2OTATE mIP FOOT(e) to forward-facing position (f).36abcdef
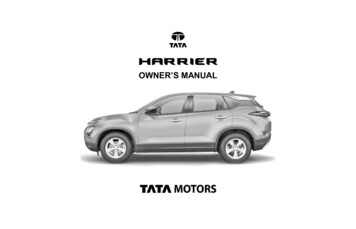
OPERATIONS & ADJUSTMENTS CONTINUEDLevel Indicator5SE CORRECTED AGE FOR PREEMIES WARNINGFAILURE TO PROPERLY recline theINFANT RESTRAINT ON THE VEHICLE SEATINCREASES THE RISK OF SERIOUS INJURY ORdeath.)F THE BALL IS ENTIRELY IN LIGHT BLUE THERESTRAINT IS LEVEL FOR INFANTS MONTHSin age.)F THE BALL IS IN LIGHT BLUE AND DARKBLUE THE RESTRAINT IS LEVEL FOR A CHILD MONTHS IN AGE - If the ball is in RED CHILD RESTRAINT ISNOT LEVEL 9OU MUST ADJUST YOURrecline position.37
OPERATIONS & ADJUSTMENTS CONTINUEDRemoving LATCH fromVehicle Anchor Points: 4O REMOVE LATCH PUSH BUTTON WHILEpulling on the LATCH belt as shown (a).2. Press and hold LATCH release hinge (b). 0USH CONNECTOR IN LIFT CONNECTOR UP ANDPULL OUT AWAY FROM ANCHOR POINT (c).4. Repeat step 1 2 and 3 for otherconnector.aRemoving Tether from Vehiclec 2ELEASE THE TENSION ON THE TETHER CONNECTORBY LIFTING LEVER AS SHOWN (d).2. Press and hold tether release hinge. (e). 0USH CONNECTOR IN LIFT CONNECTOR UP ANDPULL OUT AWAY FROM ANCHOR POINT (e).38bde
&ASTEN LATCH onto storagebar as shown (a).Repeat for other side of seat.a39
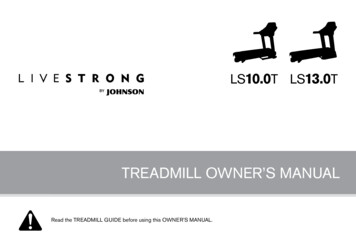
OPERATIONS & ADJUSTMENTS CONTINUEDLATCH Belt Routing ForRear-Facing Mode 0ULL THE LATCH belt out of theforward-facing BELT PATH OPENINGso that the LATCH HOOKS END UP ONthe same side of the child restraint(a).2. Slide the LATCH belt along the barto the 2%!2 &!#).' belt path openING MARKED WITH A ",5% label (b). 5NCLIP THE SEAT PAD FROM THE FRONT OFthe child restraint (c).abSNAP!c40
OPERATIONS & ADJUSTMENTSLATCH Belt Routing ForRear-Facing Mode4. Feed the LATCH HOOK WITH THEGRAY BUTTON ON IT BACK THROUGH THE2%!2 &!#).' belt path opening (d).Be sure to route the LATCH belt inBETWEEN THE BUCKLE SLOTS (e). EnsureTHE BELT IS mAT AND NOT TWISTED 2EPLACE THE SEAT PAD FABRIC ON THEfront of the child restraint (f).deSNAP!f41
OPERATIONS & ADJUSTMENTS CONTINUEDLATCH Belt Routing ForForward-Facing ModeSNAP! 5NCLIP THE SEAT PAD FROM THE FRONTOF THE CHILD RESTRAINT TO EXPOSE THELATCH belt (a).2. Pull the LATCH belt out of the rearfacing BELT PATH OPENING SO THATthe LATCH HOOKS END UP ON THEsame side of the child restraint (b).ab42
OPERATIONS & ADJUSTMENTSLATCH Belt Routing ForForward-Facing Mode 3LIDE THE LATCH belt along the barto the &/27!2 &!#).' belt pathOPENING MARKED WITH AN /2!.'%label (c).4. Feed the LATCH HOOK WITH THEGRAY BUTTON ON IT BACK THROUGH THE&/27!2 &!#).' belt path opening (d) %NSURE THE BELT IS mAT ANDnot twisted (e). 2EPLACE THE SEAT PAD FABRIC ON THEfront of the child restraint (f).cdSNAP!e43f
VEHICLE SEAT BELTSWARNINGNot all vehicle seat beltscan be used with a childrestaint. The childrestraint must be heldsecurely at all times by alap belt (or lap beltportion of a lap/shoulderbelt) that will not changelength while driving.4O PROVIDE THE MOST SECURE INSTALLATION OF THEchild restraint:s 2EAD THE VEHICLE OWNER S MANUALregarding child restraint installationand seat belt use with child restraint.s &OLLOW ALL INSTRUCTION LABELS ON VEHICLEseat belt and child restraint.If child restraint is not held securely afterFOLLOWING INSTRUCTIONS IN THIS MANUAL VEHICLESEAT BELT LABELS AND VEHICLE OWNER S MANUAL s -OVE CHILD RESTRAINT TO ANOTHERSEATING LOCATION AND TRY AGAIN ORs /R YOU CAN VISIT THE www.seatcheck.orgwebsite to find a child car seat inspectionstation nearest you.44
VEHICLE SEAT BELTS CONTINUEDLap/Shoulder Belt with SwitchableRetractor and Sliding Latch Plate&OLLOW THESE STEPS TO DETERMINE IF YOU HAVE Aretractor system that will hold child restraintsecurely:a. Pull belt all the way outB !LLOW BELT TO RETRACT ABOUT INCHES CMC )F YOU HEAR CLICKING SLOWLY PULL OUT ON BELT AGAINIF IT LOCKS THEN YOU HAVE A RETRACTOR THAT CAN BESWITCHED TO AN !UTOMATIC ,OCKING 2ETRACTORMode and can be used to secure your seat toVEHICLE )F YOU DON T HAVE A RETRACTOR THAT CAN BE SWITCHED TOAN !UTOMATIC ,OCKING 2ETRACTOR -ODE !. YOU PULLON THE LATCH PLATE AND IT SLIDES FREELY A LOCKING CLIPMUST BE USED SEE 0G h,OCKING #LIPv SECTION 45Pulla
VEHICLE SEAT BELTS CONTINUEDLap/Shoulder Belt with EmergencyLocking Retractor (ELR) and LockingLatch Plate4HE LOCKING LATCH PLATE ON SOME SEATbelts may slip and loosen after beingBUCKLED ON CHILD RESTRAINT IF POSITIONEDAT A CERTAIN ANGLE )F THIS HAPPENS mIPTHE LATCH PLATE OVER (a) andRE BUCKLE 4EST INSTALLATION AGAIN TO SEEIF THIS WORKS )F NOT MOVE CHILD RESTRAINTto another seating position.Flipa46
VEHICLE SEAT BELTS CONTINUEDLap Belts - Manually Adjustable4HE LOCKING LATCH PLATE ON SOME SEAT BELTS MAYSLIP AND LOOSEN AFTER BEING BUCKLED ON CHILDrestraint if positioned at certain angle. If thisHAPPENS mIP LATCH PLATE OVER (a) andRE BUCKLE 4EST INSTALLATION AGAIN TO SEE IF THISWORKS )F NOT MOVE CHILD RESTRAINT TO ANOTHERseating position.Flipa47
VEHICLE SEAT BELTS CONTINUEDLap Belts - With RetractorLap belts with retractors may or may not holda child restraint securely.&OLLOW THESE STEPS TO DETERMINE IF YOU HAVE Aretractor system that will hold child restraintsecurely:a. Pull belt all the way outB !LLOW BELT TO RETRACT ABOUT INCHES CMc. Slowly pull out on belt again.)F BELT IS LOCKED AND YOU cannot pull the beltOUT ANY FURTHER YOU HAVE AN !UTOMATIC,OCKING 2ETRACTOR WHICH MAY BE USED WITH ACHILD RESTRAINT 2EMEMBER WHEN INSTALLING ACHILD RESTRAINT PULL BELT ALL THE WAY OUT BUCKLEBELT AND THEN TIGHTEN If you can PULL THE BELT OUT AGAIN STEP CABOVE YOU MUST HAVE AN %MERGENCY ,OCKINGRetractor which MUST NOT be used with achild restraint.48Retractor
VEHICLE SEAT BELTS CONTINUEDLap/Shoulder Belt with Emergency Locking Retractor (ELR)and Sliding Latch PlateLocking ClipWARNINGYou MUST USE LOCKING CLIP PROVIDED WITHCHILD RESTRAINT WITH A VEHICLE SEAT BELT THATslides freely through the latch plate or thelap belt cannot be tightly secured.Avoid serious injury or death:s &AILURE TO USE LOCKING CLIPwhere required will result inchild restraint not beingsecurely held in place.s 2EMOVE LOCKING CLIP FROMseat belts when not beingused with child restraint.s / ./4 USE LOCKING CLIP AS Avehicle seat belt shortener.49
VEHICLE SEAT BELTS CONTINUED )NSTALL CHILD RESTRAINT AND TIGHTEN VEHICLE SEAT BELT 2. Hold seat belts together at latch plate (a) THEN UNBUCKLE )F A LOCKING CLIP IS NEEDED SEE 0G h,OCKING #LIPv SECTIONSLIDE LOCKING CLIP ON SEAT BELTS APPOXIMATELY INCH CM AND UP TO INCH CM AWAY FROM LATCH PLATE 2E BUCKLE SEAT BELT 4EST INSTALLATION TO SEE IF CHILD RESTRAINT IS SE
Read and understand instruction manual and child restraint labels. )NFANTSLESSTHAN LBS KG must use child restraint rear-facing. Infants or toddlers 20 to 40 lbs. KGTO KG may be rear-facing. Do not use child restraint rear-facing INVEHICLESEATWITHAIRBAG Secure children in rear