Transcription
SREE VIDYANIKETHAN ENGINEERING COLLEGE(An autonomous institution affiliated to JNTUA, Anantapuramu)SreeSainath Nagar, Tirupati – 517 102.DEPARTMENT OF ELECTRICAL AND ELECTRONICS ENGINEERINGLab ManualEMBEDDED SYSTEMS LAB(16BT70432)(IV B. Tech., I-Semester, EEE)Prepared byDr. G. HARIKRISHNANAssociate ProfessorDepartment of EEE
(An Autonomous institute affiliated of JNTUA, Anantapuramu)Sree Sainath Nagar, Tirupati – 517 102Department of Electrical and Electronics EngineeringLab ManualEMBEDDED SYSTEMS(16BT70432)(IV B.Tech., I-Semester, EEE)
(An Autonomous institute affiliated of JNTUA, Anantapuramu)Sree Sainath Nagar, Tirupati – 517 102Department of Electrical & Electronics EngineeringList of ContentsEmbedded Systems Lab (16BT70432)TitlePage No.Vision & MissioniPEOs, POs & PSOsiiSyllabusivCO-PO-PSO MappingviRubrics for Embedded Systems LabviiDay to Day EvaluationviiiInternal Marks EvaluationxList of Equipment NeededxiiGeneral InstructionsxiiiIntroduction to MSP430 launch pad and Programming Environment. (StudyExp-1 Experiment)Read input from switch and Automatic control/flash LED (soft-ware delay).1Exp-2Exp-3 Interrupts programming example using GPIO.5Exp-4 Configure watchdog timer in watchdog mode & interval mode.Exp-5 Configure timer block for signal generation (with given frequency)11914Exp-6 Read Temperature of MSP430 with the help of ADC.16Exp-7 Test various Power Down modes in MSP430.18Exp-8 PWM Generator23Exp-9 Use Comparator to compare the signal threshold level25Exp-10 Speed Control of DC MotorExp-11 Master slave communication between MSPs using SPIExp-12 Networking MSPs using Wi-Fi.263035
SREE VIDYANIKETHAN ENGINEERING COLLEGE(An Autonomous institute affiliated of JNTUA, Anantapuramu)Sree Sainath Nagar, Tirupati – 517 102VisionTo be one of the Nation’s premier Engineering Colleges by achieving the highestorder of excellence in Teaching and Research.MissionThrough multidimensional excellence, we value intellectual curiosity, pursuit ofknowledge building and dissemination, academic freedom and integrity to enablethe students to realize their potential. We promote technical mastery of ProgressiveTechnologies, understanding their ramifications in the future society and nurturethe next generation of skilled professionals to compete in an increasingly complexworld, which requires practical and critical understanding of all aspects.Department of Electrical & Electronics EngineeringVisionTo become the Nation’s premiere Centre of excellence in electrical ovationtocreatecompetentengineering professionals with values and ethics.Mission1Department of Electrical Engineering strives to create human resources inElectrical Engineering to contribute to the nation development and improvethe quality of life.2Imparting Knowledge through implementing modern curriculum, academicflexibility and learner centric teaching methods in Electrical Engineering.3Inspiring students for aptitude to research and innovation by exposing themto industry and societal needs to create solutions for contemporary problems.4Honing technical and soft skills for enhanced learning outcomes andemployability of students with diverse background through comprehensivetraining methodologies.5Inculcate values and ethics among students for a holistic engineeringprofessional practice.i
SREE VIDYANIKETHAN ENGINEERING COLLEGE(An Autonomous institute affiliated of JNTUA, Anantapuramu)Sree Sainath Nagar, Tirupati – 517 102Department of Electrical & Electronics EngineeringPEOs, POs & PSOsEmbedded Systems Lab (16BT70432)Program Educational Objectives - B.Tech - EEE1.Graduates will be enrolled in academic program in the disciplines of electricalengineering or other disciplines.2.Graduates will be employed as productive and valued engineers in reputed industries.3.Graduates will assume increasingly responsible positions and use the technical skills andanalytical acumen to address professional values, ethics, leadership, and team skills forexecution of complex technological solutions.Program Outcomes - B.Tech – EEE1.Acquire knowledge of computing mathematics, sciences and concepts of electricalengineering.2.Ability to perform analysis of electrical power systems.3.Design and develop electric machines power electronic converters, control systems andschemes of electrical power transmission and protection.4.Skills to solve problems in electric circuits, efficiency of electric machines and powersystem stability.5.Use of electrical engineering principles to modern electric generation, transmission anddistribution.6.Create solutions of social context the impact of electrical engineering.7.Practice electrical engineering in compliance with environmental standards.8.Follow ethical code of conduct in professional activities.9.Achieve personal excellence and ability to work in groups.10.Develop effective communication in professional transactions.11.Life skills for effective project management.12.Appreciate the significance and applications of electrical engineering and to engage inlifelong learning for knowledge and skill up gradation.ii
Program Specific OutcomesOn successful completion of the program, engineering graduates will1Demonstrate knowledge of Electrical and Electronic circuits, Electrical Machines, PowerSystems, Control Systems, and Power Electronics for solving problems in electrical andelectronics engineering.2Analyze, design, test and maintain electrical systems to meet the specific needs of theIndustry and society.3Conduct investigations to address complex engineering problems in the areas ofElectrical Machines, Power Systems, Control Systems and Power Electronics.4Apply appropriate techniques, resources and modern tools to provide solutions forproblems related to electrical and electronics engineering.iii
(An Autonomous institute affiliated of JNTUA, Anantapuramu)Sree Sainath Nagar, Tirupati – 517 102Department of Electrical & Electronics EngineeringSyllabusIV B.Tech.,I-Semester, EEEL16BT70432: EMBEDDED SYSTEMS LABDAY-TO-DAYINTERNALEND LABEVALUATIONEVALUATIONEXAMINATION30 MARKS20 MARKS50 MARKST-P3C2TOTAL100 MARKSPREREQUISITES: Course on Embedded systems.COURSE DESCRIPTION:IDE for Embedded System Design using MSP430; Interfacing Switch & LED; Timers-WDT,Configuring, Programming; ADC-usage; Power down modes; DAC; PWM Generator; Networking- SPI, Wi-Fi.COURSE OUTCOMES: On successful completion of the course, students will be able toCO1.CO2.CO3.CO4.CO5.CO6.CO7.CO8.Demonstrate knowledge in designing complex energy efficient embedded systems.Analyze usage of various on-chip resources like GPIO, Timers, Interrupts, ADC, DAC, Comparator,SPI.Design embedded systems to suit market requirements.Solve engineering problems by proposing potential solutions using industry choice advancedMicrocontrollers.Apply appropriate techniques, resources, and CCSV6 based IDE for modeling embedded systemswith understanding of limitations.Provide embedded system solutions for societal needs.Work individually and in a group to develop embedded systems.Communicate effectively in oral and written form in the field of embedded systems.DETAILED SYLLABUS:1.2.3.4.5.6.7.8.9.10.11.12.Conduct any TEN experiments from the following:Introduction to MSP430 launch pad and Programming Environment.Read input from switch and Automatic control/flash LED (soft-ware delay).Interrupts programming example using GPIO.Configure watchdog timer in watchdog & interval mode.Configure timer block for signal generation (with given frequency).Read Temperature of MSP430 with the help of ADC.Test various Power Down modes in MSP430.PWM Generator.Use Comparator to compare the signal threshold level.Speed Control of DC MotorMaster slave communication between MSPs using SPI.Networking MSPs using Wi-Fi.TOOL REQUIREMENT:Code Composer Studio Version 6, MSP430 based launch pads, Wi-Fi booster pack.REFERENCE BOOKS:1. John H Davies, MSP430 Microcontrollers Basics, Newnes Pub-lishers, 1st edition, 2008.2. C P Ravikumar, MSP430 Microcontrollers in Embedded Sys-tem Projects, ElitePublishing House , 1stedition, 2012.iv
(An Autonomous institute affiliated of JNTUA, Anantapuramu)Sree Sainath Nagar, Tirupati – 517 102Department of Electrical & Electronics EngineeringIV B.Tech., I-Semester, EEEEmbedded Systems Lab (16BT70432)PO3PO4PO5PO6PROBLEMSOLVINGAPPLYENG DUALPO1DESIGNProgram Specific OutcomesANALYSISProgram 4CO1CO2&CO3CO4CO5HHHHCorrelation Levels:HH - HighHM - MediumvL – Low
(An Autonomous institute affiliated of JNTUA, Anantapuramu)Sree Sainath Nagar, Tirupati – 517 102Department of Electrical & Electronics EngineeringRubricsEmbedded Systems Lab (16BT70432)S.NoCourse Outcome1 CO1CO2DemonstDemonstrate knowledge incomplex energy efficientsystems.PO1PO223 CO3PO34 CO4PO45 CO5PO56 CO6PO67 CO7PO9CO8PO10Rubric 1Rubric 2Rubric 3ScoreX(1-2)M(3-4) M(5)MAverageGoodVery Good(Max 5M)Unable to recall the Able to recall theAble to recall thebasic theoreticalbasic theoreticalbasic theoreticaldesigning knowledge of theknowledge of theknowledge of theembedded experiment andexperiment andexperiment and ableunable to follow the unable to follow theto follow thepractical procedure practical procedure practical procedure.Unable to analyseAnalyze usage of various on-chip resources Characteristics oflike GPIO, Timers, Interrupts, ADC, DAC,servomotor.Comparator, SPI.Able to explain the Able to analyse andoperation of motorsapply,Power electronicscircuits for real timeAble to follow theUnable not able toexperimentalfollow theprocedures andexperimentalmathematicalcalculations.Design embedded systems to suit market procedures andmathematicalBut unable torequirements.calculationsevaluate and interpretproperly.Able to followexperimentalprocedures andmathematicalcalculations. Alsoable to present andinterpret properlyand co-relate thepractical with thetheory.Unable to interpret able to interpret the Able to plan andthe experimental experimental results design and also toresults with thewith theinterpret theSolve engineering problems by proposing programming and programming and experimental resultspotential solutions using industry choice control strategy to control strategy towith theadvanced Microcontrollers.meet the requiredmeet the requiredprogramming andspecificationsspecifications. Unable control strategy toto plan and design. meet the requiredspecifications.Unable to select AbletoselectAble to selectappropriate tool and appropriate tool for appropriate tool andApply appropriate techniques, resources,develop the program simulation but lags in develop the programand CCSV6 based IDE for modelingfor simulation developingthe logic for simulation.embedded systems with understanding ofmodel/programfor Able to interpret thelimitations.simulation.results and correlatethem with practical.Unable to handle as Occasionally works Able to work andProvide embedded system solutions foran individual.as an individualexecute the problemsocietal needs.individually.Work individually and in a group todevelop Embedded Systems.Lab report is notsystematicLab report isReport is fullysystematic at some systematic and alsoplaces to demonstrate in specified format.Unable to follow the able to follow theable and apply theCommunicate effectively in oral and professional code of professional code of professional code ofwritten form in the field of Embeddedethicsethics and can unableethics.Systems.to define standardcode of ethics68Total Score (Max 30M)Y Xii 191011Average Marks ObtainedMarks ObtainedAssessmentZ Y6 Z*3Average /Good / Very Goodvi
(An Autonomous institute affiliated of JNTUA, Anantapuramu)Sree Sainath Nagar, Tirupati – 517 102Department of Electrical & Electronics Engineering12345678CO5CO6CO7CO8ENG & 6M3M3M3M3M6MIntroduction to MSP430launch pad andProgramming Environment.(Study Experiment)Read input from switch andAutomatic control/flashLED (soft-ware delay).Interrupts programmingexample using GPIO.Configure watchdog timerin watchdog mode &interval mode.Configuretimerblock forsignalgeneration(withgivenfrequency)Read Temperature ofMSP430 with the help ofADC.Test various Power Downmodes in MSP430.PWM Generator9Use Comparator to comparethe signal threshold level10Speed Control of DC Motor11Master slavecommunication betweenMSPs using SPI12Networking MSPs usingWi-Fi.16BT70432APPLYCourse Code:PROBLEMSOLVINGExperiment NameEmbedded Systems LabDESIGNS.No.Roll No. :ANALYSISName of the Laboratory:IV B.Tech. I SemesterDEMONSTRATIONYear and Semester:viiTOTAL30 MSignature of theFaculty
(An Autonomous institute affiliated of JNTUA, Anantapuramu)Sree Sainath Nagar, Tirupati – 517 102Department of Electrical & Electronics EngineeringIV B.Tech., I-Semester, EEEEmbedded Systems Lab (16BT70432)General Instructions1. Shirts should be tucked in.2. Perform only appropriate experiments and be sure that you understand the procedureinvolved before you begin.3. Supply to test table should be obtained only through the lab technician.4. Energize the circuit only after getting approval from the faculty-in-charge.5. Students who are not appropriately attired will not be allowed to perform experiments.6. No horse-play before, during or after lab.7. Be familiar with emergency procedures & know the location of emergency equipment.First aid kit for minor injuries is with the lab technician.8. Do not modify equipment settings unless instructed by lab handout or lab instructor.9. Unauthorized experiments and working in the laboratory outside the class hours withoutpermission are strictly prohibited.10. Keep bags in the designated areas.11. If you feel unhealthy or dizzy while doing the experiment, stop immediately, sit downand notify the instructor.viii
SVEC, EEE11. BLINK IN-BUILD LED1 & LED2(1A) To Blink GREEN LED with GPIOAIM: The main objective of this experiment is to blink the on-board, GREEN LED(connected to P1.0) using GPIO.APPARATUS:1) Code Composer studio software2)MSP430F5529 target Launch-pad3) USB cable4) Patch ChordsTHEORY :The MSP430F5529 has two LED’s connected to GREEN LED (P1.0) and RED LED(P4.6) on the MSP430F5529 Launch-Pad for visual feedback. In this experiment, thecode programmed into the MSP430F5529 processor toggles the output on Port P1.0at fixed time intervals computed within the code. A HIGH on P1.0 turns the LEDON, while a LOW on P1.0 turns the LED OFF. Thus, the toggling output blinks theGREEN LED connected to it.PROGRAM:#include msp430.h intmain(void){WDTCTL WDTPW WDTHOLD;// Stop watchdog timerPM5CTL0 & LOCKLPM5; // Disable the GPIO power-on default highimpedance mode to activate previously configured port settingsP1DIR 0x01; // set the pin 1.0 direction to O/Pwhile(1){volatile unsigned long i;P1OUT 0x01; // blink LEDi 50000;doi--;while(i ! 0);return 0;}Page1}
SVEC, EEE2PROCEDURE:1. 1. Connect the MSP430F5529 LaunchPad to the PC using the USB cable supplied.2. Build, program and debug the code into the LaunchPad using CCS to viewthe status of the LED.3. In the CCS debug perspective, select View -- Registers.RESULT :(1B) To Blink an RED LED with GPIOAIM: The main objective of this experiment is to blink the onboard, RED LED(connected to P4.6) using GPIO.PROGRAM:#include msp430.h intmain(void){WDTCTL WDTPW WDTHOLD;// Stop watchdog timerPM5CTL0 & LOCKLPM5; // Disable the GPIO power-on default high//impedance mode to activate previously configured port settingsP4DIR 0x40; // set the pin 4.6 direction to O/Pwhile(1){volatileunsignedlongi;P4OUT 0x40;// blink LEDi 50000;doi--;while(i ! 0);}return 0;}Page2RESULT :
SVEC, EEE3(1C) To Blink an RED LED & GREEN LED TogetherAIM: The main objective of this experiment is to blink the onboard, RED LED(connected to P4.6) and GREEN LED(connected to P1.0) together using GPIO.PROGRAM:#include msp430.h intmain(void){WDTCTL WDTPW WDTHOLD;// Stop watchdog timerPM5CTL0 & LOCKLPM5; // Disable the GPIO power-on default //high-impedance mode to activate previously configured port settingsP1DIR 0x01; P4DIR 0x40;P1OUT 0x01; P4OUT 0x40;while(1){volatileunsignedlongi;P1OUT 0x01;P4OUT 0x40;i 50000;doi--;while(i ! 0);}return 0;}RESULT :(1D)To Blink an RED LED & GREEN LED AlternativelyPROGRAM:#include msp430.h intmain(void){WDTCTL WDTPW WDTHOLD; // Stop watchdog timerPM5CTL0 & LOCKLPM5; // Disable the GPIO power-on default //high//impedance mode to activate previously configured port settingsPage3AIM: The main objective of this experiment is to blink the onboard, RED LED(connected to P4.6) and GREEN LED(connected to P1.0) alternatively using GPIO.
SVEC, EEE4P1DIR 0x01;P4DIR 0x40;P1OUT 0x01;P4OUT & 0x40;while(1){volatileunsignedlongi;P1OUT 0x01;P4OUT 0x40;i 50000;doi--;while(i ! 0);}return 0;}Page4RESULT :
SVEC, EEE52. READ INPUT FROM SWITCH AND GLOW LED(2A)To Blink an GREEN LED using ButtonAIM: The main objective of this experiment is to blink the onboard, GREEN LED(connected to P1.0) whenever button (connected to P.1.1) is pressed and OFF whenreleased using GPIO.APPARATUS:1) Code Composer studio software2)MSP430F5529 target Launch-pad3) USB cable4) Patch ChordsTHEORY :The MSP430F5529 has two LED’s and two push BUTTONS connected to GREENLED (P1.0),S2(P1.1) and RED LED (P4.6),S1(P4.5) on the MSP430F5529LaunchPad for visual feedback. In this experiment, the code programmed into theMSP430F5529 processor to turn on GREEN LED when button is pressed & OFFwhen button is released are computed within the code.PROGRAM:#include msp430.h int main(void){WDTCTL WDTPW WDTHOLD;// Stop watchdog timerPM5CTL0 & LOCKLPM5; // Disable the GPIO power-on default highimpedance mode //to activate previously configured port settingsP1DIR 0x01;P1REN 0x02;while(1){if(P1IN & BIT1){P1OUT & BIT0;}else{Page5}}
SVEC, EEE6P1OUT BIT0;return 0;}PROCEDURE:1. Connect the MSP430F5529 LaunchPad to the PC using the USB cable supplied.2. Build, program and debug the code into the LaunchPad using CCS to viewthe status of the LED.3. In the CCS debug perspective, select View -- Registers.RESULT :(2B) To Blink an GREEN LED using Button with Delay 1secAIM:The main objective of this experiment is to make the green LED stayON for around 1 second every time the button is pressed.APPARATUS:1) Code Composer studio software2)MSP430F5529 target Launch-pad3) USB cableTHEORY:The MSP430F5529 has two LED’s and two push BUTTONS connected to GREENLED (P1.0),S2(P1.1) and RED LED (P4.6),S1(P4.5) on the MSP430F5529LaunchPad for visual feedback. In this experiment, the code programmed into theMSP430F5529 processor make the green LED stay ON for around 1 second everytime the button is pressed.PROCEDURE:Page61. Connect the MSP430F5529 LaunchPad to the PC using the USB cable supplied.2. Build, program and debug the code into the LaunchPad using CCS to view thestatus of the red LED.3. In the CCS debug perspective, select View -- Registers.
SVEC, EEE7PROGRAM:#include msp430.h int main(void) {WDTCTL WDTPW WDTHOLD;// Stop watchdog timer// Disable the GPIO power-on default //high-//impedance mode to activate previouslyconfigured port settingsPM5CTL0 & LOCKLPM5;P1DIR 0x01;P1REN 0x02;while(1){ volatileunsignedlongi;if(P1IN & BIT1){P1OUT & BIT0;}else{}P1OUT BIT0; i 50000;doi--;while(i ! 0);}return 0;}(2C) To Blink an GREEN LED & RED LED using ButtonAIM: The main objective of this experiment is to turn the red LED ON whenthe button is pressed and the green LED ON when the button is released.APPARATUS:1) Code Composer studio software2)MSP430F5529 target Launch-pad3) USB cableThe MSP430F5529 has two LED’s and two push BUTTONS connected to GREENLED (P1.0),S2(P1.1) and RED LED (P4.6),S1(P4.5) on the MSP430F5529Page7THEORY:
SVEC, EEE8LaunchPad for visual feedback. In this experiment, the code programmed into theMSP430F5529 processor turn the red LED ON when the button is pressed and thegreen LED ON when the button is released.PROCEDURE:1. Connect the MSP430F5529 LaunchPad to the PC using the USB cable supplied.2. Build, program and debug the code into the LaunchPad using CCS to viewthe status of the LED.3. In the CCS debug perspective, select View-- Registers PROGRAM:Page8RESULT:
SVEC, EEE93. INTERRUPTS PROGRAMMING EXAMPLE USING GPIOAIM: The main objective of this experiment is to write a C program andassociated GPIO ISR using interrupt programming technique.APPARATUS:1) Code Composer studio software2)MSP430F5529 target Launch-pad3) USB cableTHEORY:The MSP430F5529 has two LED’s and two push BUTTONS connected to GREENLED (P1.0),S2(P1.1) and RED LED (P4.6),S1(P4.5) on the MSP430F5529LaunchPad for visual feedback. In this experiment, the code programmed into theMSP430F5529 processor toggle the GREEN LED whenever interrupt is generated.MSP430FR59xx----------------/ \ XIN 32kHz-- RSTXOUT P1.0 -- LED P1.1 --- S2PROCEDURE:1. Connect the MSP430F5529 LaunchPad to the PC using the USB cable supplied.2. Build, program and debug the code into the LaunchPad using CCS to viewthe status of the LED.3. In the CCS debug perspective, select View -- Registers4. Press the S2 and observe the GREEN LED toggled.#include msp430.h intmain(void){WDTCTL WDTPW WDTHOLD; // Stop WDT PM5CTL0 & LOCKLPM5;P1DIR BIT0; // Set P1.0 to output directionP1REN BIT1; // Enable P1.1 internal resistanceP1OUT BIT1; // Set P1.1 as pull up resistancePage9PROGRAM:
SVEC, EEE10P1IES BIT1; // P1.1 High/Low EdgeP1IFG & BIT1; // P1.1 IFG ClearedP1IE BIT1; // P1.1 Interrupt Enabledbis SR register(LPM4 bits GIE); // Enter LPM4 w/ interruptno operation();return 0;}#pragma vector PORT1 VECTORinterruptvoidPort 1 (void){P1OUT BIT0; // Toggle P1.0P1IFG & BIT1; // P1.1 IFG Cleared}Page10RESULT:
SVEC, EEE114. CONFIGURE WATCHDOG TIMER IN WATCHDOG MODE & INTERVALMODEAIM: The main objective of this experiment is to configure watchdog timer modulein watchdog and Interval time mode and observe its output.APPARATUS:1) Code Composer studio software2)MSP430F5529 target Launch-pad3) USB cableTHEORY:WDT A OperationThe watchdog timer module can be configured as either a watchdog or interval timerwith the WDTCTL register. WDTCTL is a 16-bit password-protected read/writeregister. Any read or write access must use word instructions and write accesses mustinclude the write password 05Ah in the upper byte. Any write to WDTCTL with anyvalue other than 05Ah in the upper byte is a password violation and triggers a PUCsystem reset, regardless of timer mode. Any read of WDTCTL reads 069h in theupper byte. Byte reads on WDTCTL high or low part result in the value of the lowbyte. Writing byte wide to upper or lower parts of WDTCTL results in a PUC.Watchdog Timer Counter (WDTCNT)The WDTCNT is a 32-bit up counter that is not directly accessible by software. TheWDTCNT is controlled and its time intervals are selected through the WatchdogTimer Control (WDTCTL) register. The WDTCNT can be sourced from SMCLK,ACLK, VLOCLK, or X CLK on some devices. The clock source is selected with theWDTSSEL bits. The timer interval is selected with the WDTIS bits.Watchdog ModeAfter a PUC condition, the WDT module is configured in the watchdog mode with aninitial 32-ms reset interval using the SMCLK. The user must setup, halt, or clear thewatchdog timer prior to the expiration of the initial reset interval or another PUC isgenerated. When the watchdog timer is configured to operate in watchdog mode,either writing to WDTCTL with an incorrect password, or expiration of the selectedtime interval triggers a PUC. A PUC resets the watchdog timer to its defaultcondition.Setting the WDTTMSEL bit to 1 selects the interval timer mode. This mode can beused to provide periodic interrupts. In interval timer mode, the WDTIFG flag is set atthe expiration of the selected time interval. A PUC is not generated in interval timermode at expiration of the selected timer interval, and the WDTIFG enable bit WDTIEremains unchanged.Page11Interval Timer Mode
SVEC, EEE12When the WDTIE bit and the GIE bit are set, the WDTIFG flag requests an interrupt.The WDTIFG interrupt flag is automatically reset when its interrupt request isserviced, or it may be reset by software. The interrupt vector address in interval timermode is different from that in watchdog mode.PROGRAM:1. A WATCHDOG TIMER:INTERVAL TIMER MODE C PROGRAM:{WDTCTL WDT ADLY 250; // WDT 250ms, ACLK, interval timerIE1 WDTIE;// Enable WDTP1DIR 0x01;// Set P1.0 to bis SR register(LPM3 bits GIE);Enter LPM3}//// Watchdog Timer interrupt service routine#pragma vector WDT VECTORinterrupt voidwatchdog timer(void){P1OUT 0x01;// Toggle P1.0 using exclusive-OR}intmain(void){WDTCTL WDT ARST 1000;P1DIR 0x01;P1OUT 0x01;bis SR register(LPM3 bits);}3. WATCHDOG TIMER: WATCDOG MODE ALP PROGRAMPage122. WATCHDOG MODE: C PROGRAM
SVEC, EEE13WDCNT: 0000 0001RESETmov.w #0280h,SP; Initialize stackpointerSetupWDT mov.w #WDT ARST 1000N,&WDTCTL ; Set Watchdog Timerbis.b #WDTIE,&IE1bis.b #001h,&P1DIR; P1.0 outputxor.b #001h,&P1OUT; Toggle P1.0bis.w #LPM3,SR;Mainloop jmp Page13RESULT
SVEC, EEE145.CONFIGURE TIMER BLOCK FOR SIGNAL GENERATIONAIM: The main objective of this experiment is to write a C program andTIMER ISR using interrupt programming technique.APPARATUS:1) Code Composer studio software2)MSP430F5529 target Launch-pad3) USB cableTHEORY:The MSP430F5529 has two LED’s and two push BUTTONS connected to GREENLED (P1.0),S2(P1.1) and RED LED (P4.6),S1(P4.5) on the MSP430F5529Launch-Pad for visual feedback. In this experiment, the code programmed into theMSP430F5529 processor Toggle P1.0 using software and TA 0 ISR. Timer0 A isconfigured for continuous mode, thus the timer overflows when TAR counts toCCR0. In this example, CCR0 is loaded with 50000.// ACLK n/a, MCLK SMCLK TACLK default DCO 1MHzMSP430FR59xx----------------/ \ XIN 32kHz-- RST XOUT P1.0 -- LEDPROCEDURE:1. Connect the MSP430F5529 LaunchPad to the PC using the USB cable supplied.2. Build, program and debug the code into the LaunchPad using CCS to viewthe status of the LED.3. In the CCS debug perspective, select View -- Registers4. Observe the GREEN LED blinks whenever timer overflows.#include msp430.h intmain(void){WDTCTL WDTPW WDTHOLD; // Stop WDT// Configure GPIOP1DIR BIT0; P1OUT BIT0;Page14PROGRAM:
SVEC, EEE15// Disable the GPIO power-on default high-impedance mode to activate// previously configured port settingsPM5CTL0 & LOCKLPM5;TA0CCTL0 CCIE; // TACCR0 interrupt enabled TA0CCR0 20000;TA0CTL TASSEL SMCLK MC UP; // SMCLK, UP modebis SR register(LPM0 bits GIE);// Enter LPM0 w/ interruptno operation();// For debugger}// Timer0 A0 interrupt service routine#if defined( TI COMPILER VERSION ) defined( IAR SYSTEMS ICC )#pragma vector TIMER0 A0 VECTORinterruptvoidTimer0 A0 ISR (void)#elif defined( GNUC )void attribute ((interrupt(TIMER0 A0 VECTOR))) Timer0 A0 ISR (void)#else#error Compiler not supported!#endif{P1OUT BIT0;}Page15RESULT:
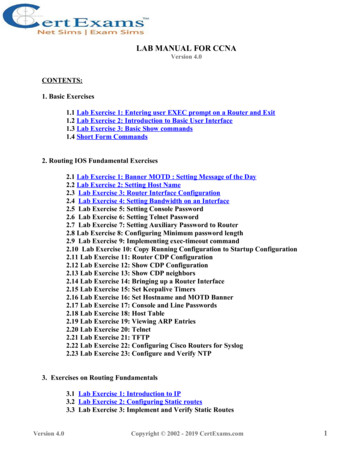
SVEC, EEE166. READ TEMPERATURE OF MSP430 WITH THE HELP OF ADCAIM: The main objective of this experiment is to measure temperature usinginbuilt ADC module.APPARATUS:1) Code Composer studio software2)MSP430F5529 target Launch-pad3) USB cableTHEORY:Page16To use the on-chip temperature sensor, select the analog input channel INCHx 1010. Any other configuration is done as if an external channel were selected,including reference selection and conversion-memory selection. The temperaturesensor is part of the reference. Therefore, for devices with the REF module, inaddition to the input channels selection INCHx 1010, configuringADC12REFON 1 (for REFMSTR 0) or REFON 1 (for REFMSTR 1) isrequired to enable the temperature sensor. For the MSP430F54xx (non-A) devices,which do not include the REF module, selecting the temperature sensor byconfiguring INCHx 1010 automatically enables the reference generator requiredfor the temperature sensor. Any other configuration is done as if an externalchannel were selected, including reference selection and conversion-memoryselection.
SVEC, EEE17Figure shows a typical temperature sensor transfer function. The transfer functionthat is shown is only an example; the device-specific data sheet contains the actualparameters for a given device. When using the temperature sensor, the sampleperiod must be greater than 30 µs. The temperature sensor offset error can be largeand may need to be calibrated for most applications. Temperature calibrationvalues are available for use in the TLV descriptors (see the device-specific datasheet for locations). Some MSP430 devices include calibration data that can beused to compute temperature more accurately.PROGRAM:Read Temperature of MSP430 with the help of ADCRESULT:Page17#include msp430.h long temp;long IntDegC;intmain(void){WDTCTL WDTPW WDTHOLD;// Stop WDTADC10CTL1 INCH 10 ADC10DIV 3;// Temp Sensor ADC10CLK/4ADC10CTL0 SREF 1 ADC10SHT 3 REFON ADC10ON ADC10IE;while(1){ADC10CTL0 ENC ADC10SC;// Sampling and conversion startbis SR register(CPUOFF GIE);// LPM0 with interrupts enabledtemp ADC10MEM;IntDegC ((temp - 673) * 423) / 1024;no operation();// SET BREAKPOINT HERE}}// ADC10 interrupt service routine#pragma vector ADC10 VECTORinterrupt voidADC10 ISR (void){bic SR register on exit(CPUOFF);// Clear CPUOFF bit from 0(SR)}
SVEC, EEE187. TEST VARIOUS POWER DOWN MODE IN MSP430AIM:The main objective of this experiment is to Configure the MSP-EXP430FRLaunchpad for Low Power Mode (LPM3) and measure current consumption bothin active and low power modes.APPARATUS:1) Code Composer studio software2)MSP430F5529 target Launch-pad3) USB cableTHEORY:The RTC B module is used to set the time, start RTC operation,and read thetime from the respective RTC registers. Software will
Embedded Systems Lab (16BT70432) S. No Rubric 1 Course Outcome Rubric 2 Rubric 3 Score X (Max 5M) (1 -2)M Average (3 4) M Good (5)M Very Good 1 CO1 unable to follow the PO1 DemonstDemonstrate knowledge in designing complex energy efficient embedded systems. Unable to recall the basic theore