Transcription
CatalogLED module.1RGB module.5Button module.8Photoresistor module.10Active buzzer module.14Passive buzzer module.16Touch sensor module.23Tracking module.25Fan module.28Infrared receiving module.31Microphone module.33Potentiometer module.35Ultrasonic module.37
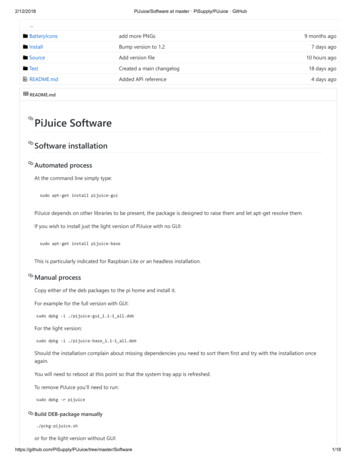
LED module(Red/Yellow/Green/Blue/White)Module description: LED is the abbreviation of light-emitting diode. It is usually made ofgallium arsenide, gallium phosphide semiconductor material. LED has two electrodes, onepositive and one negative. When the positive current passes through, it will light up. It canbe red, blue, green or yellow light, and the color of the light depends on the material it uses.Working voltage:3.3V 5VOutput type:Digital signal. (For analog voltages from 0V to 5V, values (0-255) are alsoallowed to be entered as digital values.)Working mode:4 typeInterface mode:PH2.0 3PModule size:35*26.3mmModule weight:47gPin denifition:INInput VCC-GNDArduino unoExample 1Connection diagram1
Codeint LEDpin 12;// Pin 12 of LEDvoid setup() {pinMode(LEDpin, OUTPUT);}// Define LED pin as output pinvoid loop() {digitalWrite(LEDpin, HIGH);delay(1000);// Write output value is highdigitalWrite(LEDpin, LOW);delay(1000);// Write output value is low}Mixly graphic programming2
Result: after pin 12 is plugged in the L E D light, the L E D light will turn on for one second andoff for one second.Pulse Width Modulation or PWM is a king of technical and digital means to obtain simulationresults. Digital control is used to generate a square wave, and a signal exchange is betweenon and off. These switch modes simulate voltage on 5V and off 0V between voltages. Bychanging the time part of the signal, the duration is compared with the signal stop time. Theduration of the voltage on is called the pulse width. To get different analog values, you canchange the pulse width. For example, led, the result is like a signal between 0V and 5V stablevoltage, to control the brightness of LED. In the following figure, the green line represents afixed time period. In other words, the pulse width modulation frequency with Arduino is about50Hz, and the green line measurement is 20ms each time. Call the analog Write (pin, value),where the value is 0 255, so that the analog Write(pin, 255) requests 100% duty cycle(always open). For example, analog Write(pin, 127) is a 50% duty cycle (half time).Example 2Connection diagram3
Codeint ledPin 10;// Pin 10 ofLEDvoid setup() {pinMode(ledPin,OUTPUT); // Define LED pin as output pin}void loop(){fadeOn(1000,5);fadeOff(1000,5);}// Define fuction, the analog output value of LED is increased one by one according to thecustom increamentvoid fadeOn(unsigned int time,int increament){for (byte value 0 ; value 255; value increament){ analogWrite(ledPin, value);delay(time/(255/5));}}// Define fuction, the analog output value of LED is decreased one by one according to thecustom increamentvoid fadeOff(unsigned int time,int decreament){for (byte value 255; value 0; value- decreament){ analogWrite(ledPin, value);delay(time/(255/5));}}Mixly graphic programmingResult: the LED on pin 10 has a slow process from on to off, rather than directly on and off.。4
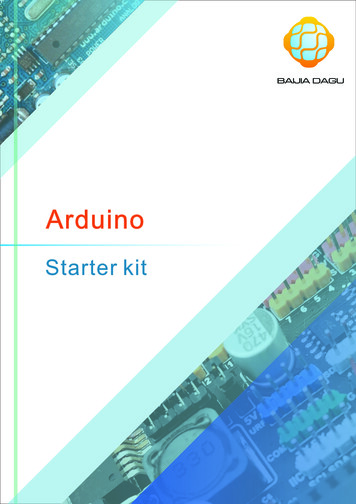
RGB moduleProduct description: RGB LED consists of 3 leds. Each led has a red light, a green light and ablue light. These three colors leds can produce any color. The RGB LED has red, green andblue light transmitters and is usually connected to a common lead (anode or carthode) usingthree wires. The module is a commong cathode led.Working voltage: 3V 5VInput type: PWM. The value (0 255) is input into RDDB three interfaces as digitial value.The color of RGB LED is controled by PWM.Interface mode: pH2.0 4PModule size: 35*26.3mmModule weight: 49gPin denifition:BBlue intputGGreen input-GNDRRed inputArduino unoExample 1Connection diagram5
Codeint redpin 9;// Pin 9 of RGB Red LEDint greenpin 10;// Pin 10 of RGB Green LEDint bluepin 11;// Pin 11 of RGB Blue LEDvoid setup() {pinMode(redpin,OUTPUT);// Define three color of LED pin as output );}void loop() lay(200);}// Define fuction, define write output values separatelyvoid color(int red,int green ,int ,green);analogWrite(bluepin,blue);}6
Mixly graphic programmingResult: Pin R of module connect to Pin 9, G connect to Pin 10, B connect to Pin 11. The RGBled blinks in cycles of red, green, blue and white.7
Button moduleProduct description: Buttons are common components used to control electronic devices.They are usually used as switches to connect or disconnect circuits. Under normalcircumstances, the two contacts of the button are in the open state, and they only closewhen the button is pressed.Working voltage:3.3V to 5VOutput type:Digital signal. Press the key, high level;Release the key, low level.Interface mode:PH2.0 3PModule size:35*26.3mmModule weight:49g.3mmPin definition:OUTOutput VCC-GNDArduino unoExample 1Connection diagram8
Codeint buttonpin 8;// Pin 8 button moduleint LEDpin 12;// Pin 12 of LEDvoid setup() {pinMode(LEDpin, OUTPUT);pinMode(buttonpin,INPUT);}// Define LED pin as output pin// Define button pin as input pinvoid loop() {int state digitalRead(buttonpin);// Read output valueif(state HIGH ){// Check whether the input is high. Press button is high.digitalWrite(LEDpin, HI G H );// Light on status}else{digitalWrite(LEDpin, LOW);// Light off status}}Mixly graphic programmingResult: when you press the button, the LED of Pin 13 will be on. When you release the button,the LED will be off.9
Photoresistor moduleModule description: Photoresistor is a kind of light controlled variable resistor.Photoresistorshave photoconductivity and can be used in photodetectors. Photoresistors are made of highresistance semiconductors. In the dark, the resistance of photoresist can be as high as severalmegaohms (m Ω), while in sufficient light, the resistance of photoresist can be as low as severalhundred ohms. If the incident light on the photoresist exceeds acertain frequency, the photonsare absorbed by the semiconductor to the bound electrons enough energy to jump into theconduction band. The resulting free electrons conduct electricity, thereby reducing resistance.Working voltage: 3.3V 5VOutput type: Digital and analog interfaces. In this module, the stronger the incident light is,the lower the output analog value is.Interface mode: PH2.0 4PModule size: 35*26.3mmModule weight: 42gPin denifition:DODigital outputAOAnalog output-GND VCCArduino unoExample 1Connection diagram10
Codevoid setup() {pinMode(8, OUTPUT);pinMode(A0,INPUT);Serial.begin(9600);}// Pin 8 of LED as output pin// Pin A0 of photoresistor as input pin// Open 9600 serial port with baud ratevoid loop(){int state analogRead(A0); // Read the analog input value of photoresistorSerial.println(state);// Serial port output the analog input value of photoresistorif(state 800){ // Judge whether the analog value of photoresistor input is less than }// Light on status// Light off status}Mixly graphic programmingResult: The analog port of photoresistor conncet to Pin A0, Led connect to Pin 8. Illuminatethe photoresistor module with a flashlight, whether the analog output value is higher than800, the LED is on. Otherwise, the LED is off.11
Example 2Connection diagramCodevoid setup() {pinMode(8, OUTPUT);// Pin 8 of LED as output pinpinMode(9,INPUT);// Pin 9 of photoresistor as input pin Serial.begin(9600); Open 9/6/00 serial port with baud rate}void loop(){int state digitalRead(9); // Read the digital input value of photoresistorSerial.println(state);// Serial port output the digial value of photoresistorif(state){ // Judge where whether the analog value of photoresistor input is highdigitalWrite(8, HIGH);// Light on status}else{digitalWrite(8, LOW);// Light off status}}12
Mixly graphic programmingResult: Digital port of photoresistor connect to Pin 9, LED connect to Pin 8. When the outputdigital sigal of pin 9 is 0, led is on. Otherwise, led is off.13
Active buzzer moduleModule description: Buzzer is a kind of audio signal device. As an integrated electronic buzzer,it is powered by DC voltage and widely used in computers, printers, copiers, alarms,electronictoys, automotive electronic equipment, telephones, timers and other electronic product voiceequipment. According to its driving mode, buzzer can be divided into activebuzzer and passivebuzzer.The difference between the active buzzer and the passive buzzer: the source here does notrefer to the power supply, but refers to the vibration source. That is to say, there is a vibrationsource inside the active buzzer, so as long as the power is on, it will ring, and there is no vibrationsource inside the passive buzzer, so it is impossible to make it ring with DC signal.The buzzer described here is an active buzzer. As long as there is power. We output alternatinghigh and low levels to make the buzzer sound.Working voltage: 3.3V 5VOutput type: Digital outputInterface mode: pH2.0 3PModule size: 35*26.3mmModule weight: 47gPin denifition:INDigital input GND-VCCArduino unoExample 1Connection diagram14
Codevoid setup() {pinMode(8,INPUT);// Define button of Pin 8 as input pinpinMode(9,OUTPUT); // Define active buzzer of Pin 9 as output pin}void loop() {int state digitalRead(8);// Read the button input valueif(state){// Check whether input is high, Press button is );}// Buzzer sounds// Buzzer off}Mixly graphic programResult: button connect to pin 8, buzzer connect pin 9. When press the button, buzzer sounds,when release the button, buzzer off.15
Passive buzzer moduleModule description: Buzzer is a kind of audio signal device. As an integrated electronic buzzer,it is powered by DC voltage and widely used in computers, printers, copiers, alarms,electronictoys, automotive electronic equipment, telephones, timers and other electronic product voiceequipment. According to its driving mode, buzzer can be divided into active buzzer and passivebuzzer. Is the input module, digital interface.The difference between the active buzzer and the passive buzzer: the source here does notrefer to the power supply, but refers to the vibration source. That is to say, there is a vibrationsource inside the active buzzer, so as long as the power is on, it will ring, and there is novibration source inside the passive buzzer, so it is impossible to make it ring with DC signal.The buzzer described here is a passive buzzer.Working voltage: 3.3V 5VOutput type: Digital outputInterface mode: pH2.0 3PModule size: 35*26.3mmModule weight: 40gPin denifition:INInput GND-VCCArduino unoExample 1Connection diagram16
代码float sinVal;int toneVal;void setup() {// put your setup code here, to run once:pinMode(8,OUTPUT);pinMode(10,OUTPUT);}void loop() {// put your main code here, to run repeatedly:for(int x 0;x 180;x ){sinVal (sin(x*(3.1412/180)));toneVal 2000 map(toneVal,2000,3000,10,255));delay(2);}}Mixly graphic programResult: Led connect to pin 10, buzzer connect to pin 8. The buzzer will make a similar alarmlike sound, and the brightness of the light will change with the fluctuation of the sound.17
Example 2Connection diagramCode#define NOTE D0 -1#define NOTE D1 262#define NOTE D2 294#define NOTE D3 330#define NOTE D4 350#define NOTE D5 393#define NOTE D6 441#define NOTE D7 495#define NOTE DL1 131#define NOTE DL2 147#define NOTE DL3 165#define NOTE DL4 175#define NOTE DL5 196#define NOTE DL6 221#define NOTE DL7 248#define NOTE DH1 525#define NOTE DH2 589#define NOTE DH3 661#define NOTE DH4 700#define NOTE DH5 786#define NOTE DH6 882#define NOTE DH7 990//The definition above is to match each note with the frequency valueint tune[] {NOTE D1,NOTE D2,NOTE D3,NOTE D1,NOTE D1,NOTE D2,NOTE D3,NOTE D1,NOTE D3,NOTE D4,NOTE D5,NOTE D3,NOTE D4,NOTE D5,NOTE D5,NOTE D6,NOTE D5,NOTE D4,NOTE D3,NOTE D1,NOTE D5,NOTE D6,NOTE D5,NOTE D4,NOTE D3,NOTE D1,18
NOTE D1,NOTE D5,NOTE D1,NOTE D1,NOTE D5,NOTE D1}; //This part is the note part of the whole piece, which isdefined by a sequence as tune, integerfloat duration[] {1,1,1,1,1,1,1,1,1,1,1 1,1,1,1 1,0.5 0.5,0.25 0.5,0.5 0.5,0.25 0.5,1,1,0.5 0.5,0.25 0.5,0.5 0.5,0.25 0.5,1,1,1,1,1 1,1,1,1 1};//This part is the beat part of the whole song, and also defines the sequence duration andfloating point (the number of arrays is the same as the number of previous notes, one-toone correspondence)int length;//Define a variable, followed by how many notes there areint tonePin 9;//pin of buzzervoid setup(){pinMode(tonePin,OUTPUT); // Setting the pin of buzzer as output modelength sizeof(tune)/sizeof(tune[0]);// Using a sizeof function, you can find out howmany notes there are in the tone sequence}void loop(){ for(int x 0;x length;x )//Number of circular notes{tone(tonePin,tune[x]); //This function plays the array in the tune sequence in turn, that is, each notedelay(400*duration[x]); //The duration of each note is the larger the adjustment time is, the slowerthe music speed is, and the smaller the music speed is, the faster the music speed isnoTone(tonePin);// Stop the current note and enter the next note}delay(5000);// Wait 5 seconds and the cycle starts again}19
Mixly graphic programmingResult: buzzer connect to pin 9, buzzer sounds "two tiger" song.Expansion: use the buzzer to play a song you like!Step 1: get a list of the corresponding sounds (note frequency table) from the song's scoreand the buzzer. Here are two tigers.20
104911781322G786882990104911781322148421
Step 2: Look at the music scoreIn the notation, the blue box shows the tune in C key, so we only need to look at the C line in thenote frequency table (marked in red font). Because there is no high and low tone in the notation,this piece is only used for the C-key part (marked with yellow background) ofthe mid note in thenote frequency table. So we get the note sequence of two tigers. Only notes are not enough. Weneed to add rhythm to notes. Rhythm can be divided into one beat, half beat, one quarter beat,one eighth beat and two beatsThere is a horizontal line behind 5 in the red box of the notation, indicating beat 1. There is adot on the right of 5 in the yellow box of the shorthand score, which means beat 0.5; there is anunderscore below 5, which means beat is 0.5; there are two underscores below 6, which meansbeat is 0.25. The rule is that there is no underline for a single note in time,that is, one beat, halfbeat (0.5) if there is underline, and quarter beat (0.25) if there are two underscores. After thenote, there is "-" equal to beat 1 of the previous note, and after the note, it is a little equal tobeat 0.5 of the previous note. So we get the beat sequence of two tigers.22
Touch sensor moduleModule description: Touch module is a capacitive touch switch module based on touch detection.Normally, the module outputs low level;When touching the corresponding position with fingers,the module will output high level.The module can be installed on the surface of non-metallicmaterials such as plastic and glass.In addition, a thin piece of paper (non- metallic) can becovered on the surface of the module.As long as the touch position is correct, it can be madeinto a key hidden in the wall, desktop and other places.This module can help you to avoid thetrouble of pressing buttons.Working voltage:3.3V 5VOutput type:Digital signalWorking mode:4 typeInterface mode:PH2.0 3PModule size:35*26.3mmModule weight:36gPin denifition:OUTOutput-GND VCCArduino unoExample 1Connection diagram23
Codevoid setup() {pinMode(8,INPUT);pinMode(9,OUTPUT);}// Pin 8 of touch sensor as input pin// Pin 9 of LED as output pinvoid loop() {int state digitalRead(8);//Read module levelif(state){//Judge the level of touch moduledigitalWrite(9,HIGH);//LED on}else{digitalWrite(9,LOW);//LED off}}Mixly graphic programmingResult: touch module connect to pin 8, led connect to pin 9. When touch the sensor of module,led is on. The LED will not turn off until the touch module is no longer touched.24
Tracking moudleModule description: The tracking module is used to transmit light to the road by the infraredtransmitting tube. When the infrared light encounters black, it is absorbed. The receiving tubedoes not receive the reflected light and outputs high level. When the red light meets othercolors, the receiving tube receives the reflected light and outputs a low level. When using analogoutput, the module can be used as a gray-scale sensor. The gray-scale sensor is an analogsensor, which can sense different colors of the ground or desktop and generate correspondingsignals.Operating voltage: 3.3V 5V;Output mode: digital signal, analog signal;Interface mode: pH2.0 6PModule size: 35*26.3mmModule weight: 51g.3mmPin definition:AO-RRight analog inputDO-RRight digital inputAO-LLeft analog inputDO-LLeft digital input-GND VCCArduin uno Example1 Connectiondiagram25
Codeint data[2];void setup() (9600);}void loop() {distanceonD();}void distanceonD(){data[0] digitalRead(9);data[1] digitalRead(12);if(data[0] && data[1]){Serial.println("stop");}if(!data[0] && !data[1]){Serial.println("go");}if(!data[0] && data[1]){Serial.println("right");}if(data[0] && !data[1]){Serial.println("left");}}Result: when the infrared on both sides is blocked, the signal will not be received, and thehigh-level output will prompt "stop"; when the infrared on both sides is not blocked, the signalwill prompt "go"; when the infrared on the left is blocked, the signal will prompt "left";when theinfrared on the right is blocked, the signal will prompt "right".Tips: Try to use a screwdriver to twist the cross port on the L and R of the module. In the testexample, increase and reduce the distance between the detected object and the detectedobject, and observe the output content of the serial port and the movement of the car.26
Example 2Codeint data[2];void setup() l.begin(9600);}void loop() {distanceonA();}void distanceonA(){data[0] analogRead(9);data[1] analogRead(12);if(data[0] 500 && data[1] 500){Serial.println("stop");}if(data[0] 500 && data[1] 500 ){Serial.println("go");}if(data[0] 500 && data[1] 500 ){Serial.println("right");}if(data[0] 500 && data[1] 500 ){Serial.println("left");}}Result: when the infrared tracking module uses the analog signal to input the signal, it can beregarded as the gray-scale sensor. When the gray value on both sides is greater than 500,prompt "stop"; when the gray value on both sides is less than 500, prompt "go"; when thegray value on the left is greater than 500, and the gray value on the right is less than 500,prompt "right"; when the gray value on the left is less than 500, and the gray value on theright is greater than 500, prompt "right"; (500 in the code can be adjusted according to theactual situation)27
Fan moduleModule description: DC motor is a kind of motor that converts DC electric energy into mechanicalenergy. The most common type depends on the force produced by the magnetic field. Almost alltypes of DC motors have some internal mechanism, either electromechanical or electronic, toperiodically change the current flow direction of some motors. Most types produce rotationalmotion; linear motors produce force and linear motion directlyWorking voltage: 5V.Input type: digital signal, PWMInterface mode: ph2.0-4pModule size: 35*26.3mmPin denifition:IAForward digital inputIBReverse digital input-GND VCCControl methodIAIBFunction00Stop01Reverse10ForwardArduino unoExample 1Connection diagram28
Codeconst int IB 6;const int IA 5;int buttonpin A1;boolean state false;void setup() {Serial.begin(9600);pinMode(IA, OUTPUT);pinMode(IB, OUTPUT);digitalWrite(IA, LOW);digitalWrite(IB, LOW);pinMode(buttonpin, INPUT);pinMode(4, INPUT);}void loop(){analogWrite(IA, 0);analogWrite(IB, 0);delay(1000);analogWrite(IA, 0);analogWrite(IB, 255);delay(1000);}29
Mixly graphic programmingResult: IB interface connect to pin 6, IA interface connect to pin 5. After motor rotates for 1 second,stop rotating for 1 second as periodic cycle movement.30
Infrared receiving moduleModule description: The external receiving tube is an electronic device that receives infraredlight. For example, our TV sets, air conditioners and other household appliances need infraredreceivers. We all know that the remote control emits infrared light. It is necessary for the TV tohave an infrared receiver to receive the infrared signal from the remote control.Working voltage: 3.3V 5VOutput type:digital signalInterface mode: pH2.0 3PModule size: 35*26.3mmModule weight: 40gPin denifition:OUTOutput-GND VCCArduino unoExample 1Connection diagram31
CodeBefore we start programming, we need to add the library "irremote. h" for infrared reception.Click "project" - "load library" - "manage library" - "search" irremote ",and install the followingirremote library.After installing the library, you can program it. We found irremote under "file" - "example" - under "third party library example", which provides some examples of the library using infraredreception.code#include IRremote.h int RecvPin 11;//Pin 11 of infrared moduleIRrecv irrecv(RecvPin);// Initialize irrecv instancedecode results results;//Data receivedvoid setup() {Serial.begin(9600);//Open the serial port with baud rate of 9600irrecv.enableIRIn();// Instance allowed to receive data}void loop() {if(irrecv.decode(&results)){//Decode results and determine whether data is receivedSerial.println(results.value,HEX);// The serial port outputs the received data valueand outputs it in hexadecimalirrecv.resume();// Instance allowed to receive data}}Mixly graphic programmingResult: pin 11 is connected to the infrared receiving module, and the serial port window is opened.When the infrared remote control sends information to the infrared receiver, the infrared receivingmodule receives the information and displays it on the serial port window.Later, the received hexcode can be used to control the lights, steering gear, motor and so on32
Microphone module(Sound sensor module)Module description: Output module, digital analog interface. It acts as a microphone. It is usedto receive sound waves and display vibration images, but it can not measure the intensity ofnoise. The sound wave makes the electret film in the microphone vibrate,resulting in the changeof capacitance, thus generating the corresponding change of micro voltage, which is received bythe data collector through digital / analog conversion, and transmitted to the control board.Ao analog output microphone's received sound signal in real time Do when the sound intensityreaches a certain threshold, the low-level signal is output (which can be adjusted by R2 on themodule). Because the time of outputting the low-level signal is very short, in order to captureuseful information, information filtering or interruption is used to present, here informationfiltering is used.Working voltage: 3.3V 5VOutput type: Digital output, analog outputInterface mode: pH2.0 4PModule size: 35*26.3mmModule weight: 50gPin denifition:DODigital outputAOAnalog output-GND VCCArduinoExample 1Connection diagram33
Codevoid setup() {// put your setup code here, to run 0,INPUT);pinMode(11, OUTPUT);}void loop() {int astate analogRead(A0);int dstate digitalRead(8);if(dstate 0){Serial.print("Digital ("Analog interface: te, 1, 1023, 1, 255)));}else {digitalWrite(11,LOW);}}Results: the do of the module was connected to pin 8, clapped at the microphone, and the LEDlight at the do of the module was on; on the contrary, the LED light was off. When rotating thecrosshead on R2, it will be found that the higher the sensitivity of the module to sound will be ifit rotates anticlockwise; when an active buzzer is added and the crosshead on R1 is rotated, itwill be found that the module will amplify the received sound signal in different multiples, andthe greater the received sound, the more obvious the amplification effect.34
Potentiometer moduleModule description: Potentiometer is a kind of three terminal resistance element whose resistancecan be changed according to certain rules. It usually consists of a resistance element and a movablebrush. When the brush moves along the element, a resistance or voltage is generated at the terminalrelative to its moving distance.Working voltage: 3.3V 5VOutput type: Obtain the digital output of the potentiometer switch and the analog outputof the potentiometer value (0-1023).Interface mode: PH2.0 4PModule size: 35*26.3mmModule weight: 93gPin denifition:AUTOAnalog outputSWDigital output-GND VCCArduino unoExample 1Connection diagram35
Codevoid setup() TPUT);Serial.begin(9600);// Pin 10 of pin SW of potentiometer as input pin// Pin A0 of pin AOUT of potentiometer as input pin// Pin 11 of LED as output// Open 9600 serial port with baud rate}void loop() {int state digitalRead(10); // Read the level of pin SW, High level means the key is notpressed, low level means the key is pressedint value analogRead(A0); // Read the analog value of pin AOUT, 0 1023if(state 0){ // Judge whether you press the keyanalogWrite(11,map(value,0,1023,10,255)); // Change the brightness according to theanalog value of potentiometer input}else{digitalWrite(11,LOW); // LED off}Serial.println(value); // Serial port output potentiometer analog value}Mixly graphic programmingResults: pin 10 was connected to the digital interface of the potentiometer, pin A0 to the analoginterface of the potentiometer, and pin 11 to the LED lamp. The brightness of the LED lightchanges with the twist of the potentiometer.36
Ultrasonic ModuleModule description: This module is used to measure the distance. By sending and receivingultrasonic waves, it measures the time required for the sound to rebound from the object andreturn to the sensor. Using the time difference and sound propagation speed, it calculatesthe distance between the module and the obstacles in front.Working voltage: 3.3V 5VMinimum measurement distance measurement: 2cmMaximum measurement distance measurement: 350cmType: Echo is the input digital signal, trig is the output digital signal.Interface mode: Ph2.0-4pModule size: 35*26.3mmModule weight: 86gPin definition:EchoReceive inputTrigSend output-GND VCCWorking principle: input a high level of more than 10us to trig pin to trigger module ranging.When the ranging is finished, the echo pin will output a high level, and the level width is thesum of the ultrasonic round-trip time.37
Arduino unoExample 1Connection diagramCodevoid setup() (9600);}// Pin 13 of send as output pin// Pin 12 of receiver as input pin// Open 9600 serial port with baud ratevoid loop() {digitalWrite(13,LOW);// Trigger ultrasonic delayMicroseconds(10);digitalWrite(13,LOW);int distance pulseIn(12,HIGH)/58;// Calculate distanceSerial.println(distance);// Output distance of serial portdelay(200);// Delay 200ms}38
Mixly graphic programmingResult: Trig connect to pin 13, Echo connect to pin 12. Open serial port, the obstacles in frontof the mobile ultrasonic ranging module and the data output to the serial port change.Explanation: the time returned by pulsein() is the time when the ultrasound is sent to the receiver,the unit is subtle, and the sound speed is 340m / s. because distance speed *time, the distance(CM) 340 * 100 / 1000000 * pulsein() / 2, that is, distance (CM) pulsein() / 58.39
Arduino uno Example 1 Connection diagram 5 Product description: RGB LED consists of 3 leds. Each led has a red light, a green light and a blue light. These three colors leds can produce any color. The RGB LED has red, green and blue light transmitters and is usually connecte