Transcription
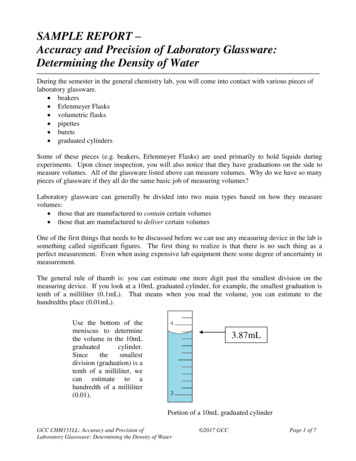
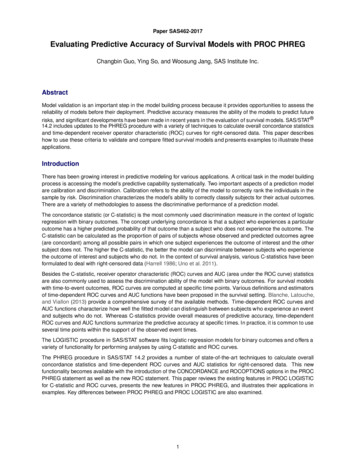
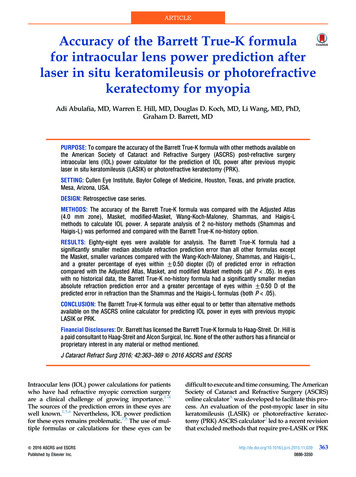
Accuracy and Precision of Laboratory Glassware:Determining the Density of WaterDuring the semester in the general chemistry lab, you will come into contact with various pieces oflaboratory glassware. beakers Erlenmeyer Flasks volumetric flasks pipettes burets graduated cylindersSome of these pieces (e.g. beakers, Erlenmeyer Flasks) are used primarily to hold liquids duringexperiments. Upon closer inspection, you will also notice that they have graduations on the side tomeasure volumes. All of the glassware listed above can measure volumes. Why do we have so manypieces of glassware if they all do the same basic job of measuring volumes?Laboratory glassware can generally be divided into two main types based on how they measurevolumes: those that are manufactured to contain certain volumes those that are manufactured to deliver certain volumesOne of the first things that needs to be discussed before we can use any measuring device in the lab issomething called significant figures. The first thing to realize is that there is no such thing as aperfect measurement. Even when using expensive lab equipment there some degree of uncertainty inmeasurement.The general rule of thumb is: you can estimate one more digit past the smallest division on themeasuring device. If you look at a 10mL graduated cylinder, for example, the smallest graduation istenth of a milliliter (0.1mL). That means when you read the volume, you can estimate to thehundredths place (0.01mL).Use the bottom of themeniscus to determinethe volume in the 10mLgraduatedcylinder.Sincethesmallestdivision (graduation) is atenth of a milliliter, wecan estimate to ahundredth of a milliliter(0.01).3.87mLPortion of a 10mL graduated cylinderGCC CHM151LL: Accuracy and Precision ofLaboratory Glassware: Determining the Density of Water 2013 GCCPage 1 of 9
However, some glassware such as volumetric flasks and volumetric pipettes only have a single line toindicate volume. This is because they are made to measure just one specific volume. In the case ofthe glassware used in general chemistry lab, both the 10mL volumetric pipette and 50mL volumetricflask will have two sig figs after the decimal point (i.e. 10.00mL and 50.00mL).For the 150mL beaker and the kitchen measuring cup, assume that 50.mL has two sig figs (it will notbe obvious based on the volume markings).Recording and analyzing lab data:If a metal rod has known a length of 1.23 cm and you measure its length using three differentmeasuring devices (A, B, and C), you obtain the following data.Data Table: Measured Lengths of Device A, B, and CTrial 1Trial 2Trial 3Trial 4Device A(cm)1.431.431.431.42Device B(cm)1.241.231.251.22Device C(cm)1.191.231.221.26The first thing we like to is to find an average from our multiple trials. As you may know, there aredifferent types of averages. The types you may have heard about in your math classes are most likelymean, median, and mode. Many times when we say “average” or “simple average” we are actuallyreferring specifically to the mean. A mean is calculated as follows: add all of the values together anddivide by the number of values. For example:(1.43 1.43 1.43 1.42) 1.4 275 or 1.43cm (Based on sig. figs.)4The “2” is underlined in the unrounded answer because based on the addition rule, when the answeris rounded, it should have three total sig figs. If I want to use the unrounded number for anothercalculation in the future, the underline will remind me of the sig figs that number actually has. The“4” that it is in the denominator of the equation is an exact number and therefore has an infinitenumber of sig figs.Using the same formula we can then calculate a mean for the other measuring devices:AverageDevice A (cm)1.43Device B (cm)1.24Device C (cm)1.23How do we describe how “good” these measuring devices are based on our measurements andmeans? There are two ways we can describe these measurements – by their accuracy and precision.Accuracy is a measure of how close your measured value is to the true value or other standard.Although sometimes we use qualitative (verbal) words to describe the accuracy (such as goodaccuracy and bad accuracy), a quantitative (numerical) measure is more useful when comparingGCC CHM151LL: Accuracy and Precision ofLaboratory Glassware: Determining the Density of Water 2013 GCCPage 2 of 9
measuring devices based on laboratory data. Our quantitative measure of accuracy is called percenterror.Percent Error (Experimen tal Value - Theoretical Value)x 100Theoretical ValueSo, for each measuring device, using the averages calculated previously, we can calculate a percenterror. If you use the values from Device A:Percent Error 1.4 275 - 1.23x 100 16%1.23The lower the percent error is, the more accurate the measuring device is. In this case the mean forDevice A had a 16% error from the true value of the length of the metal rod.(Notice that when calculating percent error, we used some extra significant figures from ourcalculation of the mean. This is done to minimize rounding errors; errors that come from roundingand then using a rounded number in the next calculation. Remember it’s always best to round onlywhen you need to report a number, as in a table. If you need to use a calculated number in anothercalculation, use the unrounded number.)Percent ErrorDevice A(cm)16%Device B(cm)0.5%Device C(cm)0.5%You’re probably wondering why the percent error for device A has two significant figures while theothers only have one. If you look at the formula for percent error, you will notice that the first step issubtraction. Thus, we must use the addition/subtraction rule. So, for device A, when we take 1.4275(unrounded average) and subtract 1.23 we get 0.1975. Since the numbers that are being subtractedeach has two sig figs after the decimal point, based on the addition/subtraction rule, the answer canonly have two sig figs after the decimal point: 0.1975. Then, once we divide the answer by 1.23 andmultiply by 100 (an exact number), we have a number with two sig figs, divided by a number withthree sig figs. Based on the multiplication/division rule, our answer can only have two sig figs. Thesame logic gives only one sig fig for device A and B (do the calculations step by step to see foryourself).Precision is a measure of how close repeated measurements are to each other.Like accuracy, we can describe precision in qualitative terms (such as high precision and lowprecision).So, which measuring device is “best” to use? We want a device that is both accurate and precise.Based on our experimental data, using the percent error we calculated, we can see that Devices B andC have better accuracy than A. Therefore, we will need to look at the precision of these devices inorder to make our final selection. Looking at the measurements, we can see that Device B has ahigher degree of precision (lower standard deviation) than C. Therefore, Device B has the bestcombination of accuracy and precision.GCC CHM151LL: Accuracy and Precision ofLaboratory Glassware: Determining the Density of Water 2013 GCCPage 3 of 9
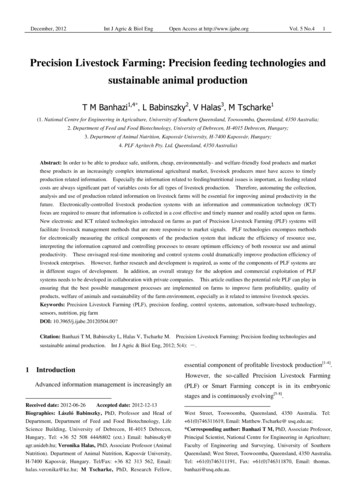
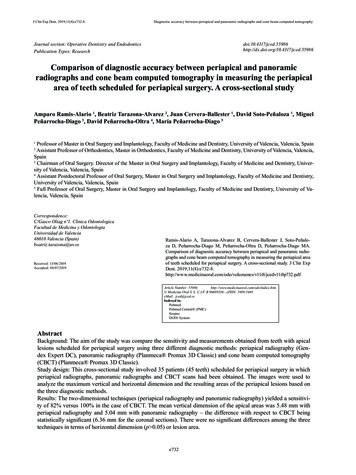
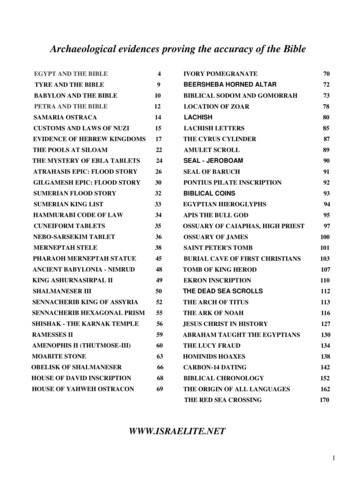
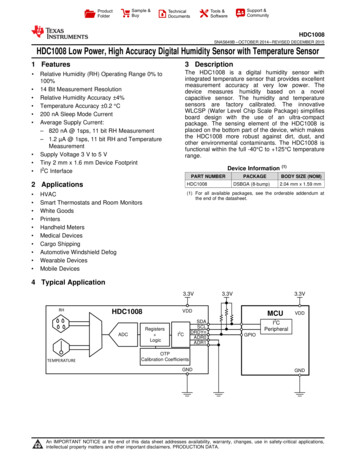
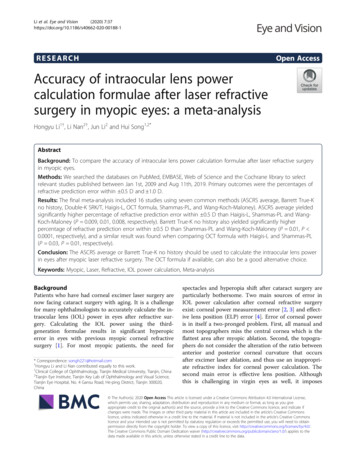
Using a buret 12.14mLFilling the buret: Close the stopcock. Use thebeaker of water and a funnel to fill the buretabout 1 mL above the “0” mark. Place acontainer under the buret tip and open thestopcock slowly. The buret tip should fill withsolution, leaving no air bubbles. If the tip doesnot fill with solution, ask the instructor for help.Continue to let out solution until the liquid levelis at “0” or below.Like other pieces ofglassware, the level in aburet is read at the bottomof the meniscus. However,the graduations are “upsidedown” compared to theother glassware.Reading the buret: Record the volume bynoting the bottom of the meniscus. (Be surethat the meniscus is at eye level). If this readingis exactly “0,” record 0.00 mL. Otherwise, countthe number of markings between each number,and estimate to the nearest 0.01 mLPortion of a 50mL buretUsing a pipette Place the pump loosely on the top of the pipet. Place itjust far enough on the pipete to get an air-tight seal.Position the tip of the bulb below the liquid level in thebeaker. With your thumb, roll the wheel on the pumpallowing the water to enter the tip of the pipete. Fill thepipet well above the calibration line (etched or markedabove the wide center section of the pipet), taking carenot to get liquid into the pipet pump.Slide the pump off the pipet while quickly sliding yourindex finger or thumb over the top of the pipet. Moveyour finger slightly and rotate the pipet to allow theliquid level to drop to the calibration line on the pipet.Then press down harder with your finger and transferthe tip of the pipet into a position over the container.10.00mLPortion of a 10mL pipete Remove your finger and allow most of the liquid to drain out. Then hold the tip of the pipetagainst the inside of the container for about 10 seconds to allow more liquid to drain. Do not try to remove the small amount of liquid remaining in the tip. Pipets are calibrated toretain this amount.GCC CHM151LL: Accuracy and Precision ofLaboratory Glassware: Determining the Density of Water 2013 GCCPage 4 of 9
**Lab Notebook**In your lab notebook, create a separate data table for each piece of glassware used. Be sure to labeland title each table so you can easily identify the information contained in each one. (For example,the table for the 150 mL beaker might look like the following:Table 1. Volumes and masses for 150 mL beakerMass of empty beaker:Temperature of water:TrialMass of beakerwith waterMass of waterVolume ofwaterDensity123Procedure: Part I1. Obtain approximately 100mL of de-ionized in a 250mL beaker. Place the beaker on a foldedpiece of paper towel on the bench. Place a thermometer in the water. Record the temperatureafter there is no change in temperature for at least ten minutes. This water will be used for all ofthe experiments. Find the CRC Handbook of Chemistry and Physics located in your laboratory.Using the CRC Handbook, look-up and record the following information: The density of water at the exact temperature you measured (notice that the units in the bookare kg m-3, which is the same as kg/m3. You will need to convert to g/mL. Show this work inyour lab notebook. Remember 1mL 1cm3).You will also need to record the following values from the CRC Handbook to answer postlab questions:o The density of water ten degrees higher than the temperature you measured.o The temperature at which the density of water is the highest.2. Obtain one of the pieces of glassware listed the Table 2. Ensure that it is dry and determine itsempty mass using an analytical balance. Make sure all of the doors of the balance are closed, asair currents in the lab can affect the balance. Record its mass in the Data Table. Remove theglassware from the balance.Table 2. Laboratory glassware manufactured to contain specific volumesType of glasswareVolume of de-ionizedwater to add150mL beaker50mL100mL graduated cylinder50mLGCC CHM151LL: Accuracy and Precision ofLaboratory Glassware: Determining the Density of Water 2013 GCCPage 5 of 9
50mL volumetric flask*50mLKitchen measuring cup**50mL10 mL graduated cylinder10mL* can only measure a single volume** actually made of plastic3. From the 250mL beaker, transfer a little less than the volume of water listed for the glasswarefrom Table 2. Use a plastic disposable pipette to add the water drop-wise until the bottom of themeniscus is on the line that corresponds to the volume listed in Table 2. If too much water wasadded, remove the extra water using the plastic disposable pipette. Wipe down the outside andbottom of the beaker in case any water was spilled during the transfer.4. Using the same balance as before, record the mass of the glassware with the added water.5. Pour the water from the glassware back into the 250mL beaker and repeat steps 3-4 two moretimes with the same piece of glassware. You should have a total of three trials. You will use theempty mass from step 2 for all three trials.6. You will then repeat the process (three trials each) with each piece of glassware listed in Table 2.Procedure: Part IIThe proper use of a pipette is a skill that takes time and practice to perfect. Therefore, you shouldperform at least three practice runs of filling the pipette and delivering the water back to the 250mLbeaker. For the glassware in Table 3, the glassware will be used to transfer water to a beaker forweighing.1.Obtain a dry 50mL beaker and determine the mass of the dry, empty container.2. Obtain the glassware listed in Table 3. For each type of glassware, deliver the indicated volumeto the 50mL beaker. For the buret, record initial and final buret readings in a table along with theamount of water delivered to the beaker. Weigh the beaker with the water.3. Repeat the process so that you have three trials with each type of glassware.Table 3. Laboratory glassware manufactured to deliver specific volumesType of glasswareVolume of de-ionizedwater to dispense50mL buret10mL10mL volumetric pipette*10mL* can only measure a single volumeGCC CHM151LL: Accuracy and Precision ofLaboratory Glassware: Determining the Density of Water 2013 GCCPage 6 of 9
CalculationsComplete your data tables by calculating the mass of water for each trial. Using this value, calculatethe density of water in units of grams per milliliter (g/mL) for each trial using the formula for density(density mass/volume).**Lab Notebook**Next create a Summary Table that summarizes the percent error for each piece of glassware. List theglassware in order of the smallest percent error (best) to the largest percent error (worst).Summary TableRank basedon % errorGlassware% Error1237GCC CHM151LL: Accuracy and Precision ofLaboratory Glassware: Determining the Density of Water 2013 GCCPage 7 of 9
Accuracy and Precision of Laboratory Glassware:Determining the density of waterName:Section Number:Turn this page in. Include thecopies from your lab not
However, some glassware such as volumetric flasks and volumetric pipettes only have a single line to indicate volume. This is because they are made to measure just one specific volume. In the case of the glassware used in general chemistry lab, both the 10mL volumetric pipette and 50mL volumetric flask will have two sig figs after the decimal point (i.e. 10.00mL and 50.00mL). For the 150mL .