Transcription
An Introduction to Robotics and JavaProgramming
Copyright 2005-2007 by RidgeSoft, LLC. All rights reserved.RidgeSoft , RoboJDEand IntelliBrainare trademarks of RidgeSoft, LLC.Java and all Java-based marks are trademarks or registered trademarks of SunMicrosystems, Inc. in the United States and other countries. All other brand or productnames are trademarks of their respective owners.RidgeSoft, LLCPO Box 482Pleasanton, CA 94566www.ridgesoft.comRevision 2ii
Table of ContentsINTRODUCING THE INTELLIBRAIN-BOT. 1INTELLIBRAIN-BOT EDUCATIONAL ROBOT DESIGN . 2A HANDS-ON DEMONSTRATION . 5SUMMARY. 12EXERCISES . 12PROGRAMMING THE INTELLIBRAIN-BOT. 19CREATING A NEW PROJECT. 19CONNECTING THE ROBOT TO YOUR COMPUTER . 21RUNNING YOUR FIRST PROGRAM . 22PROGRAMMING CONCEPTS . 23DEBUGGING YOUR PROGRAMS . 26SUMMARY. 32EXERCISES . 32MANEUVERING THE INTELLIBRAIN-BOT . 33DIFFERENTIAL DRIVE ROBOTS. 33PROGRAMMING SIMPLE MANEUVERS . 34COMBINING SIMPLE MANEUVERS . 38SUMMARY. 45EXERCISES . 46INTERACTING WITH THE INTELLIBRAIN-BOT . 49USING TEXT OUTPUT . 49USING LEDS . 51USING THE THUMBWHEEL . 55ARITHMETIC OPERATIONS . 56USING PUSH BUTTONS . 59LOGICAL OPERATORS AND BOOLEAN VARIABLES . 60TEACHING THE ROBOT NEW TRICKS . 61SWITCH STATEMENTS . 63USING THE BUZZER. 66PLAYING A TUNE . 66USING A UNIVERSAL REMOTE CONTROL . 68SUMMARY. 74EXERCISES . 74INTRODUCTION TO SENSING . 77SONAR RANGE SENSING . 77USING THE PING))) SENSOR . 82SUMMARY. 90EXERCISES . 90LINE FOLLOWING . 91LINE SENSING . 91FOLLOWING A LINE USING ONE SENSOR . 94FOLLOWING A LINE USING TWO SENSORS . 97SUMMARY. 106EXERCISES . 107iii
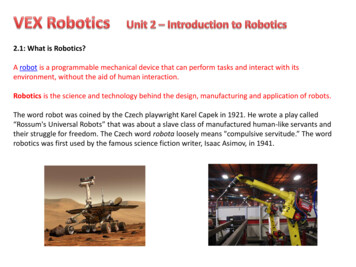
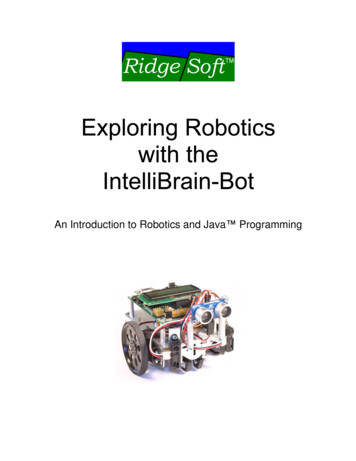
CHAPTER 1Introducing the IntelliBrain-BotThroughout this book we will be using the IntelliBrain -Bot Deluxe educational robot tolearn about the emerging field of robotics. The IntelliBrain-Bot educational robot is apre-designed mobile robot, which will allow us to focus our discussion primarily onrobotics programming, using the companion Java -enabled robotics softwaredevelopment environment, RoboJDE . Before we get started programming the robot,let s first take a look at the mechanical and electronics components which make up theIntelliBrain-Bot educational robot.LCDAluminumchassisIntelliBrain 2robotics controllerUltrasonicrange sensorInfrared wheelencoder sensorInfrared rangesensorDrive wheelServo motorInfrared linesensorFigure 1-1 - IntelliBrain-Bot Deluxe Educational Robot1
IntelliBrain-Bot Educational Robot DesignFigure 1-1 shows a fully assembled IntelliBrain-Bot Deluxe educational robot. As youcan see in the figure, the robot is made up of the following major parts:IntelliBrain 2 robotics controller with LCD displayaluminum chassisservo motorswheelsassorted hardwaresensorsbattery holder (not visible, under chassis)batteries (not visible, under chassis)MechanicsThe IntelliBrain-Bot educational robot employs a simple mechanical design. Analuminum chassis fabricated from a single piece of sheet metal provides a sturdy centralstructure for the robot. Two motors mounted on the underside of the chassis drive thetwo large wheels, enabling the robot to move under its own power. A ball tail wheelsupports the back end of the robot. The robotics controller, sensors, motors, tail wheeland battery holder mount directly on the chassis.13 Digital Inputs/Outputs7 Analog / Digital InputsCOM2 PortInfrared Transmitter- RS-232, 115.2K baud- CMUcam ready(6V regulated power)Infrared Receiver- Sony/Universal TV remotecompatible5 I2C Ports8 Servo Ports- 5 with power- 3 signal onlyJavaProgrammableAtmel ATmega128MicrocontrollerRoboJDE v1.5.0r1Ready16x2 LCD Display-14.7MHz128K flash program memory132K RAM4K bytes EEPROM6 Programmable LEDsBuzzerThumbwheel2 DC Motor PortsMounting HolesBattery Power- 4-6 alkaline, NiCd,or NiMH batteries- IntelliBrain-Bot- Your custom robot- Lego grid compatibleSTART STOPWall BrickPower Connector2 Push ButtonsPower SwitchCOM1 Port- RS-232, 115.2K baud- Host interface or generalpurpose- Bluetooth ready(5V pin 9 power)Figure 1-2 - IntelliBrain 2 Robotics Controller2 IntelliBrain-Bot Educational Robot Design
IntelliBrain 2 Robotics ControllerThe IntelliBrain 2 robotics controller, depicted in Figure 1-2, is the IntelliBrain-Boteducational robot s brain. A Java program executing on the IntelliBrain roboticscontroller enables the robot to function independently, analyzing input from the robot ssensors and by controlling the robot s motors to achieve desired results. By creating andloading different programs you can program the robot to perform a wide range offunctions. A program can be very simple or quite complex. A program may be as trivialas displaying your name on the LCD screen or as complex as a program that controls asearch and rescue robot.Sensor and Motor PortsSensors and motors connect to the IntelliBrain 2 robotics controller via input and outputports. As you can see in Figure 1-1 and Figure 1-2, most of these ports consist ofconnector pins along the front edge (top edge in Figure 1-2) of the controller board. Eachport has three or four pins: ground, power and signal pins. The ports are arranged sideby-side across the forward edge of the controller s circuit board. Each port is marked bya label on the controller board, which indicates the type of port and the number of theport. Table 1-1describes the ports available on the IntelliBrain 2 robotics controller.Table 1-1 - IntelliBrain 2 Robotics Controller PortsPort rM1, M2SerialCOM1,COM2DescriptionAnalog ports use an analog to digital converter to read avoltage between 0 and 5 volts and convert it to an integervalue between 0 and 1023, where 0 corresponds to 0 voltsand 1023 corresponds to 5 volts.Digital ports input or output a Boolean (on/off ortrue/false) signal. When configured as an output, a digitalport outputs 0 volts when it is off (false) and 5 volts whenit is on (true). When configured as an input, a digital portreturns a false value when the signal is low (nearest 0volts) and true when the signal is high (nearest 5 volts).Servo ports interface directly to hobby servo motors.Servo motors were originally developed for use in modelairplanes and, due to their light weight, low cost andsimple electronics, are now commonly used in smallrobots.Motor ports interface directly with conventional DCmotors, using pulse width modulation (PWM) to vary thepower output by each motor.Serial ports interface to more complex sensors such ascameras and Global Positioning System (GPS) devices.By attaching a Bluetooth serial adapter to a serial port therobot can communicate wirelessly to a host computer orother robots. The COM1 port also serves as theconnection to a PC when developing a program using theRoboJDE development environment.Introducing the IntelliBrain-Bot 3
Port I2C (pronounced i-two-c) ports interface to more advancedsensors and effectors such as compass sensors and speechsynthesizers. There are five port headers for I2C devices.The I2C ports are not numbered individually because I2Cdevice addressing is controlled in software, not by thephysical connection.The infrared transmitter provides a signal an on/off signalthat can be detected by the infrared receiver (describedbelow). This can be used for simple communicationbetween robots to signal a Boolean (on/off) value, forexample, signaling another robot to stop or go.Human Interface FeaturesIn addition to providing the ability to execute a Java program and to interface to sensorsand motors, the IntelliBrain 2 robotics controller provides a number of features whichmake it easy to program the robot to interact with people. Table 1-2 lists these features.Table 1-2 - Human Interface FeaturesDeviceLiquid CrystalDisplayPush ButtonThumbwheelBuzzerUniversal remotecontrol receiverLight EmittingDiodes (LEDs)DescriptionThe Liquid Crystal Display (LCD) screen provides two, sixteencharacter lines of output. The LCD is useful to directly displaysensor readings, providing an easy way to learn about and diagnoseproblems with sensors. The display is also useful for providing asimple menu-based user interface.Two push buttons, labeled START and STOP may be used like thebuttons on a mouse, allowing a human to indicate choices. Bydefault the buttons start and stop the Java program, but yourprogram can use them for other purposes.The thumbwheel works like a volume control knob on a car stereo.It provides a means for users to vary the setting of an analog value,such as motor speed, or a way to scroll through screens of output onthe LCD display.The buzzer can be programmed to beep, click or play a tune.The universal remote control receiver allows the program to takeinput from a universal remote control, giving a human the ability toremotely control the robot or provide a keyboard type input for amore sophisticated human interface.Seven LEDs provide visual indications to humans. Six of these canbe turned on, off or blinked under program control to provide avisual indication to the user. Three of the program controlled LEDsare green and three are red. The left most LED is a power indicator,which illuminates green when power is on. It cannot be controlledby the program. The LEDs are numbered 1 through 6, starting withthe LED to the right of the power LED.4 IntelliBrain-Bot Educational Robot Design
SensorsThe IntelliBrain-Bot Deluxe educational robot comes with seven sensors described inTable 1-3.Table 1-3IntelliBrain-Bot Deluxe Educational Robot SensorsSensorWheel EncoderSensor (2)DescriptionTwo wheel encoder sensors sense movement of the robot s wheels.These sensors use reflected infrared light to sense if a hole or aspoke is in front of the sensor.Line Sensor (2)Two line sensors mounted on the underside of the robot sense thepresence of a non-reflective line. These sensors use infrared light tosense the reflectivity of the surface below the robot, allowing it tofollow the course of a non-reflective, black line over a highlyreflective, white background.Infrared RangeTwo infrared range sensors sense the distance to objects between 4Sensor (2)and 30 inches in front of the robot. These sensors measure the angleof reflection of a narrow beam of infrared light to determine thedistance to objects within their range. They can be used to detectand avoid obstacles in the robot s path.Ultrasonic Range One ultrasonic range sensor senses the distance to an object betweenSensor1.2 and 118 inches in front of the robot. This sensor measuresdistance by issuing a brief pulse of high frequency sound, a ping,and precisely measuring the time until the first echo returns. Usingspeed-of-sound calculations the distance to an object can beprecisely determined. This sensor can be used to identify far offobjects, walls and hallways. It is also can be used to create aninvisible tractor beam, as you will observe later in this lesson.BatteriesChemical energy in the four AA batteries mounted in the battery holder, on the undersideof the chassis, provides the energy to power the motors and electronics.A Hands-on DemonstrationNow for some fun, let s take a few minutes to see what the IntelliBrain-Bot educationalrobot can do.Note: Your lab instructor should have loaded the IntelliBrain-Bot demo program into theflash memory of your robot and made sure the batteries are fully charged prior to thisexercise.The demo program provides examples of the robot using various sensors to performdifferent behaviors. It also provides a simple user interface, demonstrating the use of theIntelliBrain 2 robotics controller s human interface features, as well as a Sony compatibleuniversal remote control. Finally, it provides a simple means to verify that each sensor isproperly connected and functioning correctly.Introducing the IntelliBrain-Bot 5
Using the IntelliBrain-Bot Demo ProgramThe user interface of the IntelliBrain-Bot demo program enables you to toggle through alist of pre-programmed functions (behaviors) the robot can perform to select the functionyou want the robot to demonstrate. Try this by completing the following steps:1. Switch the power on.The power switch is located toward the left side of the rear edge of theIntelliBrain 2 robotics controller, just left of the push buttons labeled START andSTOP. Slide it toward the front of the robot.2. Press the button labeled START.This will start the demo program. You should see the following displayed on theLCD screen:Select FunctionDo NothingThe first line of text is telling you to select a function for the robot to perform.The second line is the name of the function.3. Press the button labeled STOP.The stop button is typically used to stop your Java program. However, it can alsobe used for other purposes. The demo program uses it to allow you to scrollthrough the list of functions.You should see the following displayed on the LCD screen:Select FunctionPlay Tune4. Press the STOP button repeatedly, observing the various functions which areavailable.The available functions are described in Table 1-4.5. Continue to press the STOP button until the Play Tune function is displayed.6. Press the START button.The robot will play Beethoven s tune, Ode to Joy, using the buzzer.7. Switch the power switch to the off position.6 A Hands-on Demonstration
Table 1-4IntelliBrain-Bot Demo Program FunctionsFunctionDo NothingPlay TuneRemote ControlNavigate ForwardRotate 180Navigate SquareRandom DanceFollow LineAvoid ObstaclesFollow ObjectDescriptionThe robot does not attempt to move. This allows you to test thesensors. You will find this is extremely useful for debuggingsensor problems.Plays Beethoven s tune, Ode to Joy, using the buzzer.Allows you to remotely control the robot using a Sony compatibleinfrared remote control. Use the channel up button to move therobot forward, the channel down button to move it backward, thevolume up button to rotate right and the volume down button torotate left. (Requires a Sony compatible infrared remote control.Most universal remote controls will work if programmed for aSony television.)Uses wheel encoder sensors and navigation classes (provided inthe RoboJDE class library) to navigate the robot straight ahead 24inches.Uses wheel encoder sensors and navigation classes to rotate therobot in place 180 degrees.Uses wheel encoder sensors and navigation classes to navigate therobot around a 16 inch square.Uses software generated random numbers to perform a dancemade up of random steps.Uses line sensors to enable your robot to follow a black line on awhite surface.Uses wheel encoder sensors, navigation classes, and infrared rangesensors to navigate your robot 24 inches forward and back towhere it started, avoiding obstacles along the way.Uses the ultrasonic range sensor to maintain a distance of 6 inchesfrom an object in front of your robot, creating a tractor beameffect.Testing SensorsOnce you have selected a function in the demo program and started it running, the LCDscreen switches to displaying screens which give you a glimpse into the robot s view ofthe world. This will allow you to verify that all of the sensors are functioning properly.Let s peer into the robot s brain to verify each sensor is operating properly.1. Switch the power on.2. Press START.Do Nothing should appear on the second line of the display. If it doesn t, pressSTOP repeatedly until it displays.Introducing the IntelliBrain-Bot 7
3. Press START again.4. Use your finger to rotate the thumbwheel, observing the different screens whichdisplay as you move the wheel.The screens are described in Table 1-5.Table 1-5IntelliBrain-Bot Demo Program ScreensDisplayIntelliBrainBotL WheelR WheelL LineR LineL RangeR RangeSonar RangeL EncR EncPoseDescriptionDisplays the program name and version.Displays the current raw analog values reported by the left andright wheel sensors. Turn a wheel and observe the change in thevalue reported by the associated sensor as spokes and holes pass infront of the sensor.Displays the current raw analog values reported by the left andright line sensors.Displays the current raw analog values reported by the left andright infrared range sensors.Displays the distance in inches to the nearest object in front of thesonar range sensor.Displays the current count values maintained by the encoders.Turn a wheel and observe the change in the count value. Note:the counter will not sense changes in direction when you turn thewheel by hand.Displays the x and y coordinates of the robot in inches from thestarting point and the heading in radians, with zero being thedirection the robot was facing when the program started.Wheel Encoder Sensors5. Rotate the thumbwheel until you see the display referring to the wheel sensors.6. Hold the robot in your right hand and use your left hand to slowly rotate the leftwheel.Observe that the sensor reading displayed to the right of L Wheel variesbetween a low value of approximately 40 and a high value of approximately 1000as you rotate the wheel. (The numbers are the readings of the sensors. In laterchapters you will learn about how the IntelliBrain 2 controller uses its analog-todigital converter to sample sensor readings.)7. Switch hands and repeat the previous step, this time testing the right wheel sensor.8 A Hands-on Demonstration
Line Sensors8. Rotate the thumbwheel until you see the display referring to the line sensors.9. Set the robot down with the sensors over a bright white surface. For example, thewhite area of the line following poster.Observe that both line sensors report a reading, below 300.10. Set the robot down with the sensors over a non-reflective black surface. Forexample, the black line on the line following poser.Observe that both line sensors report a high reading, above 300.11. Set the robot down with one sensor over a bright white surface and the othersensor over a non-reflective black surface. For example, straddling the line on theline following poster.Observe that the sensor over the white surface reads low, while the sensor of theblack surface reads high.Ultrasonic Range Sensor12. Rotate the thumbwheel until you see the display referring to the left and rightrange sensors.13. Hold the robot up such that there are no objects within four feet of the robot.Observe that both sensors read a very low value, typically less than 10.14. Hold your hand approximately 3 inches in front of the left range sensor.Observe the left sensor reading is approximately 500.15. Repeat the previous step for the right range sensor.Sonar Range Sensor16. Rotate the thumbwheel until you see the display referring to the sonar sensor.17. Hold your hand in front of the sonar sensor.Observe as you move your hand the distance value displayed on the screen tracksthe distance your hand is from the sensor.Introducing the IntelliBrain-Bot 9
18. Switch the power off.Tractor Beam DemonstrationThe Follow Object function of the demo program implements an invisible tractorbeam by using the sonar range sensor to maintain a fixed distance of 6 inches betweenthe robot and an object ahead of it.1. Set the robot on the floor with a few feet of clear space around it.2. Start the demo program and select the Follow Object function.3. Place your hand approximately six inches in front of the robot.4. Slowly move your hand away from the robot.Observe the robot follows your hand forward.5. Slowly move your hand toward the robot.Observe the robot backs away from you hand.6. Switch the power off.Navigation DemonstrationThe demo program includes three functions which demonstrate the IntelliBrain-Boteducational robot s ability to navigate, Navigate Forward, Rotate 180, and NavigateSquare. These functions use the wheel sensors to keep track of the robot s position. If itdrifts off course, the program quickly compensates by adjusting power to the motors tosteer it back on course.1. Set the robot on the floor with at least 3 feet of clear space in front of it.2. Start the demo program and select the Navigate Forward function.Observe the robot drives straight ahead for 2 feet, then stops.3. Press STOP.4. Set the robot on the floor and select the Rotate 180 function.Observe the robot turns in place approximately 180 degrees.5. Press STOP.6. Set the robot on the floor with at least 3 feet of clear space in all directions.10 A Hands-on Demonstration
7. Select the Navigate Square function.Observe the robot drives in a 16 inch square pattern.8. Switch the power off.Random Dance DemonstrationThe Random Dance function of the demo moves the robot in a never ending series ofsmall random moves. Because the robot has equal probability to move any direction, itwill not drift far from where it started as it performs this unusual dance.1. Set the robot on the floor with a few feet of clear space around it.2. Start the demo program and select the Random Dance function.Observe the robot dances about randomly, but doesn t drift far from where itstarted.3. Switch the power off.Collision Avoidance DemonstrationOne of the primary uses of the infrared range sensor is to avoid collisions with objects inthe robots path. The Avoid Obstacles function of the demo program demonstrates howthe robot can steer around obstacles in its way.1. Set the robot on the floor with three feet of clear space in front of it.2. Place an object approximately the same size as the robot roughly one foot in frontof the robot.3. Start the demo program and select the Avoid Obstacles function.Observe the robot will drive to a point 2 feet ahead of it, detecting and steeringaround the obstacle in its path and then return to where it started.4. Switch the power off.Line Following DemonstrationIn case you haven t guessed it already, the line sensors enable the robot to follow a lineon the floor. You will need either a line following poster or a one inch wide strip of nonreflective black electrical tape on a white surface to complete this demonstration.1. Set the robot on the floor over the black line.2. Start the demo program and select the Follow Line function.Introducing the IntelliBrain-Bot 11
Observe the robot follows the line.3. Switch the power off.Remote Control DemonstrationThe IntelliBrain-Bot educational robot can receive input from a universal remote control.You will need a universal remote control configured to control a Sony television tocomplete this demonstration.1. Set the robot on the floor with several feet of clear space around it.2. Start the demo program and select the Remote Control function.3. Press and hold the next channel button for a moment.Observe the robot moves forward while you hold the button down.4. Press and hold the previous channel button for a moment.Observe the robot moves backward while you hold the button down.5. Press and hold the increase volume button for a moment.Observe the robot rotates clockwise while you hold the button down.6. Press and hold the decrease volume button for a moment.Observe the robot rotates counter clockwise while you hold the button down.7. Steer the robot around the room using these four control buttons.8. Switch power off.SummaryYou should now be familiar with the features of the IntelliBrain-Bot educational robotand its construction. Through the hands-on demonstration you have seen many of thecapabilities you will learn to program yourself in subsequent chapters.Exercises1. Complete the parts list in Table 1-6 by inspecting the robot and filling in themissing information.2. Locate the ports on the IntelliBrain 2 robotics controller and fill in Table 1-7.12 Exercises
3. Locate the human interface features of the IntelliBrain 2 robotics controller andfill in Table 1-8.4. Trace wires from each sensor and motor to the port on the IntelliBrain 2 roboticscontroller it connects to. Record the label and type of the port in Table 1-9.5. Using the demo program experiment with each sensor and record the minimumand maximum reading you observe as you experiment with the sensor in Table1-10. Note the circumstances when you observed the minimum and maximumreadings for each sensor.Introducing the IntelliBrain-Bot 13
Table 1-6 - IntelliBrain-Bot Deluxe Educational Robot Parts ListQty Part11Aluminum chassis2Servo motor21Coverts torque of from the motor shaft to force to move therobot forward or back.Ball tail wheelTire22124DescriptionActs as the robot s brain by executing a Java programs andinterfacing to sensors, motors and humans.Battery holderBatteriesAluminumstandoff1 corner bracketRight angle bracketScrewsNutsWasherCotter pin14 ExercisesProvides traction (friction) so the wheels don t slip.Uses reflected infrared light to enable the robot to sense andfollow a line on the floor.Uses reflected infrared light to enable the robot to sense thedistance to an object between 4 and 30 inches away.Meas
robotics programming, using the companion Java-enabled robotics software development environment, RoboJDE. Before we get started programming the robot, lets first take a look at the mechanical and electronics components which make up the IntelliBrain-Bot educational robot. Figure 1-1 -