Transcription
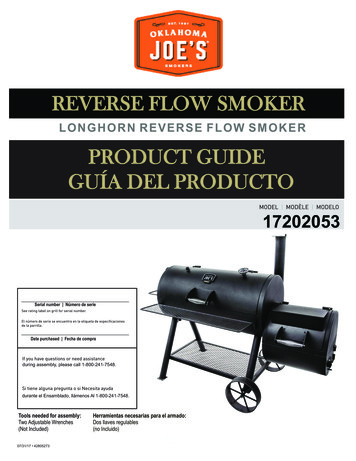
REVERSE FLOW SMOKERL O N G H O R N R EV ER S E F L OW S M O K E RPRODUCT GUIDEGUÍA DEL PRODUCTO17202053Serial number Número de serieDate purchased Fecha de compraduring assembly, please call 1-800-241-7548.durante el Ensamblado, llámenos Al 1-800-241-7548.Tools needed for assembly:Two Adjustable Wrenches(Not Included)07/31/17 42805273Herramientas necesarias para el armado:Dos llaves regulables(no Incluido)
TABLE OF CONTENTSTHIS GRILL IS FOR OUTDOOR USEONLY.Product Record Information . . . . . . . . . . . . . . . . . . . . . . . . . . . . 1Safety Symbols . . . . . . . . . . . . . . . . . . . . . . . . . . . . . . . . . . . . 2-3WARNINGPreparing to use your Smoker . . . . . . . . . . . . . . . . . . . . . . . . . . 3Failure to follow all manufacturer’s instructions couldresult in serious personal injury and/or property damage.Smoker Maintenance . . . . . . . . . . . . . . . . . . . . . . . . . . . . . . . . . 3Cooking Tips . . . . . . . . . . . . . . . . . . . . . . . . . . . . . . . . . . . . . . 3-4Limited Warranty. . . . . . . . . . . . . . . . . . . . . . . . . . . . . . . . . . . . . 5CAUTIONParts List. . . . . . . . . . . . . . . . . . . . . . . . . . . . . . . . . . . . . . . . . . 10Parts Diagram . . . . . . . . . . . . . . . . . . . . . . . . . . . . . . . . . . . . . . 11Read and follow all safety statements, assembly instructions,and use and care directions before attempting to assembleand cook.Hardware List . . . . . . . . . . . . . . . . . . . . . . . . . . . . . . . . . . . . . . 12Assembly . . . . . . . . . . . . . . . . . . . . . . . . . . . . . . . . . . . . . . . 13-21Registration Card . . . . . . . . . . . . . . . . . . . . . . . . . . . . . . . . . . . 23CAUTIONThis instruction manual contains importantinformation necessary for the proper assemblyand safe use of the appliance.Some parts may contain sharp edges! Wear protectivegloves if necessary.Follow all warnings and instructions when usingthe appliance.INSTALLER/ASSEMBLER:CAUTIONLeave this manual with consumer.THIS UNIT IS HEAVY! DO NOT attempt to assemblewithout a helper.CONSUMER:Keep this manual for future reference.Safety SymbolsThe symbols and boxes shown below explain what each headingmeans. Read and follow all of the messages found throughoutthe manual.WARNINGCALIFORNIA PROPOSITION 651. Combustible by-products produced when using thisproduct contains chemicals known to the State ofCalifornia to cause cancer, birth defects, or otherreproductive harm.2. This product contains chemicals, including lead and leadcompounds, known to the State of California to causecancer, birth defects or other reproductive harm.Wash your hands after handling this product.WARNINGWARNING: Indicates a potentially hazardous situationwhich, if not avoided, could result in death or serious injury.CAUTIONCAUTION: Indicates a potentially hazardous situation orunsafe practice which, if not avoided, may result in minoror moderate injury.WARNINGAll surfaces can be hot during use. Use protection asrequired to prevent burning.Do not use this unit on or near combustible surfaces orstructures such as wood decks, dry leaves or grass, vinyl orwood siding, etc.SEE OWNERS MANUAL FOR IMPORTANT SAFETYINFORMATION.WARNINGCARBON MONOXIDE HAZARDBurning charcoal inside can kill you. It gives off carbonmonoxide, which has no odor. NEVER burn charcoal insidehomes, vehicles, or tents.2
PREPARING TO USE YOUR SMOKERWARNINGMost surfaces on this unit are hot when in use. Use extremecaution. Keep others away from unit Always wear protectiveclothing to prevent injury. Keep children and pets away. Donot move this unit during operation. Never substitutegasoline, kerosene or alcohol for charcoal starter. In somestates, the use of charcoal starter is prohibited by law. In thiscase, paraffin-based starter cubes can be substituted forcharcoal starter. Never use charcoal starter fluid with anelectric starter.WARNINGAfter a charcoal fire appears extinguished, unconsumedembers can retain heat for up to 24 hours, and if exposed tofresh air, can burst into flame unexpectedly. Any such embersoutside the firebox of the grill pose a fire hazard and canignite combustible surfaces such as wooden decks.3. Close door. (Position damper and smokestack damperapproximately at one quarter open.) This burn should be sustainedfor at least two hours, the longer the better. Then, begin increasingtemperature by opening the damper and smokestack damper halfway and adding more charcoal. Your smoker is now ready for use.SMOKER MAINTENANCEFor residential use only. Do not use for commercial cooking.WARNINGFAILURE TO READ AND FOLLOW INSTRUCTIONSFOR LIGHTING CHARCOAL MAY RESULT IN SERIOUSPERSONAL INJURY AND OR PROPERTY DAMAGE.ALWAYS USE CAUTION WHEN HANDLING HOTCOALS TO PREVENT INJURY.ALWAYS LIGHT THE FIRE WITH THE GRILL LID OPEN.Use grill at least 3 ft. from any wall or surface.Maintain 10 ft. clearance to objects that can catchfire or sources of ignition such as pilot lights onwater heaters, live electrical appliances, etc.Use grill only in well-ventilated space. NEVER usein enclosed space such as carport, garage, porch,covered patio, or under an overhead structure ofany kind.(1m))3Frequency of clean up is determined by how often the grill is used.Make sure coals are completely extinguished before cleaning inside ofthe unit. Thoroughly rinse with water and allow to air dry before usingagain. Wipe out the interior of the unit with a cloth or paper towels.When finished cooking, and the unit has adequately cooled, clean outall remaining ashes. Ashes collect moisture, which can lead topremature rusting and decay. Periodically coating the interior surfaceswith vegetable oil will aid in the protection of your unit. Also, occasionaltouch up of the exterior paint will be required. Black, high-temperaturespray paint is recommended. NEVER PAINT THE INTERIOR OF THEUNIT.Cooking Surface: If a bristle brush is used to clean any of the grillcooking surfaces, ensure no loose bristles remain on cooking surfacesprior to grilling. It is not recommended to clean cooking surfaces whilegrill is hot.COOKING TIPSBuilding Your Fire1. Stack charcoal briquettes or wood into a pyramid-shaped pile on topof the charcoal grate or ash pan. We recommend using 3 pounds(approximately 45 briquettes) to start your fire, adding more asneeded.2. If using lighter fluid, saturate the charcoal briquettes with lighter fluidand let it soak in for approximately 5 minutes. If using a chimneystarter, electric starter, or other type of fire starter, light your fireaccording to the manufacturer's instructions.3. Always light the fire with the cooking chamber and firebox lids open.Leave lid open until briquettes are fully lit. Failure to do this couldtrap fumes from charcoal lighter fluid in grill and may result in a flashfire when lid is opened.4. Never add charcoal lighter fluid to hot or warm coals as flashbacksmay occur causing injury.5. You are ready to begin cooking when the pile of briquettes ashesover and produces a red glow (approximately 12 – 15 minutes).6. Depending on your cooking method, either leave the briquettes in apile or spread evenly across the charcoal grate using a long-handledpoker.7. Avoid laying coals on smoker walls.WARNINGft2. Build a small fire on the fire grate or pan, being sure not to lay coalsagainst the walls.Rust can appear on the inside of your smoker. Maintaining a light coatof vegetable oil on interior surfaces will aid in the protection of your unit.Exterior surfaces of smoker may need occasional touch up. Werecommend the use of a commercially available black high temperaturespray paint. NEVER PAINT THE INTERIOR OF THE UNIT !CAUTION3Before cooking with your smoker, the following steps should be closelyfollowed to both cure the finish and season the interior steel. Failure toproperly follow these steps may damage the finish and/or impartmetallic flavors to your first foods.1. Brush all interior surfaces including grills and grates with vegetablecooking oil.1mft (The product represented in this product guide is producedin China.3
Food SafetySMOKING AND SLOW COOKINGRemove the cooking grill from the firebox and build your fire ontop of the fire grate in the firebox. Either charcoal or wood maybe used, but wood is the recommended fuel for it’s rate of burnand the flavor it imparts to the food being cooked. Mostseasoned hardwoods are good for smoking such as hickory,mesquite, pecan, oak, and many other fruit woods. Bark shouldbe avoided or burned off first as it contains a high acid contentand imparts an acrid flavor.After allowing the fire to burn down, close the doors and controlthe temperature and smoke with the dampers located on thefirebox and atop the smokestack. Smoke is contained within thechambers, which will reduce burn while imparting more smokeflavor. Do not operate the Smoker with temperatures exceeding450 degrees in the smoker chamber. Place the food in thesmoker chamber and monitor the temperature. Cooking andsmoking are taking place using indirect heat. There is no needto worry about a grease fire flare-up ruining the food. A generalrule of thumb for cooking is about 1 hour per pound for smokinglarge cuts of meat. Refer to a cook book for specific cuts ofmeat. Limit the number of times you open the smoker chamberdoor as this will allow heat to escape and extend the cookingtime.SMOKING WITH WOOD CHIPS/WOOD CHUNKSFor a more robust smoke flavor while using charcoal briquettesor lump charcoal, try adding wood chips or several wood chunksto the fire. Wood chunks are available in a variety of naturalflavors, and can be used alone or in addition to charcoal. As ageneral rule, any hardwood that bears a fruit or nut is suitable forcooking. However, different woods have very different tastes.Experiment with different woods to determine your personalfavorite, and always use well-seasoned wood. Green or fresh-cutwood can turn food black, and tastes bitter.Our Recommendations:Chicken - Alder, Apple, Hickory, MesquiteBeef - Hickory, Mesquite, OakPork - Fruitwoods, Hickory, OakLamb - Fruitwoods, MesquiteVeal - Fruitwoods, GrapevinesSeafood - Alder, MesquiteVegetables – MesquiteFood safety is a very important part of enjoying the outdoorcooking experience. To keep food safe from harmful bacteria,follow these four basic steps:Clean: Wash hands, utensils, and surfaces with hot soapy waterbefore and after handling raw meat.Separate: Separate raw meats from ready-to-eat foods to avoidcross contamination. Use a clean platter and utensils whenremoving cooked foods.Cook: Cook meat and poultry thoroughly to kill bacteria. Use athermometer to ensure proper internal food temperatures.Chill: Refrigerate prepared foods and leftovers promptly.Cooking on your new grill is a hands-on experience, and it isrecommended to remain outside with your grill while cooking.Grilling can be affected by many external conditions. In coldweather, you will need more heat to reach an ideal cookingtemperature, and grilling may take longer. The meat's internaltemperature and thickness can also affect cooking times. Coldand thicker meats will take longer to cook.Internal Meat TemperaturesMeat cooked on a grill often browns very fast on the outside.Therefore, use a meat thermometer to ensure it has reachedsafe internal temperatures.USDA Recommended Safe MinimumInternal TemperaturesBeef, Veal, Lamb, Steak, Roasts, & Whole Pork(with a 3 minute rest time)145 FFishBeef, Veal, Lamb, and Pork - GroundEgg DishesTurkey, Chicken & Duck Whole, Pieces & Ground145 F160 F160 F165 FPlease refer to the USDA for complete, up-to-date information.Our internal temperature chart is based on USDA standards formeat doneness. Check it out at www.isitdoneyet.govGRILLINGSuccessful charcoal grilling depends on a good fire. The general rulefor knowing when your coals are ready for grilling is to make sure that80 percent or more of the coals are ashy gray. Using caution, arrangethe hot coals on your charcoal grate based on your desired method ofcooking. Here are a few steps you can take to adjust the temperatureof your fire:Ÿ If it is too hot, spread the coals out a bit more, which makes the fireless intense.Ÿ Avoid laying the coals on the walls of the smoker.Ÿ Partially close the vents in the grill, which reduces the amount ofoxygen that feeds the fire.Ÿ In the event of a severe flare-up, spray the flames with water from asquirt bottle. Be careful, spraying with water tends to blow ashesaround and make a mess.Ÿ Add briquettes 2 or 3 at a time to increase the burn time. Allow 10minutes for coals to ash over before adding more.4
LIMITED WARRANTYThis warranty only applies to units purchased from an authorized retailer. Manufacturer warrants to the original consumer-purchaser only that thisproduct shall be free from defects in workmanship and materials after correct assembly and under normal and reasonable home use for the periodsindicated below beginning on the date of purchase*. The manufacturer reserves the right to require that defective parts be returned, postage and orfreight pre-paid by the consumer for review and examination.SCOPE OF COVERAGEAll PartsPERIOD OF COVERAGE2 year from date of purchase*TYPE OF FAILURE COVERAGEPERFORATION, MANUFACTURING,AND MATERIAL DEFECTS ONLY*Note: A dated sales receipt WILL be required for warranty service.The original consumer-purchaser will be responsible for all shipping charges for parts replaced under the terms of this limited warranty.This limited warranty is applicable in the United States and Canada only, is only available to the original owner of the product and is not transferable.Manufacturer requires proof of your date of purchase. Therefore, you should retain your sales slip or invoice. Registering your product is not asubstitute for proof of purchase and the manufacturer is not responsible for or required to retain proof of purchase records.This limited warranty applies to the functionality of the product ONLY and does not cover cosmetic issues such as scratches, dents, corrosions ordiscoloring by heat, abrasive and chemical cleaners or any tools used in the assembly or installation of the appliance, surface rust, or thediscoloration of stainless steel surfaces. Paint is not warranted and will require touch up. RUST is not considered a manufacturing or materials defect.This limited warranty will not reimburse you for the cost of any inconvenience, food, personal injury or property damage.ITEMS MANUFACTURER WILL NOT PAY FOR:1. Shipping cost, standard or expedited, for warranty and replacement parts2. Service calls to your home.3. Repairs when your product is used for other than normal, single-family household or residential use.4. Damage, failures, or operating difficulties resulting from accident, alteration, careless handling, misuse, abuse, fire, flood,acts of God, improper installation or maintenance, installation not in accordance with electrical or plumbing codes, or useof products not approved by the manufacturer.5. Any food loss due to product failures or operating difficulties.6. Replacement parts or repair labor costs for units operated outside the United States or Canada.7. Pickup and delivery of your product.8. Repairs to parts or systems resulting from unauthorized modifications made to the product.9. The removal and/or reinstallation of your product.DISCLAIMER OF IMPLIED WARRANTIES and LIMITATION OF REMEDIESRepair or replacement of defective parts is your exclusive remedy under the terms of this limited warranty. In the event of parts availability issues,the manufacturer reserves the right to substitute like or similar parts that are equally functional.Manufacturer will not be responsible for any consequential or incidental damages arising from the breach of either this limited warranty or anyapplicable implied warranty, or for failure or damage resulting from acts of God, improper care and maintenance, grease fire, accident, alteration,replacement of parts by anyone other than Manufacturer, misuse, transportation, commercial use, abuse, hostile environments (inclement weather,acts of nature, animal tampering), improper installation or installation not in accordance with local codes or printed manufacturer instructions.THIS LIMITED WARRANTY IS THE SOLE EXPRESS WARRANTY GIVEN BY THE MANUFACTURER. NO PRODUCT PERFORMANCESPECIFICATION OR DESCRIPTION WHEREVER APPEARING IS WARRANTED BY MANUFACTURER EXCEPT TO THE EXTENT SETFORTH IN THIS LIMITED WARRANTY. ANY IMPLIED WARRANTY PROTECTION ARISING UNDER THE LAWS OF ANY STATE,INCLUDING IMPLIED WARRANTY OF MERCHANTABILITY OR FITNESS FOR A PARTICULAR PURPOSE OR USE, IS HEREBYLIMITED IN DURATION TO THE DURATION OF THIS LIMITED WARRANTY.Neither dealers nor the retail establishment selling this product has any authority to make any additional warranties or to promise remediesin addition to or inconsistent with those stated above. Manufacturer's maximum liability, in any event, shall not exceed the purchase price of theproduct paid by the original consumer.NOTE: Some states do not allow an exclusion or limitation of incidental or consequential damages, so some of the above limitations or exclusionsmay not apply to you. This limited warranty gives you specific legal rights as set foth herein. You may also have other rights which vary from stateto state. In the state of California only, if refinishing or replacement of the product is not commercially practicable, the retailer selling this product orthe Manufacturer will refund the purchase price paid for the product, less the amount directly attributable to use by the original consumer-purchaserprior to discovery of the nonconformity. In addition, in the state of California only, you may take the product to the retail establishment selling thisproduct in order to obtain performance under this limited warranty.If you wish to obtain performance of any obligation under this limited warranty, you shouldwrite to:Consumer RelationsP. O. Box 1240Columbus, GA 31902-1240Consumer returns will not be accepted unless a valid Return Authorization is first acquired. Authorized returns are clearly marked on the outside ofthe package with an RA number and the package is shipped freight/postage pre-paid. Consumer returns that do not meet these standards will berefused.5WS 1 Rev05
ÍNDICEESTA PARRILLA SOLO SE PUEDEUSAR EN EXTERIORES.Registro de información del producto.1Símbolos de seguridad.6-7Preparación para la utilización Fumador.7Fumador Mantenimiento .7Consejos para cocinar.7-8Garantía limitada .9Lista de piezas .10Diagrama de piezas.11Lista de Hardware.12Montaje.13-21Tarjeta de inscripción.23ADVERTENCIAEl no cumplir con todas las instrucciones del fabricantepuede ocasionar lesiones graves y/o daños materiales.ADVERTENCIAAntes de empezar a armar la parrilla y cocinar, lea y sigatodas las indicaciones de seguridad, las instrucciones dearmado y las instrucciones de uso y mantenimiento.Este manual de instrucciones contieneinformación importante, necesaria para armar elaparato adecuadamente y usarlo de manerasegura.Cuando use el aparato, siga todas lasadvertencias y las instrucciones.ADVERTENCIACiertas partes pueden tener bordes afilados. Si esnecesario, use guantes protectores.A LA PERSONA QUE INSTALEO ARME ESTA PARRILLA:ADVERTENCIADeje este manual al cliente.¡ESTA UNIDAD ES PESADA! NO intente armarla sinla ayuda de otra persona.AL CONSUMIDOR:Conserve este manual para que lo pueda consultar en elfuturo.Símbolos de seguridadLos símbolos y las casillas ilustradas más adelante explican loque significa cada encabezado. Lea y cumpla todo lo indicadoen los mensajes que se encuentran en el manual.ADVERTENCIAPROPOSITION 65 DEL ESTADO DE CALIFORNIA1. En el estado de California se sabe que lossubproductos de la combustión en este aparato,contienen substancias químicas que causan cáncer,defectos congénitos u otras lesiones al aparatoreproductor.ADVERTENCIAADVERTENCIA: Indica una situación potencialmentepeligrosa que, de no evitarse, podría causar la muerte olesiones graves.2. Este producto contiene substancias químicas comoel plomo y sus compuestos que, en el estado deCalifornia, se sabe que causan cáncer, defectoscongénitos u otras lesiones al aparato reproductor.ADVERTENCIALávese las manos después de manipular esteproducto.ADVERTENCIA: Indica una situación potencialmentepeligrosa o una práctica insegura que, de no evitarse, podríacausar lesiones leves o menores.ADVERTENCIAEL NO LEER Y SEGUIR LAS INSTRUCCIONES PARAENCENDER EL CARBÓN, PUEDE OCASIONARLESIONES GRAVES Y DAÑOS MATERIALES.ADVERTENCIAPELIGRO DE MONÓXIDO DE CARBONOLa combustión de carbón en interiores puede ser fatal.Despide monóxido de carbono, que es inodoro. NUNCAqueme carbón dentro de las casas, de los vehículos ni delas carpas.PARA EVITAR LESIONES, MANIPULE SIEMPRE CONPRECAUCIÓN LOS CARBONES CALIENTES.ENCIENDA SIEMPRE EL FUEGO CON LA TAPA DE LAAHUMADOR ABIERTA.6
PREPARATIVOS PARA USAR SU AHUMADORADVERTENCIAAntes de cocinar con su ahumador, debe seguir al pie de la letra ossiguientes pasos para curar el acabado y el acero del interior. Si nocumple con estos requisitos al pie de la letra, se puede dañar el interiorde la ahumador y los primeros alimentos que cocine podrán tener ungusto metálico.1. Unte todas las superficies metálicas del interior, incluyendo lasahumadors y las rejillas con aceite vegetal para cocinar.2. Encienda un fuego pequeño, no muy intenso, en la rejilla paracarbón o la sartén , asegurándose de no colocar los carbones contralas paredes.3. Cierre la tapa. Ajuste los reguladores de tiro a casi un cuarto de suapertura total. Este nivel de fuego se deberá mantener durante almenos dos horas. Comience a aumentar la temperatura abriendo losreguladores a la mitad de su apertura y añadiendo más carbón. Suahumador smoker está lista para usarlaLa mayoría de las superficies de esta unidad estáncalientes cuando está en uso. Sea sumamentecuidadoso. No deje que las demás personas seacerquen a la unidad. Use siempre ropa protectorapara evitar lesionarse.No deje a los niños ni a las mascotas acercarse a launidad. No la mueva mientras esté en uso.Nunca use gasolina, queroseno ni alcohol paraencender el carbón. En algunos estados, la leyprohíbe el uso de líquido para encender carbón. Enestos casos, puede usar cubos a base de parafina enlugar del líquido para encender carbón. Nunca uselíquido para encender carbón con un encendedoreléctrico.Puede ser que se oxide la parte interior de su ahumador. Elmantenimiento de las superficies interiores con una capa ligera deaceite vegetal ayudará .a proteger su ahumador. Las superficies exteriores de la ahumadorpueden requerir un retoque de vez en cuando. Le sugerimos que useuna pintura en aerosol resistente a temperaturas elevadas, que puedeadquirir en cualquier tienda. ¡NUNCA PINTE LA PARTE INTERIOR DELA UNIDAD!ADVERTENCIATodas las superficies pueden estar calientes durante el uso.Protéjase debidamente para no sufrir quemaduras.No use esta unidad en superficies ni en estructuras combustibles,ni cerca de ellas, tales como terrazas de madera, hojas o céspedsecos, revestimientos de vinilo o de madera, etc.LEA EN EL MANUAL DEL PROPIETARIO INFORMACIÓNIMPORTANTE SOBRE MEDIDAS DE SEGURIDAD.MANTENIMIENTO DE LA AHUMDORLa frecuencia de la limpieza dependerá de la frecuencia con que seuse el ahumador. Asegúrese de que las brasas estén completamenteapagadas antes de limpiar el interior del ahumador. Para limpiar lassuperficies interiores puede usar una solución concentrada dedetergente y agua, aplicándola con un cepillo de cerdas resistentes.Enjuáguelas bien con agua y deje que se sequen completamente alaire antes de volver a usar el aparato.Si utiliza un cepillo de cerdas para limpiar las superficies para cocinar,antes de usar la ahumador verifique que no queden cerdas sueltassobre éstas. Se recomienda no limpiar las superficies para cocinarcuando la ahumador esté aún caliente.CONSEJOS PARA COCINARCómo encender el fuego1. Apile en forma de pirámide las briquetas de carbón o los trocitos demadera sobre la rejilla o la bandeja colectora de cenizas. Lesugerimos que use 3 libras (aproximadamente 45 briquetas) paraencender el fuego, y luego añada más según lo necesite.2. Si usa líquido para encender carbón, usa encendedor parachimeneas, encendedor eléctrico o de otro tipo, encienda el fuegosegún las instrucciones del fabricante del encendedor.3. Siempre encender el fuego con la cámara de cocción y lastapas de la caja de fuego abierto.Deje la tapa abierta hasta que las briquetas estén totalmenteencendidas. El no hacerlo puede atrapar en la ahumadoremanaciones tóxicas del líquido de encender el carbón y ocasionarfuego repentino cuando la tapa esté abierta.4. Nunca rocíe líquido para encender carbón sobre el carbón caliente otibio, pues puede producir fogonazos y ocasionar lesiones.5. Puede comenzar a asar cuando la pila de briquetas se cubra decenizas y esté al rojo vivo (de 12 a 15 minutos aproximadamente).6. Según el método de cocción que se use, deje las briquetas apiladaso espárzalas de manera uniforme por toda la rejilla para el carbón,usando un atizador de mango largo.7. Evitar que pone carbones en las paredes fumador.El producto representado en esta guía del producto seproduce en China.ADVERTENCIADespués de un fuego de carbón parece extinguirse, brasasconsumidas pueden retener el calor durante un máximo de 24horas, y si se expone al aire libre, pueden estallar en llamasinesperadamente. Cualquier brasas fuera de la caja de fuego de laparrilla representan un peligro de incendio y pueden encendersuperficies combustibles tales como terrazas de madera.ADVERTENCIASólo para uso particular. No la use para fines comerciales.ADVERTENCIAUse la parrilla al menos a 3 pies de distancia decualquier pared o superficie. Deje un espacio de 10 pies entre laparrilla y los objetos que puedan incendiarse o que sean fuentesde ignición, tal como las llamas piloto de calentadores de agua,aparatos eléctricos conectados, etc.Use la parrilla sólo en lugares bien ventilados. NUNCA la use enlugares cerrados tales como cocheras, garajes, porches, patiostechados o debajo de superficies de ningún tipo.3ft(1m))1mt(3f7
Nuestras sugerencias:Pollo - Aliso, manzano, nogal americano, mezquiteCarne de res - Nogal americano, mezquite, robleCerdo - Madera de árboles frutales, nogal americano, robleCarnero - Madera de árboles frutales, mezquiteTernera - Madera de árboles frutalesPescado y mariscos - Aliso, mezquiteVerduras - MezquiteAHUMAR Y COCINAR LENTOSi se utiliza el ahumador como un ahumado o olla de cocción lenta,quite la rejilla de la caja de fuego y construya el fuego en la partesuperior de la rejilla de fuego. Cualquiera, carbón o madera, se puedenutilizar, pero la madera es el combustible recomendado por su tasa dequemadura y el sabor que imparte a los alimentos que se cocinan.Maderas duras son buenas para ahumador, tales como nogal,mezquite, roble, y muchas maderas de otras frutas. La corteza debeser evitado o quemado primero, ya que contiene un alto contenido deácido y le da un sabor acre.Seguridad con los alimentosDespués de dejar que el fuego baje, cierre las puertas y controle latemperatura y el humo con los amortiguadores que se encuentran en lacaja de fuego y encima de la chimenea. El humo está contenida dentrode las cámaras, lo que reducirá quema al tiempo que imparte mássabor a humo. No opere el ahumador con temperaturas superiores a450 F grados en la cámara de ahumar. El ahumar y cocinar utilizancalor indirecto. Cocina y el tabaquismo se llevan a cabo utilizandoindirecta calor. No hay necesidad de preocuparse por un incendio degrasa que arruine la comida. Una regla general para es de ahumar 1hora por cada libra de cortes grandes de carne. Consulte a un libro decocina para los cortes específicos de carne. Limite el número de vecesque se abra el ahumar puerta de la cámara ya que esto permitirá que elcalor escape y extiende el tiempo de cocinar.La seguridad con los alimentos es una parte muy importante deldisfrute de su parrillada al aire libre. Siga estos cuatro pasos básicospara proteger a los alimentos contra las bacterias nocivas:Limpieza: Lávese las manos, lave los utensilios y las superficies conagua jabonosa caliente, antes y después de manipular carne cruda.Separación: Mantenga las carnes separadas de los alimentos listospara comer, para evitar la contaminación cruzada. Use bandejas yutensilios limpios para servir los alimentos preparados.Cocción: Cocine bien las carnes y las piezas de ave, para matar lasbacterias. Use un termómetro para verificar que los alimentosalcancen la temperatura interna adecuada.Refrigeración: Refrigere con prontitud los alimentos preparados y lassobras.La experiencia en cocinar a la parrilla se adquiere con la práctica y esaconsejable que se quede junto a la parrilla mientras cocine. El asar ala parrilla es una actividad que depende de muchos factores externos.En tiempo frío, necesitará una mayor cantidad de calor para alcanzarla temperatura de cocción ideal, y puede tomar más tiempo el cocinarla carne. La temperatura interna y el grosor de la carne puedentambién afectar el tiempo de cocción. Toma más tiempo cocinar lostrozos de carne fríos o más gruesos.Acómo asar con astillas/trocitos de maderaPara lograr un sabor ahumado más fuerte con briquetas o carbón demadera en bloques, pruebe poner varias astillas o varios trocitos demadera en el fuego. Los trocitos de madera se venden en diversossabores naturales, y se pueden usar solos o como un agregado alcarbón. Como regla general, toda madera dura de árboles frutales o defru
smoking are taking place using indirect heat. There is no need to worry about a grease fire flare-up ruining the food. A general rule of thumb for cooking is about 1 hour per pound for smoking large cuts of meat. Refer to a cook book for specific cuts of meat
