Transcription
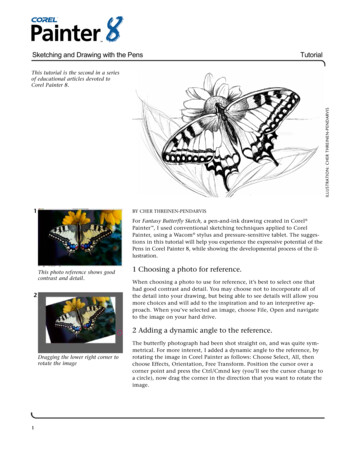
Sketching and Drawing with the PensTutorialILLUSTRATION: CHER THREINEN-PENDARVISThis tutorial is the second in a seriesof educational articles devoted toCorel Painter 8.1BY CHER THREINEN-PENDARVISFor Fantasy Butterfly Sketch, a pen-and-ink drawing created in Corel Painter , I used conventional sketching techniques applied to CorelPainter, using a Wacom stylus and pressure-sensitive tablet. The suggestions in this tutorial will help you experience the expressive potential of thePens in Corel Painter 8, while showing the developmental process of the illustration.This photo reference shows goodcontrast and detail.21 Choosing a photo for reference.When choosing a photo to use for reference, it’s best to select one thathad good contrast and detail. You may choose not to incorporate all ofthe detail into your drawing, but being able to see details will allow youmore choices and will add to the inspiration and to an interpretive approach. When you’ve selected an image, choose File, Open and navigateto the image on your hard drive.2 Adding a dynamic angle to the reference.Dragging the lower right corner torotate the image1The butterfly photograph had been shot straight on, and was quite symmetrical. For more interest, I added a dynamic angle to the reference, byrotating the image in Corel Painter as follows: Choose Select, All, thenchoose Effects, Orientation, Free Transform. Position the cursor over acorner point and press the Ctrl/Cmnd key (you’ll see the cursor change toa circle), now drag the corner in the direction that you want to rotate theimage.
Sketching and Drawing with the PensTutorial3 Setting up Brush Tracking.3Before you begin to draw, it’s important to set up the Brush Tracking soyou can customize how Corel Painter interprets the input of your stylus,including parameters such as pressure and speed. Choose Edit, Preferences, Brush Tracking (Mac OS X users, choose Corel Painter 8, Preferences, Brush Tracking) and make a representative brushstroke in thewindow. For instance, if you plan to use both light and heavy pressure,while sketching slowly for a while and then quickly, try to make abrushstroke in the window that would include all of these factors.Setting up Brush Tracking4 Choosing a color and texture.In the Color picker, choose black color for your drawing. If the palette isnot visible when you attempt to choose a color, choose Window, ShowColors to open the Colors palette. Click in its HSV triangle and drag theColor Ring to the bottom left, the darkest point in the triangle. In theToolbox, click the flyout menu arrow on the Paper Selector and choose BasicPaper texture.4a5 Making a clone and using Tracing Paper.Choosing black color in theStandard Colors picker4bChoosing Basic Paper texture2With Corel Painter, it’s possible to “clone” or duplicate the image, andwith the original still open, clear the image from the clone file and activate the useful Tracing Paper function, which is much like a traditionallight table in the program. Using Tracing Paper to see your reference image, you can sketch in the basic proportions of your subject. To create aclone, choose File, Clone, and clear the image from the clone by choosingSelect, All (Ctrl/Cmnd-A) and then pressing the Backspace/Delete key. To5The clone canvas has been cleared and Tracing Paper hasbeen enabled.
Sketching and Drawing with the Pens6aTutorialturn on Tracing Paper, choose Canvas Tracing Paper or click the small ToggleTracing Paper button in the upper right of the Corel Painter image window.(Turn Tracing Paper on and off as you wish using the Toggle button.)6 Sketching with Pens.If the Brush Selector Bar is not visible, open it by choosing Window, ShowBrush Selector Bar. Choose the Pens category from the Brush Category popup menu, then choose the Thick n Thin variant from the Variant menu.It’s a good idea to make some practice marks to get to know the mark-makingtool. Experiment with the Thick n Thin variant of Pens. Press lightly on yourstylus to sketch a thinner line, press more heavily for a thicker line. For thisillustration, I chose to sketch the outer lines using this pen because it allowsyou to sketch smoothly, while varying the thickness of the lines.Choosing the Page Rotation tool inthe Toolbox6bFor greater control while drawing, consider using the Corel Painter Page Rotation feature to position the image at an angle that makes it easier for youto draw. The tool resides under the Grabber hand in the Toolbox. Click andhold, and the fly-out tool will appear. Using the Page Rotation tool, positionthe image at the angle you need to be more comfortable while drawing. (Irotated my image one direction to add tone to the right wing, then the opposite direction to draw the lines on the left wing.) After positioning yourimage, click on the Brush tool in the Toolbox to resume drawing. To returnthe image to its original angle, double-click on the Page Rotation tool in theToolbox. Then click on the Brush tool to resume sketching.Take the time to study your subject carefully and analyze the basic formsand shapes. Think about how you can simplify the subject, so that in thebeginning you draw just the basic shapes using loose strokes. You don’thave to draw a continuous line around the butterfly. Instead, you canAfter rotating the in-progress sketch,I began drawing the basic shapesusing the Thick n Thin variant ofPens6cRefining the basic shapes using the Thick n Thin Pen.3
Sketching and Drawing with the Pens7aTutorialsketch, in a way similar to how you would use a fine-pointed ink pen,with sketchy lines that overlap one another to suggest the curves of thewings. Once you’ve established the proportions, begin to refine yourdrawing. If you’d like to erase, choose the Eraser variant of Erasers in theBrush Selector Bar.7 Building up tone, form and texture.Choose the Ball Point 1.5 variant of Pens and use this pen to draw finelines that help to sculpt the forms of the butterfly. This pen will draw amore even line without as much variation between thin and thick lines.You can use a sketchy approach to this line work here; also, it will helpyou to add vitality and energy to your drawing.Now, choose the Scratchboard variant of Pens. Use this pen to sketchbroader lines, building up tones and filling the patterned areas of thewings.7bChoosing the Ball Point Penvariant of Pens from the BrushSelector BarAdding fine hatched lines to show form and add texture on the wings and body,and then the thicker lines in the darker areas for more contrast4
Sketching and Drawing with the PensTutorial8 Adding more texture and final details.8aChoosing the Round Tip Pen in theBrush Selector BarFor more interest to the foreground, I loosely sketched the leaves usingthe Scratchboard variant of Pens; to draw soft cross-hatch strokes visiblein illustration 8b, I pressed lightly on my stylus. Next, I used theScratchboard Tool to sketch lightly and build up subtle tone and textureon the body and wings. In areas where I wanted a clean, even line, I usedthe Round Tip Pen, sized down to 1.5 pixels. I also used this pen to drawdarker cross-hatch lines in areas of the butterfly that needed more contrast. See the completed illustration at the top of page 1.8bDetail showing the soft cross-hatch strokes on the butterfly’s body and the leafAn award-winning artist, author and educator based in San Diego, California, Cher Threinen-Pendarvis has workedwith both traditional and electronic tools for nearly thirty years. She has received recognition for her mastery ofCorel Painter, Photoshop, and the Wacom pressure-sensitive tablet, using these electronic tools since they were firstreleased. Her digital paintings and illustrations have been exhibited as large-format prints worldwide and her articlesand art have been published in many books and periodicals including The Photoshop WOW! Book, The OfficialPhotoshop Handbook, Photoshop 7 Magic, EFX Art and Design, Design Graphics, Digital Fine Art Magazine, MacWeek,MacUser, Macworld, Publish, Photoshop User, Step-by-Step publications and Computer Artist. Cher holds a BFA withHighest Honors and Distinction in Art specializing in painting and printmaking. She is principal of the consultingfirm Cher Threinen Design and is author of all editions of The Painter Wow! Book. The Painter 8 Wow! Book is themost recent edition of this highly praised volume of techniques and inspiration. The Painter 8 Wow! Book has beencompletely revised, featuring classic techniques and the coolest new features in Corel Painter 8!Cher Threinen-Pendarvis’s Web site: http://www.pendarvis-studios.comThe Painter Wow! Book companion Web site: http://www.peachpit.com/wow/painterTo order the Painter 8 Wow! Book, phone your order to 800-283-9444 or 510-524-2178, or fax it to 510-5242221. Mail your order to Peachpit Press, 1249 Eighth Street, Berkeley, CA 94710, or order online and save onpostage and save a tree! Order online at: http://www.peachpit.com 2003 Corel Corporation. All rights reserved. All other product, font, company names and logos are trademarks or registered trademarks of their respective companies.5
Sketching and Drawing with the Pens Tutorial 1 ILLUSTRATION: CHER THREINEN-PENDARVIS BY CHER THREINEN-PENDARVIS For Fantasy Butterfly Sketch, a pen-and-ink drawing created in Corel Painter , I used conventional sketching techniques applied to Corel Painter, using a