Transcription
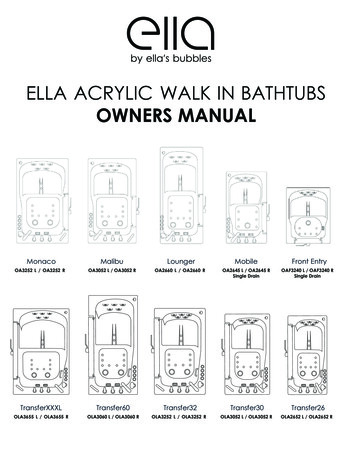
ELLA ACRYLIC WALK IN BATHTUBSOWNERS MANUALMonacoMalibuLoungerMobileOA3252 L / OA3252 ROA3052 L / OA3052 ROA2660 L / OA2660 ROA2645 L / OA2645 RSingle 3655 L / OLA3655 ROLA3060 L / OLA3060 ROLA3252 L / OLA3252 ROLA3052 L / OLA3052 RFront EntryOAF3240 L / OAF3240 RSingle DrainTransfer26OLA2652 L / OLA2652 R
Table of ContentsIMPORTANTWarranty Activation Form MUST be completed for both the Owner and Installer to validatethe warranty.Failure to complete both pages will void the warranty on this bathtub.Completed Ella Warranty Activation Forms can be emailed to warranty@ellasbubbles.com,faxed to 312.666.3551, OR mailed to 2101 S. Carpenter St., Chicago, IL 60608www.ellasbubbles.com
Unpacking and InspectingInspect the carton fordamage: Take a picture ifpossible.CAREFULLY RECORD ALLPERCEIVED DAMAGEDO NOT LIFT THE TUB BY THEPLUMBING. Doing so canresult in leaks, for which theinstaller is responsible. AllWalk-In Tubs are water testedbefore they leave ourfactory and the bath tub youhave purchased has passedinspection.Inspect the plumbing for anyfittings that may haveloosened in transit.You must follow all the instructions in this manual.FAILURE TO READ AND COMPLY WITH ALL INSTRUCTIONS CAN RESULT IN PRODUCTDAMAGE OR INJURY TO BOTH INSTALLER AND HOMEOWNER. IT WILL ALSO RESULT INASSUMPTION OF ALL LIABILITY BY SAID INSTALLERNOTE: Returns are only accepted in original packaging used for shipping. Use caution so asnot to damage cardboard crate or its wooden pallet. Do not dispose of shipping materialuntil installation is complete. Please visit our website, www.ellasbubbles.com for completedetails of return/exchange policy.www.ellasbubbles.comPage 1
Warnings and LabelsYour Ella's bathtub comes with several warning label stickers throughout and are as follows:Details on Page 12Push ControlAcrylic ShellBack nutAir hoseDetails on Page 3www.ellasbubbles.comPage 2
Warnings and Labels ContinuedBacknut MUST be securely tightened.Failure to do so will cause looseningover time resulting in it coming apartand falling down the drain.Drain closedcompletelyDrain openall the wayDrain must open completely to drainproperly and close completely to avoidunnecessary drainage.www.ellasbubbles.comPage 3
Moving your Ella Walk in Bathwww.ellasbubbles.com
Important Safety InstructionsWARNING:***Read through the entire manual completely before beginning installation.***Contract a licensed plumber and electrician for installation. Be sure you and yourcontractor are aware and follow all local plumbing and electrical codes. Your Ella Walkin Bath is not intended for outdoor use. Install the tub in accordance with the instructionsin the manual. Use ONLY the parts and accessories provided or as recommended by themanufacturer.CAUTION:When using this product, basic precautions should always be followed. Read and followall instructions pertaining to risk of fire, electric shock and injury. Make sure and have yourlicensed electrician test all connections to the dedicated line, including the GFCI.Risk of electric shock; Do not permit electric appliances within 3 feet (1.5m) of the tub. i.e.:hair dryers, lamps, phones, radios, televisions, etc.To reduce the risk of injury, do not permit children or persons with disabilities to use thisproduct unless they are supervised by an able-bodied adult at all times. Never drop orinsert any objects into any openings.Do not turn on the Hydro jets without water reaching the waterline. The waterline is the pointwhere all jets are covered with water.DANGER:Temperature in excess of 100.4 Fahrenheit (38 Celsius) may be harmful to your health. Checkand adjust the temperature before use. Consult your physician before using your Ella Walk inBath if you have a heart condition or other health issues. People using medications, herbalremedies, sleep aids, and/or having adverse medical history should consult a physicianbefore using this product.Pregnant women should NOT use this product before consulting their physician. Avoid theuse of alcohol, drugs or other medications while using your walk in bath.Be aware, hyperthermia is a risk when raising body temperature. Do no keep bodysubmerged in heated bath for extended periods of time. The symptoms of hyperthermiainclude an increase in body temperature which can cause dizziness, lethargy, drowsinessand fainting. Avoid using the heated bath after strenuous activity.Exercise caution while entering and exiting your Ella Walk in Bath.www.ellasbubbles.com
Important Safety InstructionsWARNING:***USE TUB ONLY AS INTENDED! FAILURE TO DO SO CAN LEAD TO INJURY OR DEATH***CORRECTWARNINGBATHER SHOULD ONLY SIT AS SHOWN IN FIGURE TOTHE LEFT. SIT FULLY IN SEAT WITH BACK ON THEBACKREST. DO NOT ATTEMPT TO SLOUCH OR LIEDOWN IN THE FOOT WELL AREA! DO NOT ATTEMPTTO PUT YOUR FEET UP ON OPPOSITE SIDE OF TUB!In the case of bathers who do not have allfunctioning limbs or are paralyzed, bather mustbe attended by caregiver at all times and use aninstalled safety belt at all times.WRONG POSITIONINGwww.ellasbubbles.comPage 6
Required Steps Prior to InstallationProtecting the BathCover and protect the bath shell and fixtures from scratches or other damages during theinstallation and tests. Remove the access panels when moving the Walk in Bath andalways lift the bathtub from the frame (Page #2).ElectricalThe unit MUST be connected to a circuit protected by a ground fault circuit interrupter(GFCI) provided and installed by a licensed electrician and tested periodically (refer toinstructions provided by GFCI manufacturer). Electrical requirements vary based onpackage; please refer to package diagrams included in the specifications. A licensedelectrician for your area is required to install and test the electrical installation process.DO NOT use any kind of extension cords to power the unit.Operating the pumps without first filling the bath to above the jets can cause permanentdamage to your equipment.Push the GFCI “test” button into “reset” mode. If the GFCI fails to operate in this manner,there is a ground current flow or a device malfunction, indicating the possibility of electricalshock. If this occurs, turn OFF the power and do not use the bathtub until the source of theproblem has been identified and corrected.Water TestIt is important to test that the Hydro and Air Pumps are functioning properly before final inwall installation to avoid unnecessary repairs or removal.A. Place the tub on a completely flat surface in an area where it may be drained aftertesting.B. Using a clean rag and warm water wipe down seal to insure it is free of debris.C. Seal the drains (this can be done with tape) and fill the tub to at least three inchesabove the highest jet, or to the bottom of the grab bar if no jets are present.D. Allow the water to stand in tub for 30 minutes and then inspect all plumbing and seals forleaks.E. Using appropriately rated three-prong extension cords, all plugged in to separate outlets,operate all electrical components (air blower, water pump, and heater if applicable) foranother 30 minutes and inspect for leaks again. Inspect the unions around the pump andheater.F. If a leak persists at a union after tightening, it may have been over-tightened or mighthave a displaced O-ring. Disassemble it and make sure the O-ring was seated properly.Do the same if a leak persists at the heater. Verify that the heater threads match thepipe threads.www.ellasbubbles.com
Drain and Plumbing Positioning Optionswww.ellasbubbles.com
Drain and Plumbing Positioning Optionswww.ellasbubbles.comPage 9
Drain and Plumbing Positioning OptionsThe drain positioning should be determined by a licensed plumber. The pictures above only show a few of themany possible options for drainage setup. For faster drainage all 4 ports may be connected to house drain.www.ellasbubbles.comPage 10
Drain and Plumbing Positioning OptionsThe drain positioning should be determined by a licensed plumber. The pictures above only show a few of themany possible options for drainage setup. For faster drainage all 4 ports may be connected to house drain.www.ellasbubbles.comPage 11
Door and Frame AdjustmentsPrepare the sub-floor for the drain and ensure that the area is level. The supporting sub-floormust be able to support the total weight of the bathtub, bather and water and must meetlocal construction code requirements.Use a level and make sure that the sub-floor below the tub is leveled. If the floor is notperfectly level, adjust the appropriate leveling legs to re-align the tub to perfect level. It isimportant that all of the leveling legs are completely supporting the tub (touching the floorwith equal weight distribution) and the tub is leveled for the door seal to work properly. If thetub is not perfectly leveled, it may cause frame and shell warping which can causechanges in door alignment resulting in water leakage and void the warranty.DISCLAIMER: The frame specifications and configuration vary based on model. If the subfloor does not support the total weight of the bath, bather and the water, it can result inwarping of the shell, misalignment of the door and/or create leaks and could lead todamage of your home.www.ellasbubbles.com
Door and Frame AdjustmentsYour walk in bathtub has been tested and leveled properly before leaving our facility. Ourwalk in bathtubs have been set on a perfectly level surface to ensure no leaks and properdoor closing. It is up to your installer to test and make any adjustments necessary to ensurethat all leveling legs support the tub frame and that the door is aligned correctly to preventany leaks. The door must close smoothly to create a water tight seal.Extending or shortening the legs will help correct any alignment issues to close the gapbetween the door and the frame. Please call us immediately if any issues arise or if youhave any concerns. 1-800-480-6850.DISCLAIMER: The frame specifications and configuration vary based on model. If the subfloor does not support the total weight of the bath, bather and the water, it can result inwarping of the shell, misalignment of the door and/or create leaks and could lead todamage of your home.www.ellasbubbles.comPage 13
Door and Frame AdjustmentsWARNING: Failure to level the tub correctly WILL RESULT IN MISALIGNMENT! The drawingsbelow illustrate some examples of what types of frame warping will occur if the legs arenot level with the floor.www.ellasbubbles.comPage 14
Door Handle InstructionsDoor StopperThe door handle must be placed correctly so the handle stopper stops thedoor handle and protects the door mechanism from breaking. There mustnot be a gap between the door and door handle if it is installed correctly.Make sure to tighten the screw with a wrench. The screw holds the doorhandle at approximately torque of 10 pounds. Screw on the cover andtighten it by hand (do not use a wrench).www.ellasbubbles.comPage 15
Installation of Deck Mount Grab BarParts List: Chrome grab bar x (1)Escutcheon x (2)Rubber washers x (4)Metal washers x (2)Bolts x (2)WARNINGGrab BarGRAB BAR WASHERS MUST BE INSTALLED TOPREVENT CRACKING OF THE ACRYLIC SHELL,FAILURE TO DO SO WILL VOID THE WARRANTYEscutcheon*THE LARGER METAL WASHER IS THE MOSTIMPORTANT OF THE WASHERS, THIS ONEABSOLUTELY MUST BE INSTALLED TOPREVENT ACRYLIC SHELL DAMAGERubberWasherTub ShellRubberWasherMetalWasherBolt*To install the supplied grab bar first locate all the parts needed for installation. See drawingshown above. Ready the bolt assembly by first placing a metal washer onto the boltfollowed by a rubber washer. Feed the bolt up through the tub shell and place anotherrubber washer over the extruded bolt followed by the escutcheon. You may start thethreading into the grab bar to hold the assembly loosely in position and then repeat theprocess for the second bolt. Once the entire assembly is in place, tighten the bolts with thesupplied Allen wrench.WARNING: Under no circumstances install the grab bar without the large metal washerunderneath the tub shell. Doing so will leave the tub shell vulnerable to cracking and voidthe warranty.www.ellasbubbles.comPage 16
Installing Extension KitsInstalling Extension KitsL" Stainless Steel Brackets .Qty (3)L" Acrylic Bracket .Qty (1)1" x 1/8" Bolts . Qty (7)1" x 1/4" Bolts . Qty (7)1" Screw . Qty (1)1/2" Nuts . Qty (9)3/8" Nuts . Qty (7)Medium Washers .Qty (14)Small Washers .Qty (14)Plastic Washer .Qty (1)Plastic Cap .Qty (1)Deluxe Dimensions: 5"W x 29 1/2"L x 37"HElite Dimensions: 7"W x 29 3/4"L x 37 3/4"HRoyal Dimensions: 7"W x 31 3/4"L x 37 3/4"HPetite Dimensions: 7"W x 27 2/4"L x 37 3/4"H1. I nstall 3 extension supportbracketsprovides in the kit.2. Clamp in place, theextension panel to the walkin tub shell, lining up thefacade of top and front.3. P re-drill ( 3/8") slightly widerholes than mounting screwsto allow for final adjustmentto the panel.1.4. Mount extension with 7screws, washers and bolts.5. A pply Silicone or whitecaulking as needed.(Image 4)3. & 4.www.ellasbubbles.comThe extension kit can be installed as needed. Opening can be filled as e 17.Petite.Companion
Finishing InstallationAfter all of the water and electrical testing is completed and all fixtures are checked, thetub can be installed to the surrounding wall or walls. Ella Walk in Baths come with lowrise tile flange which allows for two or one wall installations. The extension panel of thebathtub can be installed as needed for 60" GlueTileTileTile5/8”Tub LipCaulking5/8”Tub LipCaulkingCaulking5/8”Tub LipThe tub can be finished and tiled over as shown in images. Caulking must be applied tojoints as needed after the bathtub is installed.Threshold Lowering OptionLowering the threshold is an option that can be chosen during installation. Because yourElla Walk in Bath is set up for easy installation, lowering the threshold requires the drainoption to be set up below the floor. To lower the Walk in Bath threshold; First, remove thetoe kick panel to expose the adjustable leg supports. Adjust the height of the tub whilekeeping the Walk in Bath plumb level on all four corners. Finish the installationwith baseboard.NOTE: Any alterations or installed additions are the responsibility of the installer. EllaAccessible Bathrooms is not responsible for any damage to the unit or for water damage,which could occur due to improper installation.www.ellasbubbles.comPage 18
Cleaning and MaintenanceRecommended Acrylic CleanersUse only cleaning products whose labelsstate that they are SAFE for ACRYLIC.Always test products on a small are of skirtbefore applying to complete bath area.DO NOT USE the following on yourACRYLIC Bath System. The use of thefollowing chemicals will cause a dullsurface or chemical cracks. The use ofthese products will VOID YOUR WARRANTY. White Vinegar & Water(Recommended) ZEP Professional strength showertub & tile cleaner Dawn dish detergent Rubbermaid commercial strengthshower tub & tile cleaner Home Depot HDX shower tub & tilecleaner Scrub free original soap scum remover Kaboom shower tub & tile cleaner withoxy clean Simple green all purpose cleaners(any scent) Simple green lime scale remover Simple green natural bathroom cleaner All tilex products All Pine-Sol Products All Fragranzia Products Monthly MaintenanceIt is recommended that once a monththe tub is flushed. As well, with everymonth of normal use, clean outthe pumps inlet cover (shown right)by unscrewing the cover (counterclockwise) and removing any hair anddebris from the cover and housing.Remount the cover in place. Neveroperate the system with the cover off,as the pump creates a strong suctionand damage to the pump or injury mayoccur.www.ellasbubbles.comPage 19Any product containing ammoniaDow scrubbing bubblesAbrasive CleanersAjaxCometFantistikSoft ScrubMr. CleanNail Polish RemoverScouring PadsAmmoniaTough ActPowder or Crystal Drain CleanersGreenworks Bathroom CleanerScrub Free w/BleachSeventh generation bathroomcleaner - regular Magic Eraser
May not be applicable to your specific packageRefer to your package diagrams for more informationAdditional Operating Instructionsby theOriginal Part ManufacturerTOUCHSTONEDual Load ControllerCIMC-296-01-01-01 (15 Amp)CIMC-296-01-02-01 (20 Amp)Configuration #1Single Speed PumpVariable Speed BlowerOwner’s ManualPage 1
May not be applicable to your specific packageRefer to your package diagrams for more informationImportant Safety InstructionsPLEASE READ CAREFULLY PRIOR TOTroubleshooting and Servicing Electrical EquipmentDefinitions:WARNING (May cause serious injuries or death)CAUTION (May cause property damage)For information on NuWhirl Instructions, When installing and using this electrical equipment, basic safetyprecautions should always be followed, including:WARNING: Keep dry. Replace control ifexposedtowater,moistureorcontamination.WARNING: Use and follow theseinstructions along with all instructions thathave been provided with your whirlpoolbathtub in order to fully enjoy the bathtubsafely.WARNING: Electronic control systemcomponents should be installed as perlocal and national Electrical Codes, in alocation not to be subjected to splashing orflooding. Exposure to water or splashingwill void all product certifications andwarranties.There are no user serviceable parts inside.Opening, modifying, or tampering withcontrol system components will void allproduct certifications and warranties.WARNING: Risk of electric shock. Connectonly to a ground type receptacle or powersupply junction box protected by a Ground-Fault Circuit Interrupter (GFCI). Contact aqualified electrician if you cannot verify thatthe power supply is protected by a GFCI.The GFCI should be tested on a routinebasis. Consult the GFCI manufacturer’sinstructions for correct testing andoperation.For electrical connections, see applicablewiring diagram.See www.nuwhirl.com/docs/productinstructions.htmlDo not use an extension cord to connect theproduct to the electric supply; provide aproperly located receptacle or junction box.WARNING: Failure to install in strictaccordance with each and every instructionabove may compromise the system, whichmay cause injury to persons and/or property.The tub may be supplied from more than onepower source. Before working on anyelectrical device, make sure all power to thecontrol system is off.Use this unit only for its intended use asdescribed in this manual. Do not useattachments not recommended by themanufacturer. Any improper installation ormisuse of the equipment may result in injuryto the user and will void the warranty.Do not run unit dry. Always be certain thatthe pump casing is filled with water beforestarting the unit. If pump fails to prime within30 seconds, turn it off. Check if there is anairlock, clogged plumbing, or closed valve.Save these instructions.
May not be applicable to your specific packageRefer to your package diagrams for more informationTOUCHSTONE Dual Load Bath Control SystemConfiguration #1 Owner’s ManualYour whirlpool bathtub has been equipped with TOUCHSTONE ElectronicControls to provide features that allow you to customize your bathingexperience to your individual preference. Please familiarize yourself withthe features and operating instructions below in order to maximize theenjoyment you receive from your bath. These operating instructions shouldbe used in conjunction with the other instructions and warnings providedwith your whirlpool bathtub in order to fully understand and safely utilize thebathtub.System Features Air Button or Electronic Keypad OptionsIndependent Function TimersSingle-Speed PumpVariable-Speed BlowerAutomatic Dry CycleMulticolor LED Tub LightsAir Button and Electronic Keypad OptionsAirswitch Buttons may be labeledWater, Air, Light.AirWaterLightLighted Electronic Keypad.
May not be applicable to your specific packageRefer to your package diagrams for more informationAir Button Operating InstructionsSingle Speed Pump (Water): The Whirlpool WaterSystem is activated by pressing the Water Button.Ensure first that there is sufficient water in the Tub to at Waterleast cover the Jets. (If not, the Water DetectionFunction will prevent the Pump from starting dry). Thiswill turn on the Pump, and activate its 20-minute timer. TheWhirlpool Water System will stop automatically when its timerexpires. To turn off this function earlier, press the Water SystemButton at any time.Variable-Speed Air Blower (Air):The Air system isactivated by pressing the Air Button.(The Air Systemruns independantly of the Tub Water Level).This willAirturn on the Blower, and activate its 20-minute timer.Tochange the Speed of the Blower, press and hold to startthe Blower, and then ramp its Speed down. Release at thedesired setting.To activate the "Massage Mode", press and holdto start the Blower, and then ramp its Speed down to the lowestsetting, pause, then release.To turn off the Air System earlier,press the Air Button at any time.Automatic Dry Cycle: 15 minutes after the Water and/or Airsystems are turned off, or the tub is drained, the Air Blower willautomatically come on for 2 minutes. This will purge out anyresidual moisture in the air system, making the system fresh andready for the next bath.Multi-color Tub Light (Light)The LED Multi-Color Tub Light is activated by pressingthe Light Button. The first press will start its 60-minutetimer, and activate the Tub Light in a “Rainbow” mode.LightSubsequent presses will change the color to Blue,White, Blue, Aqua, Green, Yellow, Red, Magenta, andoff. To turn off this function earlier, press and hold the LightButton at any time.
May not be applicable to your specific packageRefer to your package diagrams for more informationTOUCHSTONE Dual Load Bath Control SystemConfiguration #1 Owner’s ManualElectronic Keypad Operating InstructionsKeypad Backlighting: When in Standby, the keys are not lighted.When in use, Blue keys indicate "No Water Detected", and Green keysindicate "Water Is Detected". When a function is in use, its key will lightRed. When a fuction is off, its key will light Blue or Green as notedabove.Single Speed Pump (Water): The WhirlpoolWater System isactivated by pressing the Water SystemButton. Ensure first that there is sufficientwater in the Tub to at least cover the Jets. (If not, the Water DetectionFunction will prevent the Pump from starting dry, and the Button willflash Red/Blue to alert you). This will turn on the Pump, and activate its20-minute timer. The Whirlpool Water System will stop automaticallywhen the timer expires. To turn off this function earlier, press the WaterSystem Button at any time.Variable-Speed Air Blower (Air): The Airsystem is activated by pressing the AirButton. (The Air System runs independantlyof the Tub Water Level). This will turn on theBlower, and activate its 20-minute timer. To change the Speed of theBlower, press and hold the " " or "-" Buttons accordingly. Release atthe desired speed. To activate the "Massage Mode", press and hold the" " and "-" Buttons together, pause, then release. To turn off the AirSystem earlier, press the Air Button at any time.Automatic Dry Cycle: 15 minutes after the Water and/or Airsystems are turned off, or the tub is drained, the Air Blower willautomatically come on for 2 minutes. This will purge out any residualmoisture in the air system, making the system fresh and ready for thenext bath.Multi-color Tub Light (Light): The LEDMulti-Color Tub Light is activated by pressingthe Light Button. (The Tub Light runsindependantly of the Tub Water Level). Thefirst press will start its 60-minute timer, andactivate the Tub Light in a “Rainbow” mode. Subsequent presses willchange the color to Blue, White, Blue, Aqua, Green, Yellow, Red,Magenta, and off. The Tub Light will turn off automatically when thetimer expires. To turn off this function earlier, press and hold the LightButton at any time.
May not be applicable to your specific packageRefer to your package diagrams for more informationTOUCHSTONE Dual Load Control SystemInstallation InstructionsSystem Identification: CIMC-296-01-[01 or 02]-0101 Configuration #1System features: Air Buttons or Electronic Keypad, Independent Timers, Single-SpeedSinglePump, Variable-Speed Blower, Multi-Color LED Tub Lights,Conductive Water Detect.Note: For instructions on setting the Configuration # see “ControlControl Configuration Selection and Setting GuideGuide”Installation Diagram:Electronic Keypad OptionTO BLOWERMax 8 AMPS LoadTO PUMPMax 15 AMPS LoadPluglocatedon TOPFemaleCordCCBL-372PlugslocatedonREARAir Button OptionFemaleCordTo 120V GFCIProtectedReceptacle15A or 20AAccording ToThe ControllerModelWaterAirLightMaleCordCCBL-366x2 daisychainedorCCBL-376“Y” SplitterNOTES:1. PUMPS equipped with air switch must be in the “ON” position prior to plugging into the controller.2. The combined rating of both Loads must not exceed the Controller’ss Amperage Rating.3. Connect cables to ports as shown. Installation may not require the use of all connection ports.Failure to connect cables to ports as shown, may damage the control box and its components.CCBL-143Conductive WaterDetectCICL-297Tub Lightsx2 Max.
May not be applicable to your specific packageRefer to your package diagrams for more informationTOUCHSTONESurface Heater Controller SystemFor controller CIHC-300-01-01-01Installation & OperatingInstruction Manual
May not be applicable to your specific packageRefer to your package diagrams for more informationImportant Safety InstructionsPLEASE READ CAREFULLY PRIOR TOTroubleshooting and Servicing Electrical EquipmentDefinitions:WARNING (May cause serious injuries or death)CAUTION (May cause property damage)For information on NuWhirl Instructions, When installing and using this electrical equipment, basic safetyprecautions should always be followed, including:WARNING: Keep dry. Replace control ifexposedtowater,moistureorcontamination.WARNING: Use and follow theseinstructions along with all instructions thathave been provided with your whirlpoolbathtub in order to fully enjoy the bathtubsafely.WARNING: Electronic control systemcomponents should be installed as perlocal and national Electrical Codes, in alocation not to be subjected to splashing orflooding. Exposure to water or splashingwill void all product certifications andwarranties.There are no user serviceable parts inside.Opening, modifying, or tampering withcontrol system components will void allproduct certifications and warranties.WARNING: Risk of electric shock. Connectonly to a ground type receptacle or powersupply junction box protected by a Ground-Fault Circuit Interrupter (GFCI). Contact aqualified electrician if you cannot verify thatthe power supply is protected by a GFCI.The GFCI should be tested on a routinebasis. Consult the GFCI manufacturer’sinstructions for correct testing andoperation.For electrical connections, see applicablewiring diagram.See www.nuwhirl.com/docs/productinstructions.htmlDo not use an extension cord to connect theproduct to the electric supply; provide aproperly located receptacle or junction box.WARNING: Failure to install in strictaccordance with each and every instructionabove may compromise the system, whichmay cause injury to persons and/or property.The tub may be supplied from more than onepower source. Before working on anyelectrical device, make sure all power to thecontrol system is off.Use this unit only for its intended use asdescribed in this manual. Do not useattachments not recommended by themanufacturer. Any improper installation ormisuse of the equipment may result in injuryto the user and will void the warranty.Save these instructions.
May not be applicable to your specific packageRefer to your package diagrams for more informationTOUCHSTONE Surface Heater Control SystemInstallation InstructionsYour whirlpool bathtub has been equipped withTOUCHSTONE Electronic Controls to provide features thatallow you to customize your bathing experience to yourindividual preference. Please familiarize yourself with thefeatures and operating instructions below in order tomaximize the enjoyment you receive from your bath. Theseoperating instructions should be used in conjunction withthe other instructions and warnings provided with yourwhirlpool bathtub in order to fully understand and safelyutilize the bathtub.System Features Electronic Keypad Automatic 30-minutetimer Surface Heaters Optional Multicolor TubLights
May not be applicable to your specific packageRefer to your package diagrams for more informationElectronic KeypadYour Surface Heater System is controlled by a single electronic keypadpower switch or combination heater and light keypad.When LED is litthe SurfaceHeaters arerunning.
May not be applicable to your specific packageRefer to your package diagrams for more informationTOUCHSTONE Surface Heater Control SystemInstallation InstructionsOperating InstructionsSurface HeatersIt is recommended to turn the Surface Heater ON 5-10 minutes prior toentering the tub. Once the Heater Button is pressed the red LEDindicator will illuminate and start a 30-minute timer. The Heater willbegin to warm the surface of the seat and/or back wall. Thetemperature will increase to a c
installation and tests. Remove the access panels when moving the Walk in Bath and always lift the bathtub from the frame (Page #2). Electrical The unit MUST be connected to a circuit protected by a ground fault circuit interrupter (GFCI) provided and installed by a licensed electrician and tested periodically (refer to


![HOME [images.thdstatic ]](/img/43/8ee35b57-aadc-4819-a5dc-d8bb01f2e90c.jpg)