Transcription
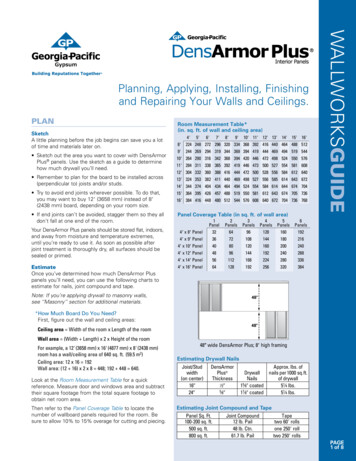
PLANSketchA little planning before the job begins can save you a lotof time and materials later on. Sketch out the area you want to cover with DensArmorPlus panels. Use the sketch as a guide to d eterminehow much drywall you’ll need. Remember to plan for the board to be installed across(perpendicular to) joists and/or studs. Try to avoid end joints wherever possible. To do that,you may want to buy 128 (3658 mm) instead of 88(2438 mm) board, depending on your room size. If end joints can’t be avoided, stagger them so they alldon’t fall at one end of the room.Your DensArmor Plus panels should be stored flat, indoors,and away from moisture and temperature extremes,until you’re ready to use it. As soon as possible afterjoint treatment is thoroughly dry, all surfaces should besealed or primed.EstimateOnce you’ve determined how much DensArmor Pluspanels you’ll need, you can use the following charts toestimate for nails, joint compound and tape.Room Measurement Table*(in. sq. ft. of wall and ceiling 40672704736768Panel Coverage Table (in sq. ft. of wall area)1Panel4* x 8* Panel324* x 9* Panel364* x 10* Panel404* x 12* Panel484* x 14* Panel564* x 16* Panel642Panels64728096112128Note: If you’re applying drywall to masonry walls,see ‘‘Masonry’’ section for additional anning, Applying, Installing, Finishingand Repairing Your Walls and Ceilings.6Panels19221624028833638448(*How Much Board Do You Need?First, figure out the wall and ceiling areas:48(Ceiling area Width of the room x Length of the roomWall area (Width Length) x 2 x Height of the roomFor example, a 128 (3658 mm) x 168 (4877 mm) x 88 (2438 mm)room has a wall/ceiling area of 640 sq. ft. (59.5 m2)Ceiling area: 12 x 16 192Wall area: (12 16) x 2 x 8 448; 192 448 640.Look at the Room Measurement Table for a quickreference. Measure door and windows area and subtracttheir square footage from the total square footage toobtain net room area.Then refer to the Panel Coverage Table to locate thenumber of wallboard panels required for the room. Besure to allow 10% to 15% overage for cutting and piecing.48( wide DensArmor Plus; 8* high framingEstimating Drywall NailsJoist/Studwidth(on center)169249DensArmorApprox. lbs. ofPlus Drywallnails per 1000 sq.ft.ThicknessNailsof drywall1 2915 89 coated51 4 lbs.57 891 89 coated51 4 lbs.Estimating Joint Compound and TapePanel Sq. Ft.100-200 sq. ft.500 sq. ft.800 sq. ft.Joint Compound12 lb. Pail48 lb. Ctn.61.7 lb. PailTapetwo 608 rollsone 2508 rolltwo 2508 rollsPAGE1 of 8
terials DensArmor Plus Interior PanelsUse our online calculator to estimate the numberof pieces you’ll need for your project. Go towww.densarmorplus.com, choose a productand click the Installation tab.242623272228212920301931 Fasteners302029212822272326242525 Cornerbeads (if needed)158742CutUsing your T-square or straightedge and drywall knife, scorethe gypsum panel completely through the facer. Thenuse firm, even pressure to snap the board along the cut.Fold back the board, and use the knife to cut the backfacer. Smooth rough edges.445544643 Primer and paint or other wall covering4194010391138123713361435Apply34 Paper or fiberglass tape for the joints16331732183119 Joint compound ORANGE247346ToolsThe basic tools you’ll need are:1. Drywall knife with heavy-duty blade2. Drywall hammer or regular crown-headedcarpenter’s claw hammer3. 48 T-square or steel straightedge4. Steel tape measure5. Keyhole or utility saw6. Joint finishing knives— 59 (127 mm) and109 (254 mm) blades7. Plastic pan for joint compound8. Sandpaper, medium texture (80 to 100 grit) andsanding block for joint finishing9. Damp sponge10. Pencil11. Safety glasses12. Dust mask13. Protective glovesFollow these standard work practices: Wear a loose-fitting,long-sleeved shirt and long pants, protective gloves andeye protection (goggles or safety glasses with side shields).Wear a dust mask or NIOSH/MSHA approved respiratoras appropriate when sanding. Additional protection maybe needed when very dusty. For additional productsafety and use information, including MSDS, go towww.buildgp.com/safetyinfo.Caution: When working with tools, alwayswear approved safety glasses.Receptacle Openings, Etc.Carefully measure openings for receptacles, switches, etc.from the edge and end of the board, and mark guidelineson the face. Use a keyhole saw to cut the openings. Makesure your measurements and cuts are accurate, or thecover plate you install later on will not conceal the hole.InstallationDensArmor Plus panels are installed in a similar mannerto traditional paper-faced drywall. DensArmor Plus panelsshould be installed according to the most current versionsof Gypsum Association Publication GA-216 “Applicationand Finishing of Gypsum Panel Products” and ASTM C840–“Standard Specification for Application and Finishingof Gypsum Board for Non-Fire Rated Construction.” Forbest results, abut DensArmor Plus panels against regularpaper-faced wallboard only at inside or outside corners toeliminate transitions in the field of a wall or ceiling. Adjustfastening tools to insure that the fasteners are not overdriven through the face of the board. Nails and screwsshould be driven with the heads slightly below the surfaceof the panel.CeilingsFor ceilings, always use nailsor screws (mechanical attachment). Nails should be spacedat 79 (178 mm) intervals andscrews at 129 (305 mm) intervals, around the edges (about3 89 [9.5 mm] from the edge),and through the center of theboards. Make sure you hit thecenter of the ceiling joists. Forjoists that are 169 (406 mm) o.c., 1 29 (12.7 mm) or5 89 (15.9 mm) DensArmor Plus panels may be applied.PAGE2 of 8
29 (12.7 mm) DensArmor Plus may be applied to 249(610 mm) o.c. joists as long as it is installed across orper pendicular to ceiling joists as shown.All nails should be “dimpled”. That is, drive the nails firmenough to indent the board’s facer without tearing it. It’sbest to install board on the ceiling before installing boardon the wall.It also helps to have a pair of T-braces to help hold theboard in place while it’s being nailed. A good T-brace canbe made by nailing a 28 (610 mm) piece of 19 x 49 (25 mmx 102 mm) onto the end of a 29 x 49 (51 mm x 102 mm).Install boards across (perpendicular to) ceiling joists.WallsNail the board around the edges(about 3 89 [9.5 mm] from theedge), and along each end.Space fasteners at 89 (203 mm)intervals at the ends, edgesand field of the panel. Fastenersshould be driven so that theheads are slightly below thesurface.Many professionals prefer screws to nails for theirextremely strong holding power. For screw application,use only drywall screws.Install boards horizontally or vertically, running across thewall studs.MasonryIf you’re installing gypsumInsulationboard on a masonry wall,first cut 19 x 29 (25 mm x51 mm) or 29 x 29 (51 mmx 51 mm) furring strips toreach from the floor to the16( o.c.ceiling. 519 x 519 (25 mmx 51 mm) strips are good ifyou plan to back your drywall with insulation.) Cut enoughstrips to go around the room when nailed vertically on169 (406 mm) centers. Nail the strips on the walls, 169(406 mm) o.c., using masonry nails. (Check with yourhome supply dealer for the proper nails for your kind ofmasonry wall.) When the furring strips are up, rigid foamboard insulation and fiberglass insulation can be cut andplaced between strips. Then treat the furring as youwould ordinary wall studs, using the application methodsdescribed in the “Walls” section.FinishingThe finishing and sanding of DensArmor Plus panelsshould be performed in accordance with the most currentversion of Gypsum Association Publication GA-214-07“Recommended Levels of Gypsum Board Finish.”DensArmor Plus panels may be finished with eitherpaper tape embedded with all purpose joint compoundor with fiberglass mesh tape and setting compound.Because of the enhanced p roperties of DensArmor PlusInterior Panels, drying times for the joint and settingcompounds may vary slightly. It is essential to alloweach coat of compound to dry t horoughly before applyingadditional coats of compound. Care should be taken toensure that all joints and fasteners are properly andadequately sanded to provide a smooth transitionbetween the compound and the face of the board.WALLWORKSGUIDE1Option 1 — Paper TapeJointsFinish the joints in four steps. First, apply a coat of jointcompound to the joints. Then, immediately imbed papertape in the joint compound, smooth out bubbles andallow to dry. Next, apply two successive finish coatsover the tape and allow to drybetween coats. Sand when dry.BeddingWith your 59 (127 mm) joint finishingknife, apply a smooth, full, even coatof joint compound into the recesscreated by the tapered edges ofadjoining boards.Center a strip of paper tape over the joint, and press itfirmly into the wet bedding compound with your drywallknife at a 45 angle. Press hard enough to squeeze a littlecompound out from the edge of the tape, but leave enoughcompound for a good bond. Let dry about 24 hours.Taping and FinishingWhen the taped bedding coat is dry, apply your firstfinish coat of all-purpose joint compound. Extend thiscoat a few inches beyond the tape, and feather theedges. Let dry about 24 hours. Then apply a secondfinish coat with your 109 (254 mm) joint finishing knife.Extend this coat 11 29 (38 mm) wider than the first finishcoat. Wait 24 hours, and sand lightly with your sandingblock and medium grit sandpaper. Don’t sand downto the tape. Wipe off dust with a damp sponge.CornerbeadTo protect outside corners from edge damage, installcornerbeads after you’ve installed the drywall. Nail thecornerbead every 59 (127 mm) through the gypsumboard, into the wood framing.PAGE3 of 8
To further reduce the potential for mold growth andmaintain a completely non paper-faced wall surface,fiberglass joint tape should be used to finish the joints ofDensArmor Plus panels. A setting-type compound isrequired for at least the first coat over fiberglass meshtape. Additional coats prescribed by the desired level of finish should be a drying-type (powder or ready-mixed)joint compound. Inside corners may be finished with vinylcorner beads to maintain a non paper-faced wall.For either tape option, continue with installation.Fastener HeadsDraw your 59 (127 mm) joint finishing knife across thefastener head to make sure it is below the surface of theboard. Apply your first coat of all-purpose joint compoundso that it just fills the nail dimple. Don’t use excess pressurewhen applying, or your knife may scoop compound fromthe dimple. Let the first coat dry. At least one more coatwill be required. A third coat of joint compound may beneeded. Sand lightly after each coat dries.Butt JointsButt joints (square cut edge joints)are finished the same way asregular joints, with one exception.Because butt joints are nottapered, you need to be carefulnot to allow the joint compoundand tape to build up any morethan necessary. To reduce theeffect of the build-up, feather theedges of your finish coats widerthan you would for a regular joint.Outside CornersBe sure the metal cornerbead is attached firmly (see‘‘Cornerbead’’ in previous section). Use your 89 (203 mm)knife to spread all-purpose joint compound about 39-49(76-102 mm) past metal corner. Be sure to cover themetal edges. Let dry 24 hours. Apply second coat withyour 109 (254 mm) knife. Feather edges 29-39 (51-76 mm)beyond first coat. Sand lightly when dry. A third coat maybe needed.Inside CornersCut a strip of drywall tape the length of the corner you’regoing to finish. Crease the tape down the center. Useyour 59 (127 mm) knife to spread joint compound about11 29 (38 mm) on both sides of the corner. With the knifepress the tape into the corner. Use enough pressure tosqueeze some compound from the edge of the tape, butleave enough compound to form a good bond. Featherthe compound 29 (51 mm) from the edge of the tape. Letdry 24 hours, finishing only one side at a time. Let dry,finish other side of corner. Let dry, then sand corner.Be careful not to let the compound build up in the verycorner of the tape. Excess compound in the cornercould cause hairline cracks.Now you’re ready to primeand paint!PLEASE NOTE that Georgia-Pacific Gypsum makes nowarranty regarding the primers and surfacers identified inthe following section or the finishing results obtained bysuch products. As indicated, a mock-up or test wall shouldbe used to ensure the proposed decorative finish willproduce an acceptable result. For further information regardingfinishing of DensArmor Plus interior panels, please seeGeorgia-Pacific Gypsum’s Technical Guide for such panelsavailable at www.gpgypsum.com.WALLWORKSGUIDEOption 2 — Fiberglass TapePriming & PaintingA mock-up or test wall should be used to ensure theproposed decorative finish will produce an acceptableresult. Proper installation, finishing and priming arecritical. Skipping a step, such as the application of aprimer or taking shortcuts, such as not using propersanding techniques, will negatively impact the qualityof the final decorative finish.Because many factors that are unrelated to the manufactureof the panels can affect the acceptability of the final finishresult, Georgia-Pacific Gypsum makes no warranty, expressor implied, regarding the finish results to be achieved withDensArmor Plus panels.The following guidelines for priming DensArmor PlusInterior Panels have been developed by the Rohm & HassPaint Quality Institute:1. A high solids primer with at least 40% volume solidsshould be used. The primer can best be applied by rollerat a higher film thickness in one coat vs. brush or sprayapplied.2. For adequate coverage, the primer should be applied toa dry film thickness of 1.7 to 1.8 mils dry to ensure uniform coverage and appearance. The number of coats toachieve the dry film thickness will depend on the primerused. For instance, a primer with lower than 37% volumesolids may need two coats for adequate coverage.% Volume Solids of Primer37404347Spread Rate, sq. ft./gal.330-350355-380380-400420-4503. For best results, apply the high solids primer with a3 8( (9.5 mm) nap roller at a natural application rate.PAGE4 of 8
ToolsThe materials and tools you’ll need for most repairs are:5. To maximize the mold-resistant benefit of DensArmorPlus panels, a 100% acrylic primer with mildecideshould be used.2. Fiberglass mesh tape or drywall tape6. High-quality flat or satin paint should be applied over theprimer. Semi-gloss or gloss paints are not recommended.4. Fasteners (nails or screws)7. Level 5 finish should be utilized for semi-gloss or glosspaints, per GA-214.6. 59 (127 mm) and 109 (254 mm) taping knivesPrimers on the market that may provide suitable finishingresults include:8. Safety glassesa. ICI Paints Glidden Gripper Interior/Exterior Stain KillerPrimers/Sealer GL3210-1200b. ICI Paints Prep and Prime Gripper MultiPurposeInterior/Exterior Water Based Primer Sealer 3210-12001. Setting-type or all-purpose joint compound3. DensArmor Plus scraps5. Utility knife7. HammerMedium to Small Holes1. Cut out a rectangle around damaged area with knifeor keyhole saw.c. Pratt and Lambert Paints, SUPRIME Interior LatexEnamel Undercoater Z1013/F1013.2. Cut a scrap section ofDensArmor Plus, with topand bottom slightly largerthan the hole.d. Do It Best Interior Latex Wood & Wall Primer3. Place a piece of string through the center of scrap. e. Do It Best Latex Stainblocker Primerf. Sherwin Williams Builders Solution High Build surfacers that may provide suitable finishingresults include:a. ICI Paints Prep and Prime Fill & Seal Equalizing InteriorWater-Based Primer Sealer 1070-12004. Apply joint compound to edges of scrap, then slideinto hole.5. Center scrap and pull tight until joint compound is set.6. Cut string, fill hole with joint compound.7. Additional finish coats may be necessary.b. Sherwin Williams Prep Rite High Build Interior-LatexPrimer SurfacerDents and Gouges1. Fill with all-purpose joint compound or sandablesetting compound.c. Hamilton Prep Coat Plus2. Touch up with paint. d. Dursystem DS 4000e. Variance OmniCoat Acrylic FinishWallcoveringsBecause of the enhanced properties of DensArmor Pluspanels, drying times for the wallcovering adhesives andprimers may vary slightly. Some wallcoverings, suchas an unbacked vinyl wallcovering, require a Level 5finish as detailed in GA-214-07 when applied overDensArmor Plus. Avoid the use of wallcovering materialover a Level 4 finish if the material is lightweight,contains a limited pattern, has a gloss finish or anycombinations of these elements is present as detailedin GA-214-07. Always follow wallpaper and adhesivemanufacturer’s installation instructions.WALLWORKSGUIDE4. It is possible to use a 1 2( (12.7 mm) nap roller and applya thicker coat. However, the roller pattern is morepronounced and some may find it objectionable.Large Holes1. To patch larger holes, you may have to cut the gypsumboard back to the studs to replace the entire damagedsection.2. Apply paper or fiberglass tape and finish off with jointcompound.PAGE5 of 8
Nail Pops1. Drive new nail about 1-29(25-51 mm) above and belowthe one that has popped.2. P ush panel close to the studwhile you “dimple” the twonails. (See Installation sectionfor explanation of “dimpling.”)3. R emove loose material fromdimpled areas, sand lightly.4. F ill dimpled area with joint compound — let dryovernight.5. I f shrinkage occurs in drying, re-apply joint compound.When patch is dry, sand lightly.6. P rime and texture or paint to match existing wall.CracksFor large cracks, use joint compound and drywall tape.1. S and the area about 69 (152 mm) on each side of thecrack.2. Work joint compound down into crack.3. C enter tape over the crack and press down firmly witha 59 (127 mm) drywall knife.4. C over tape with a coat of joint compound. Smooth itout well beyond tape edges by feathering.5. A llow patch to dry overnight. Apply another coat ofjoint compound which extends 11 29 (38 mm) widerthan the last coat. Smooth edges, let patch dry.Sand lightly. Narrow cracks may be filled with joint compoundalone. Use a stiff brush or screwdriver to remove loosematerial from the crack. Dampen edges of the crack with water. F ill deep cracks almost to the surface. Let dry, then adda thin coat of joint compound. Smooth out 29 (51 mm)on each side of crack, by feathering. Let dry. Sand smooth.Do It YourselfGarageA 5 89 (15.9 mm) DensArmor Plus Fireguard Interior Panels,available in 88 (2438 mm)to 128 (3658 mm) lengths,is used in garage walls andceilings for improved fireresistance compared to 1 29(12.7 mm) gypsum board.B 1 29 (12.7 mm) DensArmor Plus, available in 88 (2438 mm)to 128 (3658 mm) lengths, is the normal wall andceiling product for new homes and additions. 5 89(15.9 mm) DensArmor Plus Fireguard is preferred forceilings for improved sag resistance.C Cornerbead in 88 (2438 mm) lengths protects outsidecorners from damage and gives straight and true corners.D Joint compound and other setting type compounds areavailable in various sized pails and boxes. Used fortaping and finishing gypsum board. Typical usage: two61 lb. (28 kg) pails or boxes per 1000 sq. ft. (93 m2) ofgypsum board.E If a non paper-faced wall surface is desired, fiberglassjoint tape should be used. Follow instructions regardingfiberglass joint tape under Option 2— Fiberglass in theFinishing Section. Paper joint tape can also be used totape all joints and interior angles/corners. Typicalusage: 350 lineal feet (107 m) of tape per 1000 sq. ft.(93 m2) of board.WALLWORKSGUIDERepairBathroomA 1 29 (12.7 mm) DensArmorPlus Interior Panel isavailable in 88 (2438 mm)to 128 (3658 mm) lengthsand is the normal walland ceiling product fornew homes and additions.B 1 49 (6.4 mm) and 1 29 (12.7 mm)DensShield Tile Backer from Georgia‑Pacific arelightweight, easy to handle s ubstrates that come invarious sizes. This heavy-duty tile backer for ceramictile is used for walls, ceilings, floors and countertops.Features a Lifetime Limited Warranty when used in aresidential tile installation. See complete warranty fordetails at www.densshield.com.C D ensArmor Plus panels in 88 (2438 mm) lengths arethe normal product for bathrooms. DensShield tilebacker is recommended for backing tile installations.D A ll-purpose joint compound is available in varioussized pails and boxes. Used for taping and finishinggypsum board. Typical usage: two 61 lb. (28 kg) pailsor boxes per 1000 sq. ft. (93 m2) of gypsum board.BasementA 1 29 (12.7 mm) DensArmor Plus, available in 88 (2438mm) to 128 (3658 mm) lengths, is the ideal wall andceiling drywall product for new homes and additions.5B 89 (15.9 mm) DensArmor Plus Fireguard, available in 88(2438 mm) to 128 (3658 mm) lengths, is recommendedas an alternative to 1 29 (12.7 mm) gypsum board forimproved acoustical isolation and fire resistancecompared to 1 29 (12.7 mm) gypsum board.PAGE6 of 8
AdditionA 5 89 (15.9 mm) DensArmor Plus Fireguard , availablein 88 (2438 mm) to 128 (3658 mm) lengths, is thepreferred substrate for ceilings and walls for improvedfire resistance and sound isolation compared to 1 29(12.7 mm) gypsum board.1B 29 (12.7 mm) DensArmor Plus, available in 88 (2438 mm)to 128 (3658 mm) lengths, is the typical wall andceiling drywall product for new homes and additions.C J oint compound is used for bedding tape, finishingjoints, filling cornerbead, spotting nails and texturing.Typical usage: two 61 lb. (28 kg) pails per 1000 sq. ft.(93 m2) for joint taping and finishing and 15-50 lbs.(6.8-23 kg) per 1000 sq. ft. (93 m2) when used fortexturing.D All-purpose joint compound is available in various sizedpails and boxes. Used for taping and finishing gypsumboard. Typical usage: two 61 lb.(28 kg) pails per 1000 sq. ft.(93 m2) of gypsum board.**R ecommended drywall taping knives: 49 (102 mm) wide for taping, 69(152 mm) for the first finish coat, 129 (305 mm) for second finish coat.WALLWORKSGUIDEC C ornerbead in 88 (2438 mm) lengths protects outsidecorners from damage and gives straight and true corners.D If a non paper-faced wall surface is desired, fiberglassjoint tape should be used. Follow instructions regardingfiberglass joint tape under Option 2— Fiberglass in theFinishing Section. Paper joint tape can also be usedto tape all joints and interior angles/corners. Typicalusage: 350 lineal feet (107 m) of tape per 1000 sq. ft.(93 m2) of board.E All-purpose joint compound is available in varioussized pails and boxes. Used for taping and finishinggypsum board. Typical usage: two 61 lb. (28 kg) pailsper 1000 sq. ft. (93 m2) of gypsum board.*PAGE7 of 8
WALLWORKSGUIDEDensArmor Plus Interior PanelsDensArmor Plus Interior Panels have fiberglass mats instead of paper to providesuperior mold resistance. The c ombination of non paper-faced surfaces andthe addition of a moisture-resistant core provides superior m oisture and moldresistance when compared to t raditional paper-faced drywall.**Please refer to installation recommendations and written warranty.Details available from Georgia-Pacific Gypsum.**When tested, as manufactured, in accordance with ASTM D3273.U.S.A.Georgia-Pacific Gypsum LLCGeorgia-Pacific Gypsum II LLCCanadaGeorgia-Pacific Canada LPSales Information & Order 6-4746South Central: 800-947-4497CANADA Canada Toll Free: 1-800-387-6823Quebec Toll Free: 1-800-361-0486Technical InformationGeorgia-Pacific Gypsum Technical HotlineU.S.A. and Canada: 1-800-225-6119www.gpgypsum.comTRADEMARKS DensArmor Plus, DENSSHIELD,FIREGUARD, TOUGHROCK, BUILDING REPUTATIONS TOGETHERand the Georgia-Pacific logo are trademarks ownedby or licensed to Georgia-Pacific Gypsum LLC. GRIPPER,GLIDDEN and PREP & PRIME are trademarks of The GliddenCompany. SUPRIME is a trademark of Pratt & LambertUnited, Inc. DO IT BEST is a trademark of Do It Best Corp.SHERWIN WILLIAMS and BUILDERS SOLUTION are trademarks of SWIMC, Inc. MYTHIC is a trademark in the U.S.Patent and TM Office and in other countries, owned bySouthern Diversified Products, LLC. DURSYSTEM is aregistered trademark of Tool World, Inc. 2014 Georgia-Pacific Gypsum LLC. All rights reserved. 2/14. GP-TM Lit. Item #622760PAGE8 of 8WARRANTIES, REMEDIES AND TERMS OF SALEFor current warranty information for this product,please go to www.gpgypsum.com and select theproduct for warranty information. All sales of thisproduct by Georgia-Pacific are subject to our Termsof Sale available at www.gpgypsum.com.UPDATES AND CURRENT INFORMATIONThe information in this document may change withoutnotice. Visit our website at www.gpgypsum.com forupdates and current information.CAUTION For product fire, safety and useinformation, go to www.buildgp.com/safetyinfoor call 1-800-225-6119.HANDLING AND USE–CAUTION This productcontains fiberglass facings which may cause skinirritation. Dust and fibers produced during thehandling and installation of the product may causeskin, eye and respiratory tract irritation. Avoidbreathing dust and minimize contact with skin andeyes. Wear long sleeve shirts, long pants and eyeprotection. Always maintain adequate ventilation.Use a dust mask or NIOSH/MSHA approved respiratoras appropriate in dusty or poorly ventilated areas.FIRE SAFETY CAUTION Passing a fire test in acontrolled laboratory setting and/or certifying orlabeling a product as having a one-hour, two-hour,or any other fire resistance or protection rating and,therefore, as acceptable for use in certain fire ratedassemblies/systems, does not mean that either aparticular assembly/system incorporating the product,or any given piece of the product itself, will necessarily provide one-hour fire resistance, two-hour fireresistance, or any other specified fire resistance orprotection in an actual fire. In the event of an actualfire, you should immediately take any and all actionsnecessary for your safety and the safety of otherswithout regard for any fire rating of any product orassembly/system.
DensArmor Plus panels may be finished with either paper tape embedded with all purpose joint compound or with fiberglass mesh tape and setting compound. Because of the enhanced properties of DensArmor Plus Interior Panels, drying times for the joint and sett