Transcription
Arctic Equipment Manufacturing CorporationM683 Hydraulic Power UnitTable of ContentsGeneral Information.2Hydraulic & Electrical Operation Diagrams.10Hydraulic & Electrical Installation.18High Mount Conversion Kit.23Parts List.31Troubleshooting.34
Arctic Equipment Manufacturing CorporationM683 Power UnitM683 R03Sept 06, 2002M683Note: This unit will not fit under hood of most new vehicles.*M683 will fit in the M3593 box shown on page for Hi Mount Mounting Plate Kit.
Arctic Equipment Manufacturing CorporationM683 Power UnitM683 R03Sept 06, 2002GENERAL INFORMATIONThe Monarch "Dyna-Ramic" Model M-683 series power units are specially designed for thesnow plow application. These units have a 3-way/4-way (single/double acting) functionincorporating internal solenoid valving for maximum protection and efficiency.WARRANTY IDENTIFICATIONFor purposes of warranty consideration, it is necessary to record the serial number of the powerunit. This serial number is displayed on a label affixed to the reservoir section of the power unit.Serial numbers prefixed by the letter "F" were built after August 1, 1986.MOTOR IDENTIFICATIONShould a motor replacement become necessary at some point, it is recommended that the samemotor be used in order to ensure optimum performance. If a substitution is desired, it isrecommended that you consult with the factory.Older M-683 models will be equipped with 4.5" diameter motors bearing the Prestolite partnumber MHN-4001. This motor was subsequently used and identified with the Monarch partnumber 8080. The MHN motor can be readily identified by its one piece cast iron body withstamped metal end cap.Subsequent versions of the M-683 have incorporated the "belly band" 2 piece body version ofthe 8111 motor, the 8112 motor which can be identified by its one piece ribbed bodyconstruction and the latest "one piece body" version of the 8111 motor incorporating analuminum end cap.In addition to the 4.5" diameter motors, a small number of M-683's were equipped with 3"diameter motors. These types are generally found on earlier Arctic-X snow plows.GENERAL MAINTENANCEUnder normal operating conditions, the M-683 should not require servicing during the plowingseason, provided periodic post season maintenance has been carried out.POST SEASON MAINTENANCEIt is recommended that after the first season or 100 hours, whichever comes first, the hydraulicfluid be changed. This may require the removal of the unit from under the hood. The
Arctic Equipment Manufacturing CorporationM683 Power UnitM683 R03Sept 06, 2002replacement fluid recommended is "DEXTRON" automatic transmission fluid. If unit is notunder the hood (mounted out front on lift frame J13 (UNIVIS HVI13 is recommended.Subsequent oil changes may be carried out at less frequent intervals. The recommended timeperiod is 200 hours or bi-seasonal. Care should be taken that with the lift cylinder fully retracted,the oil level in the reservoir is to within ½" of the top.When draining the hydraulic fluid, the hoses at the cylinders should be disconnected and drained.With the hoses disconnected, the cylinders should be collapsed.When refilling the system, it is recommended that the hoses and cylinders be bled by looseningthe hydraulic fittings at the cylinders until they leak. Power angle plow repeatedly from side toside until fluid flows steadily from leaking fittings. Care should be taken in maintaining thefluid level in the reservoir during this operation.When the hydraulic fluid is changed, the port filters in the M-683 should be cleaned. Thesefilters are retained in each of the outlet ports in the manifold by 1/4" allen retaining screws. Thescreens on the internal solenoid valves are generally not cleaned until and unless the valvemodule has to be removed for major servicing. Oil changes as recommended should prevent thesilting of these screens, under normal conditions.ELECTRICAL SYSTEMFrequently problems develop due to an undersized electrical charging and storage system.Generally, the heavier the usage, the heavier the system. For a moderately light duty, the batteryshould not be less than 70 ampere-hours and the alternator should charge at a rate of not less than60 amperes. For heavy usage and in the case where a number of other devices are run off thebattery simultaneously, heavier ratings are strongly recommended.Periodically, and during post season maintenance, make sure the electrical connections are tightand free of corrosion. The terminals may be covered with grease for additional protection fromcorrosion.OTHER PROTECTIONWhen the hydraulic system is not used for an extended period of time such as in the off season,all exposed chrome rod surfaces should be coated with an axle grease.DYNARAMIC —683 COMPONENTSFour 12 volt DC, 4.5" diameter motors have been used over time. Physically all areinterchangeable, however since the original motors were matched with certain pump sizes,
Arctic Equipment Manufacturing CorporationM683 Power UnitM683 R03Sept 06, 2002optimum performance is achieved only if motors are replaced with the identical part number. All4.5" motors are electromagnetic series wound.MHN-4001 / MONARCH 8080 MOTORThis motor was the only one used on all Dyanramic models up to 1983. It is a four poleelectromagnetic motor consisting primarily of an armature/commutator, four field coils, fourpole pieces, four brushes in a brush holder set, and a one piece steel frame. This motor can beused with either a negative ground or positive ground electrical system.Power units with this motor will generally be equipped with pump number 51, although pumpnumber 05 was also used on a more limited basis.MONARCH 8111 MOTORThis motor was used extensively on the Dynaramic series in 1984 and 1985. It is a four poleelectromagnetic motor consisting of an armature/commutator, two field coils, four pole pieces,four brushes in a brush holder set, and a two piece steel frame consisting of a tube and bellyband. This motor can also be used with both negative and positive ground systems.Power units with this motor are equipped with both pumps 03 and 51, with the former offeringthe most optimum performance.MONARCH 8112 MOTORThis motor was introduced on Dynaramic power units in 1986. It is identical in construction tothe 8080 with the physical difference being in the ribbed appearance of the one piece frame. Theperformance of the motors are not identical however, and for this reason all M-683's with the8112 motor will have the 03 pump.As with the 8080 and 8111 motors, the 8112 is compatible with both positive and negativeground systems.MONARCH 8111 - ONE PIECE FRAME MOTORThis motor replaces the earlier version of the 8111 motor and differs only in appearance of theframe and end cap. Its performance and usage specifications are the same as that of the earlierversion of this motor.MONARCH 8110 - 3' DIAMETER MOTOR
Arctic Equipment Manufacturing CorporationM683 Power UnitM683 R03Sept 06, 2002In addition to the 4.5" diameter motors, a small number of M-683's were built with a 3" motorwith the Monarch part number 8110. This motor consists of a 3" diameter steel frame, anarmature/commutator, brushes and four ceramic permanent magnet fields. These motors cannotbe used on vehicles with positive grounds.HYDRAULIC PUMPThe hydraulic pump converts mechanical energy transmitted by the prime mover (in this case a12 volt DC electric motor) into hydraulic energy. The hydraulic energy is due to flow (kineticenergy) and pressure (potential energy). The rate of energy output is expressed in horsepower.At the inlet, as the gears unmesh, the volume in the cavity increases thereby causing fluid toenter. This fluid is then carried between the gears and the housing to the other side of the gearsinto the outlet cavity. At this point the gear teeth mesh. The outlet cavity volume decreases,causing fluid to flow into the system. Note that without a load, the pressure at the outlet port isnil.The pressure at the outlet of the pump is due to external loads placed on the system. These loadscan be transmitted through cylinders and linear actuators as well as hydraulic motors and rotaryactuators. In practice, system components by virtue of orifice and line sizes, offer someresistance to the flow of fluid. This translates into pressure at the outlet of the pump.PRESSURE RELIEF VALVEThe basic pressure relief valve consists of a poppet or ball, a retaining spring and a seat. Thepoppet or ball is exposed to the pressure in the outlet line from the pump. This pressure acting onthe exposed area of the poppet, causes a force on the retaining spring. When the pressure is suchthat the force on the poppet or ball exceeds the force in the spring (due to a preset amount ofcompression) the poppet or ball lifts off the seat and the fluid from the outlet of the pump isallowed to flow back to the reservoir. In some systems the fluid is allowed to flow back to thesuction line. The "standard setting" for the M-683 is 2000 psi.SOLENOID VALVESThe M-683 Dyanramic circuit contains 4 solenoid valves. These are identified as "A", "B", "C",and "D".Solenoid valves "A" and "B" are 2 way / 2 position normally closed poppet (check) type valves.The "C" valve is also a 2 way / 2 position normally closed valve but is of a spool typeconstruction. The "D" valve is a 4 way / 2 position valve also of a spool type construction.A basic solenoid valve consists of a valve cartridge and a coil.
Arctic Equipment Manufacturing CorporationM683 Power UnitM683 R03Sept 06, 2002The valve cartridge is comprised of an armature attached to a valve mechanism. This armature iscontrolled electrically by way of a coil. The cartridge screws into a modular valve manifold.The coil consists of a certain length of wire wrapped around a spool and often surrounded by ametal can. When current is put through the coil, magnetic forces are set up causing the armatureto be pulled further into the coil. The armature pulls a poppet or spool into its energized position.A coil spring is compressed in this position, hence when the current ceases and the magneticfield has collapsed, this spring pushes the armature back to its de-energized (normal) position.SOLENOID VALVE "A"Valve "A" is a 2 way / 2 position poppet valve which is closed in the non-energized position.When the plow is angled by extending the cylinder connected to C1, the cylinder connected toC2 must be allowed to retract. This is accomplished by opening solenoid valve "A".In its normal de-energized position, valve "A" acts as a check valve preventing the cylinderconnected to C2 from collapsing when forces are placed upon it during the plowing operation.SOLENOID VALVE "B"Valve "B" is identical to valve "A". Its purpose in the circuit is to check the oil from the liftcylinder thereby holding the plow up when not in use. To lower the plow, this valve must beenergized to the open position. This allows fluid from the lift cylinder to return to the reservoir.Valve "B" is also energized while plowing snow. In this manner the plow is allowed to "float"and follow the contour of the ground.SOLENOID VALVE "C"The "C" valve is a 2 way / 2 position poppet valve. In the normal or de-energized position it isclosed, allowing no flow in any direction. In the M-683 circuit it functions as a selector valve (incombination with valve "A").In the de-energized state valve "C" prevents fluid from entering the lift circuit while the anglingside is being operated. When valve "C" is energized and with valve "A" being normally closed,fluid flows to the lift circuit and will cause the lift cylinder to extend. Note that valve "B" is alsonormally closed.SOLENOID VALVE "D"Solenoid valve "D" is a 4 way / 2 position spool valve. In its normal position, pressurized pumpflow is directed through the valve to C1 allowing this cylinder to extend. Valve "A" must be
Arctic Equipment Manufacturing CorporationM683 Power UnitM683 R03Sept 06, 2002energized simultaneously thereby allowing fluid from C2 to be returned through it and valve "D"and thence to the reservoir.When valve "D" is energized, pressurized fluid flows through valve "A" to the C2 cylindercausing it to extend. Note that valve "A" is not energized as its poppet check type constructiondoes not allow flow in one direction, as would be the case with a check valve.Return flow from C1 passes through a pilot operated check valve and valve "D" back toreservoir.CHECK VALVESThe M683 incorporates one check valve and one pilot operated check valve.CHECK VALVEA simple check valve allows fluid to flow in one direction only. No fluid can pass through in theopposite direction only. A simple check valve is located between the "C" solenoid valve and portC3. Fluid can flow from the pump through the check valve into the lift cylinder, however noflow can occur from the lift cylinder back through this valve.PILOT OPERATED CHECK VALVEA pilot operated check valve (p.o. check valve) allows flow in one direction. The flow path inthe opposite direction is closed or checked. This opposite flow path however can be opened byway of pilot pressure. When the checked flow path is opened, pilot pressure acts on top of apiston which has a pin connected to it at the opposite end. The pressure moves the piston causingthe pin to make contact with and unseat the ball of the check valve. In this manner flow canoccur through the checked position. The M-683 has a p.o. check valve located between solenoidvalve "D" and angling port C1. The return flow from C2 does not involve the operation of thep.o. check valve. When C2 is extended, the return flow from C1 must pass through the p.o. checkvalve. As pressurized fluid is fed to C2, a pilot pressure line to the top of the piston of the p.o.check valve opens the check valve and allows return flow from C1 back to the reservoir.CROSSOVER RELIEF VALVESThe modular valve body of the M-683 has built into it two cross over relief valves which, whenactivated, bleed fluid from C1 to C2 or vise versa. The cross over relief valves are similar inconstruction to a regular direct acting relief valve. They are there to help protect the valving inthe power pack as well as allowing for the absorption of all but the most severe impact forces
Arctic Equipment Manufacturing CorporationM683 Power UnitM683 R03Sept 06, 2002that may occur during the plowing operation. In this manner both the angling cylinders, the plowframe and the truck frame are protected from the normal impact forces associated with plowing.The cross over relief valves are adjustable and are normally set at about 2500 psi.CONTROL SWITCHESThe M-683 uses two rocker switches mounted in a control station. Later models also have apressure release switch mounted in the top of the control station.The rocker switches are both 3 position with only the down position on the up/down switch notbeing spring returned.Then the plow is raised, the switch permits current to the C-valve as well as the motor solenoid.When the plow is lowered or in the float position, only the B-valve sees current.For angling to the right, C1 is extended. The angling switch then permits current to flow to valveA and the motor start solenoid. For angling left requiring the extension of C2, current flowsthrough the D-valve and the motor start solenoid.
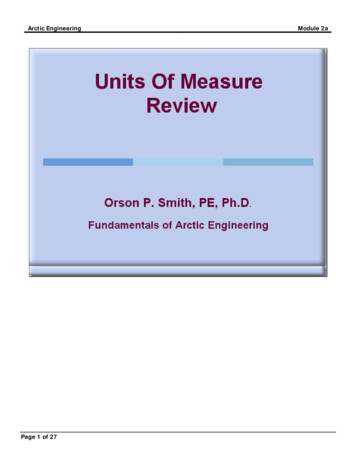
Arctic Equipment Manufacturing CorporationM683 Hydraulic InstallationR05Sept 06, 2002ARCTIC M683 HYDRAULIC INSTALLATIONWarning:-Top of battery needs to be protected. If positive side of battery is accidentally grounded personcould be burnt or wiring system can be damaged, or battery gasses could explode causinginjuries.-Disconnect cable from negative battery terminal before replacing the motor or solenoid.-Always wear eye protection and protective clothing when working around hydraulic systems.-Remove jewelry and objects that might conduct electricity while working on power units.-Fluid under pressure can pierce the skin and enter the bloodstream causing death or seriousinjury.- Hydraulic hoses and electrical cables (harnesses) must be tied and routed safely to avoid anydamage and pinching (away from hot places, sharp objects etc.).1. The hydraulic kit contains 5 hoses. - see diagram2 - 18" hoses to attach to the angling cylinders1 - 66" hose from pump to quick disconnect at the end of the 18" hose on the opposite side ofthe truck as pump.2 - 54" hoses - one to go to the lift cylinder, the other to quick disconnect at the end of the 18"hose on the same side of the truck as the pump.2. Before installing the pump, put the elbows into the ports.3. Connect 1 - 54" hose from lift port C3 to lift cylinder. The hose should be mounted to thecylinder first, then routed through the grill and attached to the pump with the swivel. Use the66" hose and the other 54" hose to go from the angling ports C1 and C2 to the anglingcylinders. Route the hoses to clear any sharp or moving objects under the hood.4. Attach the pump plug to the cable from the control box (electrical) in the cab.5. Connect the battery cable to the positive terminal on the solenoid and the positive terminal onthe battery. Also connect the brown wire and the black wire from the control box to the toppost on the solenoid and a solenoid mounting screw respectively.6. Install blade assembly to the vehicle.7. Install the 18" hoses into the angling cylinders. Attach the quick disconnects to the hose endsso that 1 male and 1 female are on both the blade assembly and on the truck. When the bladeisoff the truck, the couplers should be put together to prevent dirt from entering the system.8. Fill the reservoir with automatic transmission fluid. It is recommended to add 1 oz. of arcticanti-freeze to the fluid.
Arctic Equipment Manufacturing CorporationM683 Hydraulic InstallationR05Sept 06, 20029. To activate the system:1. Raise the blade approximately 6" off the floor.2. Jog the angling buttons alternately side to side moving the blade slightly farther eachtime. Do not angle the blade fully on the first movement.3. Once the full swing of the blade has finally been accomplished, bring the blade back tothe centre and lower.4. Collapse lift cylinder and refill pump.
Arctic Equipment Manufacturing CorporationM683 Hydraulic InstallationITEMPART NUMBERDESCRIPTIONR05Sept 06, 2002QTY150931-MM-683 Hydraulic Pump12CS150-06.00-NRSLift Cylinder13CS150-10.00-NRSAngling Cylinder2451333-M54" Hydraulic Hose Assembly2551334-M66" Hydraulic Hose Assembly1651002-M18" Hydraulic Hose Assembly2751003-MQuick Disconnect28HH-00790-00290 Degree swivel elbow39HH-00794-0031/4" pipe to pipe internal swivel1*1051335-M4 gauge battery cable 78"1*11130611036" power cable1*Items not shown on drawing
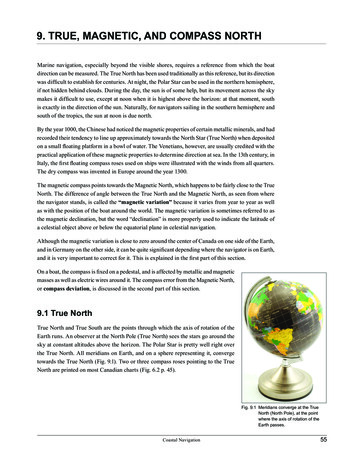
Arctic Equipment Manufacturing CorporationHigh Mount Conversion Kit M68352519-M R01April 2, 2002High Mount Conversion Kit M68352519-M
Arctic Equipment Manufacturing CorporationHigh Mount Conversion Kit M68352519-M R01April 2, 2002High Mount Conversion Kit M683 52519-MItemPart #DescriptionQuantity1*52377-01-MM683 Mounting Plate Kit12130634022" Battery Power Cable13HH-00915-001Swivel, 45 deg., 1/4" male & 1/4" female NPTF2452428-NBlack Terminal Protector1552427-NRed Terminal Protector173004665Cable and Plug Assembly181306122154" Ground Cable191306120Power Cable 63"1100203300Weather cover for power and ground cable1*Note: See information about 52377-01-M on drawing 52377-01/02-M. (Hi Mount MountingPlate Kit)
Arctic Equipment Manufacturing CorporationHi-Mount Mounting Plate Kit 52377-01-MR02April 2, 2002Hi-Mount Mounting Plate Kit 52377-01-M(M683 hydraulic power unit fits in this mounting plate)
Arctic Equipment Manufacturing CorporationR02April 2, 2002Hi-Mount Mounting Plate Kit 52377-01-M52377-01-M M683 Mounting Plate KitItemPart untingPlate Kit152162-CQ-Link I Lift Frame11a*52365-DLift Frame, QLII252166-CQ-Link I Spreader Bar2a*52310-DFord Q-Link I Spreader Bar2b*52363-CSpreader Bar QLII2c*52364-CFord Spreader Bar QLII352435-NGrommet 1 ½" x 3/16" x 1 3/4"2452548-BMounting Bracket Support2550069-CLift Channel1652208-BLight Brace27HH-00972-090½" x 1½" Capscrew48HH-00457-001½" Lockwasher49HH-00460-002½" Hexnut410HH-00972-1533/4" x 3½" UNF Cap screw112HH-00973-0073/4" UNF Thin Collar Locknut11352348-AMounting Pin1112
Arctic Equipment Manufacturing CorporationR02April 2, 2002Hi-Mount Mounting Plate Kit 52377-01-M52377-01-M M683 Mounting Plate KitItemPart #Description13aWA-34704Mounting Pin, QLI1450040-ALynch Pin1552522-NGrommet 11/16" x 3/16" x 1"116HH-00971-136½"-13 x 1 ½" Carriage Bolt417HH-00294-005½" - 13 Hex nut41852513-ALight Cross Bar21952514-ALight Support12052377-CPump Mounting Plate121HH-00972-089½" - 20 X 1 1/4" Hex Head Cap Screw322HH-00460-002½" - 20" Hex Head Nut323HH-00457-001½" Lock washer7*2552378-AAdapter for M6831*2652375-CPower unit Cover1*2752378-M BBm683 mtg plate bolt bag1*Note: These items are not show on ate Kit22
Installation of M683
Arctic Equipment Manufacturing CorporationM683 BOM R04M683 BOM (M683-016-05C05E thru ing, 3 5/8" x 3-7/8" x1/8"2Harness, 4 Prong Plug,Control EndHarness, 6 Prong Plug,Control End117FP0122‘O’-Ring, 3/8" x 9/16" x3/32"2Harness, 4 Prong PlugValve EndHarness, 6 Prong PlugValve End118FP7527Relief Valve Kit (withball inside/shown)Relief Valve Kit (with coneinside)1FPN0065-SA-1Control Station 4 ProngHarnessControl Station 6 ProngHarnessFP3568FP35673ITEM #DESCRIPTIONFPN0064-SA2SEQ#ITEM #FP3384FP3386QUANT.FP2222QUANT.4FP1413Fitting, Strain Relief119FP2350Plug, Pipe, Flush 1/4" NPT15FP0838-SAManifold Ass’y with allvalves120FP2349Plug, Pipe, Flush 3/8" NPT46---21FP2159Seal17FP1209Tube, Suction 3/8"NPT ,90 Degrees122FP2348Plug, Pipe, Flush 1/2"NPT18FP1134Screen, Filter, Suction123FP8111Motor 12V DC forM683-016-05C05E19FP1143Vent Plug, Plastic, 3/4"NPT1FP8112Motor 12V DC forM683-018-05C05E10FPN0151-SAReservoir With WeldedMounting Saddle124FP2318Bearing, Motor to Base111FP6703Reservoir 4 ½" Dia. x8", 60 Cu. In. Useable125FP3336Switch, Solenoid, 12V DC112FPN0013Base Bracket, M683126FP7683Screw, Round HeadMachine, 10-32 x 1/4213FP7703Screw, Self Tapping10-24 x 3/8"1227FP3414Terminal, Male Tab 1/4"Slip On114FP1452Tube, Pressure, Transfer128FP1349Strap, Motor-SolenoidConnecting115FP12471Pump Base115aFP12171-250-SAPump Assembly (inc.modular pump, suctionstrainer etc.)1
Arctic Equipment Manufacturing CorporationM683 BOM R04M683 BOM (M683-016-05C05E thru M683-018-05C50E)SEQ#ITEM #DESCRIPTION29FP7710Screw, Self Tapping30FP339531QUANT.SEQ#ITEM #DESCRIPTIONQUANT.851FP0262Valve, Cartridge, 12V DC3Switch, Rocker, LiftW/Float152FP0121‘O’-Ring and Screen Kitfor 3W Directional Valve3FP3397Switch, Rocker, Angling153FP0089Valve Coil 12V DC332FPN0053N.O. Push Button Switch154FP1274Tube, Return133FPN0015Red Light w/Clip155FP0095Valve, N.C. , 4W/2P 12VDC134FPN0002Connector, Panduit JN-418156FP0266Valve, Cartridge, 12V DC135FPN0016Terminal, Female 1/4"Tab157FP0096Valve, Coil, 12V DC136FPN0014Control Box, Grey ArcticStyle w/Back Plate158FP0061Piston, Ass’y, Pilot CheckValve137FP1414Fitting, Plastic StrainRelief159FP2395Plug, Expander, Ball1238FP13023Parts Kit, X-Over ReliefValve260FP1316Filter, Screen339FP3694Seal Kit, X-Over ReliefValve261FP7624Screw, Filter Retainer340FP0007‘O’-Ring 1/4" x 3/8" x1/16"262FP3507Gasket, Poppet Seat141FP0346Ring, Back Up, for 0007‘O’-Ring263FP2424Seat, Poppet142FP0378Seat, X-Over Rel. Valve,Ball Type264FP0126Ball 5/16"143FP0114‘O’- Ring, 0.468" ID x0.078W265FP2680Poppet, Ball Retainer144FP0379Housing Adj. Relief Valve,Ball Type266FP0130Spring, Light, Check Valve145FP0012Ball 1/4"267FP7732Screw, Spring Retainer,5/16-18146FP1288Shim, Spacer, Adj. X-OverRelief Valve268FP3624Parts Kit, Check ValveAssembly247FP2221Spring, Relief Valve269FP7669Plug, Pipe, Flush 1/16"NPT448FP0386Nut, Sealing, 3/8"-16UNC271FPN0027-SAManifold Ass’y comes withX over valves only, NoValves149FP0387Screw, S Set, Oval P, 3/8 x16 x 1250FP0094Valve N.C., 2W/2P, Poppet12V DC3
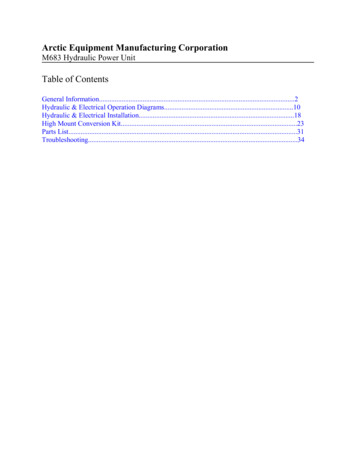
M683 valvesNew M683 with 1/2” stem Deltrol valves (2010—up) is shown on the picture #1. Older model is shownon the picture #2.If you replace “A”,”C”, or “B” valve cartridge or a coil in old M683 with new valve 1/2” stem, you haveto replace both parts, a cartridge and a coil (see next page). “D” valve in old model can’t be replacedwith new “D” valve.Picture 1 (New M683 (2010—present))Coil “A”, “B”, “C” part#: FP0089LS; Cartridge “A”, “B”, “C” part#:FP0262LS; Valve assembly (coil cartridge) “A”, “B”, “C” part#: FP0094LSCoil “D” part#: FP0096LSCartridge “D” part#: FP0266LSValve assembly (coil cartridge) “D” part#: FP0095LSPicture 2 (Old M683 (prior 2010))Coil “A”, “B”, “C” part#: FP0089 ; Cartridge “A”, “B”, “C” part#:FP0262;Valve assembly (coil cartridge) “A”, “B”, “C” part#: FP0094Coil “D” part#: FP0096 ;Valve assembly (coil cartridge) “D” part#: FP0095Cartridge “D” part#: FP0266;
Valves 2 way /2 position (2w/2p) cavity (O-ring) change1. Power units manufactured prior to 2010Typically manufactured with "Monarch-style" valve cavity, identifiable by:a) Cavity without identification mark (without Greek letter delta (triangle)) (see picture 1)b) Black O-ring, with 0.070" cross-section (see picture 3)2. Units manufactured in 2010 and beyondTypically manufactured with "Industry standard" valve cavity, identifiable by:a) Cavity with identification mark - Greek letter delta (triangle) (see picture 2)b) Blue O-ring, with 0.087” cross-section (see picture 3)Valve replacementa) Cavity and O-ring must be selected correctly for proper sealing function, the rest of the valve is the same.If necessary, replace O-ring with the proper O-ring to match the valve cavity:b) Cavity without identification mark requires black O-ring, with 0.070" cross-section (see picture 3)c) Cavity with identification mark requires blue O-ring, with 0.087” cross-section (see picture 3)Picture 2Picture 1Picture 3
Troubleshooting flow chart for power unit M683- Motor does not operate.- Motor operates continuously.- Snow plow does not raise.- Snow plow raises up very slow.- Snow plow will not lower.- Snow plow leaks down.- Snow plow angles before raising up.- Snow plow angles before going up whenup switch is pressed.- Snow plow does not angle to right.- Snow plow does not angle to left.- Snow plow does not hold angle.Warning:-Top of battery needs to be protected. If positive side of battery is accidentally groundedperson could be burnt or wiring system can be damaged, or battery gasses could explodecausing injuries.-Disconnect cable from negative battery terminal before replacing the motor or solenoid.-Always wear eye protection and protective clothing when working around hydraulicsystems.-Remove jewelry and objects that might conduct electricity while working on power units.-Fluid under pressure can pierce the skin and enter the bloodstream causing death orserious injury.Specification:-Max Amp Draw 210 AMP,Note: Do not operate motor continuously for more than 30 sec.-Relief valve setting 2000 psi.-X-over relief valve setting 2500 psi.
PLOW DOES NOT HOLD ANGLE M683Are cylindersspongy? Can bladeYesbe moved 2" to 6"by hand?Bleed air fromcylinders. Check forany looseconnections.NoCheck X-over relief valvesvalves X1 and X2. Clean/replace. Replace seat ifnecessary. Check setting to2500 psi.Is plow not holding angle onthe left?NoClean check valve portion of POcheck valve and lightly tapcheck valve ball against steelseat. PO check valve is close tothe center (3/8" NPT plug), and5/16" screw spring retainer mustbe turned 1 turn back after itwas turned all the way in.
SNOW PLOW DOES NOT ANGLE TO LEFT SIDE M683Does the motoroperate when leftswitch is pressed?NoDoes motor operate when upswitch up is pressed?YesReplace switch orreplace control box.NoSee chart - Motor does not operate.YesDisconnect harness plugs slightlyso that you can insert tester toconnector for red wire. Is therepower ?No Replace A coil.YesCheck switch inside of controlbox for continuity . Is therecontinuity?NoReplace Switch.YesReplace A valvecartridge. Does it angleto left?NoReplace D cartridgevalve. Does it angle to leftside?NoClean/replace X-over reliefvalves. Check setting 2500psi. Does it angle to left side?NoChange quickcouplings. Does it angleto left side?NoCheck for a bent or seized cylinder.Hint: Connect left and right anglecylinder by coupling the hose fromthe left cylinder into the right cylinderand pushing the blade by hand.Note: Before start troubleshooting check that plow moves up and down. Ifplow does not move up and down see "plow does not raise".
SNOW PLOW DOES NOT ANGLE TO RIGHT SIDE M683Does the motoroperate when rightswitch is pressed?NoYesDisconnect harness plugsslightly so that you can inserttester to connector for greenwire. Is there power ?Does motor operate when upswitch up is pressed?YesReplace switch orreplace control box.NoSee chart - Motor does not operate.NoReplace D coil.YesCheck switch inside of controlbox for continuity. Is therecontinuity?NoReplace SwitchYesReplace D cartridgevalve. Does it angle toright side?NoClean/replace X-over reliefvalves. Check setting 2500psi. Does it angle to rightside?NoCheck and clean PO check valve. Be surethat there is piston movement approx1/8".PO check valve is close to the center(3/8" NPT plug), and 5/16" sc
The pressure at the outlet of the pump is due to external loads placed on the system. These loads can be transmitted through cylinders and linear actuators as well as hydraulic motors and rotary actuators. In practice, system components by virtue of orifice an