Transcription
QUICKBOOKS ONLINEGetting Started in QuickBooks Online
Getting Started in QuickBooks OnlineGetting Started in QuickBooks Online Overview . 3Part 1: Starting QuickBooks Online from Scratch . 4Getting around QuickBooks Online . 5Why do we use QuickBooks? . 8How QuickBooks is Built . 9Import Lists. 16Basic Sales Tax Setup . 19Make your First Sale. 22Customer Invoice Workflow . 22Setting up Bank feeds . 26Process your first download . 31Part 2: Taking QuickBooks Online over from someone . 32Review and Edit the Chart of Accounts . 32Review Products & Services List . 36Review Account & Settings . 38Customize invoices. 42Conclusion . 492
Getting Started in QuickBooks OnlineGetting Started in QuickBooks Online OverviewStarting your journey in QuickBooks Online can be intimidating. No need to fear, this class isdesigned to help you get up and running and feeling confident in your QuickBooks skills. Whetheryou’re starting from scratch or taking over from someone else, this class will give you the tools to geta head start.There are usually two different situations you find yourself in when you’re getting started inQuickBooks.New BusinessFirst, you may be a new business just getting started and you need to start tracking your accountingin QuickBooks. There are a few key steps to get going that you’ll learn here today. We’ll talk aboutyour situation in part 1 of this class.Existing Business – Taking over from someone elseSecond, you may be taking over the books from someone else. This may be taking it over from apartner, accountant, or a previous bookkeeper. This requires a little extra work, but don’t worry we’llshow you the first few steps to review what’s in QuickBooks now and how to make some changes toget what you need from it.3
Getting Started in QuickBooks OnlinePart 1: Starting QuickBooks Online from ScratchAfter you’ve signed up for QuickBooks Online the program opens up to the Dashboard. Now you’reready to get started working in QuickBooks.4
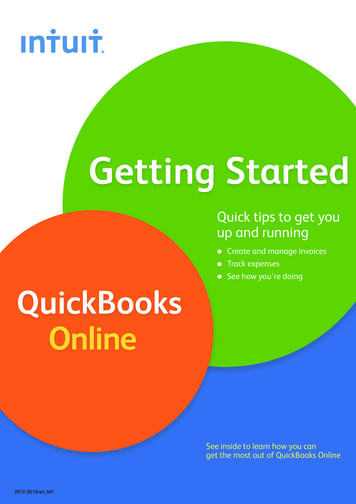
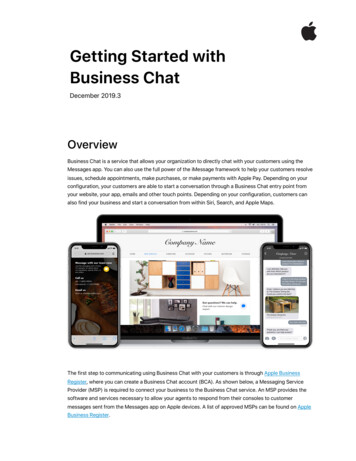
Getting Started in QuickBooks OnlineGetting around QuickBooks OnlineIts’s important to get your bearings in the software. QuickBooks Online keeps it simple and providesyou with just a few ways to navigate. There are three main ways to get around QuickBooks online.They are the following:1. New menu2. Navigation Bar3. Gear MenuNew MenuThis menu includes all of your day-to-day transactions that you’ll enter in the process of your work.This includes all sales transactions like invoices, sales receipts, customer payments, expenses andmore. This will be used more than any other area of QuickBooks. Click New on the left navigation barto display the menu.5
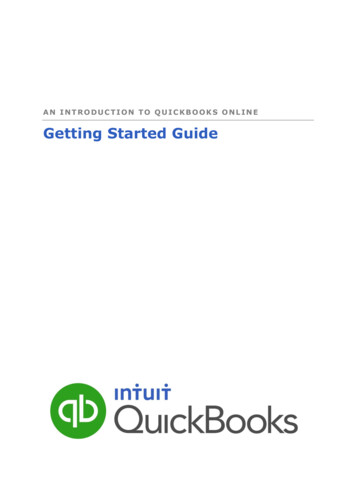
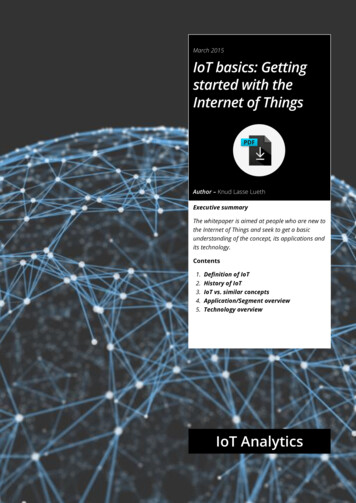
Getting Started in QuickBooks OnlineNavigation BarThe navigation bar includes information about the different areas of your business and tracksinformation about the people you do business with like customers, suppliers, employees and others.The Navigation bar is broken down into different categories that includes sub-menus full of usefulinformation. A few of these areas includes Sales that displays the Customers, Invoices, Products andServices and more.6
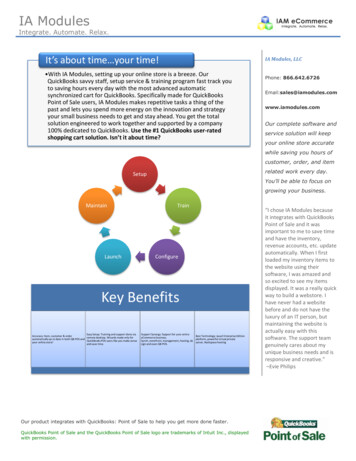
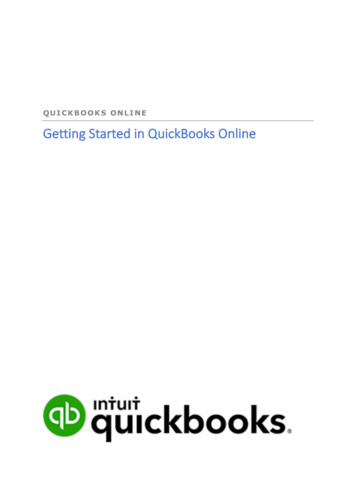
Getting Started in QuickBooks OnlineGear MenuThe Gear menu includes additional information and tasks that you can use when needed. You willuse the Gear menu less frequently than the New menu and Navigation bar.This menu provides you access to various important lists, like the Chart of Accounts, Products &Services, Classes and more. Click the Gear in the top right corner to access the menu. It also givesyou access to important parts of your company such as the Account & Settings and Manage Users.7
Getting Started in QuickBooks OnlineWhy do we use QuickBooks?Small businesses use QuickBooks to track all of your business transactions. After recording all of yourbusiness transactions QuickBooks helps you stay organized and keep on top of managing yourbusiness. QuickBooks helps use with the following:1. Track business transactions2. Report internally the performance and position of the business3. Report externally to different bodies like the CRA, Minister of Finance (PST) and otherimportant organizations that you may work with in your businessIt’s important to understand that all of your transactions go through your Chart of Accounts andQuickBooks uses the Chart of Accounts to create reports. See the diagram below.The structure of QuickBooks lets you easily enter information into QuickBooks and QuickBookscreates reports for your business.8
Getting Started in QuickBooks OnlineHow QuickBooks is BuiltQuickBooks uses a few basic elements to make it easy for you to enter information and do therequired accounting tasks. QuickBooks uses lists and transactions to make the accounting entries.ListsQuickBooks lists include Customers, Suppliers, Employees, Products & Services, and mostimportantly the Chart of Accounts, etc. You add entries to a list, so they can be used wheneverneeded. This means that you don’t have to enter names or accounts each time they’re used. Thepurpose of lists in QuickBooks are: Make it easy for you to fill out transaction forms.Save time on data entry.Chart of AccountsThe chart of accounts is the most important list in QuickBooks. The Chart of Accounts is used in everysingle transaction that is entered into QuickBooks. This means its critical to get it setup in a way thatworks for you.When you first setup QuickBooks Online, a Chart of Accounts is created for you. You can add newaccountTo add a new account:1. Click the Gear icon à Chart of Accounts2. Click New9
Getting Started in QuickBooks Online3. Choose the Category Type à and Detail Type. Note: these are required fields.4. Enter the Name.Note: The Detail Type is a required field, although it has no effect on anything in QuickBooks. This is aplaceholder for future development of the product. If you don’t see an obvious choice, choose theclosest type.10
Getting Started in QuickBooks OnlineExpense AccountsYou’ll add expense accounts like any other account, but you’ll have an additional option to add a taxcode. Adding a tax code ensures that you add tax to their expense transactions.11
Getting Started in QuickBooks OnlineProducts & Services ListTo easily track the services and products that you sell, you’ll add them to the Products and Serviceslist. There are 2 main purposes of the products and services list:1.2.Make it easy for you to fill out transaction formsAct as “pointers” to do correct accounting entries. Debit and Credits are done using theaccounts linked to the product or service and the type of form.To create a new service:1. Click Gear Icon à Click Products and Services.2. Click Add New à Choose the Type of item to setup.12
Getting Started in QuickBooks OnlineComplete the information including the Name of the service. This will be what displays on thecustomer’s sales form.4. Enter the Sales information and Sales price/rate if necessary. These are optional fields, asthey can be added to each sales form as needed.5. Choose the Income Account. We recommend Sales if you don’t have anything else that sticksout to you. This account will increase every time you make a sale to a customer and thisaccount will display on your Profit & Loss report as income.6. Add the Tax Code à Click Save and Close.3.13
Getting Started in QuickBooks OnlineCustomer ListClick the Sales or Invoicing link on the navigation bar and then Customers.Click anywhere on the colorful bar below Customers to filter the customer list by Estimates, Unbilledactivity, Overdue invoices, etc.14
Getting Started in QuickBooks OnlineTo Add a new customer.1. Click the New customer button.2. Complete the information on the new customer window.a. The Display name as lets you choose what naming convention to use on thecustomer list.b. Add payment and billing details on the Payment and billing tab.3. Click Save.15
Getting Started in QuickBooks OnlineImport ListsIf you have lists in MS Excel or in any format that can be exported to Excel, QuickBooks lets youimport multiple list entries inTo import a data a customer list:1. Go to the Gear icon2. Click Import Data.3. Then choose the type of data you would like to import Customers4. Find your data.16
Getting Started in QuickBooks Online5. Click Next.6. Review the data to ensure it is mapping correctly.7. Click Next.17
Getting Started in QuickBooks Online8. Click Import to complete the import.18
Getting Started in QuickBooks OnlineBasic Sales Tax SetupBefore you record any sales or expenses, it’s important to make sure that sales tax is setup.QuickBooks knows the location of your business based on their company information enteredduring the setup.To complete the setup, you must enable the sales tax option. To turn on sales tax:1. Click Taxes.2. Click Set up sales tax.3. Choose your Province or Territory.4. Click Save.19
Getting Started in QuickBooks Online5. Add the appropriate tax information for your business.6. Click Next.QuickBooks confirms the setup of sales tax.20
Getting Started in QuickBooks OnlineTransaction FormsQuickBooks uses forms to make the accounting entries in QuickBooks. Each form in QuickBooks isgoing to create a journal entry behind the scenes. You will enter almost all forms in the same way. Todisplay a form:Click Create à Click Invoice2. There are simple ways to complete the form:a. Who – Customerb. When – Datec. What – Products/Service sold to their customerd. How much – Quantity, Amount, and Sales tax3. Click Save and Close to enter any form.1.21
Getting Started in QuickBooks OnlineMake your First SaleAfter getting started it’s important to make your first sale in QuickBooks. Remember you’ve alreadysetup the Chart of Accounts and Products & Services list, so making your first sale should be easy.Customer Invoice WorkflowWe want to complete your first sale, and we also want to make sure you know what to do when acustomer pays your first invoice. There are three steps in the invoice workflow.Follow these three transaction steps to create your invoice, receive a customer payment and thendeposit the funds in the bank. (For more detailed information on this workflow attend the Money In:Sales & Customers in QuickBooks Online class)22
Getting Started in QuickBooks OnlineCreate the Invoice1. Click the New menu2. Click Invoice.3. Complete the essential informationa. Customer Nameb. Datec. Product/Service for salesd. Amounte. Sales Tax23
Getting Started in QuickBooks OnlineReceive Customer PaymentNext step is to receive the customer payment. To do this:1. Click New2. Click Receive Payment3. Choose Customer4. Enter Date5. Choose the Payment Method6. Choose Deposit to (we recommend using undeposited funds if you’re going to the bank at alater date)7. Select the Invoice to pay and QuickBooks Online completes the Amount received field.8. Click Save and Close24
Getting Started in QuickBooks OnlineMake DepositThe last step is to make the deposit of the customer payment. Do the following:1. Click New.2. Click Bank Deposit.3. Choose the Account to deposit to under Account.4. Select the Payments to Deposit.5. Click to Save.25
Getting Started in QuickBooks OnlineSetting up Bank feedsQuickBooks Online lets you easily enter and manage your bank and credit card transactions. You canconnect your QuickBooks directly to your accounts and QuickBooks will download the transactionsinto QuickBooks. All you need to do is review and categorize them and add sales tax. After your firstfew downloads, QuickBooks will learn how you handle most transactions and will begin autocategorizing them for you.1. Click Banking, and then click Connect Account.2. Search for your bank or credit card name or choose from the list of common banks.26
Getting Started in QuickBooks Online3. After finding the bank or credit card company click Continue.4. Enter your banking or credit card information.5. Click Sign In.27
Getting Started in QuickBooks Online6. Select the Account.7. Click Authorize.28
Getting Started in QuickBooks Online8. I
QuickBooks uses a few basic elements to make it easy for you to enter information and do the required accounting tasks. QuickBooks uses lists and transactions to make the accounting entries. Lists QuickBooks lists include Customers, Suppliers, Employees, Products & Services, and most importantly the Chart of Accounts, etc. You add entries to a list, so they can be used whenever