Transcription
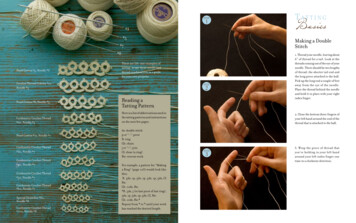
STEP1#3#5#8These are life-size examples oftatting, so use these needle andthread combinations as a guidefor your own projects.Crochet Thread Cebelia #10,Needle #5Pearl Cotton #8, Needle #5Cordonette Crochet Thread#20, Needle #5Pearl Cotton #12, Needle #7Cordonette Crochet Thread#30, Needle #7Cordonette Crochet Thread#40, Needle #7Cordonette Crochet Thread#50, Needle #7Cordonette Crochet Thread#60, Needle #7Special Dentelles #80,Needle #8Cordonette Crochet Thread#100, Needle #8STEP2Reading aTatting PatternHere is a list of abbreviations used inthe tatting patterns and instructionson the next few pages:ds: double stitchp or “–”: picotR: ringCh: chainj or “ ”: joinCl: close (a ring)Rw: reverse workFor example, a pattern for “Makinga Ring” (page 103) would look likethis:R. 5ds, 1p, 5ds, 1p, 5ds, 1p, 5ds, ClRw.Ch. 10ds, Rw.*R. 5ds, j (to last picot of last ring),5ds, 1p, 5ds, 1p, 5ds, Cl, Rw.Ch. 10ds, Rw.*Repeat from * to * until your workhas reached the desired length.BasicsMaking a DoubleStitch#7Pearl Cotton #5, Needle #3T a tt i n g1. Thread your needle, leaving about6" of thread for a tail. Look at thethreads coming out of the eye of yourneedle. There should be two lengthsof thread: the shorter tail end andthe long piece attached to the ball.Pick up the long end a couple of feetaway from the eye of the needle.Place the thread behind the needleand hold it in place with your rightindex finger.2. Close the bottom three fingers ofyour left hand around the end of thethread that is attached to the ball.STEP33. Wrap the piece of thread thatyou’re holding in your left handaround your left index finger onetime in a clockwise direction.
Making a DoubleStitch (continued)STEP44. Starting from the bottom of yourindex finger and going upward,slide the needle under the string onyour finger. Once the loop of threadaround your finger is also aroundyour needle, slide your finger out.5. Slide this part of the stitch downto your right index finger and hold itin place with that finger. Pull gentlyon the thread with your left hand tomake sure the stitch is snug but nottoo tight. This is the first half of yourdouble stitch.6. Now wrap the thread aroundyour left index finger in a counterclockwise direction.STEP7Making a DoubleStitch (continued)7. Bend your left index finger over soyou can see your knuckles. Slide theneedle under the thread from yourknuckle toward your fingernail. Pullyour finger out of the loop of threadonce it is on your needle. Pull theloop of thread down the needle untilit is snug against the other half of thestitch.STEP5STEP6Your double stitch is now complete.This is really the only stitch in tatting;everything else is just a manipulationof the double stitch. Repeat steps 3–7to create another double stitch. Whenyou are making double stitches oneright after the other, slide each stitchsnugly against the others. Practiceyour double stitches until each oneis consistent.
Making a PicotA picot is simply a space of thread leftbetween two double stitches.STEP1STEP11. When your pattern calls for a picot,make the first half of your doublestitch. When you’re sliding the stitchdown the needle, stop it about 1/2"away from the other stitches withyour right index finger.2. Make the second half of yourdouble stitch and slide it down theneedle to your first half. Now slidethe whole double stitch down to meetthe previous ones. There should bea little loop of thread sticking outbetween this stitch and the one rightbefore it: this loop is your picot.Practice making five double stitchesand one picot (and then five moredouble stitches, etc.) a few timesuntil all of your picots are the samesize.STEP2STEP2Making a RingAfter you are comfortable with yourdouble stitches and picots, it’s timeto actually make something out ofthem!1. Start by tatting this onto yourneedle: five double stitches, onepicot, five double stitches, one picot,five double stitches, one picot, andfive more double stitches. Hold onto the needle with your right handabove the stitches (closer to thepointy end). With your left thumband index finger, slide the stitchesdown toward the end of the needle.Carefully slide the stitches off theneedle, making sure that you don’t letgo of the double stitches. Slide yourstitches farther down the thread.There is a loop of thread on one endof the stitches; stick your left pinkiefinger into the loop to help keep thethread from tangling. Keep pullingon the needle end of the thread. Thelarge loop of thread will get smallerand smaller, and if your finger wasn’tin it, it would disappear completely.Don’t let that happen!2. Take your finger out of the loopand bring the needle up through it.Keep pulling on the needle to closeup the ring all the way. You’ve justcompleted one ring.This is what your ring looks like afterstep 2.
Making a Ring(continued)STEP3STEP33. Flip your ring over from right toleft like you’re turning the page ofa book. This is called reversing thework and should make the threadscross and create a little hole. Bringthe needle up through the hole andpull the strings tight to create a knot.This knot will help keep your projecttogether. Also note that the side ofthe ring that is facing you is the“wrong” side.Making a Chain1. Put your needle on top of the knotyou just made. Make ten doublestitches on your needle. Make surethat the first one is right next to thering; it’s easy to leave a little space ofthread if you’re not careful.2. Slide the stitches off the needleand push them all the way downagainst the ring. You don’t have tothread the needle through that littleloop as you would when you make aring; otherwise it would be a ring andnot a chain!Making a Chain(continued)3. Reverse your work by turning itover right to left, like a page in abook. Bring your needle up throughthe little loop of thread and tie aknot. Your chain is complete!STEP1STEP1Making the SecondRing and Joining1. Put five double stitches on yourneedle. At this point, you would beready to make another picot, as in thefirst ring, but you have to attach yournew ring to the first ring instead. Todo this, start by grasping the threadin your left hand and then place itbehind the last picot you made onyour first ring.STEP2STEP22. Using the tip of your tatting needleor a small crochet hook, pull thethread up through the picot. Notethat you’re pulling a loop of threadthrough the picot, not putting thepicot on your needle.
Making the SecondRing and Joining(continued)STEP3STEP13. Slide the thread down the needleto meet the double stitches and pullon the thread so it tightens aroundthe needle. This loop you madearound the needle does not countas a part of any double stitch, it isa “join.”4. Now make five double stitches,one picot, five double stitches, onemore picot, and five more doublestitches on your needle. Close thering by sliding the stitches off yourneedle, but remember the little loopof thread that you have to bring yourneedle through to complete the ring!Pull the string tight, and reverse thework by turning it over like a pagein a book. Reverse the work andtie a knot as in Step 3 of “Making aRing.”Making the SecondChain1. Place your needle on top of the ringjust as you did for the first chain. Putten double stitches on your needle.Note how the stitches on your needlelook compared to the first chainyou made. Slide the stitches off theneedle, reverse your work, and don’tforget to tie a knot as in Step 3 of“Making a Chain.”Adding a NewThread or aDifferent ColorYou can only add a new threadafter a ring or a chain. For the besttransition, add a new thread aftera ring.1. Just cut the needle and ball threadsand tie them in a knot. Take yournew ball of thread and thread yourneedle. Push your needle up underthe last knot that you made.STEP4STEP1STEP22. With a length of thread a coupleof feet long on the needle side ofthe thread, tat the next part of yourpattern onto the needle and work asusual, reversing your work and tyinga knot. To hide the extra ends of thethread, simply thread them onto aneedle and feed them back throughsome of the already completeddouble stitches.
stitch. Making a Double Stitch (continued) Your double stitch is now complete. This is really the only stitch in tatting; everything else is just a manipulation of the double stitch. Repeat steps 3–7 to create another double stitch. When you are making double stitches one right after the other, slide e