Transcription
Part three of a series of tutorials for the Blender gameengine by Smoking mirror.Document Description:This is part three of a set of tutorials, it covers setting up a helicopter type character's weapons foruse in the BGE*.* Blender Game engine
Document Aim:The aim of the tutorials is to introduce new users of the BGE to some of the concepts needed toproduce a moderately complex game. The aim of this third tutorial is to show users how to set uptheir player character's weapons. A similar set up can be used for the enemy weaponsDocument Goals: Describe how to make a weapon's effects object.Show how to integrate the shooting script.Show how to set up the ground and enemies so they can be damaged and register hits.Show how to make the first steps of a basic HUD (heads up display, or UI, user interface)Introduction:We've already made a game model and set up its movement profile, now we are getting to the funpart. In this tutorial I'm going to show how to add weapons to your character. Again, I'm going tobe supplying the scripts, all you have to do is set up the game objects as shown and plug in thescripts to your blend file by cutting and pasting.
Document Index:Part 1 - Creating the weapon effects.- Page 4Part 2 - Setting up the player logic and objects.– Page 15Part 3 - Adding a HUD– page 20Part 4 - Setting up the ground and enemies for collisions.– page 25Afterword- page 27
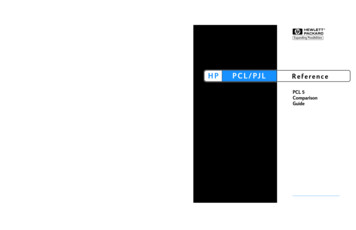
Part One – Creating the weapon effects:We are going to give our character 4 different kinds of weapons. The original Desert Strike only had3, but we want to add more tactical challenge to the game by including anti-missile flares. The firstweapon is the Machine gun, or 30mm cannon as it will be called in the HUD.When creating the weapons effects we have two options. One is to use a billboard type object, asingle plane which always faces the camera and looks the same from every angle. The other is to use3 planes set up like the gun flash above. This has the advantage of being able to look different fromdifferent angles. You should choose which to use in each case. A missile tail should use 3 planes,while a small explosion might use the single billboard. There are also different types of transparencyyou can use. “Alpha clip” and “alpha blend” require an alpha channel on your image. “Add” justrequires that the background, and any part you want to be invisible be black. For these ones we aregoing to use “add” type transparency. This looks best with the 3 plane type object.
So add a material to your weapon effect. Be sure to check the shadeless box and set the gamesettings. When you add a texture don't forget to set the UV mapping:How you set up your materials and textures will depend on whether you are using the GLSL mode ornot.
You should go ahead and make all the weapons effects. You can also use animated textures as I'vedone with the “big bang” effect:In the image window press “n” to open the option panel and set the game properties. When makingan animated texture you should have a number of squares which can fit equally in to the size of theimage. So if you have a 256x256 image, 4x4 animations work well, but 6x6 or 7x7 will give a strangeeffect.
We need the “gunflash” object as well as all the other pictured above. If the object is not going tohave physics (set to “no collision”) you just need the mesh. If it is going to have collisions it's betterto parent the graphics mesh to a collision mesh. This can be a simple cube or rectangle, set to “solidbody” and with the invisible and ghost boxes checked. This allows us to better control the collision.See the missile above, we only want the missile, not its tail, to register collisions. The boxes at thetop are empties set up to carry a sound.
You can set up the sound logic like this. Open the .wav file you've prepared, check the 3d sound boxand set the volume to whatever sounds right in game. You need the following sound empties:You can also add the helicopter blades sound to your player object. Just give it an always sensor andan AND controller.
You will need quite a few sounds for your project.http://www.freesound.org is a good place to look for sounds.This list should be enough though we may need to add more. I will include these sounds with theBlend files, they will be packed along with the textures.
Going back to the weapon effects, we need to set up the actions for the explosions. Add key framesto set the scale of the explosion (see tutorial 2 for this info) and then go to the object displaysettings. You can set the object color here, which will be used in the action to change the color ofthe explosion, making it fade out over time.Right click on the object color box to add a keyframe.You need to make an action like this. It gets bigger and fades out over time.
Set up the logic like this.For the rockets and missiles you will have to add two properties:p bullet means that this object will be detected by enemy checking to see if they have been hit. Hittype sets the damage level and makes the object be affected by flares (if hit type 2).Rockets should be hit type 1 while missiles will be hit type 2.
Your missiles will also need some logic to make them track to your target. Leave the tracking objectbox empty, it will be set by python.You also need some bullet hole type objects. They should lay flat on the ground.
You need “m hole”, “r hole” and “b hole”. They should be set to no collisions and they don't needany special logic. In other games we might give them an animation to make their appearance morenatural, but here they are going to be too small to notice.So the objects you need are as pon effectNo collisionsNone“player rocket”Weapon effectSolid body, ghost“hit type” int 1, “p bullet” bool True“player missile”Weapon effectSolid body, ghost“hit type” int 2, “p bullet” bool True“flare”Weapon effectSolid body, ghost“flare” bool True“m hole”Weapon effectNo collisionsNone“r hole”Weapon effectNo collisionsNone“b hole”Weapon effectNo collisionsNone“small bang”Weapon effectNo collisionsNone“big bang”Weapon effectNo collisionsNone“mg sound”Weapon soundNo collisionsNone“rocket sound”Weapon soundNo collisionsNone“missile sound”Weapon soundNo collisionsNone“missile hit”Weapon soundNo collisionsNone“no ammo”Weapon soundNo collisionsNone
You can set up the flare object to have animations, just like the explosions, but you need a slightlydifferent set of animation curves:
Part two – Setting up the player logic and objects:We want to add some empties to our player objects, we need three empties called.rockets right, rockets left and m gun. The empties are where the weapons are going to be firedfrom. Parent them to the player mesh, or to the roll action object (the circle).
We also need an empty set way out in front of the chopper called “null target”.This also needs a property called “null target”.It's best to set his object a little lower than your chopper and parent it to the roll action object. Thisis what your guns will aim at if they have no enemy target, so you just want them to fire at the floora little way in front of the helicopter.
Next we have to give our player object some new properties. Set them up just like in the pictureabove. “target ob” and “enemy” are both strings, they can store any information here, in this casewe are going to be storing references to objects in game. “target ob” will be the “null target” objectwe created above, while enemy will be the closest enemy to the player, if they are in the correct arc.
This is the logic set up. It has just two sensors and three actuators.
Be sure to add each actuator and sensor as shown. You can increase or reduce the number of logicticks on the left mouse button sensor to get faster or slow firing weapons.The python module is:cobra.cobra shootingAt this point you should get the new script from the place you got this tutorial. Just cut and paste itover the old cobra.py script in your text window. All the new code has been added to this script.You may have already added the helicopter sound in the last section. Just connect it to the samealways sensor as the helicopter blades. We will be changing that in future, but for now it's nice tohear the “whup-whup” sound as your chopper flies around the screen.
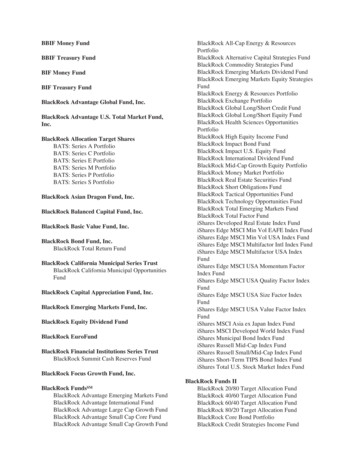
Part three – Adding a HUD:There are several ways to handle adding a HUD or UI to your games. One of the most common is toadd a overlay scene. However we are going to keep things simple and simply add some objects tothe scene parented to our camera.Add a simple plane to the scene and parent it to the camera so its rotation matches the camera.
Adjust the position in the view so it is in the bottom right hand corner.Give the object a property called “amount”. Create a new action for the weapon display object to setthe object color (like we did with the explosions and flare above).
Next we need to add some more properties to the camera:And we also need to add some more actuators to the camera and display object:Make sure you set the action to “property” not “play”. The actions should be “display switch” and“color code”. We want the player to see if they are running out of ammo, but we don't want to getin to using text yet, so we are going to show ammo levels by color.“Amount” is the property which drives the color change of the weapon display object. It has to beon the object, not on the cam.
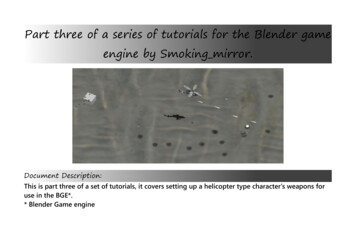
Create four objects on another layer, you will need a new texture for this, I'm using this one:
The arrow and power bar will be used later to show fuel, armor and nearest enemies and objectives.Name the meshes of the objects as follows:Name:Represents:weapon display 1Machine gunweapon display 2Rocketsweapon display 3Missilesweapon display 4FlaresYou should be careful how you set up the object color action. It should fade from pale green at 0frames towards dark red at 100 frames and then black at 101 frames.This should give the following result:When you are out of ammo the image goes black.You should also create a blank mesh (move the verts on the UV image so they are covering atransparent part of the image) and call it “empty display”. This will be displayed if your chopper hasno weapons. If you did everything correctly you should now be able to fly around and fire yourmissiles, but they don't explode. So how do we handle that?
Part four – Setting up the ground and enemies for collisions:Add some cubes to your scene. Make them static and give them the following properties:Next set up their logic like this:The python module is:cobra.player weapon hitand the collision sensor should be checking for the property “p bullet” (remember it's the propertyyou gave the player's missiles and rockets earlier).
Do the same with the ground in your scene:But don't give the ground the “health” property, instead it needs the “ground” property. You willneed to give all enemies and buildings this set up if you want them to be shootable. Objects withthe “ground” property will accept missile and rocket craters. You don't want to give this property tosmall objects such as flagpoles and people because they are smaller than the crater and it'll look likethe crater is floating in mid air. Instead use it on things like large buildings.Now when you fire your weapons the missiles and cannon should automatically track the enemyobjects, and they should register explosions. If you cause enough damage you can destroy theenemy objects.Later we are going to set up enemy so they explode when destroyed, but for now have fun firingyour weapons.
I've added a new player model to the blend file that goes with this tutorial. If you changethe player object adder to add “player alt” you can enjoy flying around in a classicUH-1 Huey. This will be part of a later tutorial focusing on changing the player object toadd more variety to missions (in the UH-1 you will be able to pick up passengers).Next time we will look at making enemies and giving them simple AI. Thanks forreading. If you have any questions please post them in the Blender artists thread.Smoking Mirror AKA Pickledtezcat AKA John Topple.30thJune 2013
If you want to write your own tutorials to be included in the series you should use the followingformatting conventions:Main Title: Segoe Print 26 point, Centered.Subtitles: Segoe Print 16 point, left aligned.Main text: Segoe UI Semibold 16 point, left aligned.Image captions: Segoe Print 16 point, Centered.The document should be landscape, not portrait for better viewing on wide screen monitors withoutsplitting pages, and images included should be of a maximum with of 512 pixels and should becentered. There should be a roughly 50/50 mix of text and imagesYou can use the following image for title text background:It's a simple gradient from pure white to “404040” gray on the right.From now on all the tutorials can be found here:Tutorials by smoking Mirror
Part three of a series of tutorials for the Blender game engine by Smoking_mirror. Document Description: This is part three of a set of tutorials, it covers setting up a helicopter type character's weapons fo