Transcription
ADOBE DRIVE CCUSER GUIDE
2 2013 Adobe Systems Incorporated. All rights reserved.Adobe Drive CC User GuideAdobe, the Adobe logo, Creative Cloud, Creative Suite, Illustrator, InCopy, InDesign, and Photoshop areeither registered trademarks or trademarks of Adobe Systems Inc. in the United States and/or othercountries. Microsoft and Windows are registered trademarks or trademarks of Microsoft Corporation in theUnited States and/or other countries. Apple, Mac OS, and Macintosh are trademarks of Apple Computer,Inc., registered in the United States and other countries. Java and Sun are trademarks or registeredtrademarks of Oracle Corporation in the United States and other countries. All other trademarks are theproperty of their respective owners.The information in this document is furnished for informational use only, is subject to change withoutnotice, and should not be construed as a commitment by Adobe Systems Inc. Adobe Systems Inc. assumesno responsibility or liability for any errors or inaccuracies that may appear in this document. The softwaredescribed in this document is furnished under license and may only be used or copied in accordance withthe terms of such license.Adobe Systems Inc., 345 Park Avenue, San Jose, California 95110, USA.
ContentsOverview . . . . . . . . . . . . . . . . . . . . . . . . . . . . . . . . . . . . . . . . . . . . . . . . . . . . . . . . . . . . . . . . . . . . . . . 4Installing Adobe Drive 5 . . . . . . . . . . . . . . . . . . . . . . . . . . . . . . . . . . . . . . . . . . . . . . . . . . . . . . . . . . . . . . . . . . . . . .Updating your installation . . . . . . . . . . . . . . . . . . . . . . . . . . . . . . . . . . . . . . . . . . . . . . . . . . . . . . . . . . . . . . . . . . . .Uninstalling Adobe Drive 5 . . . . . . . . . . . . . . . . . . . . . . . . . . . . . . . . . . . . . . . . . . . . . . . . . . . . . . . . . . . . . . . . . . .Terminology . . . . . . . . . . . . . . . . . . . . . . . . . . . . . . . . . . . . . . . . . . . . . . . . . . . . . . . . . . . . . . . . . . . . . . . . . . . . . . . . .4555Connecting to servers using Adobe Drive 5 . . . . . . . . . . . . . . . . . . . . . . . . . . . . . . . . . . . . . . . . 5Edit connections . . . . . . . . . . . . . . . . . . . . . . . . . . . . . . . . . . . . . . . . . . . . . . . . . . . . . . . . . . . . . . . . . . . . . . . . . . . . . 8Set system preferences . . . . . . . . . . . . . . . . . . . . . . . . . . . . . . . . . . . . . . . . . . . . . . . . . . . . . . . . . . . . . . . . . . . . . . . 9Connecting your server to Windows Explorer . . . . . . . . . . . . . . . . . . . . . . . . . . . . . . . . . . . . . . . . . . . . . . . . 10Connecting your server to Adobe Bridge . . . . . . . . . . . . . . . . . . . . . . . . . . . . . . . . . . . . . . . . . . . . . . . . . . . . . 14Working with remote files . . . . . . . . . . . . . . . . . . . . . . . . . . . . . . . . . . . . . . . . . . . . . . . . . . . . . . . 14Inspecting a connected server in Adobe Bridge . . . . . . . . . . . . . . . . . . . . . . . . . . . . . . . . . . . . . . . . . . . . . .Adding files or folders to the DAM server . . . . . . . . . . . . . . . . . . . . . . . . . . . . . . . . . . . . . . . . . . . . . . . . . . . .Opening a remote file . . . . . . . . . . . . . . . . . . . . . . . . . . . . . . . . . . . . . . . . . . . . . . . . . . . . . . . . . . . . . . . . . . . . . . .Changing remote file names and locations . . . . . . . . . . . . . . . . . . . . . . . . . . . . . . . . . . . . . . . . . . . . . . . . . . .Placing remote files in documents . . . . . . . . . . . . . . . . . . . . . . . . . . . . . . . . . . . . . . . . . . . . . . . . . . . . . . . . . . .View file status and versions in the Links panel . . . . . . . . . . . . . . . . . . . . . . . . . . . . . . . . . . . . . . .Replace a placed file with a previous version . . . . . . . . . . . . . . . . . . . . . . . . . . . . . . . . . . . . . . . . .Deleting remote files or folders . . . . . . . . . . . . . . . . . . . . . . . . . . . . . . . . . . . . . . . . . . . . . . . . . . . . . . . . . . . . . .1516171819192021Working with versions . . . . . . . . . . . . . . . . . . . . . . . . . . . . . . . . . . . . . . . . . . . . . . . . . . . . . . . . . . 21File status in integrated applications and file browsers . . . . . . . . . . . . . . . . . . . . . . . . . . . . . . . . . . . . . . .Checking out files . . . . . . . . . . . . . . . . . . . . . . . . . . . . . . . . . . . . . . . . . . . . . . . . . . . . . . . . . . . . . . . . . . . . . . . . . . .Checking in versions . . . . . . . . . . . . . . . . . . . . . . . . . . . . . . . . . . . . . . . . . . . . . . . . . . . . . . . . . . . . . . . . . . . . . . . .Editing files checked out by another user . . . . . . . . . . . . . . . . . . . . . . . . . . . . . . . . . . . . . . . . . . . . . . . . . . . .Updating a file to the most recent version . . . . . . . . . . . . . . . . . . . . . . . . . . . . . . . . . . . . . . . . . . . . . . . . . . . .Viewing, promoting, and deleting versions . . . . . . . . . . . . . . . . . . . . . . . . . . . . . . . . . . . . . . . . . . . . . . . . . . .Viewing a previous version in its native application . . . . . . . . . . . . . . . . . . . . . . . . . . . . . . . . . .Promoting a version . . . . . . . . . . . . . . . . . . . . . . . . . . . . . . . . . . . . . . . . . . . . . . . . . . . . . . . . . . . . . . . .Deleting a version . . . . . . . . . . . . . . . . . . . . . . . . . . . . . . . . . . . . . . . . . . . . . . . . . . . . . . . . . . . . . . . . . . .Reverting to the last version . . . . . . . . . . . . . . . . . . . . . . . . . . . . . . . . . . . . . . . . . . . . . . . . . . . . . . . . .Searching for managed files in Adobe Bridge . . . . . . . . . . . . . . . . . . . . . . . . . . . . . . . . . . . . . . . . . . . . . . . .2123232424252626262627Offline editing . . . . . . . . . . . . . . . . . . . . . . . . . . . . . . . . . . . . . . . . . . . . . . . . . . . . . . . . . . . . . . . . . . 28Troubleshooting . . . . . . . . . . . . . . . . . . . . . . . . . . . . . . . . . . . . . . . . . . . . . . . . . . . . . . . . . . . . . . . 32Adobe Bridge does not show Adobe Drive features . . . . . . . . . . . . . . . . . . . . . . . . . . . . . . . . . . . . . . . . . . 32Adobe Bridge does not update its view of remote assets . . . . . . . . . . . . . . . . . . . . . . . . . . . . . . . . . . . . . 32Performance optimization and troubleshooting . . . . . . . . . . . . . . . . . . . . . . . . . . . . . . . . . . 32Log files . . . . . . . . . . . . . . . . . . . . . . . . . . . . . . . . . . . . . . . . . . . . . . . . . . . . . . . . . . . . . . . . . . . . . . . . . . . . . . . . . . . .Automatic check-in or manual check-in . . . . . . . . . . . . . . . . . . . . . . . . . . . . . . . . . . . . . . . . . . . . . . . . . . . . . .File caching . . . . . . . . . . . . . . . . . . . . . . . . . . . . . . . . . . . . . . . . . . . . . . . . . . . . . . . . . . . . . . . . . . . . . . . . . . . . . . . . .Environmental performance differences . . . . . . . . . . . . . . . . . . . . . . . . . . . . . . . . . . . . . . . . . . . . . . . . . . . . .Avoiding mount point confusion . . . . . . . . . . . . . . . . . . . . . . . . . . . . . . . . . . . . . . . . . . . . . . . . . . . . . . . . . . . .Sharing access with AEM DAM WebDAV . . . . . . . . . . . . . . . . . . . . . . . . . . . . . . . . . . . . . . . . . . . . . . . . . . . . .3233333334343
Adobe Drive CC User GuideOverviewAdobe Drive CC enables you to connect Creative Cloud and Creative Suite 6 desktop applications toDigital Asset Management (DAM) servers. A connected server appears in your computer as a mountedhard drive or mapped network drive. Once connected, you can access the server through the platform filebrowser (Windows Explorer or Mac OS Finder), where you can work with remote managed files as if theywere local.Adobe Drive CC is the name of the version 5 release; the product is referred to in the documentation and inthe user interface as Adobe Drive 5.Some desktop applications (Photoshop , InDesign , InCopy , Illustrator ) and Adobe Bridge are integratedwith Adobe Drive 5. For example, when you use Photoshop CS6 to open and edit a file stored on a DAMserver, the file is checked out automatically when you modify it; when you close the file, you can choose tocheck it in or simply save it. You can use Adobe Bridge to access DAM servers and files, and to view, searchfor, and compare information about DAM-managed assets.Installing Adobe Drive 5Adobe Drive 5 is used together with Adobe Creative Cloud desktop applications Photoshop, InDesign,InCopy, Illustrator, and Adobe Bridge. It is also compatible with the Creative Suite 6 versions of theseapplications. See the Creative Cloud system requirements lYou must have installed one of these applications in order to install Adobe Drive 5.Download the free, standalone installer for Adobe Drive 5 TANT: If you have previously installed an earlier version of Adobe Drive, you must uninstallit before you can install Adobe Drive 5. This is because Adobe Drive 5 is installed, by default, inthe same location as the previous release: platform path Adobe/Adobe Drive 4/.To uninstall Adobe Drive 4.x: In Windows XP, go to Control Panels Add Remove Programs, select Adobe Drive 4.x,and click Uninstall/Change. In Windows 7, go to Control Panels Programs Uninstall a Program, select AdobeDrive 4.x, and click Uninstall/Change. In Mac OS, go to Applications Utilities Adobe Installers, and double-click UninstallAdobe Drive.4
Adobe Drive CC User GuideConnecting to servers using Adobe Drive 55Adobe Drive 5 installation requires 500MB of available hard-disk space. You must have Administratorprivilege to install on either platform. To install in Windows, unzip the installation package to the defined folder, then double clickSet-up.exe to launch the install process. To install in Mac OS, double-click the downloaded DMG file; this mounts the AdobeDrive5-mulvolume in Mac OS Finder. Go to this volume and double-click Install.app to launch the installprocess.Restart the computer after the installation is completed.Updating your installationIf you have previously installed an earlier version of Adobe Drive 5, you can update it to the latest release. You can click the Updates link from the Adobe Drive Connect UI You can use the Adobe Application Manager (AAM), which you access by choosing Help Updatesfrom a Creative Suite product such as Photoshop You can download updates directly from g Adobe Drive 5 In Windows XP, go to Control Panels Add Remove Programs, select Adobe Drive 5, and clickUninstall/Change. In Windows 7, go to Control Panels Programs Uninstall a Program, select Adobe Drive 5, andclick Uninstall/Change. In WIndows 8, go to Settings Control Panels Programs Uninstall a Program, right-click AdobeDrive 5, and choose Uninstall. In Mac OS, go to Applications Utilities Adobe Installers, and double-click Uninstall AdobeDrive.TerminologyDAM SERVER: Digital Asset Management server, such as an AEM DAM server.MANAGED ASSETS: The files and folders managed by a DAM server.INTEGRATED APPLICATIONS: Creative Cloud and Creative Suite 6 desktop applications (Illustrator,InDesign/InCopy, Photoshop, and Adobe Bridge) that are integrated with Adobe Drive 5 and offeroperations on managed assets through the application UI.Connecting to servers using Adobe Drive 5When you connect to a DAM server using Adobe Drive 5, you can view the remote files on that serverthrough your platform file browser (Windows Explorer or Mac OS Finder), and through integrated desktopapplications. You also have access to the remote files in Open, Save As, and other file management dialogs.
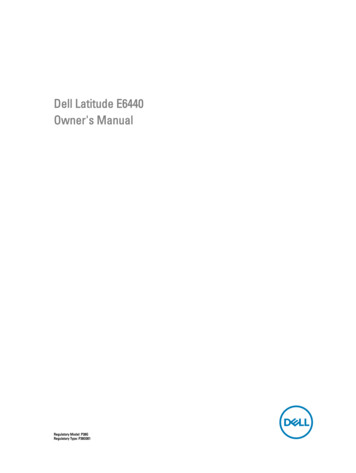
Adobe Drive CC User GuideConnecting to servers using Adobe Drive 56To establish a connection:1. Make sure that the DAM server has been started.2. Take one of these actions to invoke the Adobe Drive 5 interface: Launch Adobe Drive 5 directly. In Windows Explorer, right-click a folder, a file, or the desktop and choose Adobe Drive ConnectTo from the context menu. In Mac OS Finder, CTRL-click a folder or a file and choose Adobe Drive Connect To from thecontext menu. In Adobe Bridge, choose Tools Adobe Drive Connect To, or click the Connect To icon.This brings up the Adobe Drive 5 Connect UI.
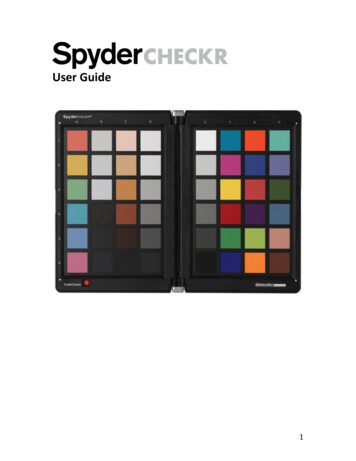
Adobe Drive CC User GuideConnecting to servers using Adobe Drive 573. To connect to a server, click the Add Drive icon at the lower left. This gives you the opportunity toenter connection information:4. Choose one of the available Connectors on the left, then enter or select the server URL on the right. Ifyour configuration has preset servers for the chosen connector, these are available in a drop-downmenu. When you select one, the URL for that server is filled in for you.NOTE: The list of preset servers is configurable by the server administrator. For details, see the AdobeDrive 5 Administrator’s Guide.5. Enter your login information, and choose configuration options: Remember me: When selected, Adobe Drive 5 keeps your login information and automaticallyfills in the password for you on future connections to this server. Enable asset editing offline when server is not available: When selected, you can continueediting a managed asset that has been saved locally if the connection goes down or the servergoes offline. When you select this option, "Remember me" is automatically selected. Automatically connect to this server when computer starts: When selected, Adobe Drive 5keeps your login information and server preference, and connects to the server on startup, so youdo not have to bring up the Adobe Drive 5 Connect UI unless you want to edit the connection orconnect to a different server.6. Enter a Display Name to identify this connection wherever is appears on screen. This string can containonly letters, numbers, and the underscore (" "), hyphen ( "-"), and dot (".") characters.7. Click Connect.
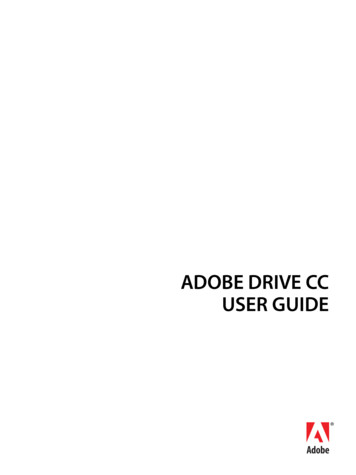
Adobe Drive CC User GuideConnecting to servers using Adobe Drive 588. Once a connection has been established, the window shows the Recent Connections. To change theviewing mode, click the tile-view or list-view icon in the upper right of the Recent Connections panel.Edit connectionsAfter you have successfully established the connection, you can close the Adobe Drive 5 Connect UI. Youremain connected until you explicitly disconnect. If you want to change the configuration setting, orconnect to a different server or service, open the Adobe Drive 5 Connect UI again.For a selected server, you can:OPEN IN [PLATFORM FILE BROWSER]: Open the root folder of the mounted volume in Windows Explorer orMac OS Finder.CONNECT: Establish a new connection to the selected DAM server, if it is currently disconnected.DISCONNECT SERVER : Disconnect Adobe Drive 5 from the DAM server, if it is currently connected.REMOVE: First disconnects the DAM server if it is currently connected, removes all cache data from thelocal cache of Adobe Drive 5, and removes DAM server from the Recent Connections panel.
Adobe Drive CC User GuideConnecting to servers using Adobe Drive 59Set system preferencesTo set system preferences for Adobe Drive 5:1. Open the Adobe Drive 5 window and click Settings.2. Specify any of these options:CACHING: The cache stores information to improve performance when you’re connected to a DAMserver. The cache takes up disk space; you can modify the configuration to optimize it for your system. After you have disconnected from all servers, you can click Move Cache to control where yourcached files are stored. Specify a Cache Size to set the maximum total size of the cache. When the cache reaches thislimit, the oldest cached files are automatically deleted. Click Empty Cache to delete all currently cached files.LOGGING : The log records information about the status of connections, and shows installationlocations and configurations of connected servers. In case of warnings or errors, it contains a Javastack trace that you can send to your server administrator.
Adobe Drive CC User GuideConnecting to servers using Adobe Drive 510 Specify the logging level as info (log informational, warning, and error messages), warning (logwarning and error messages), or error (log only error messages). Click Open Log File to open the log file in the default text editor.AUTOMATIC CHECK-IN: You can choose to automatically check in new files that are added in a connectedfolder through the file system (Mac OS Finder or Windows Explorer). This preference does not affectnew files added through Adobe Bridge (which has its own bulk check-in mechanism) or directly froman integrated application. Automatic check-in is enabled by default; you can deselect the checkbox to disable the feature. When the feature is enabled, files are automatically checked in when you create them in aconnected folder, or when you copy new files into a connected folder using copy-and-paste ordrag-and-drop. (Temporary files, such as *.tmp, are not checked in.) The comment that you enter is used as the check-in comment for files that are added through thefile system. Check the log for information about files that may have failed to be automatically checked in forany reason. There are no error notification dialogs for automatic check-in.3. If you have changed the configuration, click Save.Connecting your server to Windows ExplorerIn Windows, when you install Adobe Drive 5 as a “Local Administrator”, it expects to map to the Z: drive.Before you install, therefore, you should make sure that any location you have previously mapped to the Z:drive is re-mapped to another drive.1. Perform the installation as Administrator. To do this, unzip the downloaded installation archive, selectand right-click the file Set-up.exe. Choose the option "Run As Administrator" and provide "LocalAdministrator" credentials.
Adobe Drive CC User GuideConnecting to servers using Adobe Drive 5112. When the installation (and installation of all available updates) is complete, restart the computer andstart Adobe Drive 5. You see a screen like this:3. Click Add Drive and fill out the details of your AEM DAM server. For example:
Adobe Drive CC User GuideConnecting to servers using Adobe Drive 54. Click Connect. In the new screen, select the new connection and click Open In Explorer.This open a Windows Explorer window, where the drive letter Z:\ (if it’s available) is mapped to theDAM.5. To test the connection, drag and drop a file into a folder managed by your AEM DAM server.If automatic check-in is enabled, the file is automatically checked into the server with the defaultcheck-in comment.6. If you have disabled automatic check-in, select the new file, right click, and chooseAdobe Drive Check In.12
Adobe Drive CC User GuideConnecting to servers using Adobe Drive 5Provide a version comment, click OK.The URL for the uploaded file follows this pattern:http:// server IP addr : AEM TCP LISTEN port /assetdetails.html/content/dam/ upload path / filename 7. In Windows Explorer, select the file, right click, and choose Adobe Drive Open In DAM.8. In the resulting web page, check the Renditions tab on the right side. You should see differentrenditions (resolutions) of the uploaded image that are automatically created; for example,cq5dam.thumbnail.319.319.png, cq5dam.web.1280.1280.jpeg, and so on.13
Adobe Drive CC User GuideWorking with remote files14Connecting your server to Adobe BridgeOnce Adobe Drive is configured to connect to your AEM DAM server, you automatically have file browseraccess to AEM DAM contents from within Adobe Bridge.Connected AEM DAM serverWhen you select an asset from the connected server, Adobe Bridgecan display the associated metadata and thumbnail images.Working with remote filesWhen Adobe Drive 5 successfully connects to a DAM server, a mounted hard drive or mapped networkdrive appears in the file browsers. You can use the contents of this drive the same way you use the local filesystem. When you save a file that is managed by a DAM server, Adobe Drive 5 stores a temporary filelocally. It creates a new version of the file on the server when you check the file in, or save it as a specificversion.This is what a remote file system might look like, for example, in Windows Explorer.
Adobe Drive CC User GuideWorking with remote filesInspecting a connected server in Adobe BridgeThis is what a mounted drive might look like in the Content panel in Adobe Bridge.15
Adobe Drive CC User GuideWorking with remote files16The Inspector panel in Adobe Bridge displays context-sensitive information about DAM servers andmanaged assets. For example, if you select a DAM server in the Content panel, the Inspector showsinformation about the server and asset properties in the top portion, and active links in the bottomportion that allow you to perform Adobe Drive 5 tasks, such as disconnecting from the server.You can set preferences to customize the information that appears in the Inspector panel:1. Choose Edit Preferences (in Windows) or Adobe Bridge CC Preferences (in Mac OS).2. In the Preferences dialog, select the Inspector tab.3. Select items to be displayed in the Inspector panel, and click OK. For example, select Adobe DriveServer Panel to display information and tasks related to a selected DAM server.You can copy information from the Inspector panel; for example, the text of a lengthy version comment. Todo this, right-click (in Windows) or CTRL-click (in Mac OS) the information (such as a version comment) thatyou want to copy, and choose Copy [item name] from the context menu.Adding files or folders to the DAM serverTo save a version of a file, add the file to your DAM server. You can add both Adobe and non-Adobe files.The procedure depends on whether you are using Adobe Bridge, a platform file browser, or an integratedAdobe application. In all cases, assume that you have already connected to the server using Adobe Drive 5.Using Adobe Bridge1. Click Adobe Drive in the Favorites panel, open the DAM server in the Content panel, then double-clickthe folder to which you want to add files.2. Do one of the following: Drag files or folders from Windows Explorer or Mac OS Finder to the folder in Adobe Bridge. You cannot drag an empty folder into Adobe Bridge, but you can create a new subfolder in AdobeBridge, which is automatically checked in to the DAM server. Choose Tools Adobe Drive Add Files. In the Open dialog box, select one or more files andclick Open.3. Enter a version comment in the Check In dialog box and click OK.Using the platform file browser1. Open the DAM Server in Windows Explorer or Mac OS Finder.The DAM Server appears in the same place as your mapped network drives and hard drives.2. Open a folder, then do one of the following: Drag the files you want to add into the folder. Create a new subfolder in the platform browser; the created folder is automatically checked in tothe DAM server.3. To check in a file so that it is available to others, invoke the context menu for the file with right-click (inWindows) or CTRL-click (in Mac OS) and choose Adobe Drive Check In. Type a version comment andclick OK.
Adobe Drive CC User GuideWorking with remote files174. If you check out a file, then drag a new version of the file into a folder that already contains an olderversion, you can check in the file to create another version.If you replace a file that is not checked out, Adobe Drive 5 checks it out automatically when youchoose Replace in the conflict-resolution dialog. You must then check the file in to commit a newversion.Using an integrated Adobe applicationIf you save a file to a folder using one of the integrated Adobe applications—Photoshop, Illustrator, orInDesign/InCopy—you can check in a file to a connected DAM server during the save process.1. In the application, choose File Save, File Save As, or File Check In.2. Save the file to the remote folder.3. Type a version comment and click OK. The file is saved and checked in.4. If you edit the file, it is automatically checked out to you again. You can then check in another versionby choosing File Check In. You can also check in the edited file when you close it.Opening a remote fileYou can open a remote file directly in any application using File Open, the same way you would open anyother file. If you open a checked-in file and edit it in an integrated Adobe application, the file is checked outautomatically and you can save versions of the file directly from the application UI. If you open a checked-in file in any other application, an error indicates that you are attempting toopen a file for which you do not have write permission. You must check the file out in a platform filebrowser in order to open it, and explicitly check it in to commit any changes that you make.To open a remote file from Adobe Bridge:1. Select Adobe Drive in the Favorites panel.2. Double-click the DAM server in the Content panel.3. Double-click the folder that contains the file you want to open.4. Select the file, invoke the context menu, and choose Checkout.5. Double-click the file to open it.Adobe Bridge relies on the operating system to know which application to use when opening the file. Ifthe file opens in the wrong application, open the file directly from within the desired application, orchange the system settings to specify a different default application for the file type.
Adobe Drive CC User GuideWorking with remote files18Changing remote file names and locationsYou can use the move and copy commands of Adobe Bridge and the platform file browsers to move andcopy remote files on a connected DAM server. When you copy or move a file, the DAM server copies ormoves only the most current version.Similarly, you can rename remote files and folders in the same way you rename local files. In Adobe Bridge,you can rename multiple files as a batch. To copy remote files: In Adobe Bridge, invoke the context menu for the file with right-click in Windows, choose CopyTo, and choose or browse to the target folder. In Mac OS, CTRL-click and choose Copy, navigate tothe target folder, and choose Paste. Select the file in a platform file browser, invoke the context menu and choose Copy, then go to thetarget folder and choose Paste. In a platform file browser, CTRL-drag (in Windows) or OPTION-drag (in Mac OS) the file to the targetlocation.To move remote files: In Adobe Bridge, invoke the context menu for the file with right-click in Windows, choose MoveTo, and choose or browse to the target folder. In Mac OS, there is no Move command; you cancopy/paste, then delete the file from the original location. In a platform file browser, drag the file to the target location.You can only rename remote files if they are up-to-date. To rename remote files: In a platform file browser, select the remote file, invoke the context menu and choose Rename. In Adobe Bridge, invoke the context menu for the file with right-click (in Windows) or CTRL-click (inMac OS), choose Rename, and enter the new name. To perform a batch rename in Adobe Bridge, select the files, invoke the context menu and chooseTools Batch Rename, set the desired options and click Rename.
Adobe Drive CC User GuideWorking with remote files19Placing remote files in documentsWhile working with a document in an integrated Adobe application, you can use the Place command toplace a remote file into the document, just as you would with a local file. You can also drag a remote filefrom Adobe Bridge to an open document.Always add assets to the DAM server before placing them in a managed document. When you place a filethat is not managed by the DAM server into a file that is managed, you cannot keep track of the placedasset's versions or status.View file status and versions in the Links panelThe Links panel in Illustrator or InDesign/InCopy displays additional information about placed files fromthe DAM server, identifying whether a linked file is being edited and which user is doing the editing. Youcan also use the Links panel to determine whether the linked file needs to be updated to a newer versionfrom the DAM server.
Adobe Drive CC User GuideWorking with remote files20The Links panel works the same way for remote files as it does for local files. For example, if a newer versionof a linked file is on the DAM server, the Modified Artwork icon appears; if a file is missing, the MissingArtwork icon appears. Update the linked file as you would for a local file.In Illustrator, the Links panel identifies who is editing a linked file from a DAM server, as well as a status iconthat describes the current state of the file (see “File status in integrated applications and file browsers” onpage 21). In Illustrator and InDesign/InCopy, the status bar displays the file status icon.To view versions of a placed file, choose Versions (Illustrator) or Utilities Versions (InDesign/InCopy)from the Links panel menu. In Illustrator, a tool tip displays the version of a placed file when the pointerhovers over the name of the file in the Links panel.See application Help for more information about working with the Links panel and placed files.Replace a placed file with a previous versionYou may find yourself working with multiple versions of a document that includes a link to a file withmultiple versions. If you decide to promote an earlier version of the document that includes a link to anearlier version of the file, Adobe Drive 5 automatically links to the current version of the file in thepromoted document.
Adobe Drive CC User GuideWorking with versions21For example, suppose you create an InDesign/InCopy document, place a Photoshop file
Adobe Drive CC User Guide Connecting to servers using Adobe Drive 5 6 To establish a connection: 1. Make sure that the DAM server has been started. 2. Take one of these actions to invoke the Adobe Drive 5 interface: Launch Adobe Drive 5 directly. In Windows Explorer, right-click a folder, a file, or the des