Transcription
User Guide1
IntroductionSpyderCHECKR: Challenges and SolutionsSpyderCHECKR: What’s Included and Operating RequirementsSpyderCHECKR Workflow BasicsPatch Formulation TechnologyPatch Groups in the 48 Patch SpyderCHECKRGetting Started with SpyderCHECKRRAW Editor ConfigurationSpyderCHECKR Setup Mounting OptionsUsesLighting the SpyderCHECKR for PhotographyPhotographing the SpyderCHECKRAdjusting the Target Shot Opening the Target ShotStraighten and Crop the Target ImageWhite Balance the Target ImageExposure AdjustmentSaving the Target for use in the SpyderCHECKR Application Launching the SpyderCHECKR ApplicationProcessing your Target Shot in the SpyderCHECKR ApplicationSpyderCHECKR Rendering ModesSaving the SpyderCHECKR ProfileUsing Your New CalibrationHarmonizing Multiple CamerasImproving High ISO Color PerformanceColor Calibrating Cameras for Video in Adobe LightroomCreating Multiple Light Source CalibrationsAdjusting Your Calibration PresetSpyderCHECKR Gray TargetChecking Your Display’s NeutralityIn-Camera Color BalancingFadeCheckrChanging between 24 and 48 Patch TargetsUsing SpyderCHECKR with SpyderCUBEUsing SpyderCHECKR with Other SoftwareAdditional 18192021222324252627282930312
IntroductionDigital imaging and color management processes are evolving and becoming morestreamlined. Datacolor continues its tradition of creating and supporting photographerand videographer-oriented products, leveraging our expertise in color workflow andtechnology to help customers express their vision, improve efficiency, and reduce costs.Spyder CHECKR provides a fast, reliable method of color calibrating camera, lens andsensor combinations. It also facilitates harmonizing color between different cameras. Itallows photographers to obtain more consistent, accurate color within their normalpost-production workflow in Adobe Lightroom, Adobe Photoshop and HasselbladPhocus. It is quite useful in videography, and has been integrated into workflow inapplications like DaVinci Resolve 11 and newer.Advanced amateurs and professionals using SpyderCHECKR technology benefit fromoptimized color, workflow and output. From capture, to display, post-production andfinal output; Spyder products help make creative workflow quick and accurate.3
SpyderCHECKR: Challenges and SolutionsEvery combination of lens, camera, and sensor has a unique color signature; this maychange in different lighting conditions. And, of course, these devices don’t perceive orrecord color the way the human eye does.Color control and consistency requires a reference tool to help the user adapt to thesevariations. Adding color management at the capture stage of the digital workflowassures consistency and accuracy from day to day as well as from camera to camera.SpyderCHECKR enable the user to create custom camera calibrations that compensatesfor the characteristics of the optics and sensors which produces more accurate colorreproduction in edited images. The workflow is simple: photograph the SpyderCHECKR,import the image into a supported image editor for basic adjustments, open the imagein the SpyderCHECKR software, and export the HSL preset. You can apply this presetduring image import or editing.The SpyderCHECKR target has 48 spectrally engineered pigment color patches and easyto use calibration software makes post-production quicker by getting consistent,predictable color right from the start.4
SpyderCHECKR: What’s Included and Operating Requirements SpyderCHECKRWelcome Card – Download link and Software Serial NumberSupported Languages: English, Spanish, French, German, Italian, Russian, TraditionalChinese, Simplified Chinese, Korean, JapaneseOperating Requirements:Win 7 32 & 64, Win 8 32 & 64, Win 10Mac OS X 10.7, 10.8, 10.9, 10.10, 10.11128MB of available RAM100MB of available hard disk spaceFor Still Imaging: Adobe Lightroom, Adobe Photoshop, or Hasselblad PhocusFor Video: Adobe Lightroom, Adobe Photoshop, or DaVinci Resolve 11 Internet access for product activation5
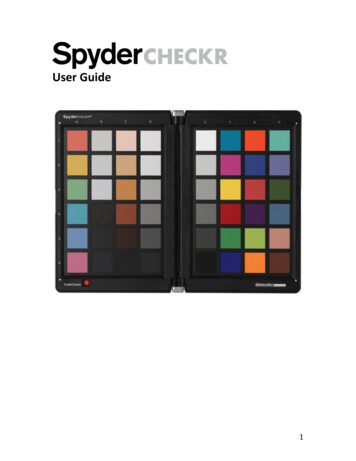
SpyderCHECKR Workflow BasicsThe goal of SpyderCHECKR targets is to provide camera calibration that fits convenientlyinto your workflow and which is easy to adjust as desired to meet your own needs. Theworkflow is simple: photograph the SpyderCHECKR, import the image into a supportedimage editor for basic adjustments, open the image in the SpyderCHECKR software, andexport the correction preset. You can apply this preset during image editing.The 48 Patch SpyderCHECKR TargetThe 48 patch SpyderCHECKR target closes for safe storage, opens like a book, and stayssecurely in its fully open position. Each half of the CHECKR has a frame that holds a colorchip chart in place. You can open these frames and invert the color target sheets todisplay their gray face. This will expose the SpyderCHECKR Gray Target for visualcomparisons, or tasks like In-Camera Custom White Balance.The SpyderCHECKR can be used for visual color comparisons, as well as with a numberof third party software packages for camera profiling and other tasks. But mostcommonly, it is used with the SpyderCHECKR software in creating camera calibrations.6
Patch Formulation TechnologyThe patches in SpyderCHECKR are composed of pigment-based colors with carefullyformulated spectral characteristics, ideal for camera calibration in varying lightingconditions. The SpyderCHECKR also provides spectrally neutral black, white, and graypatches.The patches are durable and produced to close tolerances. A SpyderCHECKR which seesonly moderate usage will last almost indefinitely. Replacement cards are available forpurchase from the Datacolor website for circumstances involving heavy use or in caseswhere the patches become scratched, worn, or soiled over time. Please avoid touchingthe patches in your SpyderCHECKR as oils from the skin can affect the patch color andtexture.Color PatchesThe color patches on the right half of the SpyderCHECKR represent the standard 24colors used in a variety of color products. These patches are near or within the sRGBcolor gamut to avoid gamut clipping and assure usability with a wide range of capture,display, and output devices.Note: the order that various software programs read these standard 24 colors varies,but the SpyderCHECKR provides them in a serpentine pattern, such that reading downone column and up the next will produce the usual measurement order.The color patches in the left half of the SpyderCHECKR represent additional colorstargeting several uses. There are six additional skin tones for a total of eight. There aresix medium saturation color patches, in the red, green, blue, cyan, magenta, and yellowzones to improve the coverage of the inside of the color gamut.There are three near white tints and three near black tones, for checking color tints andtones at both ends of the dynamic range. And, the gray ramp has been increased fromthe standard 20% steps, to 10% steps, plus extra samples at 5% and 95% to provide amore detailed gray ramp.7
Patch Groups in the 48 Patch SpyderCHECKRPlease note the reference numbers across the left side, and the reference letters acrossthe top of the SpyderCHECKR frame.Gray Patches Grays proceed from white (E1) down to black (E6) in 20% steps.Patches D2 to D6 are extra gray patches that provide 10% steps.A zigzag path from A1 to A6 will cover the 10% gray ramp in order.An additional 95% patch is located at D1, and an additional 5% patch is located atC6 for more detail near white and black.The same 10% ramp patches are repeated on the back of the chart, with a large50% gray patch, for uses requiring neutrals-only to be visible.Color Patches Full saturation patches: Columns F, G, and HSkin Tones: C1-C5Near White Tints: B1-B3Near Black Tones: B4-B6Med Saturation, RGBCM&Y: A1-A68
Getting Started with SpyderCHECKRSpyderCHECKR Software: Download, Installation, Basic SetupDownload and install the SpyderCHECKR software for your platform from the Datacolorwebsite. Before starting, make sure that you are logged onto your computer as anadministrator.Run the installer. (See section on Serialization below.) This will install a folder in yourDatacolor applications folder named SpyderCHECKR. In that folder you'll find anapplication named SpyderCHECKR.Adobe Lightroom users won't need to launch it from there in general use; it will be selflaunching, once you have configured Adobe Lightroom.Note: If you use Adobe Photoshop, you will import the target image through AdobeCamera Raw. Then you will launch the SpyderCHECKR software manually or by draggingthe adjusted image to the application icon to both launch the software and open theimage. If you use another RAW import tool, you'll still need to use ACR to create yourcalibrations. Once created, you can then use the Sidecar file from ACR in any otherapplication that honors the Adobe Sidecar file format and the adjustments it contains.Serialization and ActivationYour SpyderCHECKR comes with a unique serial number for software activation. Pleasekeep this serial number in an easy to find location for future reference. Our softwareuses a web-based activation process so it’s simplest to install and activate our softwarefrom an Internet connected computer.Software UpdatesThe software update option in the SpyderCHECKR application (accessible in“Preferences”) is on by default. When Datacolor posts a new build of the software it willtell you on next launch that there is an update available and offer to take you to theDatacolor website to download the latest version.9
Raw Editor ConfigurationConfiguring Adobe Lightroom Launch Adobe Lightroom and go to the Adobe Lightroom PreferencesIn the External Editing tab, go to the Additional External Editor section, andchoose the SpyderCHECKR Editing Preset (which was installed as part of theSpyderCHECKR software installation)Configuring Hasselblad Phocus Launch Hasselblad Phocus and go to the Hasselblad Phocus Preferences. SelectGeneral Image Editor Select.Navigate to and select the SpyderCHECKR app in the SpyderCHECKR folder inyour Datacolor Folder (in the Applications folder in Macintosh, or the C:\programfiles\datacolor folder in Windows).To use the SpyderCHECKR plugin with Hasselblad Phocus, set the HasselbladPhocus image editor preference to the SpyderCHECKR application in theDatacolor folder.Configuring Adobe Camera RawFiles cannot be directly imported to the SpyderCHECKR application so there is noconfiguration necessary for Adobe Camera Raw.10
SpyderCHECKR Setup and WorkflowMounting OptionsThe SpyderCHECKR has a standard tripod mount (1/4 inch 20 UNC thread) on the base.This allows flexible mounting at any height or angle desired. However, it's also possibleto place the target on a table or shelf; it will stand upright in stable locations. Holdingthe SpyderCHECKR is also effective if you have someone to help. There is also a standardtripod stud at the top of the SpyderCHECKR spine. This can be used to mount aSpyderCUBE, but also offers further mounting options.UsesThere are numerous uses for a color target. SpyderCHECKR can be used for both visualand digital capture functions. A number of software products, which utilize colortargets, can be adapted to work with the SpyderCHECKR.Lighting the SpyderCHECKR for PhotographyMount the SpyderCHECKR or place in a stable location. Light it from a 45- degree angle.The ideal way to light a target is to use a single light source from an extended distancewith no reflector or diffuser. Generally, you would want the sweet spot in the center ofthe light field to completely overlap the edges of the SpyderCHECKR.This assures that all portions of the target will have the same amount and color of light.This reduces light fall-off and color variation across the width of a target. A goodfluorescent proofing lamp placed in front of the target with the bulb along the length ofthe target that shines down from above at 45 degrees will offer even light.The gray side of the SpyderCHECKR provides an excellent tool for checking lightingconsistency. Once the target and lighting are configured, shoot the gray target andsample the 50% gray area at different locations to check that light quantity and color iseven.11
Photographing the SpyderCHECKRDo not fill the viewfinder frame with the target. The sweet spot of the lens is near thecenter and away from the corners. It’s best to shoot the target with a generous amountof border and crop it down later.Use a tripod to support the camera whenever possible. Make sure the camera is directlyin front of the target. The central axis of the lens should be in line with the center of theSpyderCHECKR. Mount the SpyderCHECKR as suggested above.The SpyderCHECKR and the camera sensor should be parallel. Look closely at the shapethe target makes: if the rectangle is wider at the top or bottom, or taller at one end thanthe other, you are not squarely in front of the target.Auto focus produces excellent results. Fully Automatic settings are fine, thoughAperture Priority, or full Manual settings are also good for those who are comfortablewith them. It is important to shoot in the camera's RAW format, if it offers one. Take afew frames at different settings, if you are unsure of any of the variables.12
Adjusting the Target ShotOpening the Target ShotDownload your target shot and open in Adobe Lightroom, Adobe Camera Raw, orHasselblad Phocus; as you would with any RAW image.To make the best color profile for your camera and lens combination, there are severaladjustments that need to be made to the image of the SpyderCHECKR target image. Inorder to create a profile, photograph the target using your camera manufacturer’s RAWformat then open the image in one of the supported applications.Straighten and Crop the Target ImageCropping is done with Adobe Lightroom, Adobe Camera Raw, or Hasselblad Phocus' croptool. Crop to the four white dots just outside of the patch area with no backgroundshowing beyond the target. Use the rotate function of the crop tool to straighten thetarget image. Activating a lens profile will reduce lens distortion in your target shot, butthis is rarely necessary.White Balance the Target ImageAny of the light or medium gray patches can be used to gray balance/white balance thetarget image. The 20% gray patch (E2) is recommended. Use the white balanceeyedropper tool and click on the desired gray patch.Exposure AdjustmentLook at RGB values or Percentages of the white patch (E1). Adjust the exposure slideruntil the white patch lists as approximately 90% in Adobe Lightroom, or about RGB 230,230, 230 in ACR.Adobe Lightroom - Move your cursor over the white patch to see the RGBpercentages below the histogram. Adjust the Exposure slider so themeasurements for RGB average 90%Hasselblad Phocus - Move your cursor over the white patch to see the RGBmeasurements; found at the bottom right corner of the editing window. Adjustthe Exposure so the measurements for RGB average 230.Adobe Camera Raw - Select the Color Sampler Tool and place a target on thewhite patch. Adjust the Exposure so the measurements for RGB average 230.13
Next check the black (E6). The Blacks adjustment (or in some cases the Shadowsadjustment) is used to set the black value to 4% in Adobe Lightroom, or RGB 10, 10, 10in ACR. If the value is below this level, it may be best to leave it as shot or reshoot withbrighter illumination.Adobe Lightroom - Move your cursor over the black patch to see the RGBpercentages below the histogram. Adjust the Black slider so the measurementsfor RGB average 5%Hasselblad Phocus - Move your cursor over the black patch to see the RGBmeasurements; found at the bottom right corner of the editing window. Adjustthe Brightness so the measurements for RGB average 10.Adobe Camera Raw - Select the Color Sampler Tool and place a target on theblack patch. Adjust the Black slider so the measurements for RGB average 10.Once these adjustments are made, the target image is ready to be used to create a colorprofile for your camera and lens combination.14
Saving the Target for use in the SpyderCHECKR ApplicationTo use directly from Adobe Lightroom, right click on the target image and select “Edit InSpyderCHECKR”. Choose “Edit a Copy with Lightroom Presets” to assure that your whitebalance and exposure adjustments are included in the exported file. To use directly fromHasselblad Phocus, Export the target image as a 16-Bit Tiff then choose theSpyderCHECKR as the export destination. To use with Adobe Camera Raw, save thetarget image as an uncompressed Tiff. Launch the SpyderCHECKR software and openthe target image.Launching the SpyderCHECKR ApplicationSpyderCHECKR will auto-launch if you have configured Adobe Lightroom and HasselbladPhocus. The adjusted target image will open into the SpyderCHECKR application.For Adobe Camera Raw, launch the SpyderCHECKR application from your programs orapplications folder. Now drag your target file to or select “Open” from theSpyderCHECKR menu to open and navigate to your file to open the adjusted targetimage.15
Processing your Target Shot in the SpyderCHECKR ApplicationIf you captured your image and cropped appropriately the sampling squares shouldalready be placed within the correct patches of your Target image. If not, you can dragon any edge or corner of the image area to adjust the fit. You can left click on the gridand move the entire target grid if needed. The colors inside the sampling squares shouldbe a somewhat less saturated version of the patch colors. If the patch and sample colorsare of different colors, check that the target image is not upside down, sideways, orinverted.Once you have reviewed and adjusted the target grid on the target image, choose yourRendering Mode and where you would like to save the calibration.16
SpyderCHECKR Rendering ModesIn the right pane of the SpyderCHECKR application you will find a drop down list of modechoices. The three modes are described below:Colorimetric Mode – provides the most literal results. Best when attempting toreproduce artwork and color critical work.Saturation Mode - provides a boost in Saturation. Offers results that aregenerally more pleasing for many types of images.Portrait Mode - selectively reduces the color saturation of skin tone componentsto make portrait processing easier.The effects of these modes can be subtle; the amount of change to your image dependson the color accuracy of your camera’s sensor and color neutrality of a particular lens.Saving the SpyderCHECKR ProfileOnce you have selected the rendering mode you would like to use, choose where youwould like SpyderCHECKR to save the calibration – Adobe Lightroom, Hasselblad Phocus,or Adobe Camera Raw.Click on the “Save Calibration” button. This will launch a window that allows you toname the calibration.We suggest using a naming system that includes the camera model, lens, calibrationMode, and SpyderCHECKR chart (48 for SpyderCHECKR, 24 for SpyderCHECKR 24). Forexample, if you calibrate a Nikon D810 with an 85mm lens in Portrait Mode with the 48patch SpyderCHECKR, a file name such as this would be optimal:D810 85 portrait 48This way you can easily identify the preset for the correct camera and lens combination.Note: Once you save your calibration, you must restart Adobe Lightroom, HasselbladPhocus, or Adobe Camera Raw for your calibration to appear and use.17
Using Your New CalibrationRe-launch Adobe Lightroom, Hasselblad Phocus, or Adobe Camera Raw (again - yourcalibration data will NOT be available until you quit and restart Adobe Lightroom,Hasselblad Phocus, or Adobe Camera Raw). Select an image that you would like tocorrect.Adobe Lightroom – SpyderCHECKR calibrations are stored as a User Preset in thePresets panel of the Develop Module.Adobe Camera Raw - SpyderCHECKR calibrations are stored in the Presets Dialog belowthe Histogram and capture information. You can also apply a preset from Adobe Bridgeby right clicking on an image, select Develop Settings, and choose the profile thatcorresponds to the camera and lens used to make the image.Hasselblad Phocus - SpyderCHECKR calibrations are stored in the Color CorrectionPanel. To choose the correct profile, click on the triangle pointing down on the rightside of the Color Correction tab.Presets can be applied to an individual image. A quicker method would be to filter agroup of images by the camera and lens then apply the calibration to the group ofimages at the same time.18
Harmonizing Multiple CamerasUsing SpyderCHECKR calibration presets will also make it possible to harmonize multiplecameras on the same shoot. Every camera and lens combination has a slightly differentability to render color accurately, or the same as another camera and lens combination.Creating and using calibration presets for each camera can make multiple cameras’color output more consistent, which saves time when editing.One example where this ability can be very helpful is photographing an event withmultiple cameras from multiple manufacturers. Final images should have a consistentlook and using multiple cameras can make that a challenge. By quickly applyingcalibration profiles for each camera and lens combination, harmonious color can beachieved.19
Improving High ISO Color PerformanceColor performance of any camera is best at the base ISO or lowest native ISO setting.When the ISO is increased, color performance can suffer in varying degrees based onthe camera. ISO performance can be improved at any setting by creating and using acalibration preset for a particular ISO.If your photography requires the use of high ISOs, create multiple calibrations for yourcamera using higher ISO settings to improve color performance of your camera.20
Color Calibrating Cameras for Video in Adobe LightroomAdobe Lightroom can now catalog, clip, and even make basic adjustments to your video;the question of using SpyderCHECKR Adobe Lightroom Presets to correct color for yourvideo cameras arises. This possibility is particularly interesting when it comes toadjusting video capture from different types of cameras, such as GoPro cameras andDSLRs, or different types of DSLRs to match their color as closely as possible.It is possible to apply an existing SpyderCHECKR preset from a still image shot with yourcamera to video shot with the same camera. However, since that preset was most likelyshot in RAW and as a still image, it is best to start from scratch and shoot theSpyderCHECKR target in a video clip to capture the actual video workflow for colorcorrection.To calibrate a video clip, shoot several seconds of the SpyderCHECKR on location. Openthe clip in Adobe Lightroom and capture a still frame from the video with theSpyderCHECKR. Process that still frame the same way you would any SpyderCHECKRtarget shot. When saving the calibration preset, be sure to note in the file name that it isa calibration for video.The resulting Preset can then be applied to a still image, and by selecting that still imageand one or more video clips, the “Sync Settings” button can then be used to apply thecolor corrections to video clips.Once the clips have been color corrected for the camera they have been shot with, theycan be exported from Adobe Lightroom for processing in any other Video Editingapplication you use. Be sure to check the “Include Video Files” checkbox.21
Creating Multiple Light Source CalibrationsSpyderCHECKR's Tools menu contains commands for creating multiple calibrations fromany two existing calibration presets. Choose any two presets built for the same camera,and a series of three new calibration presets will be created which offer increasedprecision for light sources between the original sources. This function is of use mainlyfor advanced processes such as museum photography.22
Adjusting Your Calibration PresetThe SpyderCHECKR color calibration adjustments are visible in Adobe Lightroom orAdobe Camera Raw in the HSL Panel (Hue, Saturation, and Brightness). This makes iteasy for the user to make adjustments to the calibration.For example: if your printer prints skies that tend to be too purple under some lightingconditions and you need to avoid adding too much magenta ink to the sky tones; youcan adjust the blue sliders in the HSL section to control this. Or, if your method oflighting portrait shots requires a different degree of saturation in the skin tones, thenthe orange sliders in HSL can be adjusted to meet those needs. The edited settings canthen be saved under a new name to provide a customized color calibration preset23
SpyderCHECKR Gray TargetThe inverse face of each SpyderCHECKR target sheet holds the neutral target patches.These patches consist of the same gray ramp in 10% steps. All colored patches havebeen removed to allow for improved neutral perception by the viewer. An enlarged 50%gray patch has been added for uses requiring a larger gray sample.Visual Gray ComparisonsThe SpyderCHECKR Gray Target can be used for various types of visual comparisons.Please keep in mind that visual comparisons of neutrals is a very subtle process, andthat it cannot work effectively if bright colors are in the field of view. That's why weprovide the Gray Targets on a separate face: viewing the neutral patches on the ColorTarget sides will not offer precise results. Be sure to eliminate colored elements from allother visual fields.24
Checking Your Display’s NeutralityIt’s possible to use the SpyderCHECKR Gray Target to validate the neutrality of yourmonitors. Place the SpyderCHECKR, with the Gray Target visible, against a neutralbackground under a medium color temperature, high CRI proofing light, or in a proofingbox, that is visible at the same time as your monitor. Dimming ambient lighting,avoidance of backlight, and avoidance of colored objects in your field of view are allimportant to this process.As your eye adapts to the gray balance of the SpyderCHECKR, shift your gaze to a totallyneutral image on a totally neutral background on your display (the Black and Whiteimages in the Datacolor SpyderProof Matrix image are intended for this type of use).Shift your gaze back and forth carefully between the SpyderCHECKR and the screen andsee if the screen appears to have a different color tone from the neutrals in theSpyderCHECKR. If so, you may wish to change your calibration target for your display, toprovide neutrals that will match those under your proofing light.25
In-Camera Color BalancingShoot the Gray Target face of the SpyderCHECKR in your camera's White Balance orGray Balance mode to produce an in-camera color balance for the lighting conditionsunder which you have shot the SpyderCHECKR. This will assure that your initial view ofimages, quick exports to JPG, or images downloaded directly to a mobile/tablet devicewill have the intended color balance and will assist in assuring that you do notoverexpose as you shoot.The mix of several levels of gray in the Gray Target will provide a more global balancethan shooting just one density of gray. Shooting the center section of the Gray Targetwill further enhance this multi-level function.26
FadeCheckrThe FadeCheckr patch is provided to assist users in determining how much lightexposure their SpyderCHECKR target has had. It is designed to fade from red to yellowafter the equivalent of 30 days of full sun in the summer. This degree of exposure issufficient to justify replacing your SpyderCHECKR Target Sheets. New sets are availablefor purchase from spyder.datacolor.com.27
Changing between 24 and 48 Patch TargetsThe SpyderCHECKR software supports both the 24 and 48 patch versions of theSpyderCHECKR target and will automatically launch configured for the target type youhave purchased. If you use both targets, the appropriate target can be chosen in theSpyderCHECKR preferences. Select the other target type you want to use and when thedialog box comes up telling you that it is necessary to restart the application to switch,select OK, to auto-quit the SpyderCHECKR app. Re-launch and it will now use the othertarget size.28
Using SpyderCHECKR with SpyderCUBEOnce a camera calibration has been produced and is being used to process images, it isthen possible to coordinate this workflow with the SpyderCUBE. The SpyderCUBE can beused in the standard manner to determine the optimum white point, exposure, blacklevel, and other basic light condition settings for a series of images.The resulting adjustments can be applied separately from applying the SpyderCHECKRcolor calibration preset. Or, for convenience, the SpyderCUBE adjustments can be builton top of the SpyderCHECKR preset and saved as a composite Color/Lighting correctionpreset.This workflow eliminates the need to carry a color target with you, and avoids buildingcolor calibration from casual site shots of a color target. It is much simpler to shoot theSpyderCUBE on location if the lighting conditions are challenging, and combining thatwith a carefully built SpyderCHECKR color calibration preset made ahead of time. If youare doing special work under a specific light source, shooting the SpyderCHECKR as areference to create a custom calibration for the situation is a good safety measure.29
Using SpyderCHECKR with Other SoftwareThe SpyderCHECKR target can be used with third party software products as well. Toutilize it with software designed to accept the standard 24 patches, measure thepatches in the appropriate order (which varies with different software) by measuringthe last four columns E-H, or the entire 24-patch target in the appropriate pattern, toproduce the needed patch order. To use 24 or 48 patches in software that allowscustom patch sets, measure the patches in appropriate order. Save your custommeasurement set in the format required by the software.Some third party software offers direct support for the SpyderCHECKR target. Thisincludes DaVinci Resolve 11, f
Adobe Lightroom users won't need to launch it from there in general use; it will be self-launching, once you have configured Adobe Lightroom. Note: If you use Adobe Photoshop, you will import the target image through Adobe Camera Raw. Then you will