Transcription
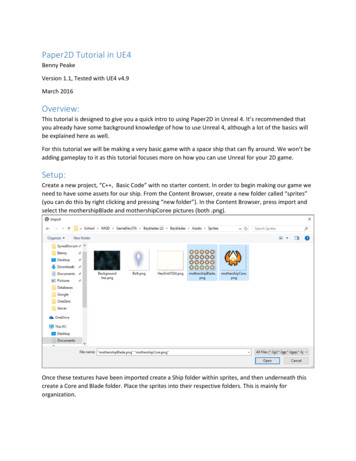
Paper2D Tutorial in UE4Benny PeakeVersion 1.1, Tested with UE4 v4.9March 2016Overview:This tutorial is designed to give you a quick intro to using Paper2D in Unreal 4. It’s recommended thatyou already have some background knowledge of how to use Unreal 4, although a lot of the basics willbe explained here as well.For this tutorial we will be making a very basic game with a space ship that can fly around. We won’t beadding gameplay to it as this tutorial focuses more on how you can use Unreal for your 2D game.Setup:Create a new project, “C , Basic Code” with no starter content. In order to begin making our game weneed to have some assets for our ship. From the Content Browser, create a new folder called “sprites”(you can do this by right clicking and pressing “new folder”). In the Content Browser, press import andselect the mothershipBlade and mothershipCoree pictures (both .png).Once these textures have been imported create a Ship folder within sprites, and then underneath thiscreate a Core and Blade folder. Place the sprites into their respective folders. This is mainly fororganization.
The content is currently imported as textures, however in order to use it in our game we need it to be asprite asset. Luckily this is pretty easy to do. Let’s start with the core sprite. Right click next to the assetand go down to Paper2D/Sprite (note! If you do not see “Paper2D” as an option as in the picture below,you may need to scroll the popup window).
This will create a new sprite asset. Name it ShipSprite and double click it. This will open up the spriteeditor. For this sprite we have relatively little to do as far as editing. On the right hand side under sourcetexture click the drop down and select mothershipCore.Then under Collision set Sprite Collision to none, we will be using a separate collider for our collision.When done save and close the spite editor.
Now we have to edit the mothershipBlade into sprite format. This sprite is an animation where all theframes are stored on a single sprite sheet. In order to use it we have to create a sprite for each frame.Luckily Unreal has some quick tools for dealing with this. Right click on mothershipBlade and selectSprite Actions/Extract Sprite.
This will bring up a tool for extracting the sprites from a single sprite sheet. By default the editor will tryto auto detect sprites, however with an animated sprite this can cause the sprite to look like its shiftingif the regions it creates are different sizes. Instead we will tell unreal to extract using a grid. On the righthand side set Sprite Extract Mode to grid. Change the Cell Width and Cell Height to 102. Set Num Cells Xto 5 and Num Cells Y to 4. You should also change the Naming Template to “ {0}”. This will cause thenew sprites to be name mothershipBlade {Cell Number}. Your editor should look like this.Press Extract and you should now see a sprite for each frame of the animation in your editor. Now weneed to turn these into an animation, or a Flipbook. To do this select the first frame, hold shift, andselect the last frame. Right click on the sprites and select Sprite Actions/Create Flipbook.
This will create a new Flipbook asset from the selected sprites.The last thing we need is a background. Under Sprites create a new folder Background. Import the hexgrid texture like before and create a sprite from it. Set Collision/Sprite Collision to None.With that all of our assets have been imported.
Code:Now that we have our assets all set we can begin actually coding. We will be putting together a C classfor our space ship. Before we can begin however there are a few things to do.First we need to setup our input. Our input will be setup just like we would any other game. Go toEdit/Project Settings and find Input on the left hand side. You should see a menu like so:For this demo we are going to create two Axis Mapings, one for horizontal input and one for vertical.Setup your binding like so:W,A,S,D is the choice shown above, however you could also setup gamepad input or anything else thatyou like.Close the Project Settings window when finished.
Now that we have our input setup we need to setup our engine for 2D. Exit out of the editor (be sure tosave all your work!) and find the Unreal Projects folder for your tutorial in a Windows Explorer. Thereshould be a Visual Studio Solution inside the same folder. If there is not then you can right click on theUnreal Engine Project File and press Generate Visual Studio Project Files. Open up the Visual StudioSolution and look for the .build.cs file inside your project directory (under the “Games” folder thenunder the “Source”). Modify the file to look like the below (note, the name “TutorialProject” will differdepending upon what you have named your saved tutorial):The only difference should be the addition of Paper2D in the PublicDependencyModuleNames list. Thisfile is used to tell Unreal how to generate our Solution (.sln) file. By default the Paper2D plugin is notused, by adding it we now have access to Paper2D inside our C code. To apply the changes regenerate the solution file by following the same steps as listed above.We are now ready to begin our C programming. Open the Unreal Editor and Visual Studio Project(note it can take a while for Visual Studio to parse all the engine files, this is normal). In Unreal, go intothe C folder, right click, and press New C Class
A dialog will come up asking for the object type. We are going to make this a player object so selectPawn.Hit next. You should now see a screen asking to name the class. We are going to name this classShipPawn (so original). Hit Create Class and Unreal should auto create the class for you.
You should now have a ShipPawn.h and ShipPawn.cpp file inside your Visual Studio project. The firstthing to do is to fill out the header file. At the top of the file put these includes:#include "PaperSpriteComponent.h"#include "PaperFlipbookComponent.h"This adds in the Paper2D scripts for use. It’s important to make sure that the generated header file isincluded last.Now in the class add the following to the endprivate:UFUNCTION()void OnHorizontal(float val);UFUNCTION()void OnVertical(float ngPawnMovement *m movementComponent;// The ship sprite teComponent *m shipVisual;// The blade animated sprite bookComponent *m bladeVisual;The variables we will use to store our main components of our ship and the two methods will be used toreceive input. We mark the two methods as UFUNCTION() so that way Unreal will know about them.NOTE: The modifier VisibleDefaultsOnly on a pointer will still allow members of the objects to be edited,it just means that the pointer itself cannot be changed.Now we will edit the .cpp file. First, we start with the constructor. In Unreal the constructor is only ranonce for each type (not for each object instance). This effectively creates a “template” for each type.The template can then have modifications done on it per instance allowing for variations from thetemplate. We will use the constructor to setup our components.
// Sets default valuesAShipPawn::AShipPawn(){// Set this pawn to call Tick() every frame.PrimaryActorTick.bCanEverTick true;// Create the root component for this object.USphereComponent *collision CreateDefaultSubobject USphereComponent (TEXT("Collision"));RootComponent collision;collision- SetSphereRadius(28.0f);collision- RelativeLocation FVector(0.0f, 0.0f, 0.0f);collision- SetCollisionProfileName("Pawn");// Setup movement.m movementComponent CreateDefaultSubobject UFloatingPawnMovement (TEXT("Movement"));m movementComponent- SetUpdatedComponent(RootComponent);m movementComponent- MaxSpeed 500.0f;m movementComponent- Acceleration m movementComponent- MaxSpeed * 5;m movementComponent- Deceleration m movementComponent- MaxSpeed * 5;// Setup the spring arm that the camera will attach to.USpringArmComponent *springArm CreateDefaultSubobject USpringArmComponent (TEXT("SpringArm"));springArm- AttachTo(RootComponent);springArm- SetRelativeRotation(FVector(0.0f, -1.0f, 0.0f).Rotation());springArm- SetAbsolute(false, false, false);springArm- TargetArmLength 500.f;springArm- bEnableCameraLag true;springArm- CameraLagSpeed 3.0f;// Setup the camera.UCameraComponent *camera CreateDefaultSubobject UCameraComponent (TEXT("Camera"));camera- AttachTo(springArm, USpringArmComponent::SocketName);camera- SetWorldRotation(FVector(0.0f, -1.0f, 0.0f).Rotation());camera- ProjectionMode ECameraProjectionMode::Orthographic;camera- OrthoWidth 700.0f;// Create the sprite for the ship.m shipVisual CreateDefaultSubobject UPaperSpriteComponent (TEXT("ShipVisual"));m shipVisual- AttachTo(collision);m shipVisual- RelativeLocation FVector(0.0f, 0.0f, -7.0f);m shipVisual- SetSprite(ConstructorHelpers::FObjectFinder UPaperSprite t);// Create the animated sprite component.m bladeVisual CreateDefaultSubobject UPaperFlipbookComponent (TEXT("BladeVisual"));m bladeVisual- AttachTo(collision);m bladeVisual- SetFlipbook(ConstructorHelpers::FObjectFinder UPaperFlipbook pbook")).Object);m bladeVisual- RelativeLocation FVector(-2.0, 0.0f, 0.0f);m bladeVisual- RelativeScale3D FVector(1.5f);}NOTE: make sure to replace the names of the assets (e.g., the sprite) with the names used in yourproject.For a brief explanation of the constructor code, first we setup the collision for our object. We give it aradius and collision profile. We also set it to the root component so all things will be children of it.Next we create our movement component. This defines how our object should move. Because we aredoing a space ship we just use a floating component. We tell the floating component to use the collideras the updated component.Next we create a spring arm. We will use this component for our camera. The spring arm is like anextended arm with a point to mount things at the end. We can have the spring arm have a dampeningeffect, however, which will allow our camera to follow slightly behind. We also setup the spring arm tonot track the rotation of our pawn.
Next we create our camera and attach it to the end of our spring arm. We also set it up to be anorthographic camera. This causes objects to not get smaller as they get farther away from the camera.We then set the width of the camera to be a little wider than default to give us more of a view.Finally, we add a sprite and a flipbook component for the visuals. One will represent the ship core andthe other will represent the animated rotating blade.
Next we have to setup the input in the same .cpp file.// Called to bind functionality to inputvoid AShipPawn::SetupPlayerInputComponent(class UInputComponent* nputComponent);InputComponent- BindAxis("Horizontal", this, &AShipPawn::OnHorizontal);InputComponent- BindAxis("Vertical", this, &AShipPawn::OnVertical);}void AShipPawn::OnHorizontal(float val){FVector input FVector(val, 0.0f, 0.0f);AddMovementInput(input);}void AShipPawn::OnVertical(float val){FVector input FVector(0.0f, 0.0f, val);AddMovementInput(input);}First, in SetupPlayerInputComponent we bind the vertical and horizontal axis to the correspondingmethod calls. We then have a method to handle applying the horizontal input to the horizontal axis (x)and vertical to the vertical axis (z). We then add this to the AddMovementInput which will tell themovement component to move.In Unreal, we now can create a Blueprint using this pawn. In the Content Browser, create a folder named“Blueprints” and inside right click and press Create Basic Asset / Blueprint Class. Under the AllClasses/Actor/Pawn select ShipPawn as the base class and name the Blueprint ShipPawnBlueprint.Finally, we need to setup the game to actually use our pawn. Inside the pre-generated game mode Mode(){DefaultPawnClass ConstructorHelpers::FClassFinder AShipPawn ;}file, make the following constructor (adjusting the name to be appropriate for your tutorial name).public:ATutorialProjectGameMode();This tells the game mode to find the Blueprint we created and use it as the pawn. Add an entry for theconstructor in the .h file, too.
Level Setup:Before editing it is recommended that you put your camera into orthographic mode. You can do this bypressing the button as shown and selecting “Front” and “Lit”.There are a few things to do in our level setup. First, we need to create a new blank scene. With the newblank scene, create a player start point and place it at [0, 0, 0]. Next, drag in the background sprite thatwe imported at the start and place it at [0, 500,0]. This put the background on a farther back plane so itwill appear behind the player.
We still want to setup our player to stay in bounds, however. From the Modes panel, go to Volumes andfind Blocking Volume.Drag the volume into the scene. Then go into volume editing mode by clicking the last tab on the Modesbar on the right hand side. You can now select and move individual vertices. Use this to create a wall likeshown.
You can then make this wall the size of the edge of the background to create a blocking wall for thearena.
Do this four times to create walls all around the arena. You should end up with a level that looks like so.
Make sure the walls are all aligned along the z-axis and then extend them back. This ensures that theplayer can hit them.Set the game mode in Project Settings/Game/Maps & Modes/Default Modes to be your tutorial gamemode.With that you should be able to run the game and move the ship around. Select Play or Launch and try itout!
In Unreal, we now can create a Blueprint using this pawn. In the Content Browser, create a folder named “Blueprints” and inside right click and press Create Basic Asset / Blueprint Class. Under the All Classes/Actor/Pawn select ShipPawn as the base class a

