Transcription
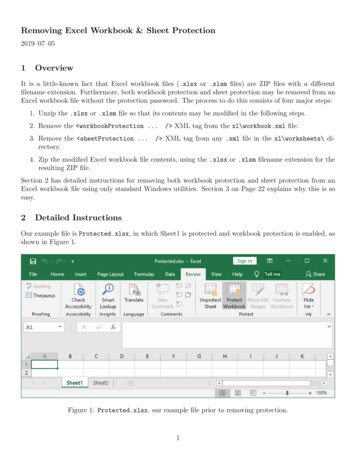
Removing Excel Workbook & Sheet Protection2019–07–051OverviewIt is a little-known fact that Excel workbook files (.xlsx or .xlsm files) are ZIP files with a differentfilename extension. Furthermore, both workbook protection and sheet protection may be removed from anExcel workbook file without the protection password. The process to do this consists of four major steps:1. Unzip the .xlsx or .xlsm file so that its contents may be modified in the following steps.2. Remove the workbookProtection .3. Remove the sheetProtection .rectory./ XML tag from the xl\workbook.xml file./ XML tag from any .xml file in the xl\worksheets\ di-4. Zip the modified Excel workbook file contents, using the .xlsx or .xlsm filename extension for theresulting ZIP file.Section 2 has detailed instructions for removing both workbook protection and sheet protection from anExcel workbook file using only standard Windows utilities. Section 3 on Page 22 explains why this is soeasy.2Detailed InstructionsOur example file is Protected.xlsx, in which Sheet1 is protected and workbook protection is enabled, asshown in Figure 1.Figure 1: Protected.xlsx, our example file prior to removing protection.1
Step 1 Begin by renaming Protected.xlsx to Protected.zip. Click "Yes" when File Explorer asks ifyou’re sure (See Figure 2).Figure 2: Renaming Protected.xlsx to Protected.zip. Yes, we are sure.2
Step 2 Now, right click Protected.zip and click "Extract All." as in Figure 3.Figure 3: Unzipping Protected.zip, formerly known as Protected.xlsx.Step 3 The window that pops up will let you pick the directory where the contents of Protected.zipwill go; Figure 4 keeps the default directory. Click the "Extract" button.Figure 4: Choosing where to place the contents of Protected.zip.3
Step 4 A new File Explorer window will open showing the contents of Protected.zip, as in Figure 5.Figure 5: The contents of Protected.zip.4
Step 5 If you only want to remove sheet protection and not workbook protection, skip to Step 11. Ifyou want to remove workbook protection, navigate to the xl\ directory, right click workbook.xml, select"Open with", and click "Notepad" (Figure 6).Figure 6: Opening xl\workbook.xml with Notepad.5
Step 6 With xl\workbook.xml open in Notepad, either click Edit Find. as in Figure 7 or key Ctrl F.Figure 7: Searching xl\workbook.xml with Notepad’s Find dialog.6
Step 7 When the Find dialog pops up, type workbookProtection in the "Find what:" box and clickthe "Find Next" button (Figure 8).Figure 8: Finding the workbookProtection .7/ XML tag in xl\workbook.xml.
Step 8 If workbook protection was enabled, Notepad will find the workbookProtection . / XMLtag. In this case, close the Find dialog (Figure 9) and proceed to Step 9. If there is no workbookProtection. / XML tag, close Notepad and skip to Step 11.Figure 9: Found the workbookProtection .8/ XML tag in xl\workbook.xml.
Step 9 Now, highlight the whole XML tag starting with the " " in workbookProtection and endingwith the first next occurrence of "/ ". In this example, the whole tag is workbookProtection workbookAlgorithmName "SHA-512" workbookHashValue tlHBnmvAkdVNwHydNEqQBSQRIX9qfSLF4Uoeg " workbookSaltValue "GLOE zLU0 ea6QALWOTQ8g " workbookSpinCount "100000"lockStructure "1"/ The tag contents will vary in each file; the important thing is to highlight the whole tag. See Figure 10.Figure 10: Highlighting the workbookProtection .of the tag is shown.9/ XML tag in xl\workbook.xml. Only the end
Step 10 Delete the whole workbookProtection .11) or key Ctrl S, then close Notepad./ XML tag, click File Save in Notepad (FigureFigure 11: Saving xl\workbook.xml after deleting the workbookProtection .10/ XML tag.
Step 11 In Protected.xlsx, Sheet1 is protected. To remove this protection, navigate to the xl\worksheets\directory, right click sheet1.xml, select "Open with", and click "Notepad" (Figure 12).Figure 12: Opening xl\worksheets\sheet1.xml with Notepad.11
Step 12 With xl\worksheets\sheet1.xml open in Notepad, either click Edit Find. as in Figure 13or key Ctrl F.Figure 13: Searching xl\worksheets\sheet1.xml with Notepad’s Find dialog.12
Step 13 When the Find dialog pops up, type sheetProtection in the "Find what:" box and click the"Find Next" button (Figure 14).Figure 14: Finding the sheetProtection .13/ XML tag in xl\worksheets\sheet1.xml.
Step 14 If sheet protection was enabled for Sheet1, Notepad will find the sheetProtection ./ XML tag. In this case, close the Find dialog (Figure 15) and proceed to Step 15. If there is no sheetProtection . / XML tag, close Notepad and either (1) go to Step 11 to unprotect anothersheet or (2) skip to Step 17.Figure 15: Found the sheetProtection .14/ XML tag in xl\worksheets\sheet1.xml.
Step 15 Now, highlight the whole XML tag starting with the " " in sheetProtection and ending withthe first next occurrence of "/ ". In this example, the whole tag is sheetProtection algorithmName "SHA-512" hashValue l7ED2RnWdgQe8OYrU7v14dmt/zSoACtVEjIoQ " saltValue "wZgSkeZQ6LJic41v7DZLkA " spinCount "100000" sheet "1" objects "1" scenarios "1"/ The tag contents will vary in each file; the important thing is to highlight the whole tag. See Figure 16.Figure 16: Highlighting the sheetProtection .the end of the tag is shown.15/ XML tag in xl\worksheets\sheet1.xml. Only
Step 16 Delete the whole sheetProtection . / XML tag, click File Save in Notepad (Figure17) or key Ctrl S, then close Notepad. If there are other sheets to unprotect, repeat Steps 11–16 foreach sheet. If there are no more sheets to unprotect, proceed to Step 17.Figure 17: Saving xl\worksheets\sheet1.xml after deleting the sheetProtection .16/ XML tag.
Step 17 We are done modifying the Excel workbook file contents; all that remains is to ZIP the contentsback up. Navigate to the directory where you stored the unzipped contents of the Excel workbook fileback in Step 3. This is the directory that holds the xl\ directory, as shown in Figure 18.Figure 18: Back to the directory holding the (now modified) unzipped Excel workbook file contents.17
Step 18 Highlight all the files and folders that make up the unzipped Excel workbook file contents as inFigure 19.Figure 19: Highlighting all the contents of the unzipped Excel workbook file.18
Step 19 Right click any of the highlighted items, select "Send to", and click "Compressed (zipped) folder"(Figure 20).Figure 20: Zipping the modified Excel workbook file contents.19
Step 20 The default .zip filename is [Content Types].zip (Figure 21). Change it to something else,making sure that the file name extension is .xlsx or .xlsm and not .zip. In Figure 22, NotProtected.xlsxis chosen. Click "Yes" when asked if you’re sure you want to change the file name extension.Figure 21: Default file name when zipping the Excel workbook file contents.Figure 22: Choosing a better file name with .xlsx or .xlsm extension. Yes, we’re sure.20
THE END We now have an Excel workbook file named NotProtected.xlsx (Figure 23). It really isno longer protected (Figure 24).Figure 23: Our new, unprotected Excel workbook file NotProtected.xlsx.Figure 24: Our modified workbook opened in Excel. Both workbook protection and sheet protection aregone.21
3Why is This so Easy?Excel workbook files are Office Open XML files, and as such their format is specified by the ECMA-376standard. Regarding workbook protection, Section 18.2.29 of ECMA-376-1:2016 states the following.Applications might use workbook protection to prevent anyone from accidentally changing,moving, or deleting important data. This protection can be ignored by applications whichchoose not to support this optional protection mechanism.Section 18.2.29 also contains the following note.Worksheet or workbook element protection should not be confused with file security. It is notmeant to make your workbook safe from unintentional modification, and cannot protect it frommalicious modification.I do question whether the not in "It is not meant to make." is a typo, but this quibble does not affectthe point that workbook protection and sheet protection were never intended to provide file security. Ifsomeone takes the steps outlined in Section 2 of this document in order to modify an Excel workbook file,they are certainly not doing so on accident, and workbook protection was not designed to stop them.22
Excel workbook files are Office Open XML files, and as such their format is specified by the ECMA-376 standard. Regarding workbook protection, Section 18.2.29 of ECMA-376-1:2016 states the following. Applications might use workbook protection to prevent anyone from a