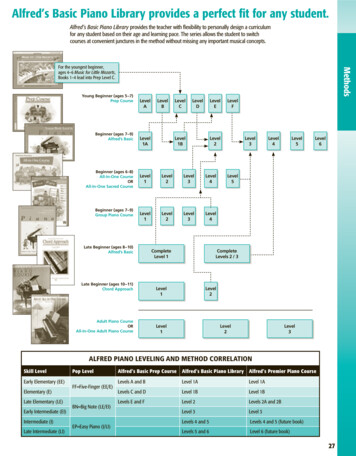
Transcription
Computer Training CentreUniversity College CorkExcel 2016Level 1
Excel 2016 – Level 1Table of ContentsIntroduction . 1Opening Excel . 1Using Windows 8 . 1Using Windows 10 . 1Getting Started with Excel 2016 . 2To set up Excel so it automatically opens a new workbook . 2Saving Workbooks . 3Where to Save your Files . 4The Excel Window . 5The File Menu . 6The Ribbon Menu . 6Tabs . 6Dialog Box Launcher . 6Quick Access Toolbar . 7Adding to the Quick Access Toolbar. 7Removing a button from the Quick Access Toolbar . 7Page Layout View . 7The Excel Work Book . 8Sheet Tabs . 8Renaming a Tab . 8Adding a new sheet. 8Changing the Tab Colour of a Worksheet . 8Deleting a Worksheet . 8Creating a new Excel Workbook . 9Saving an Excel File . 9Converting Old Excel Files to 2016 . 10Opening an Existing Workbook . 11Closing a Workbook . 11Training Centre, IT Servicestcentre@ucc.iei
Excel 2016 – Level 1Closing Excel . 12Cells . 13Types of Data . 13Entering Data in a Cell . 13Editing a cell . 13The Mouse Pointer . 14Autofill . 14The Home Tab – Basic Formatting . 15Formatting Data . 15Font Formatting. 15Using Styles . 15Using Format as a Table . 16Data Formatting . 16Cell Alignment. 17Duplicating and Moving Data. 18Using Copy and Paste . 18Using Cut and Paste . 18Paste Options . 18Rows and Columns . 19Inserting a Row. 19Inserting a Column . 19Inserting a Cell . 19Deleting Columns or Rows . 20Changing Column Widths or Row Heights . 20Column Width . 20To change the column width for the best fit . 20Row Height . 20To change the row height for the best fit . 20Using the Home Tab. 21Applying a Format to the Entire Worksheet . 22Training Centre, IT Servicestcentre@ucc.ieii
Excel 2016 – Level 1Freeze Panes . 22Un-Freeze Panes . 22Formula . 23Entering a Formula . 23Functions . 23Elements of a Function . 24AutoSum . 24Calculating sum of a range of cells . 24Inserting Functions . 25Average/Count/Max/Min . 25Sorting Data . 26AutoFilter . 27To turn off the AutoFilter . 28Charts . 29Creating a Chart . 29Chart Tools . 29Modifying Chart Data . 30Deleting a Data Series . 30Adding a Data Series . 30Resizing a Chart . 30Deleting a Chart . 30Print Preview & Printing. 31To preview your worksheet before printing . 31Print Options. 31Set printing options . 31Print all or part of the worksheet . 32To exit out of Print/Print Preview Screen . 32Page Setup . 32Adding Headers and Footers in Page Layout View . 34Training Centre, IT Servicestcentre@ucc.ieiii
Excel 2016 – Level 1IntroductionMicrosoft Excel is a spread sheet application that lets you organise your data into lists.Excel is capable of performing calculations, generating charts and has many tools toenable you to analysis and summarise your data.Opening ExcelUsing Windows 8 Press the Windows key on the keyboard. Type Excel Click on Excel 2016 under the AppsresultsUsing Windows 10 Click in the box Search the web andWindows Start to Type Excel Click on Excel 2016Training Centre, IT Servicestcentre@ucc.ie1
Excel 2016 – Level 1Getting Started with Excel 2016When you open Excel 2016, you’ll see templates for budgets, calendars, forms, andreports, and more. Click on Blank workbook to create a new workbook.or Click OpenOtherWorkbooksto work onan existingworkbook.To set up Excel so it automatically opens a new workbook Click File then Options. On the General tab, under Start upoptions, uncheck the Show the Startscreen when this application starts box. The next time you start Excel, it opens ablank workbook automatically similar toolder versions of Excel.Training Centre, IT Servicestcentre@ucc.ie2
Excel 2016 – Level 1Saving WorkbooksUse the File tab to save your workbook wherever you want to save your workbook (onyour computer or the web, or the network for example), use Save As to save yourworkbook for the first timeWhile you’ll use Save to save an existing workbookin its current location, you need to, in a differentlocation, or to create a copy of your workbook in thesame or another location. Click File Save As. Under Save As, pick the place where youwant to save your workbook. See thefollowing page for further informationbefore making your selection. The filename can be entered in the followingdialogue box By clicking on More options OR by clicking Browse you will be able to view alllocations available to save the file in the following dialogue In the file name box type a file name Click on SaveTraining Centre, IT Servicestcentre@ucc.ie3
Excel 2016 – Level 1Where to Save your FilesWhen saving work related UCC files use one of the following options: NAS – this in the UCC network. Files stored on nas are backed up daily. Selectthis PC and navigate to nas. Folders can be setup to allow multiply users accessto files. Check with your system administrator where on nas you have access to. One Drive - University College Cork – this is One Drive for Business which isweb based storage. Saving here means you will have access to the file anywhereon any device once you are connected to the internet. This is generally used for auser’s individual files and for short-term sharing and collaboration. Sites – University College Cork – SharePoint which is a web-based documentmanagement system. Saving here means you will have access to the fileanywhere on any device once you are connected to the internet. This is generallyused for project based files where a group of users need to share and collaborateon files. The SharePoint site would need to be set up in advance, check with yoursystem administrator.Note: Work related files should NOT be stored long-term on your PC (in the Documentsfolder, for example). If files are stored here the onus is on the user to back-upregularly.One Drive Personal is NOT recommended for work files.Training Centre, IT Servicestcentre@ucc.ie4
Excel 2016 – Level 1The Excel WindowQuick Access ToolbarMin, Restore/Max, CloseTabsThe RibbonColumn HeadingsRow HeadingsCell e.g. the cellref for this is G8ScrollBarsSheet TabDifferentViewsBarsTraining Centre, IT Servicestcentre@ucc.ie5Zoom
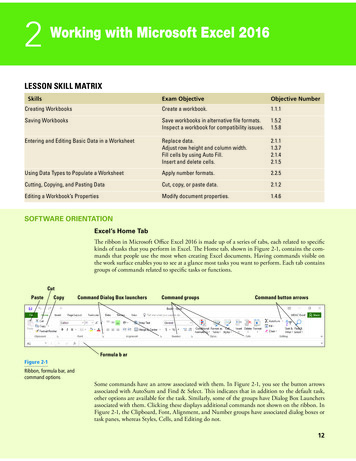
Excel 2016 – Level 1The File MenuThe File menu allows you access options such so creating a New file, Save, Save As,Close, New, Print (and Print Preview). To close the File menu click on thebuttonon the top left or press Esc on the keyboard.The Ribbon MenuThe Ribbon is designed to help youquickly find the commands that youneed to complete a task.Commands are organized in logicalgroups, which are collected togetherunder tabs. Each tab relates to atype of activity, such as writing orlaying out a page.TabsThere are 7 tabs in Microsoft Excel 2016. Tabs are used to organise together relatedgroups of commands. The commands workin the same way as before e.g. if you wantto make a piece of text appear in bold font,select the piece of text using the mouse,on the home tab, in the font group, click on the bold command button.Dialog Box LauncherAt first glance, you may not see a certain command from a previous version of Excel.Some groups have a small diagonal arrow in the lower-right corner.The arrow is called a Dialog Box Launcher. If you click it, you'll see more options relatedto that group. Those options will often appear in the form of a dialog box that you mayrecognize from a previous version of Excel.Training Centre, IT Servicestcentre@ucc.ie6
Excel 2016 – Level 1Quick Access ToolbarThe Quick Access toolbar is located on theupper left hand corner above the FileMenu It is a customizable toolbar thatcontains a set of commands that areindependent of the tab that is currentlydisplayed this means that the buttonsremain the same no matter what tab iscurrently open. By default, it containssave, undo and re-do buttons.By clicking on the arrow to the right of thistoolbar you can quickly add othercommands from the list or you can use themethod outlined below. The position of the quick access toolbar can also be moved tobelow the RibbonAdding to the Quick Access ToolbarThere may be a command that you use on a regular basis that you would like to haveaccess to without having to go through the ribbon interface. To add such a command tothe quick access toolbar do the following: Locate the command in its tab Right click on the command button and from the menu that displays select Addto quick access toolbar The button will now be added to the toolbarRemoving a button from the Quick Access Toolbar Right click on the button in the quick access toolbar Select Remove from quick access toolbar from the menu that displaysPage Layout ViewPage Layout View is a new feature since Excel 2007. It is similar in some ways to printlayout view in Word. Click on the View Tab Select Page LayoutAlternatively Click on the Page Layout View in the bottom right handcorner of the Excel WindowTraining Centre, IT Servicestcentre@ucc.ie7
Excel 2016 – Level 1The Excel Work BookIn Excel 2016, when you open up a new workbook it now contains only 1 worksheetThere can be a max of 1,048,576 rows and 16,384 columns in an excel work sheet.Sheet TabsThe name of the sheet appears on a tab at the bottom of the workbook window.(Sheet1)Renaming a TabIt can be useful to name the sheets you are using. Right Click on the tab of the sheet to be named Select Rename Type the name of the sheet Press enter on the Keyboard.Alternatively, double click on the sheet tab and type the new sheet nameAdding a new sheetThis is useful to organize and store related information within the same file but onseparate sheets. New sheets can be added to a workbook at any time Click on the insert worksheet A new sheet will be created.buttonAlternatively, right click an existing sheet tab and select Insert. A new sheet will beinserted to the left of the worksheet. To move from sheet to sheet, click the sheet tabs.Changing the Tab Colour of a Worksheet Right click on the sheet tab and click Tab Color Select the required colourDeleting a Worksheet Right click on the sheet tab and select Delete. The following warning appears Click Delete to permanently that worksheet.Alternatively, from the Home Tab in the Cells Group click on Delete and select DeleteSheet.Warning:The Undo button will not undo the deletion of a worksheetTraining Centre, IT Servicestcentre@ucc.ie8
Excel 2016 – Level 1Creating a new Excel WorkbookWhen you open Excel 2016,you’ll see templates forbudgets, calendars, forms,and reports, and more. Click on Blankworkbook to createa new workbook. If you have closed an existing file and then wish to create a new workbookClick on the File menu and click New the same screen appears as when youopen excel and you select Blank workbook.Saving an Excel FileBefore you begin adding content toyour excel file it is considered bestpractice to save the file Click on the File menu andclick SaveAs Click on Browse and theSave As window appears Select which folder you wish to save the file and type the file name in thefilename box Click on Save. Once you saved the file the name ofthe file appears at the top of thescreen It is recommended that yousave your work regularly This can be done by clicking on the Savebutton on the Quick Access ToolbarTraining Centre, IT Servicestcentre@ucc.ie9
Excel 2016 – Level 1Converting Old Excel Files to 2016If you open an excel file that was originally created in a previous version of Excel[Compatibility Mode] is displayed beside the filename in the title bar on the top of thescreen.To convert the file to the current file version Click on File and click on Info Click on Convert Button The following screen appears. Click on OK A message is displayed indicating that the conversion was successful. Click Yes to close and reopen the file so the new features can be used.Note: Thebutton will only appear if the file that is opened has been createdin a version of Excel prior to Excel 2007.Training Centre, IT Servicestcentre@ucc.ie10
Excel 2016 – Level 1Opening an ExistingWorkbookIf you have just opened Excel Click on Open OtherWorkbooks at the bottom leftof the File menu.If you are already working in excel Click on the File menu andclick on Open Click on Recent Workbooks ifit is a file that you have beenworking on recently and clickon the required file.If the file has not been opened recently Click on Browse The Open dialogue boxappears Locate your file and click onOpen.Closing a Workbook Click on the File menu Select CloseAlternatively Click on the X button on the top right of the screen. You will be prompted to save if you have any unsaved data in the file.Training Centre, IT Servicestcentre@ucc.ie11
Excel 2016 – Level 1Closing ExcelIn earlier versions of Excel, you could exit Excel and close all open workbooks at once.To reduce confusion about the different close and exit commands in Office Backstageview (File tab), Exit has been removed since Excel 2013. File Close or the Close button (in the upper-right corner of the applicationwindow) closes workbooks one at a time To exit Excel the way you did before, add Exit to the Quick Access ToolbarNote: If you have made changes to the workbook you are prompted to save theworkbook before it closes. (Click on Save if you wish to save the changes, Don’t Save todiscard changes or Cancel to cancel the command to close the file).Training Centre, IT Servicestcentre@ucc.ie12
Excel 2016 – Level 1CellsA cell must be selected i.e. made active before entering theinformation. To make the cell active, click into the cell using themouse. The active cell address is displayed in the Name Box anda dark border appears around the cell.Types of DataText, numbers, dates or a formula may be typed into a cell. By default, text aligns tothe left of the cell whereas numbers, dates and formulas are right aligned.Entering Data in a Cell Select the cell you wish to enter thedata into and type. As you type, the data appears in theactive cell and in the formula bar. A cancel mark and an enter mark appears between the name box and the formula bar. Click on the tick markupon completion of your entry or if you wish to delete the entry click on the x. Alternative ways of completing the entry of data in a cell include the following:oPress the Enter key – this completes the entry and moves you down onecell below the active cell.oPress the Tab key - this completes the entry and moves you one cell tothe right of the active cell.oPress one of the Arrow keys – this completes the entry and moves youone cell in the direction of the arrow.oUse the mouse to move to another cell.Editing a cell Double click on the cell you wish to edit and move the cursor to where you wishto type. Alternatively, select the cell you wish to edit then click into the formulabar and make the required change. To replace existing data in a cell, simply click on the cell and type the new dataand press enter. To delete data in a cell, select the cell and press the Delete key on thekeyboard.Training Centre, IT Servicestcentre@ucc.ie13
Excel 2016 – Level 1The Mouse PointerThe shape of the mouse pointer changes shape depending on where it is positionedwithin a cell. Each shape carries out a different task. If the mouse is moved to the centre area of a cell the mouse shapewill be a white cross - use to select cells Click into a cell and move the mouse to any part of the border ofthe cell. The cell changes to a double headed arrow - use tomove and drag the contents of the cell t o a different location. Click into a cell and move the mouse to bottom right of the cell. Themouse pointer changes to a symbol - use for autofill or tocopy contents of a cell.AutofillIf you are entering a set series e.g. months of the year or days of the week you can typeone of the series and then fill the rest of the series by using the autofill handle. If theentry in the cell is not part of a series the same data is filled into the other cells. If thecell contains a formula, the formula is copied into the other cells but the cell referenceswill change (because excel uses relative cell referencing by default).Example Click into cell B1 and type Jul. Rest your mouseto the bottom right of the cell until the autofillhandle appears.Click and drag over the two cells to the right ofcell B1. Aug should appear in cell C1 and Sep incell D1.Now click into cell B2 and type 50000 using theautofill click and drag into the two cells to theright of cell B1. 50000 should now be copied into cells C2 and D2.Note: In Excel 2016 you can autofill in any directionExamples of series that can be auto filledInitial selectionExtended seriesInitial selectionExtended series1, 2, 34, 5, 6,.2007, 20082009, 2016, 2011,.9:0010:00, 11:00, 12:00,.1-Jan, 1-Mar1-May, 1-Jul, 1-Sep,.MonTue, Wed, Thu,.Qtr3 (or Q3 or Quarter3)Qtr4, Qtr1, Qtr2,.MondayTuesday, Wednesday, Thursday,.text1, textAtext2, textA, text3, textA,.JanFeb, Mar, Apr,.1st Period2nd Period, 3rd Period,.Jan, AprJul, Oct, Jan,.Product 1Product 2, Product 3,.Jan-07, Apr-07Jul-07, Oct-07, Jan-08,.15-Jan, 15-Apr15-Jul, 15-Oct,.Training Centre, IT Servicestcentre@ucc.ie14
Excel 2016 – Level 1The Home Tab – Basic FormattingThe most commonly used features of Excel are located in the Home Tab. These wouldinclude many of the formatting options.Formatting DataFont FormattingThe majority of the options availablefor changing the format of the text incells are located on the Home Tab, inthe Font Group. Here you can changethe selected Font Style, Size, Colourand more. Click and drag to select the cells to beformatted Click on the formatting optionrequired. Resting your mouse over an optionwill display a screen tip detailing thefunction of the button. To see all the font formatting optionsavailable click on the small arrow onthe bottom right hand corner of thegroup. The Format Cells window will open.Using StylesThere are a large number of styles that can be used to format the cells in a worksheet.Styles can be used to help you quickly identify particular items of data. Select the Cells the background ofwhich you want to format In the Styles Group on the Home Tabselect a styleTraining Centre, IT Servicestcentre@ucc.ie15
Excel 2016 – Level 1Using Format as a TableThe Format as Table may also contain a style that suits the data. Select the Cells you want wish to format In the Styles Group on the Home Tab Click on the Format as a Table button and choose a formatIf you later decide that you’d prefer your data in its original form (i.e. not in a table),you can convert it back to a range of cells. Click anywhere in the table and then on theTable Tools tab, on the Design table, under the Tools group click on the Convert ToRange button. Once the data is converted back to a range, the table features are nolonger available.Note: that the formatting that was applied to the table is still present.Data FormattingOther than text an excel workbook will also containdata such as numbers dates and currency. Todifferentiate between say 20% and 20 you wouldneed to format the numbers. Click on the Cells to be formatted Click on the Arrow to the right of the wordGeneral in the Number Group on the Home Tab. Select your required FormattingThe default currency setting may already be (depending on your computer’s Region Settings). Ifyou want to display a different currency symbol carryout the following: Display the Format Cells window by clickingon the arrow on the bottom right of theNumbers Group on the Home Tab Click on the Number tab Select Currency from the list of Category’s Change the Format as required. Click on OKThe default date style, percentage and so on canalso be changed here.Training Centre, IT Servicestcentre@ucc.ie16
Excel 2016 – Level 1Cell AlignmentBy default text aligns left, numbers and dates right. You can change the alignment of acell by using the commands in the Alignment Group onthe Home Tab.Text direction can also we changed here.Wrap TextIf you want text to appear on multiple lines in a cell, you can format the cell so that thetext wraps automatically Select the cells that you want to format. On the Home tab, in the Alignment group, click Wrap Text. Data in the cell wraps to fit the column width. When you change the columnwidth, data wrapping adjusts automatically.(If all wrapped text is not visible, youmay need to increase the row height)Note: Data in the cell wraps to fit the column width. When you change the column width,data wrapping adjusts automatically.Merge and CentreJoins the selected cells in to one large cell and centres the data withinthe cell. Select two or more adjacent cells that you want to merge. Click on the Merge and Centre button in the Alignment Group.Note: Make sure that the data that you want to display in the merged cell is containedin the upper-left cell of the selected range. Only the data in the upper-left cell willremain in the merged cell. Data in all the other cells of the selected range will bedeleted.Training Centre, IT Servicestcentre@ucc.ie17
Excel 2016 – Level 1Duplicating and Moving DataTo duplicate data means that an electronic image is taken of the originaldata and placed in an area known as the clipboard. The process used iscalled Copy & Paste. The buttons associated with these commands arelocated in the Clipboard Group in the Home Tab - Copy and Paste.Using Copy and Paste Select the range of cells you wish to copy.Click on thebutton. A flashing border appears around the outside of theselected cells.Click into the cell where you want the first cell of your selection to appear.Click on the button. The data still remains in the original range of cells but younow have a copy of the data in the new location.You can continue to paste into other locations in the worksheet if you wish.When you have finished pasting pressing the Esc key on the keyboard to turn offthe flashing border. The flashing border will turn off automatically when youcarry out another task.Using Cut and PasteTo move data from one location in a worksheet to somewhere else either within thesame worksheet or to a different worksheet/workbook the process used is Cut & Paste. Select the range of cells you wish to move.Click on the Cutbutton. A flashing border appears around the outside of theselected cells.Click into the cell where you want the first cell of your selection to appear.Click on the Pastebutton. The data is now gone from its original location andnow appears - in the new location.Paste OptionsThere are a lot of options available when using pas
Excel 2016 – Level 1 Training Centre, IT Services tcentre@ucc.ie 8 The Excel Work Book In Excel 2016, when you open up a new workbook it now contains only 1 worksheet There can be a max of 1,048,576 rows and 16,384 columns in an excel work sheet. Sheet Tabs The name of the she