Transcription
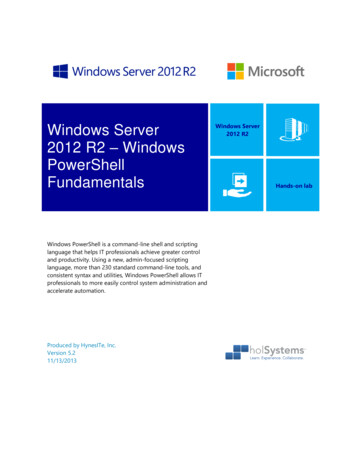
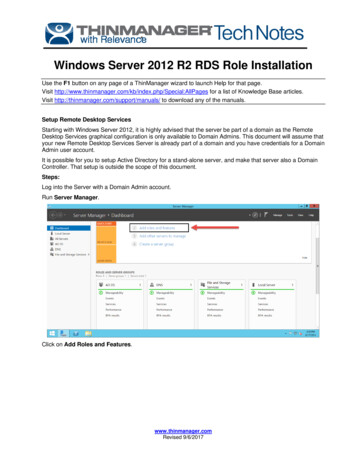
Windows Server 2012 R2 RDS Role InstallationUse the F1 button on any page of a ThinManager wizard to launch Help for that page.Visit lPages for a list of Knowledge Base articles.Visit http://thinmanager.com/support/manuals/ to download any of the manuals.Setup Remote Desktop ServicesStarting with Windows Server 2012, it is highly advised that the server be part of a domain as the RemoteDesktop Services graphical configuration is only available to Domain Admins. This document will assume thatyour new Remote Desktop Services Server is already part of a domain and you have credentials for a DomainAdmin user account.It is possible for you to setup Active Directory for a stand-alone server, and make that server also a DomainController. That setup is outside the scope of this document.Steps:Log into the Server with a Domain Admin account.Run Server Manager.Click on Add Roles and Features.www.thinmanager.comRevised 9/6/2017
Click Next.ThinManager Tech NotesWindows 2012 R2 and Remote Desktop Services-2
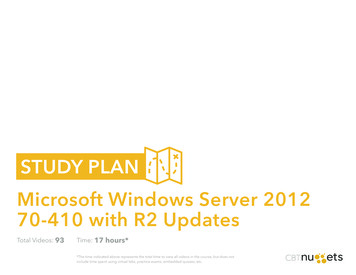
Select Remote Desktop Services installation, and then press Next.ThinManager Tech NotesWindows 2012 R2 and Remote Desktop Services-3
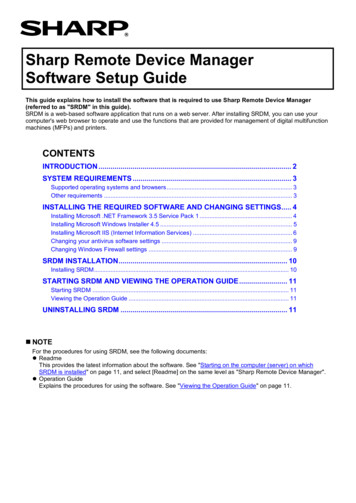
Select Quick Start, and press Next.ThinManager Tech NotesWindows 2012 R2 and Remote Desktop Services-4
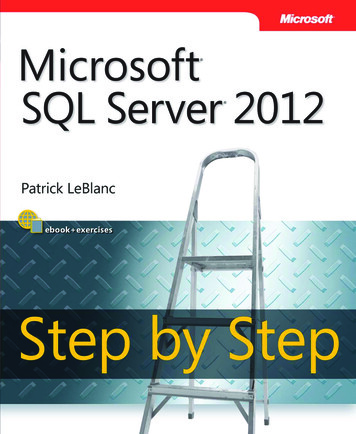
Select Session-based Desktop deployment, and press Next.ThinManager Tech NotesWindows 2012 R2 and Remote Desktop Services-5
It should select automatically create a server pool, and add your local server. Press Next.ThinManager Tech NotesWindows 2012 R2 and Remote Desktop Services-6
Check the Restart the destination server box, and press Deploy.ThinManager Tech NotesWindows 2012 R2 and Remote Desktop Services-7
A progress screen will appear and display information on the new deployment progress. The server willautomatically restart if the deployment is successful. It may also restart one or more times during thedeployment process. After each restart, it will go back into Server Manager and post the status of thedeployment.ThinManager Tech NotesWindows 2012 R2 and Remote Desktop Services-8
After the deployment completes successfully press Close.At this point, your Remote Desktop Server is setup and will allow you to make Remote Desktop connectionsto this server. If you would like to access individual applications using AppLink, follow these steps:ThinManager Tech NotesWindows 2012 R2 and Remote Desktop Services-9
In the Server Manager Dashboard, press Remote Desktop Services in the link on the left side of thewindow.ThinManager Tech NotesWindows 2012 R2 and Remote Desktop Services- 10
On the next window, select QuickSessionCollection, and then press the link for Publish RemoteApp Programs.ThinManager Tech NotesWindows 2012 R2 and Remote Desktop Services- 11
Select the applications you want to launch from the list that appears. If you don’t see your specific application,then use the Add button to browse for it. If it still does not appear, make sure the application is properlyinstalled on this server.In the example here, we have selected Calculator, Paint, and Wordpad. Use the scroll bar to the right to scrolldown for more applications.Press Next once you have selected your applications.White listing your applications is necessary to use AppLink to deploy a single application. Microsoft allowsdeploying the desktop only by default.ThinManager Tech NotesWindows 2012 R2 and Remote Desktop Services- 12
Verify that all of the applications you want to run are listed, and press Publish.White Listing isn’t enough if you want the application to launch a specific file like a *.CLI, *.SCU, or *.PDF .You need to go to the properties and allow Command Line Parameters.ThinManager Tech NotesWindows 2012 R2 and Remote Desktop Services- 13
Highlight the whitelisted application, right click and select Edit Properties.ThinManager Tech NotesWindows 2012 R2 and Remote Desktop Services- 14
The Properties window has several properties.Highlight Parameters to open the Command-line Parameter page.Select Allow any command-line parameter. This will allow you to specify specific files when using AppLink.Once you have changed the setting to allow command-line parameters select the Apply button.ThinManager Tech NotesWindows 2012 R2 and Remote Desktop Services- 15
At this point, we need to now look at some of the other settings.In the Server Manager, with Remote Desktop Services Collections QuickSessionCollection selected,press on the Task drop down shown in the image below, and then select “Edit Properties”.ThinManager Tech NotesWindows 2012 R2 and Remote Desktop Services- 16
If you would like to change the name of the collection to something other than QuickSessionCollection youcan do it here, and press the Apply button.ThinManager Tech NotesWindows 2012 R2 and Remote Desktop Services- 17
Select the User Groups item in the menu on the left, and add the User Groups that you want to be able toremotely connect to your server. Use the Add button, and Apply once you’ve finished.ThinManager Tech NotesWindows 2012 R2 and Remote Desktop Services- 18
Select the Session item in the left menu, and make any adjustments you would like to use for your system.The defaults here will work fine for ThinManager. Press Apply when complete.ThinManager Tech NotesWindows 2012 R2 and Remote Desktop Services- 19
Press the Security item in the Menu to the left. Make sure your settings match those shown in the imagebelow. Key for ThinManager clients is that you UNCHECK the Allow Connections Only from item.Note: Network Level Authentication (NLA) is supported in Firmware Package 7.1.3 and later. You can leave theAllow Connections Only from item checked.Press Apply once finished.ThinManager Tech NotesWindows 2012 R2 and Remote Desktop Services- 20
Select the Client Setting item in the menu to the left. Select the items you wish to change, and press Apply.The default settings (shown below) should work fine for you ThinManager system.You may now press the OK button to close the dialog box. At this point, your server is ready for ThinManagerto use it as a Remote Desktop Server (Terminal Server).ThinManager Tech NotesWindows 2012 R2 and Remote Desktop Services- 21
Starting with Windows Server 2012, it is highly advised that the server be part of a domain as the Remote Desktop Services graphical configuration is only available to Domain Admins. This document will assume that your new Remote Desktop Services Server is already part of a domain