Transcription
8 Free Apron Sewing Patterns8 Free Apron Sewing Patterns eBookCopyright 2010 by Prime Publishing LLCAll rights reserved. No part of this book may be reproduced or transmitted in any form or by any means,electronic or mechanical, including photocopying, recording, or by any information storage or retrievalsystem, without written permission from the publisher, except in the case of brief quotations embodiedin critical articles and reviews.Trademarks are property of their respective holders. When used, trademarks are for the benefit of thetrademark owner only.Published by Prime Publishing LLC, 3400 Dundee Road, Northbrook, IL 60062 – www.primecp.comFind thousands of free craft projects, decorating ideas, gifts and more at www.FaveCrafts.com.2
8 Free Apron Sewing PatternsLetter from the EditorsDear Reader,If you have ever taken a Home Economics class in high school or tried to learn how to sew, you havelikely tried to make an apron. Aprons are quick, easy and fun projects using a small amount of yourfavorite fabric or fabrics. Sewing beginners can start out making a half apron to practice using thesewing machine, while making something that nearly everyone can use.Responding to our readers’ love of apron projects, we have put together this quick collection of 8 FreeApron Sewing Patterns. These free apron sewing patterns come from craft bloggers, independent craftdesigners and a few craft manufacturers to give you a nice selection of ideas. If you are new to sewing,these projects are a perfect way to learn, while the more inexperienced can enjoy a quick project to useup scrap fabric. These aprons also make great gifts for a variety of occasions.Find more mini craft eBooks, free projects and extensive decorating ideas at www.FaveCrafts.com. OureBooks, like all our craft projects, are absolutely FREE to members of our crafting community. Pleasefeel free to share with family and friends and ask them to sign up at our website for our free e-mailnewsletter.We hope you enjoy reading and creating!Sincerely,The Editors of Find thousands of free craft projects, decorating ideas, gifts and more at www.FaveCrafts.com.3
8 Free Apron Sewing PatternsTable of ContentsHow to Sew a Lined Apron . 5Sassy Apron Sewing Tutorial . 11Quick Pillowcase Apron. 15Crafty Coffee Bag Apron . 17Reversible Scrap Fabric Apron . 23Quick and Easy Half Apron . 27Halloween Apron . 31Delicious Cupcake Apron . 35Find thousands of free craft projects, decorating ideas, gifts and more at www.FaveCrafts.com.4
8 Free Apron Sewing PatternsHow to Sew a Lined ApronBy: Louise Papas of lululollylegs.blogspot.comFollow this tutorial to create an easy, lined half-apron for just about anyone, children or adults. Thisapron features a contrast lining, a handy pocket, gathering and a waistband. Sew this apron for a gift,along with a cookbook.around to the other side of the back so that youleave a gap for the bow to sit. You don't want itto cross over at all or the apron will be too bigand won't tie properly.You then need to add extra to the skirt width toallow for the gathering. Again this can dependon how much you want it to gather or howmuch fabric you have. You may not want it togather at all which would also be fine. Just leaveout Step 4 and cut the skirt the same width asthe waistband.Then add a seam allowance of 1.5cm.For the Waistband:The BasicsMeasurements: these are fairly loose and candepend on how much fabric you have and thesize of the person. I know that sounds vaguebut really, as it ties up it can fit lots of differentsizes. I have written metric measurements.Use the same waist measurement for the lengthof the waistband. For the width 4-5cm is plentyfor a child but you may wish to make the adultone a bit wider - anywhere up to 6-7cm wide.Again this is personal choice.Then add a seam allowance of 1.5cm.You need to cut 1 skirt, 1 skirt lining, 1waistband, 1 pocket, 1 pocket lining and 2 tiesand 2 tie lining.For the skirt and skirt lining:Length: Measure from the waist to the desiredlength. I don't like these aprons to be too long just above the knee should be perfect.Width: Measure from one side of the backTies and pocket:For the pocket it really depends again on howlarge the person is and how big you want thepocket to be. The finished size of this pocket is15cm. You will cut two pocket pieces - one outof the lining and one out of the main fabric.For the ties you need to make them longenough to tie and not so long they hang down. IFind thousands of free craft projects, decorating ideas, gifts and more at www.FaveCrafts.com.5
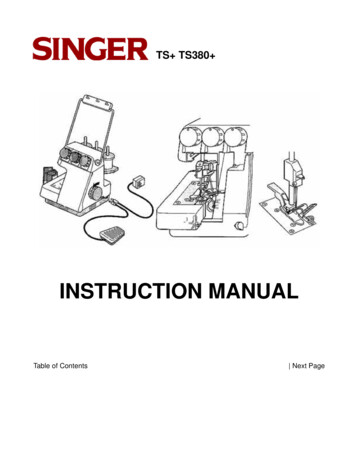
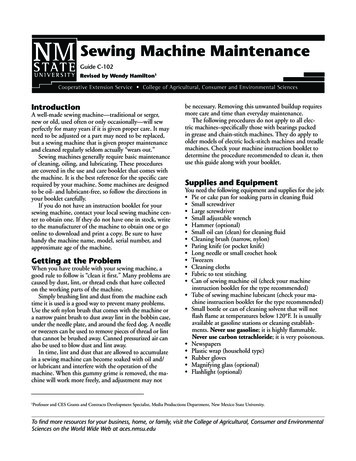
8 Free Apron Sewing Patternsthink around 60-65cm ties are fine. These tiesare 5cm wide finished. Remember to add on the1.5cm seam allowance. This particular versionuses the lining and the main fabric - so cut twoties from the main fabric and two from thelining fabric.There were my apron measurements:33cm from waist to just above the knee and56cm around the waist to the mid side back. Ithen added the seam allowances of 1.5cm oneach side and top and bottom and an extra13cm for the gathering of the skirt.Skirt & lining 36cm x 72cm56cm waist measurement plus 1.5 seamallowance. The width is 4cm x 2 (because thewaistband is folded) plus seam allowances.Waistband 59cm x 11cmTies 66cm x 8cmPocket & lining 18cm x 18cmStep 1: The PocketThere are several options for the pocket. If youwish to add ric rac you may sew it straightacross the pocket or sew it within the seam sothat only half of the ric rac sits out along theedge of the pocket making it into a frilled edge.Option a: To sew the ric rac flat onto the pocketjust pin it in the position you would like it andstitch. Then with right sides facing pin side andtop seams leaving the bottom open and stitchOption b: With right sides facing, sandwich theric rac between the pocket and the pocket liningalong the top seamline and pin (pic 1). Thenturn the pocket right side out to see if it is linedup (pic 2). Pin the side seams as well leaving thebottom open and stitch (Pic 3).For both options, trim the seams and clip thecorners (Pic 4 & 5). Turn right side out and pressthe bottom seam allowance up inside thepocket (Pic 6). Press whole pocket (Pic 7).Find thousands of free craft projects, decorating ideas, gifts and more at www.FaveCrafts.com.6
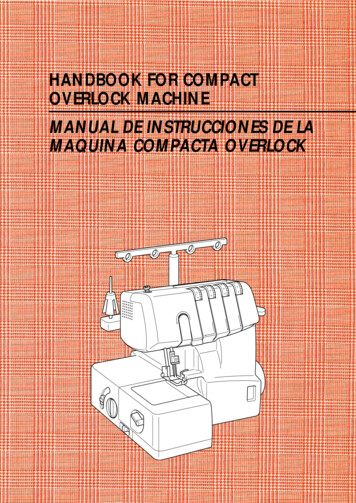
8 Free Apron Sewing PatternsStep 2: Attaching the pocketPin the pocket to the apron front. Whenpositioning, make sure you allow for when it isgathered. Stitch.I have added a row of ric rac at the bottom ofthe apron which is also optional. Pin in theposition you want it and stitch.Find thousands of free craft projects, decorating ideas, gifts and more at www.FaveCrafts.com.7
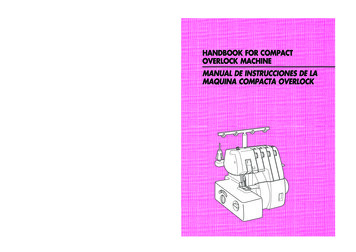
8 Free Apron Sewing PatternsStep 3: The apron skirtWith right sides facing pin the lining to theapron front.At this point it is optional whether or not youtop stitch. I liked the look of top stitching onthis apron.Step 4: Gathering the skirtSet your machine stitch length to a long stitch.Without back stitching at the start or the finishsew across the top of the apron skirt. Repeatthis just inside the first row of stitching.Stitch. Trim seams and clip the corners. Turnright side out, making sure you push out thecorners properly, and press.Take the bottom thread of each row of stitchingand holding the apron skirt pull into a gather.Do this on both sides of the apron skirt until theapron fits the width of the waistband notincluding the seam allowances.Step 5: Attaching the waistbandAt this point while making the apron I decidedthat the waistband wouldn't be stiff enough tosit properly so I attached a lightweightinterfacing - iron on vilene. This is completelyoptional. Just cut a piece that measures half thewaistband and iron on. With the right sidesFind thousands of free craft projects, decorating ideas, gifts and more at www.FaveCrafts.com.8
8 Free Apron Sewing Patternsfacing pin the waistband to the apron skirtmaking sure the gathers are even. Stitch.Step 6: Making the tiesWith right sides facing pin the ties togetherleaving one end open. Stitch. Trim seams andclip the corners. Turn right side out, makingsure you push the corners out properly, andpress.Step 7: Pleating the tiesTo fit the ties into the waistband, I sew in a littlepleat at the top of the tie. Just fold and stitch,Find thousands of free craft projects, decorating ideas, gifts and more at www.FaveCrafts.com.9
8 Free Apron Sewing Patternsmaking sure they are opposite and don't go inthe same direction - see the picture.Step 8: Attaching the ties to the waistbandFold the waistband in half with the right sidesfacing. Pin each side sandwiching the ties in theseam. Stitch.It is now optional whether you hand sew thewaistband to the apron skirt lining or top stich itdown. On this apron I have top stitched it all theway around. Again it depends on the look youwant or how much time you have etc.Trim the seam and clip the corners. Turn thewaistband right side out and press.Find thousands of free craft projects, decorating ideas, gifts and more at www.FaveCrafts.com.10
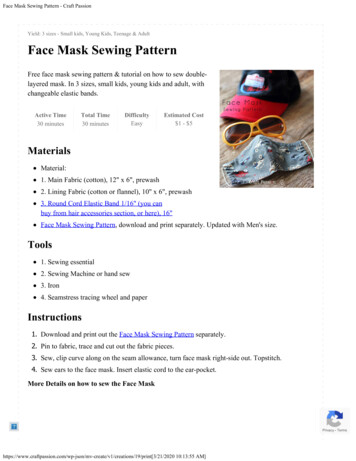
8 Free Apron Sewing PatternsSassy Apron Sewing TutorialBy: Valori Wells and Carolyn Spencer for C&T PublishingSew up a sassy accessory for the kitchen with this free apron sewing tutorial. A ruffle and pockets incoordinating fabrics are cute finishing touches. Project excerpted from C&T Publishing's Oh Sew EasyLifestyle by Valori Wells and Carolyn Spencer. 1 1 @ 301 2 201 2 Main body(kitchen apron)1 @ 301 2 151 2 Main body(cocktail apron)Cotton print 2 1 @ 51 2 181 2 Top band4 @ 51 2 51 2 PocketsCotton print 3 2 @ 6 width WaistbandAssemblyWaist BandMaterials: Cotton print 1 3 4 yard- Main bodyCotton print 2 1 4 yard- Top band andpocketsCotton print 3 1 2 yard- WaistbandThread- TopstitchingButtons, rickrack, ribbon, or beadsAccentsStitching and knitting gauge (optional)Instructions:Cutting:Cotton print 11. Cut off the selvage edges from the 2strips of waistband fabric. Use a 1 2 seam allowance to stitch together theshort ends of the waistband strips tomake one long strip. Press the seamopen.2. Measure and press under 1 4 on theshort edges of the waistband strip.Make the waistband as a Clean EdgeBand.Pockets1. To round the bottom corners of eachpocket, place pocket squares right sidestogether, and fold in half. Use a chalkpencil to draw a quarter circle in theFind thousands of free craft projects, decorating ideas, gifts and more at www.FaveCrafts.com.11
8 Free Apron Sewing Patternscorner of the raw edges. Cut on thechalk line through all layers.4. Turn each pocket right side out andpress, pressing under the seamallowance of the opening. Whipstitchthe opening closed.Top BandMake a Clean Finished-Edge Hem on the shortedges of the rectangle.Main Body1. Make a Clean Finished-Edge Hemaround the entire main body of theapron.2. Pin the pockets to the main body 21 2 from the sides and 21 2 from the topedge.2. For each pocket, open the fold, andstitch the pieces together, using a 1 4 seam allowance. Leave a 3 opening inthe center of the top edge.3. Topstitch each pocket to the main body,stitching 1 8 from the edges of thepocket. Leave the top edge open.3. Trim the points from each corner. Besure not to cut so close that you cut thestitching. Make 1 8 -deep clips alongthe curved edge so the seam will besmooth when the pocket is turned rightside out. Trim corners and clip curve.Tip- When choosing a thread for thetopstitching, you can choose a colorthat blends perfectly with the fabric ora contrasting color so that thetopstitching becomes a decorativetouch.4. To make a gathering stitch, set themachine stitch length to the longeststitch (usually 5). Stitch across the topFind thousands of free craft projects, decorating ideas, gifts and more at www.FaveCrafts.com.12
8 Free Apron Sewing Patternsedge of the main body piece, 3 4 fromthe edge.5. Remove the fabric from the machine,and cut the threads, leaving long tails.Knot the thread tails together at oneend of the stitching. At the oppositeend, gently pull the bobbin thread (thebottom thread) to gather the main bodyuntil it is the same length as the topband (181 2 ). Even out the gathers.Knot the thread tails together to secure.2. Place the top edge of the main body onthe bottom edge of the top band, withright sides up. Overlap the edges 1 ,and match the center pins. Pin theoverlapped edges together.3. Topstitch the main body to the topband along the gathering stitch line.4. Press under 1 2 on the top edge of thetop band, and then open the fold. Thepressed line will be your guide as youinsert the edge into the waistband.6. Set the sewing machine back to anormal stitch length.Put the Apron Together1. Fold the top band in half crosswise, andmark the bottom edge of the fold with apin. Fold the top edge of the gatheredmain body in half, and mark the foldwith a pin.5. Fold the top band and the main body inhalf crosswise and mark the center ofthe top edge with a pin. Fold thewaistband in half crosswise and markthe center of the bottom (open) edgewith a pin.Find thousands of free craft projects, decorating ideas, gifts and more at www.FaveCrafts.com.13
8 Free Apron Sewing Patterns6. Place the top edge of the top band inthe open edges of the waistband.Match the center pins, and align thepressed line on the top band with thebottom edges of the waistband. Pin thelayers together. Topstitch along thebottom edge of the waistband.7.Add trims and embellishments asdesired to match your fabrics.Find thousands of free craft projects, decorating ideas, gifts and more at www.FaveCrafts.com.14
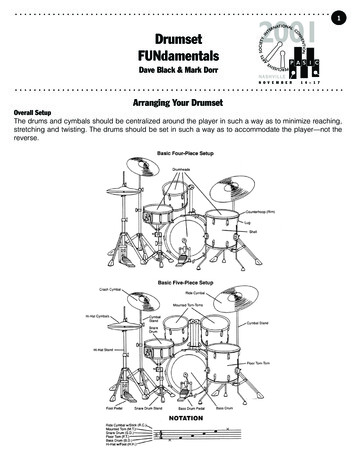
8 Free Apron Sewing PatternsQuick Pillowcase ApronBy: Betz WhiteIf you have a spare ten minutes and a pillowcase, you can create a pretty half-apron for the kitchen. Justfollow this tutorial from Betz White. Pick up a pillowcase at the thrift store with a floral pattern, findsome coordinating ribbon, and you are all set.Materials: pillowcase2 yards of ribbonsewing machine2. Turn the pillowcase over and fold thebottom up another 8". There will be 3 layersof pillowcase.Instructions:1. Lay out your pillowcase. Fold up the bottomedge 8". Top stitch along the folded edge at1/4". (The stitched edge will become thetop edge of the pockets.)Find thousands of free craft projects, decorating ideas, gifts and more at www.FaveCrafts.com.15
8 Free Apron Sewing Patterns3. Pin the layers together and top stitcharound the sides and bottom edges. Mark aline down the middle of the front pocket,pin and stitch.5. Tie it on, use it, put stuff in the pockets,look cute.you know the drill. :)4. Lay about 60" of 1" wide ribbon across thetop edge of the apron centering it on thelength of the ribbon. Pin in place. Topstitchribbon at the top edge, bottom edge andacross ribbon at sides of apron.Find thousands of free craft projects, decorating ideas, gifts and more at www.FaveCrafts.com.16
8 Free Apron Sewing PatternsCrafty Coffee Bag ApronBy: Jane SkochHave a friend or a family member that loves coffee? This Crafty Coffee Bag Apron by Jane Skoch wouldmake the perfect gift.2. Cut three strips, each 4" wide. Shorten oneof those strips to 24" (this will be for theneck strap.)Materials: One coffee bag, washed, dried and ironed.1 1/4 yards fabric for lining, washed anddriedRulerInstructions:1. Begin by making three strips of fabric. Twoof these will become the waist ties and thethird will be the next strap. Lay out liningfabric with selvage edge folded together.Find thousands of free craft projects, decorating ideas, gifts and more at www.FaveCrafts.com.17
8 Free Apron Sewing Patterns3. To finish the edge on the two long strapsfold in 1/4" on one short end and press.(The other end will be on the inside of theapron.)5. Open out strip and fold one long edge tomeet the middle and press. Repeat with theother edge so that both raw edges are nowfolded and meeting at the middle.4. Fold strips in half with long edges togetherand press.Find thousands of free craft projects, decorating ideas, gifts and more at www.FaveCrafts.com.18
8 Free Apron Sewing Patterns6. Fold in half again so raw edges arecompletely enclosed and press.7. Top stitch close to folded edge.8. Cut bag along edges.Find thousands of free craft projects, decorating ideas, gifts and more at www.FaveCrafts.com.19
8 Free Apron Sewing Patterns9. Mark the center point of the motif. Evenout the sides and bottom of bag. In thisexample, there was 5.25" to the right of themotif. So I cut off the excess on the left sidefor an overall size of 23.5" x 35".10. Mark 5.5" to the left and right of the centerpoint; mark 11.5" down on the sides.Find thousands of free craft projects, decorating ideas, gifts and more at www.FaveCrafts.com.20
8 Free Apron Sewing Patterns11. Draw a curve between the two points andcut out that top portion of the apron. (Youcould also trace an existing apron.)12. Use the cut out piece as a pattern to makethe same cut on the other side.13. Place lining fabric underneath the bag andcut out.Find thousands of free craft projects, decorating ideas, gifts and more at www.FaveCrafts.com.21
8 Free Apron Sewing Patterns14. Pin ties to right side of lining, raw edgestogether. The shorter strip is the neck pieceand the longer strips are the waist ties. Theties should be placed one inch from thesides edges.16. Sew or serge using a small stitch length anda 1/2" seam allowance around theperimeter of the apron. Leave a 6" openingat the bottom. Trim curves and cornersbeing careful not to trim too closely sincethe weave of the burlap is somewhat loose.Turn apron inside out and press; press theseams of the opening to the inside and pin.17. Top stitch the entire apron using a fairlysmall stitch to secure the coffee bag to thelining and reinforce the weave of theburlap.18. Enjoy your apron!15. Place right sides together and pin so thatthe straps are encased on the inside.Find thousands of free craft projects, decorating ideas, gifts and more at www.FaveCrafts.com.22
8 Free Apron Sewing PatternsReversible Scrap Fabric ApronBy: Jennifer Neill of Hope StudiosHey, you FaveCrafters, its Juniper Neill here! I popped out of my own little bloggy universe to meet upwith you over here and toss out a tutorial. Ready? Let’s make us some Reversible Fabric Scrap Aprons,baby!make this apron with the extra fabric and trimthey have on hand. If you need something,consider getting some fat quarters in thequilting section of your local fabric store.Cut your fabric into strips and squares ofvarious widths and press. Don’t stress, you can’tmess this up. Just make sure your scraps havestraight edges.Materials: Fabric ScrapsVarious TrimsSewing machineIronNeedle and ThreadScissorsI worked out this project with my girlfriends,and we decided to pool our scraps of fabric andtrim, to mix it up a little. I think most people canSew, right sides together, to form a patchworkfrom all your strips and squares. Thedimensions should be 27 inches x 21 inches forFind thousands of free craft projects, decorating ideas, gifts and more at www.FaveCrafts.com.23
8 Free Apron Sewing Patternsyour panel. You can measure and cut to sizeafter you piece your scraps together.Measure 14 inches from the top of the fabricpanels, fold, and then press. Now bring thepressed fold up until it is 3 inches from the topof the apron panel, forming a deep pocket. Youwill do this with both panels. Pin to hold.Press everything flat.See? Now press. Do this with both panels.Here are my TWO 27 x 21 inch panels,remember, it's reversible! I got impatient withmy reverse side and used larger pieces of fabric.Now, place the two panels’ right sides togetherand pin.Find thousands of free craft projects, decorating ideas, gifts and more at www.FaveCrafts.com.24
8 Free Apron Sewing PatternsMark three inches down from the top on bothsides. This will remain unsewn to allow you toturn the apron right side out and also give you aspot to attach your apron ties.Sew the two panels together, careful not to sewshut the 3 inch spaces you marked!Pull the panels’ right side out through one ofthe openings you left unsewn, then press.You will now have one long pocket on the rightsides. You can then sew down the center of thepocket to form two pockets, or three, or asmany as you wish!Let's make the apron ties. Cut a length of fabric6 1/2 x 20 inches. Fold the fabric in half lengthwise and sew, leaving one end open. Now makeanother for the other side. Pull the tube rightside out through the open end and press.Slide the open end into the unsewn spaces inthe apron. Pin and sew, topstitching the ties inplace.Find thousands of free craft projects, decorating ideas, gifts and more at www.FaveCrafts.com.25
8 Free Apron Sewing PatternsNow, put on your apron, a string of pearls, andsome pumps and meet your husband at thedoor tell him to take you out for dinnertonight. Girl, you don’t want to mess up yourcute apron just yet!Here is one side of the apron. Let's embellish itwith the trims. I have a friend that calls me "thequeen of random", I do random well. Mix it upwith unexpected combos of fabric and trim.Don't be too matchy matchy.Hand stitch your trims.Find thousands of free craft projects, decorating ideas, gifts and more at www.FaveCrafts.com.26
8 Free Apron Sewing PatternsQuick and Easy Half ApronBy: Ashley Johnston of Make It and Love ItQuickly sew up a half apron in your favorite fabric with this easy tutorial from Ashley Johnston of MakeIt and Love It. The pocket is a cute touch and a handy place to stash those teaspoons. This simple sewingproject is great for beginners, but also makes quick gift for Mother's Day, birthdays and more. For atouch of personalization, try embroidering the monogram of your recipient.Materials: 1 piece of fabric 18 x 25 inches (main piece)1 piece of fabric 4 x 25 inches (waistband)2 pieces of fabric 4 x 35 inches (ties)1 pieces of fabric 6 x 8 inches (pocket)coordinating threadscissors, sewing machine, etc.2. Like this. Then trim. Turn them both rightside out. Iron flat.Use 1/2 inch seams unless otherwise noted.Instructions:1. Start by making the ties. Sew along the longside, with right sides together. Curve yourseam at one end, if you want, to give it amore finished look.Find thousands of free craft projects, decorating ideas, gifts and more at www.FaveCrafts.com.27
8 Free Apron Sewing Patterns3. Top-stitch really close to the edge, all theway around both ties.6. Next, you’re going to sew around 3 edges ofthe main piece. The 2 sides (shorter sides)and the bottom (one of the longer sides).Turn under each edge a 1/4 inch, and then1/4 inch again. Sew.4. Next, fold over the long edges of yourwaistband, about 1/4 inch. Iron. Then foldover the ends a 1/4 inch and iron.7. See all 3 sides that are sewn?5. Then fold the whole waistband in halflengthwise and iron.8. Next, lay your main piece right side up withthe unfinished edge at the top. Align yourwaistband up at the top.Find thousands of free craft projects, decorating ideas, gifts and more at www.FaveCrafts.com.28
8 Free Apron Sewing Patterns9. And fold the other half of the waistbandover the top. Pin in place and sew close tothe bottom edge, leaving the 2 ends open.10. Next, you’re going to attach the 2 ties toeach end. But first, you'll need to fold eachunfinished end just a little bit so that it willfit nicely into the opening. If you'd rathernot do this, just make your strips 4 x 34inches (instead of 4 x 35) and they shouldslide right in without folding. I just like thelook of it.11. Then sew close to the edge to secure theties in place. Cute, right?12. Lastly, the pocket. Fold over the top edge(one of the shorter ends) 1/4 inch withwrong sides together. Then flip that sewnedge back and fold over 1 inch with rightside together. Sew along the edge, 1/4seam allowance. Trim the corners.Find thousands of free craft projects, decorating ideas, gifts and more at www.FaveCrafts.com.29
8 Free Apron Sewing Patterns13. Then turn that section right side out. This isthe top of your pocket. It makes it all niceand neat looking.16. Now, sew around the sides and bottom ofthe pocket to secure it to the main section.14. Now fold the 2 sides in 1/4 inch and thenfold the bottom up 1/4 inch. Iron into place.15. Then pin your pocket onto your apron.(You'll notice my ties aren't sewn on yet. Idid it in a different order.)Find thousands of free craft projects, decorating ideas, gifts and more at www.FaveCrafts.com.30
8 Free Apron Sewing PatternsHalloween ApronBy: Kristin RixBake those ghoulish cookies and eyeballtreats wearing your cute sewn Halloween apron. Using ribbonand fabric you can have this great pattern for your kitchen apron.Materials: Hand sewing needleMeasuring tape/yard stick2 yards fabric1 spool coordinating threadCoordinating ribbon (optional)ScissorsStraight pinsInstructions:I find having an iron and ironing board on hand very helpful throughout the whole project. It makeshemming much easier. A sewing machine is not required for this project, but is recommended. With asewing machine, the whole project takes only a few hours to complete.Additionally, in this tutorial I use a fabric that has a decorative border, which means that I must becareful where I cut my pieces from. If you don't use a decorative border fabric, you can cut the piecesout more efficiently using the pattern guide below.Find thousands of free craft projects, decorating ideas, gifts and more at www.FaveCrafts.com.31
8 Free Apron Sewing Patterns1. Cutting the PiecesCut your pieces using the pattern guide. I start with the skirt first, then the tie pieces and waistbandand fold them in that order. That way, the pieces won't get mixed up with each other. If you chose adecorative border print and wish to match your pocket to your skirt to maintain the integrity of theprint, consider these facts: the top of the finished and hemmed pocket will be approximately 1"from where the skirt and waistband meet, and the edge of the finished and attached pocket will beabout 1" from the left or right edge of the skirt; hemming takes up approx. 1/2" of fabric from thepiece.2. Preparing the SkirtTo hem the skirt, fold, iron, and pin the bottom, left, and right edges of the skirt, leaving the topedge undone. Fold each edge twice at the 1/4" mark, snipping the corner fabric from the twobottom corners after the first fold to reduce the amount of fabric that runs through the sewingmachine. Sew the hems down using your machine. You can use a basic straight stitch, or get creativewith a decorative stitch if your machine has that option. Use your hand sewing needle to securely tieoff the excess thread at the beginning and end of your stitches.3. Preparing the WaistbandFold, iron, and pin the top, left, and right edges of the waistband, leaving the bottom edge undone.FOl each edge twice at the 1/4" mark, snipping the corner fabric from the two top corners after thefirst fold. Sew only the top edge down, tying off the excess thread with your hand sewing needle.Find thousands of free craft projects, decorating ideas, gifts and more at www.FaveCrafts.com.32
8 Free Apron Sewing Patterns4. Preparing the TiesPlace two of the tie pieces together, print-sides facing each other. At this point you may want toconsider cutting the end of the fabric at a diagonal. If so, I suggest cutting all four tie pieces at thesame time, to ensure the diagonal is consistent for both ties. Sew the two tie pieces together, wrongside out. Do the same for the remaining tie pieces. Tie off the excess thread with your hand needle.Turn the ties right side out. Carefully iron the ties flat. Sew along the entire edge of the piece, 1/4"from the edge of the tie, to create a border and to maintain the shape of the tie. Tie off the excessthread with your hand sewing needle.5. Attaching the Waistband to the SkirtFind the middle of the skirt and mark with a straight-pin. Do the same for the waistband. Pin thecenter of the top of the skirt to the center of the bottom of the waistband, the two unfinishededges, so that their print sides are facing each other. Pleat and pin the skirt to the left and right ofthe center until the left and right edges of the skirt align with the left and right edges of thewaistband. Iron the pleats flat. Sew the two pieces together. Tie off the excess thread with yourhand sewing needle.Find thousands of free craft projects, decorating ideas, gifts and more at www.FaveCrafts.com.33
8 Free Apron Sewing Patterns6. Attaching the Ties to the WaistbandFold, iron, and pin the rough end of the tie twice at the 1/4" mark. Line up the folded end of the tieto the side of the waistband and pin, adding a pleat tuck to ensure they match. Sew the two piecestogether. Tie off the excess thread with your hand needle.7. Preparing and Attaching the PocketsFold, iron, and pin all edges of each pocket, folding at the 1/4" mark and snipping the fabric fromeach corner after
Sewing beginners can start out making a half apron to practice using the sewing machine, while making something that nearly everyone can use. Responding to our readers’ love of apron projects, we have put togeth