Transcription
Sewing Machine MaintenanceGuide C-102Revised by Wendy Hamilton1IntroductionA well-made sewing machine—traditional or serger,new or old, used often or only occasionally—will sewperfectly for many years if it is given proper care. It mayneed to be adjusted or a part may need to be replaced,but a sewing machine that is given proper maintenanceand cleaned regularly seldom actually “wears out.”Sewing machines generally require basic maintenanceof cleaning, oiling, and lubricating. These proceduresare covered in the use and care booklet that comes withthe machine. It is the best reference for the specific carerequired by your machine. Some machines are designedto be oil- and lubricant-free, so follow the directions inyour booklet carefully.If you do not have an instruction booklet for yoursewing machine, contact your local sewing machine center to obtain one. If they do not have one in stock, writeto the manufacturer of the machine to obtain one or goonline to download and print a copy. Be sure to havehandy the machine name, model, serial number, andapproximate age of the machine.Getting at the ProblemWhen you have trouble with your sewing machine, agood rule to follow is “clean it first.” Many problems arecaused by dust, lint, or thread ends that have collectedon the working parts of the machine.Simply brushing lint and dust from the machine eachtime it is used is a good way to prevent many problems.Use the soft nylon brush that comes with the machine ora narrow paint brush to dust away lint in the bobbin case,under the needle plate, and around the feed dog. A needleor tweezers can be used to remove pieces of thread or lintthat cannot be brushed away. Canned pressurized air canalso be used to blow dust and lint away.In time, lint and dust that are allowed to accumulatein a sewing machine can become soaked with oil and/or lubricant and interfere with the operation of themachine. When this gummy grime is removed, the machine will work more freely, and adjustment may notbe necessary. Removing this unwanted buildup requiresmore care and time than everyday maintenance.The following procedures do not apply to all electric machines–specifically those with bearings packedin grease and chain-stitch machines. They do apply toolder models of electric lock-stitch machines and treadlemachines. Check your machine instruction booklet todetermine the procedure recommended to clean it, thenuse this guide along with your booklet.Supplies and EquipmentYou need the following equipment and supplies for the job: Pie or cake pan for soaking parts in cleaning fluid Small screwdriver Large screwdriver Small adjustable wrench Hammer (optional) Small oil can (clean) for cleaning fluid Cleaning brush (narrow, nylon) Paring knife (or pocket knife) Long needle or small crochet hook Tweezers Cleaning cloths Fabric to test stitching Can of sewing machine oil (check your machineinstruction booklet for the type recommended) Tube of sewing machine lubricant (check your machine instruction booklet for the type recommended) Small bottle or can of cleaning solvent that will notflash flame at temperatures below 120 F. It is usuallyavailable at gasoline stations or cleaning establishments. Never use gasoline; it is highly flammable.Never use carbon tetrachloride; it is very poisonous. Newspapers Plastic wrap (household type) Rubber gloves Magnifying glass (optional) Flashlight (optional)Professor and CES Grants and Contracts Development Specialist, Media Productions Department, New Mexico State University.1To find more resources for your business, home, or family, visit the College of Agricultural, Consumer and EnvironmentalSciences on the World Wide Web at aces.nmsu.edu
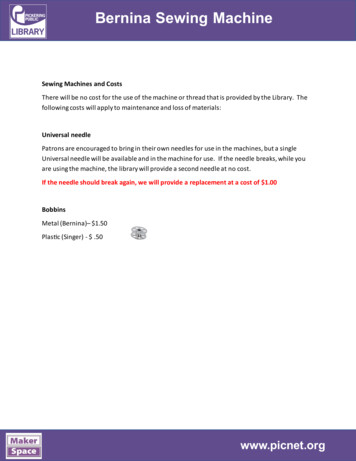
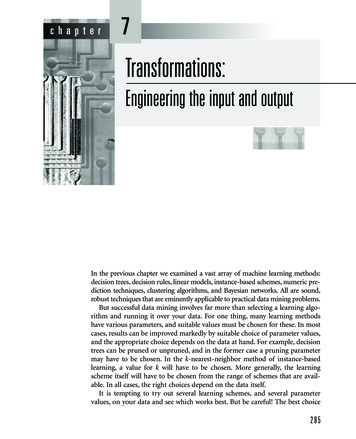
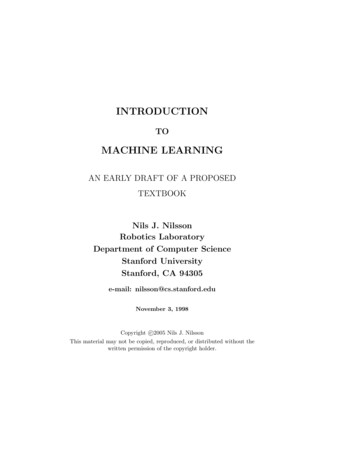
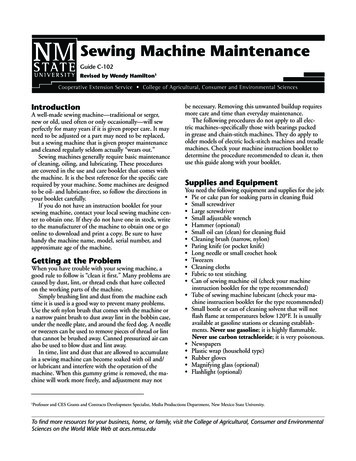
Figure 1. Remove all the parts possible in order toclean the machine thoroughly. Keep the parts in order to make it easier to replace them.Figure 2. Bobbin area. If possible, remove the bobbincase to remove all lint and stray threads.After assembling all supplies and equipment, unplugand move the machine to a cleaning area that is well lit.Protect the floor and table top with newspapers. A goodfloor or table lamp to light the work area from over yourshoulder will be helpful. A flashlight is also helpful foradding light in hard-to-see areas.If the machine begins to run hard, it is a sign thatdirt or lint has jammed inside a bearing. Continue running the machine and flushing with cleaning fluid untilthe dirt and gummed oil are washed from the bearing.When the machine runs easily again, tip the head andflush the parts underneath the machine—all oil holes,bearings, and places that rub against or within one another. Continue running the machine by hand until itfunctions smoothly.To remove any remaining dirt and oil, dip a cloth orbrush in cleaning fluid and scrub all parts of the machine that can be reached. Use a needle, knife, or otherpointed instrument to dig or scrape away any remaininggummed dirt or lint in the feed dog, around the bobbincase, and in other areas.Check the lower tension of the bobbin case and theupper thread tension discs. Pull a thread under the tension of the bobbin to remove dirt. Pull a piece of clothsoaked in cleaning fluid back and forth between the discsof the upper tension (Figure 3). Repeat with a dry clothto be sure no lint or thread is caught between them.General CleaningAs you clean the machine, it is best to clean one area ata time. Remove only the parts that are involved and besure to note where each part is from, its position, andwhich side is top (Figure 1).When removing parts, remember that “left is looseand right is tight” on practically all screws and bolts.When using a screwdriver, put the pressure on the push,not on the twist. If a screw will not loosen easily, soak itwith cleaning fluid. Then set the screwdriver in the slotand tap sharply with a hammer before attempting toloosen. The screwdriver blade should be as wide as theslot in the screw is long. Always use a wrench—notpliers—on bolts.First, remove the needle, presser foot, slide plate,throat plate, bobbin case, and the face plate (if it comesoff; Figure 2). Put them in a pan and cover with cleaning fluid. Set aside to soak while cleaning other areas.Next, wrap the motor (if necessary) and wire withplastic wrap to protect them from oil and cleaning solvent. Be sure the machine has been unplugged!Now, it is time to begin work to clean the machinehead. With a sharp pointed tool, clean out all oil holes.Then, with your hand, turn the handwheel to run themachine. At the same time, squirt cleaning fluid intoall the oil holes, on all bearings, and on all other placeswhere one part rubs against or turns within another.Areas Needing AttentionIn addition to general cleaning, three areas need specialattention: the handwheel bearing and the clutch assembly, the needle bar and presser foot, and the hook andbobbin area assemblies. When the handwheel assemblygets gummy and dirty, it must be cleaned for the clutchto work properly. The clutch disengages the needle barwhen winding a bobbin.Some newer sewing machines refill the bobbin in itsregular position and a clutch is not necessary. In suchmachines, it is often not necessary to remove the handwheel to clean this area.Guide C-102 Page 2
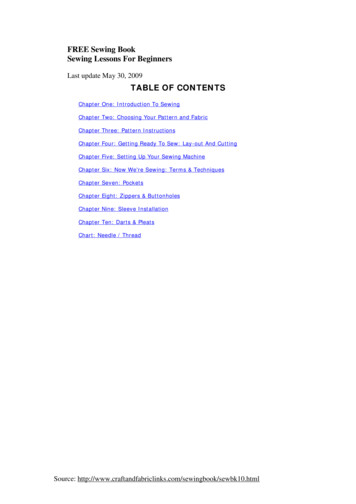
Figure 3. Upper thread tension. Pull a piece of clothsoaked in solvent back and forth between the discsto clean.Figure 4. Bobbin area. Clean carefully to remove lintusing a soft brush. Tweezers may be helpful in removing stray threads.Figure 5. Face plate area. Remove lint from the faceplate area using a soft brush. A cloth dipped in solvent can be used to remove grease and grime.Figure 6. Face plate area. Place a drop or two of oilon moving parts where they slide through a housingor move against each other.Bobbin and Hook AreaLint is the primary offender in this area. The bobbincase can be removed on all makes of machines. Use a drybrush to clean out all lint (Figure 4). Remove any threadthat may be wound up around the hook shaft. On manymachines, the hook assembly can also be removed formore complete cleaning. Place one drop of oil on theexterior perimeter of the hook and the bobbin race (theledge that the hook sits on) to lubricate it after cleaning.makes it easy to move the entire housing away from thebars and mechanisms behind it. No other parts needto be removed for cleaning in this area. First use a drybrush to clean out all lint and other foreign material(Figure 5). A small piece of cloth with a little solvent onit can be used to clean the needle bar and presser bar ofany gummy grease.After thoroughly cleaning, place a drop or two ofoil on each shaft where it slides through the housing(Figure 6). Oil all other moving parts according to yourinstruction book before replacing the face plate.Face Plate AreaThe face plate on most machines is held in place withone or two screws. By removing these, the plate can beeasily removed for cleaning both the needle and presserfoot bars. On some newer machines, the face plate isa part of a housing that is mounted on hinges, whichHandwheel AreaTo remove the clutch and handwheel, loosen the smallscrew in the face of the locknut (the locknut is the partthat is turned to the left to release the clutch for operatingGuide C-102 Page 3
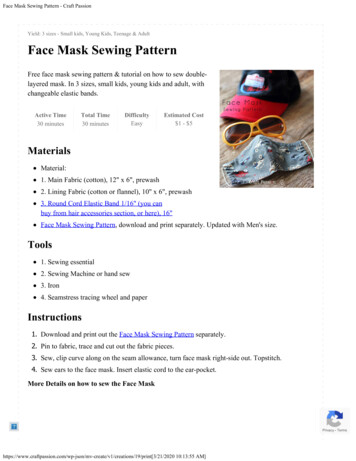
Figure 7. Handwheel area. Loosen screw in the face ofthe locknut in order to remove the clutch and handwheel.Figure 8. Different types of adjusting washers.the bobbin winder; Figure 7). Next, unscrew the locknutand remove the washer and handwheel. Most machineswill have a washer that looks like one of the three shown(Figure 8). Some machine models will be slightly different. Notice the position of the washer so you can put itback in the same position. You may want to make a smallscratch to identify the side that goes “out.”The handwheel should slide off the shaft easily. If themachine is driven by an external belt, this belt will haveto be removed before the handwheel will come off. Ifthe machine has an internal drive belt or the wheel obviously will not come off, do not remove the handwheel.Replace the parts you have removed and skip this area.Gear-driven machines will have a gear on the inside ofthe handwheel.Clean the handwheel, washer, and shaft. Lubricatethe shaft with two drops of oil and place a small amountof grease on all gears. Reassemble the handwheel andclutch. If the clutch fails to operate, either because itwill not hold or fails to release, remove the locknutagain and turn the washer one half turn (180 ) and reassemble. The clutch should then work properly.Figure 9. Oiling. Place one or two drops of oil in allholes designated by the instruction booklet.After thoroughly cleaning these areas, reassemble themachine and run it by hand. It should run smoothly ifall parts have been replaced correctly.Do not plug the machine in until all the cleaningfluid is dry.Oiling and Lubricating the MachineAllow the machine to stand overnight so excess cleaning fluid can evaporate before oiling and lubricating it.Check your machine instruction booklet to determinethe type of oil lubricant to use and where to use it.Some machines have bearings that are nylon orgraphite-impregnated bronze and do not require oilor lubricant. Also, some machines do not need oilingbecause they are designed with oil impregnated in thebearing casings. If your machine does not require oil, donot use it.Do not oil the tension discs, the handwheel release, or the belts and rubber rings on any machine.In the holes designated, and on all parts that rubagainst or within one another, squirt a little oil (Figure 9).Guide C-102 Page 4
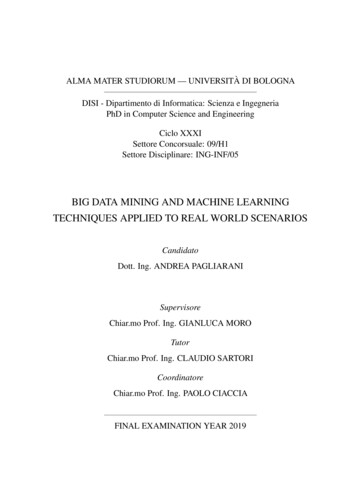
Run the machine by hand to distribute the oil into all thebearings. Use oil freely because all oil has been removedin the cleaning process. If there are any wool or felt padsthat feed oil to parts, be sure they are well oiled.For later oilings, one drop of oil on each bearingand in each oil hole is enough. It is a good practiceto oil the machine after each day’s work or after 8 to10 hours of use. Even if you do not use your machineoften, oil it occasionally to keep the oil from dryingand gumming.If the machine requires a lubricant, lubricate the areas suggested. Use the lubricant recommended for yourmachine for best results.After oiling and lubricating the machine, wipe awayexcess oil and reassemble the machine. As you replacethe parts that have been soaking in the pan, do notforce screws or parts into place. Check to be sure eachscrew and part is in the correct location.ShankLong Grooved SideCare of the MotorLubricate the electric motor of your sewing machineaccording to the manufacturer’s directions.Several newer machines have electric motors withsealed bearings that never need oiling. Lubricate motorsthat require oil or grease once a year. One or two dropsper bearing is sufficient; over-oiling may ruin the motor. A sewing machine company oil or a good-qualitylight oil is satisfactory to use. If you select a lightweighthousehold oil, be sure it says “non-gum forming” and“non-corrosive” on the container. On a grease-fittedbearing, fill the grease cups once a year.Check to see that all electric connections to the motor control and motor are tight. If the cord covering isnot in good condition, tape it with good-quality electrical tape or replace the cord. The belt that connects themotor to the handwheel should have just enough tension to keep it from slipping. On some machines, thebelt can be adjusted by slightly shifting the position ofthe motor.Take good care of the rubber driving ring or wheelon motors that drives machines by friction contact withthe handwheel. If this driving ring or wheel has becomeflat-sided or unevenly worn, causing excessive vibration,replace it with a new one. Keep the handwheel cleanand dry, and the driving ring adjusted firmly to thehandwheel and in line, so the machine will run with aminimum of vibration.Adjusting the MachineNext, thread the machine and sew (using scraps of fabric) to test the stitching.Flat Side
Sewing Machine Maintenance Guide C-102 Revised by Wendy Hamilton1 1Professor and CES Grants and Contracts Development Specialist, Media Productions Department, New Mexico State University. Introduction A well-made sewing machine—traditional or serger, new or old, used often or only occasionally—will sew perfectly for many years if it is given proper care. It may need to be adjusted or