Transcription
FREE Sewing BookSewing Lessons For BeginnersLast update May 30, 2009TABLE OF CONTENTSChapter One: Introduction To SewingChapter Two: Choosing Your Pattern and FabricChapter Three: Pattern InstructionsChapter Four: Getting Ready To Sew: Lay-out And CuttingChapter Five: Setting Up Your Sewing MachineChapter Six: Now We're Sewing: Terms & TechniquesChapter Seven: PocketsChapter Eight: Zippers & ButtonholesChapter Nine: Sleeve InstallationChapter Ten: Darts & PleatsChart: Needle / ThreadSource: k10.html
Chapter OneINTRODUCTION TO SEWINGAll Patterns, images and instructions are copyright protected.Please read our Terms & Conditions before using our patterns.Welcome to the world of sewing! This is an exciting and fun place to be. There is nothing morewonderful than the feeling of pride you get when you create something yourself. Sewing opensup a world of opportunities and possibilities for expressing your creative side. Whether sewing forpractical reasons, or as an art form, it should always be a rewarding, positive experience. Properequipment and instruction is the key to success. Confidence comes with experience. For me,there is nothing more relaxing than spending time at my sewing machine.There are so many directions to go with your new skills. From wearable art to quilt art to vests,lingerie and applique - you'll want to try it all. You not only get to create a new world using yourown ideas, but you can get everyday, practical use of your new talent. When you makesomething yourself, you have something that is truly unique. Custom made clothing and otheritems now come in the size, color and fabric YOU want and choose.Mix and match your sewing skills with crafting. Dye your own fabric, sew beads onto a hat youhave made, hand paint a sweatshirt you designed. The possibilities are endless. Crafting andsewing go together, and that is why this site includes both.Relax, get ready, SEW!Sew A sweatshirtEmbellish with fabric paint & floral appliqueLearn To AppliqueBling Tee LessonSafety Reminders For Little HelpersA. Always have an adult do all the ironing!B. Never run with scissors. Carry them pointed end down.C. Never use a sewing machine without adult supervision.D. Always let an adult use the seam ripper for you.Source: k10.html
Chapter TwoCHOOSING YOUR PATTERN & FABRICAll Patterns, images and instructions are copyright protected.Please read our Terms & Conditions before using our patterns.QUICK INDEXFabric SelectionPattern SelectionFabric SelectionProper fabric selection is important. Some fabrics are difficult to work with and would be thecause of a very frustrating experience for you. We want to avoid that!In choosing fabric, remember your project. Is this fabric appropriate for what you are making?Also, remember that patterns do not allow for shrinkage when stating quantity of fabric topurchase. It is better to buy a bit extra, especially if you need to add to length or allow forshrinkage.Although stretch knits are wonderful to use with sergers, they are difficult to work with on aregular sewing machine. Suggested fabrics for beginners are cottons and cotton-poly blends thatdo not have much stretch. Calico fabrics, for example, are nice to work with. Calico fabrics arefound in just about any fabric store. They are cotton and come in 45" width and have many typesof cute prints. They're often used for quilt making. It is also important to avoid plaids andobvious diagonals, because they require pattern matching - a skill not covered in this book.For your particular project, you need to refer to the back of the pattern for fabric suggestions.See Chapter 3 for more information on reading pattern backs. You have some choice in fabrics,but do not choose a fabric that the pattern specifically says not to use.ALWAYS pre-wash your fabric (if it is washable). This is not a place to cut corners! What a shameit would be to make a wonderful skirt that has a perfect fit, only to have it shrink in the wash!One of the benefits of sewing is that you can prevent this problem. If the fabric comes outwrinkled, a good ironing will make it easier to work with.Pattern SelectionPatterns can be very simple to very advanced. It is best to choose a pattern that does not requirethe learning of too many new skills at once. This, too, can lead to frustration. Names such as "EZ" tend to be easy, but are not necessarily for the totally inexperienced. Rather than looking forwords like "Quick" or "easy", look at what type of sewing skills and techniques are required. Tryto take on only one new concept at a time. For example, it would be best not to get a patternwith buttonholes, zippers, gathering, darts and difficult collars if you have not done any of thesethings previously. It is always best to master one skill before moving on to another. Otherwise,you may feel it is "too hard" and (heaven forbid!) not fun.Choosing a pattern goes along with choosing your fabric, so don't purchase one until you havechosen the other. CraftAndFabricLinks has wonderful patterns for beginners. Best of all, they arefree! Other sites have very good patterns as well.For a complete selection of our FREE patterns, go to: FREE Sewing PatternsI recommend a non-clothing item as your first project. Getting clothing to fit is a skill by itselfSource: k10.html
and may be a bit much as a first project. For your first project, you will be getting to know yourmachine, getting familiar with various stitches and cutting techniques and learning to guide yourfabric through the machine - not to mention learning to sew a straight line. That is enoughwithout the added complications of fitting a pattern to your body! In past sewing classes, I haveused the tote bag pattern for beginners. It is a fun, practical item to make. If your first project isclothing, be sure to measure carefully. It is better to choose a pattern that is a little too large,rather than too small. This is because you can always take in the waist and make otheradjustments.Source: k10.html
Chapter ThreePATTERN INSTRUCTIONSAll Patterns, images and instructions are copyright protected.Please read our Terms & Conditions before using our patterns.QUICK INDEXInstructions & SymbolsPattern PiecesUnderstanding And Following InstructionRead through all instructions first! It is important that you understand the sequence ofassembly. You may not understand a particular step if you do not understrand the whole picture.Be sure you have carefully reviewed all areas of the instructions, from lay-out, to symboldefinition, to the sewing instructions themselves.What Does It All Mean?There are four main areas in the instructions, plus the back of the pattern, and each area is veryimportant.1.Fabric Lay-outThe first part of the pattern shows a diagram of recommended fabric lay-out. This is coveredmore in Chapter Four.2.Instruction SymbolsThere are various symbols used throughout the instructions to designate different pieces offabric. Check this part of the instructions very carefully. You wouldn't want to end up with thetop of your collar sewn on wrong side out! The following are some examples.NOTE: Your pattern symbols may be different. Refer to your pattern instructions.3.Body of InstructionsThis is the area that takes you step by step through the assembly of your project piece. Readthrough the entire set of instructions before you begin to sew. You may need to read throughthe entire set of instructions more than once to fully understand them. Look carefully at thediagrams in the instructions. They are very helpful in understanding what is being said.NOTE: When sewing, follow the proper sequence of instructions. It is always tempting to skipahead in any project. However, until you are skilled, it is safest to carefully follow the sequenceSource: k10.html
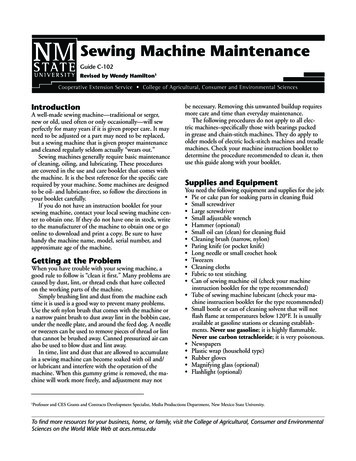
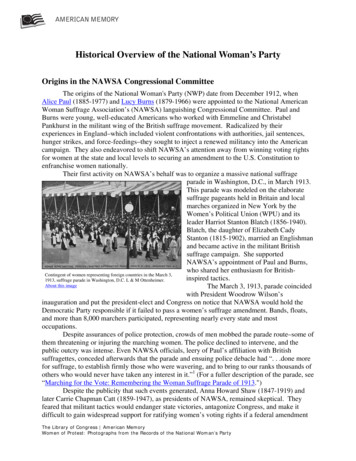
of contruction laid out for you in your pattern instructions. There is usually a very good reasonthey have you do one particular step before another.4.Pattern BackThe back of the pattern contains a chart of yardage requirements for fabric and interfacing, andnotions (snaps, elastic, etc.). Below is a typical pattern back, showing where information isfound.The pattern number is 1047. The drawing shows the item(s) included in the pattern. Thisconsists of one skirt style; the pattern includes a total of 5 pattern pieces. The description saysthat the skirt is pleated and has one pocket that is concealed in the side closure.Under Fabrics, you find out that this pattern is not suitable for obvious diagonal prints. It listsmany types of fabric which can be used. All seem to be medium weight fabric.Under sizes, you can see that a 23" waist is a size 6 and a 25" waist is a size 10 (also check hipmeasurement to be sure the size is correct).To find out how much fabric you need, simply look down to the next section. 45" and 60" refersto the width of the fabric. If the fabric you are using is 45" wide, you will need to buy 2 3/8 yardfor size 6. If the fabric is 60" wide, you only have to buy 2 yards. Remember to buy extra if youare tall or you have to allow for shrinkage. It is always better to have a bit extra than be a bitshort!You will also need interfacing according to this pattern. 22" to 36" refers to the width of theinterfacing. You will need 1 1/4 yard of light to mid weight.Under Notions, you can see that you need thread, a button and a hook & eye closure. Purchasethread to be one shade darker than the background color of the fabric.The salesperson can be a tremendous help in choosing proper fabric and notions. Don't hesitateto ask for help!Source: k10.html
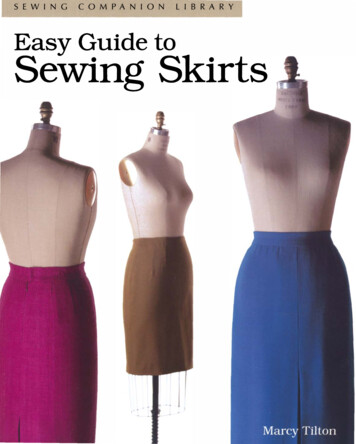
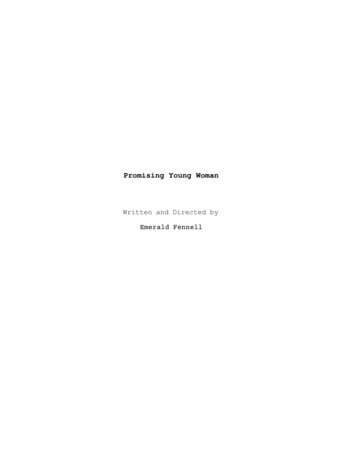
4.Pattern Pieces and Pattern SymbolsFabric PlacementSome of the symbols on a pattern piece provide instructions onhow the pattern piece is to be laid out on the fabric. Theseinclude the DIRECTION the piece is to be laid on the fabric, aswell as whether it is to be on a fold. Direction is very importantbecause fabric usually has more stretch in one direction thanin the other (perpendicular) direction. The double ended arrowmeans that is the direction of the grain of fabric (it means thearrow will run the direction of least stretch on the fabric).Sometimes, however, this arrow will say "stretch", whichmeans the arrow is to placed in the direction of greateststretch. This line should be parallel to the edge of the fabric."Place on fold" with arrows pointing to one side means that theside the arrows are pointing to is to be placed right on thefolded edge of the fabric. This is used when two halves of apiece are identical. If the pattern piece is cut down the centerand the piece is placed on a fabric that is doubled over, afinished piece with two identical halves is created.Sewing SymbolsOther symbols assist in lining up pieces that will be stitchedtogether. These marks can either be cut into the fabric, ordrawn onto the fabric. Notches are cut OUTWARD from thefabric piece (even though they point toward the seam on thepattern). Dots are drawn onto the fabric. Notches and dots areused to properly align the fabric pieces that will be stitchedtogether. The broken line represents the stitch line.Cutting InstructionsThe pattern pieces might contain instructions. A piece might tell you to "cut two" or "cut one".This refers to the number of pieces you are to cut. Usually "cut two" means two opposite piecesare to be cut. If the fabric is folded, place the pattern piece on top of the folded fabric and cutthrough both layers of fabric. You will end up with two opposite pieces. Your fabric lay-outinstructions will show this in detail.Altering InstructionsA straight line with the term "Shorten or Lengthen Here"means this is the area you can shorten or lengthen withoutchanging overall shape of the garment. For example, toshorten a pant leg, fold the pattern piece so that the 2 linesmeet. Re-draw the outline of the pant leg as needed. Ashortened boot cut pant leg is shown on the right.Source: k10.html
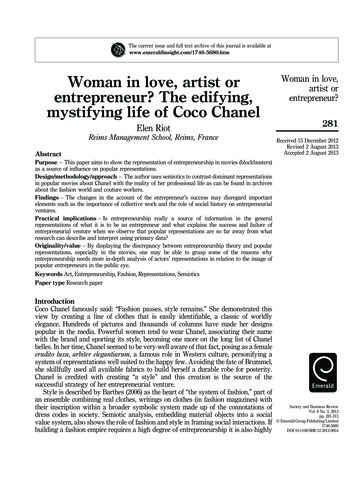
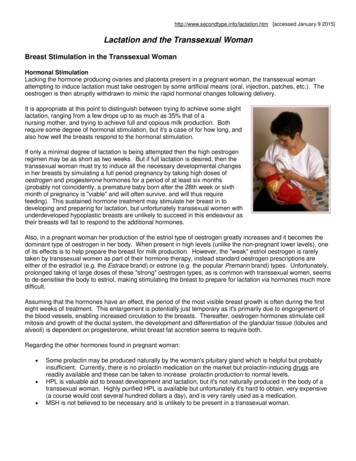
We have excellent free patterns that teach various methods ofpattern alteration and pattern making. Use our free robepattern to learn how to create your own robe pattern out of asimple tee shirt pattern. Use our free pajama pattern to learnhow to alter a pajama pattern or create your own pajamapattern. The image on the right is from our free pajamapattern and shows how to enlarge and lengthen the pant leg.Source: k10.html
Chapter FourGETTING READY TO SEW:Lay-Out, Cutting & MarkingAll Patterns, images and instructions are copyright protected.Please read our Terms & Conditions before using our patterns.QUICK INDEXFabric Lay-outFabric CuttingFabric MarkingPattern NotchesFabric Lay-outWhenever possible, I trace my patterns onto freezer paper (bought on a roll at Costco). Thereason is that most patterns come with multiple sizes. I can trace and cut only my size, withoutcutting the original pattern.Be sure you have plenty of space to work. A large table is best, because it is at a height that isfriendly to backs (especially a sewing table, which is higher than a regular table). Laying andcutting on a floor leads to very sore back and leg muscles. Assemble everything you will need:pattern pieces, pattern instructions (for lay-out instruction), pins, scissors and fabric.In laying out your fabric, there are some important concepts to keep in mind.1.Stretching Fabric Back Into ShapeFold the fabric as shown in your pattern instructions and lay out flat on a cutting surface. If thefabric does not lay in line nicely, it may be a bit stretched out of shape. If this is the case, youwill need to stretch the fabric on the diagonal. Get someone to help you, and stre
Source: k10.html FREE Sewing Book Sewing Lessons For Beginners Last update May 30, 2009 TABLE OF CONTENTS