Transcription
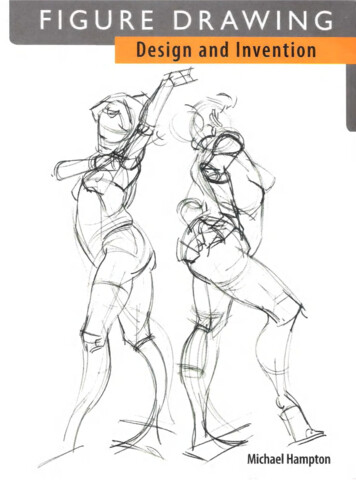
FIGUREDRAWING
35.ISBN-10:ISBN-13:0-615-27281978-0-615-27281 9 "780 615 27281 8Ii 7
FIGURE DRAWINGDesign and InventionMICHAEL HAMPTON
/Uffe/,i3Copyright 2009 by M. HamptonNo part of this book can be reproduced inany form without prior written consent.AR24www.figuredrawing.infomh @figuredrawing.infoPublished by M. HamptonLayout and Design by Hollis CooperISBN-10: 0-615-27281-9ISBN-13: 978-0-615-27281-8Printed in China/:VY
TABLE OF CONTENTSINTRODUCTIONGESTURE DRAWINGTHE EIGHT PARTS OF THE BODYFORM AND BALANCESYMMETRY AND ASYMMETRYREPETITION AND TIMINGWRAPPING LINESTHE SPINECENTER OF GRAVITYRIB CAGE AND PELVISTHE “ABOUT TO.” POSEECONOMY oF LINECREATING A STORYLANDMARKSRIB CAGE AND PELVISTHE BACKVOLUMEWEIGHT DISTRIBUTIONCONNECTIONSARMS AND LEGSFORMS AND CONNECTIONSHEADDRAWINGSTEP 1: THE SPHERESTEP 2: TILTSTEP 3: ADDING THE JAWSTEP 4: PERSPECTIVESTEP 5: PROPORTIONSSTEP 6: SIDE PLANESTEP 7: THE EARSTEP 8: THE KEYSTONESTEP 9; DENTURE SPHERECOMPLETED LINE DRAWINGTHE PROFILETHE BACK OF THE HEADANATOMYFRONT VIEWPROCESSBACK VIEWANATOMY AND MOTIONSTERNOCLEIDOMASTOID — GESTURESTERNOCLEIDOMASTOID — SHAPESTERNOCLEIDOMASTOID VOLUMEPECTORALIS MAJOR - GESTUREPECTORALIS MAJOR — SHAPEPECTORALIS MAJOR — VOLUMETRAPEZIUS — SHAPETRAPEZIUS — GESTURETRAPEZIUS — VOLUMETHE DELTOID — GESTUREDELTOID — SHAPEDELTOID - VOLUMERECTUS ABDOMINIS — GESTURERECTUS ABDOMINIS — SHAPERECTUS ABDOMINIS - VOLUMEOBLIQUES - GESTUREOBLIQUES — SHAPEOBLIQUES — VOLUMESERRATUS ANTERIOR — GESTURESERRATUS ANTERIOR — VOLUMESERRATUS ANTERIOR — SHAPEERECTOR SPINAE — GESTUREERECTOR SPINAE — SHAPEERECTOR SPINAE VOLUMELATISSIMUS DORSI — GESTURELATISSIMUS DORSI — SHAPELATISSIMUS DORS VOLUMEANATOMY AND ARCHITECTURETHE ARMTHE SHOULDERANATOMYTHE FOREARMPROCESSTHE HANDHAND STRUCTURE AND PROPORTIONHAND ANATOMYPERSPECTIVEFINGER BONES AND KNUCKLESFLESH AND MUSCLETHE WHOLE PROCESS — THE FINGERTHE WHOLE PROCESS - THE HANDTHE LEGTHE FOOTPROCESSDRAPERYSOME NOTES on LIGHTAND SHADOW
This book is dedicated to my parents for their unendingsupport and encouragement. To Hollis, without whomnone of this would have been possible.Special thanks to Nick Bygon and Joe Weatherly for allthe generous help and feedback.
INTRODUCTIONThe approach to drawing presented in this book is one have used for a number of years in theteaching of life drawing and anatomy classes. It is aimed at students in a myriad of disciplines(animation, game art, conceptdesign, comics, GED, etc.),and so does its best to remainconsistent in the emphasis ofmany artistic fundamentals. Inaddition, the drawing processpresented here can be treatedas applicable to different artisticventures. For example, thethought process outlined canbe an aid in understandingsculpture, modeling, painting,etc. Thinking outside theimmediate subject of drawingand training in the thinkingprocess described will help youprepare for a number of differentartistic avenues that require thesame basic skill set.The approach covered here isprimarily concerned with the useof line, development of form,and the simplified design ofanatomy — the basics of beingable to convincingly invent afigure that exists in space. Whilecontour, shading, and expressionare important elements inthis process, they are not atthe forefront of this particularmethod.
Through teaching this subject over a period of time, have tried to assemble differenttechnical elements to produce a consistent, beneficial result in student learning. However(before you leave screaming), consider the approach outlined here as an open,changeable thinking/working process, meant at some point for the reader to personalize.It is my hope that there will be aspects to the process you disagree with, or deem tonot be as important. After internalizing the information, suggest altering the approachto more clearly reflect your ideas: such as reorganizing chapters, leaving some chaptersout - or even adding something of your own! So, learn the drawing method outlinedhere for what it has to offer, and what consider to be the essential elements of drawingthe figure. But keep in mind that it isn’t a belief system, or claim to any absolutes -- it ismeant to help someone get started. After learning what you can from it, make it yours.As we begin, keep inmind that each chapterbuilds upon the next.This approach shouldalso apply to yourdrawings as you makethem. Have disciplinein your working process,understand how one stepleads into the next, youshould improve morequickly.Remember, a major emphasis inthis book is not on drawing thefigure, but using the figure as anexcuse to train oneself in the useof various formal principles in amyriad of artistic applications.My goal is that this book can bea beneficial resource not onlyfor drawing the figure, but alsoan introduction to the figurethat facilitates knowledge andtechnical skills that are applicableto many other pursuits.
GESTURE DRAWINGLet us begin by pointing out a few thingsgesture will not mean at this stage in thedescription of a figure. It does not necessarilyinvolve expressing your innermost emotionalstate. It also does not involve a haphazard andexcited flailing of the drawing medium on andaround the page. In the first section of the book, thegesture is presented in a more intuitive way, in order toemphasize exaggeration. Later, the gesture is discussed asa representation of the spine. In both cases, throughoutthe book, a “gesture drawing” is considered the frameworkfor everything you plan to accomplish. Additionally, think of“gesture” in a very open-ended way. “Gesture” could be thesame thing that an armature is to a sculpture, or that a rig maybe to a developed 3-D animation or model, etc.At this early stage, the focus will be on communicating anidea to a viewer or audience. In order to communicate anidea effectively, you want to start by distilling everythingseen into only the essential qualities of the figure/character in front of you (or in your imagination).Through this drawing process, the goal is to take yourattention outside of drawing the figure and onto thebasic mechanics that allow that figure to manifest. Byfollowing this rationale, you will increase your wholeartistic skill set, while learning to organize that skill set ina way that can produce a figure.This chapter is the most important to the continueddevelopment of the book, and should be something studiedcontinuously. It also begins the drawing process. It isimportant to understand that this drawing process is onefor designing the figure from imagination (or life) with anemphasis on thinking structurally. My hope is that it remainsgeneric enough to allow the addition of other influences,styles, etc.Atthisstage, your goal is limneeded to build a concentrated serTry only making lines that have ayou could explain as intentionof your drawing. za
THE EIGHT PARTSor tut BODYWhen developing a gesture drawing, it is important to be awarethat you are describing the eight parts of the body.These eight parts include:- Head- Spine- Arms (2)- Pelvis- Rib Cage- Legs (2)The essential elements you will describe using these eightparts include a sense of story and composition. Giving thePose a “sense of story” means communicating a unique senseof positioning or attitude. Every person has a specific wayof holding himself or herself when moving. By exaggeratingthe “story,” you give your viewer a compelling image toexperience. When creating a gesture drawing, this involvesdeveloping your figure’s proportions and giving your figure asense of balance and weight.- STORY [coratesitior!— Poeportion:gS PaeTS — WEIGHT /Sarance— AdatouyWpdneteGaoe 8 PaerseeWN wy”a!» ASYmmeTRYo& UNE WPAGPINGUNES ZEPETITION OF CHRNEThe lines most crucial to showing a figure are the “C” curve,the straight (line), and “S” curve. These lines will continuouslyreappear throughout the book. In this drawing process, you willnever use any other type of line.
The most important thing to keep in mind while drawing the figure is that the human from isessentially a balancing act.This illustration is a diagram of the figurefrom the side and from the front.In the side view, the head is suspendedout over the rib cage by the forwardangle of the neck. The neck and headare in turn balanced by the rib cage as itpushes at the opposite angle.The pelvis moves opposite to the tilt ofthe rib cage, and the legs stabilize thebody in the shape of a large “S”.The side view shows us that the skeletonis designed in a way that naturallybalances the figure.5OF)ta\\ /\SIDE VIEWFRONT VIEWThe diagram above right shows how the figure isbalanced between hard and soft forms. The head,rib cage, and pelvis are all large areas of bonebalanced between softer areas of muscle and flesh.In a later chapter, we will study the active andpassive groups of anatomy that create this form andbalance.
SYMMETRY ann ASYMMETRYIn order to keep this natural quality of the human form a constant in our drawings, we need ause of line that continually emphasizes visual ideas of balance and movement.Acummetene(x)Beginningwith only a “Ccor “S” curve,the main focus is on positioning one ofthe curve’s apexes higher than the onethat follows.( x)The asymmetrical use of line (shownon the left) is the main line use to be.RBx,ieeSxemphasized when developing a gesturedrawing. By keeping the high points ofthe curves slightly offset, the eye is forcedto move through them. This gives youthe ability to have a great deal of controlover where the viewer's eye goes andhow quickly. This is one way of dealingwith composition at a very early stage ofthe drawing.Avoid line use (shown on the right),which, instead of playing the curves offone another, uses mirroring or parallels.This approach closes off the form visuallyand does not allow for a flow betweenforms. Furthermore, the diagram onthe right does not emphasize a naturalsense of balance and movement, whichare paramount qualities in describing thefigure.
In addition to using asymmetry, the secondquality of curve used is that of repetition. Anytime a similar curve or shape is repeated twiceor more, it provokes a visual movement.In the diagram to the right, study how thethree “C” curves placed next to one anotherstart to push the eye from left to right.REPET TicoUsing asymmetrical curves in addition torepeating curves gives your gesture drawings asolid sense of composition, fluidity, and timing.In the diagram, notice how repeating curvescause the eye to slow down as it movesthrough the dominant asymmetrical curves.Depending on the different combinations ofline used, different visual experiences andspeeds can be developed.Fast and slow visual movements are a veryimportant quality in the design of the figure atthe gesture stage. Try slowing down the eye(emphasizing repeating lines to produce moreside-to-side motion) in more complex areas(areas of intersection: midsection, shoulders,hips, knee, elbow) and speeding it up alongthe length of forms (such as asymmetrical linescreating a faster push downwards).TiminCxBy playing one thing against another, you willkeep your designs as appealing and life-like aspossible. Also, you present the viewer with anexperience closer to how we actually see —we scan at different speeds, lingering longer insome areas and quickly glossing over others.Rarely do we view everything before us at aconsistent, steadied pace.
Here are some examples of oneminute gesture drawings.
Analyze the drawings on these pages for the ideas discussed so far. At this point, theeight parts of the body are indicated in an exaggerated activity. They are summarizedinto relationships using the straight, “C” curve, and “S” curve. The curves are usedasymmetrically to play with a dynamic sense of timing and balance.
WRAPPINGLINESThe last type of curve used in a gesture is wrapping lines. In a quick sketch, wrapping lines arecurves that move across and around a form to indicate perspective.When using lines that wraparound a form, the mostimportant decision to make iswhether that form is recedingfrom or coming towards theviewer. A wrapping line isdrawn on top and acrossthe other gesture to describethe way the form is movingthrough space.this drawing,notice how the lowerlegs have been given twodifferent types of wrappinglines to indicate the separate spatialplacement of each leg.
After using wrapping lines, the last step in creating a gesture drawing is to include the shapes of thehead, rib cage, and pelvis.When doing this, keep in mind that including these shapes will be a powerful tool in showingproportion, weight, and balance. At this point, keep the shape of the head very simple as asphere. The rib cage should be shown as a conservative egg-shape that is standing up, while thepelvis is an oval laying on its side.Refer to the diagram at the beginning of this chapter for an illustration of the shapes.Try to think of wrappinglines as rubber bands orstring tied all the wayaround a form. The pointof this exercise is to neverdraw a straight line acrossyour drawing. From nowon, only use lines that travelaround an imagined surface.This will develop a shorthand of form/perspective foryou and for the viewer.
Similar to the diagram to the right, all of thewrapping lines are volumetric contours, or linesthat travel across the surface of a form from sideto side. As a form changes direction spatially,the lines will reflect that change.However, keep in mind that you will never beusing a straight line. Using a straight line will,at this point, start to become a reference to ashape and begin to fatten out your drawings.
Developing the gesture involves considering the whole movement and relationship of theeight parts of the figure. The most important of these parts is the spine.The spine is responsible for theorganization and balancing of thethree major masses (head, rib cage,and pelvis), as well as the arms andlegs. This section describes how thespine influences the figure, and howthat influence is shown in a gesturedrawing. This section also explainsthe initial design of the three majormasses based on the influence ofthe spine.After becoming more intuitivewith the use of line and curve,consider those same elements ina more concrete relationship tothe movements of the spine.Remember, the goal is toorganize your mark-making ina way that communicates thenatural designs of the figure.
The diagram below shows four different illustrations of the spine, from aback three-quarter view. The spine is primarily an “S” curve in design -the complexity is that the “S” needs to be thought of dimensionally.BACK THREE-QUARTER VIEW\CERVICALf\THORACIC\LUMBAR-aSThe first two drawings on the left showthe design of the spine using only line.The first drawing is done using onlystraight lines, illustrating the directionchanges in the three areas of the spine:the cervical (neck), thoracic (upper andlower rib cage), and lumbar (lowerrib cage and pelvis). Starting from thebottom triangle, notice that the lumbarsection of the spine moves forward andaway from the viewer's eye. Next, thedirection of the spine changes and leansthe opposite direction. As it movesfurther into the thoracic section, therib cage again changes direction as itmoves up and towards the neck. Thethoracic section then moves into thecervical area of the spine.KaNeThe two drawings on the rightillustrate the spatial position ofthe spine.The first of these two (seconddrawing from the right) is similarto the first drawing on the leftwith the added element ofperspective. Notice that thesame 2-D directional changes aretaking place, but now include thecylinders constructed on top toclarify the spine’s snaking throughspace.The last drawing on the right uses“S” curves to depict a more fluiddesign for the spine, using ellipsesto delineate the perspective andsurface changes.The second drawing from the leftshows how an “S” curve illustrates thiscomplex movement in a simple fluidline.15
FRONT THREE-QUARTER VIEWyoThe diagram above shows the spine as if seen on a figure from a frontthree-quarter view. The same types of lines have been used as in thefirst illustration: straights, curves, cylinders, and a more organic shape.Compare the front view to the back view on the previous page.Notice that all of the movements detailed on the back view are nowreversed in this front view.In the illustration below, the same lines have been used to show thespine in profile.SN— L\eSa{i 16GESTURE DRAWING
Didetam oFSuebespedPrime CoevESBase on THEPeespectweMovements FThe Sane BaradaSew VS, FASTTwn HomBe& PLACEMENT OFASUMMETEICALCURVES After some experience with gesture drawing, you will start to notice that passages or areas in thefigure can be handled in a very formulaic way. For example, the same lines are always used todirectionally express the movements of the spine. The diagrams above were done to illustrate theimportance of trying to see with X-ray vision into the spine as a starting point in explaining thefigure. Additionally, the first two figures have the gesture lines added to show the influence of thespine on their position and direction (design).Always try and understand what the spine is doing — most everything in the figure can beexplained as a consequence of it.17
After developing your figure’s pose as a gesture drawing,you will next give a more concrete description of the majormasses: the head, rib cage, and pelvis. Manipulating thefigure’s center of gravity in an exaggerated manor is essentialin creating an interesting pose. On top of the gesture, adda sphere for the head, an egg shape for the rib cage, andahorizontal egg shape for the pelvis.The goal of using the centerof gravity is to force anawareness of how the figurestands upright, while creatingthe ability to exaggeratepositions.Following ideas of balance,you can design a 2-D leanfor the rib cage that is offthe symmetrical center. (Ofcourse, unless the figure is in aseated position, a pose usingan object to remain upright,or if the majority if weightrests on the arms.)z7DYNAMIC SE ABALANCEDMOST DYNAMICA common mistake when drawing the figure is keepingthese shapes balanced and straight (center drawing).Notice that the shapes of the major masses all have anequal and balanced relationship to the center of gravity(shown as a vertical line).Creating a dynamic pose involves creating a sense oftension with the figure’s center of gravity. Just as ourinitial gesture lines create a sense of movement with animbalance in the placement of line, you should flirt withthe idea of imbalance when drawing the shapes of thehead, rib cage, and pelvis.On the left and right, notice how the major massesmove around the center of gravity without lining up onit. The last pose is the most dramatic in its distributionof the masses in relation to the center of gravity.Keep in mind that abalanced pose is nobetter or worse thanusing an out-of-balancepose. What maitersis that you are able tobuild the correct positionto match your story/intention. Remember,though, that because ofthe spine, there is alwayssome counter-balancingof the shapes of the threemajor masses.
After identifying the center of gravity, the nextstep is to lay in the three major masses: the head,feey/ TZrib cage, and pelvis. Because the head is a more complex formaddressed in a later chapter, for now keep it asa simple sphere shape. When placing the shapesof the rib\7Swcage andpelvis,:ifNY\ make surethey areconsistentEoS )Co:PELVIS;with thespine andthe balance of the gesture.Before describing the shape of the pelvis or ribcage, look for the line of its tilt (2-D position/RIB CAGElean). An easy way to find this is to look for theweight-bearing leg. When the majority of weight ispositioned on one leg, it usually causes this large areaof bone to raise, dropping the other side. Draw thisline of tilt and then place the shape on top. Optionsfor the pelvis and rib cage are shown in the diagramson this page.At this early stage in the drawing, use the egg shape — which can then be used to developmore complex forms.19
There are hundreds of different configurations for the creation of a pose, and each one isgoverned by the desired effect and context of a given story. The following exercise willhelp you create a sense of impending action, and is an exercise generally give to studentswho are stuck making stiff symmetrical positions. While this exercise isn’t the solution tohow every pose should be thought through, it is one tool to use when thinking about themechanics of the figure, and how these mechanics can be used.Stiff, symmetrical poses, while good for a suggestion of power, strength and/or immobility,often lack a sense of lyricism and exaggeration. In an effort to push towards these moredynamic attributes in a pose, ask my students to strive to create an “about to .” quality,which is a pose or position in their drawing that is somewhere in mid-action, mid-step,etc. The “about to .” effect is an engagement in the suspended interest or outcome ofthe figure. Stable, symmetrical positions keep the action in stasis; the action has eithernot begun, or it has ended. An “about to.” position engages viewers by making themanticipate the outcome of the action, hopefully wanting to fill in the rest of the story.
The difference between a stable pose and one in mid-action isdetermined by how weight is distributed and balanced. Whilethis approach can be used to analyze most positions, here it isdemonstrated with the standing figure. Keeping in mind theprior notes on the center of gravity, build a triangle between thefeet and either the belly button or nose.In poses that are verystable, the triangle mostly appears very stable at the bottom.Notice that in exaggerated positions, or out of balance poses, thetriangle looks more irregular.f))v(,?iyKS— 7, eiWhen developing a pose with these concerns in mind, use thesame approach discussed thus far. Begin with the head, workingthe gesture lines down through the weight-bearing leg. Thisorganization of lines from the head to leg should be on adiagonal line, which, judging from the center of gravity, looksout of balance. When adding the second/supporting leg, place itnear the line of gravity to complete the out-of-balance posture.This simple thought given to a figure’s placement will create the“about to .” quality, engaging your viewer in the anticipation ofthe potential outcome of the drawing’s narrative.21
ECONOMY or LINEEconomy of line isyet another way toclarify themes relatingto gesture. Readthrough the diagramsfor suggestions on theeconomical use of thedrawing medium.22GESTURE DRAWING
* Economy oF Le”e.— DESCUBING Te DIFFEC ENE BETWEEN Muscle, FAT RenPotatoes(oweUNEeyinretsBonevsMuscleBE STENDESCHIB uleod Ep ersPLANE CHaxteeS Cd A Bow o& CAST SHap— THese THPES OF UNE GAN BE ose Foe THETHE Bold,Descaryriod oF Had, MMavead BeEAcES ONdeamda . KT.Herr THE Leah1S Powehar THeLAN PMALKSorehce THENPOSTSOFBole UNTHE Broap SipeEDGES EAVES—SceTERPacawer To THEia—ESHeerre LNeS DEScMBOH UGHT‘ n PLANEPLtHadacsiTUese Gal GEACPALLNWEST WH ILERSPUN ToTwAgeverTCH ING THEFast VS. SLoda2; --BY—AKiSLOWERVISUALEXPJo THe viewr@«ws He Someewsead ationTHe Tihs4 Enee DESCUBINGSPpdece”osmunyREseevEedCroceAS THeFoRSpreceoFANESmosthre ,SoPTERUKE) Ateas—Mosel FAT23
“Creating a sense of story” in your gesture drawings can mean a number of different things.Gesture can be the way we recognize moods through body mechanics, the innate ability torecognize your best friend from 20-30 feet away, or just simply being able to read the body asa type of communication. When studying gesture drawings, it will be a common exercise toexaggerate these positions until you become more comfortable with articulating a wide rangeof expressions. Once the ability to develop the exaggerated is achieved, the more naturalsubtleties of expression will be much easier to create.Remember that the figure is a machine in constant relationship with balance and imbalance— not just in the design of bones and muscle, but also of movement. Think of the naturalactivity of walking as an example. In order to walk, run — to move at all — we mustthrow ourselves out of balance, and with the next step catch it again. The reason all of ourdesign elements are focused on asymmetry, balance, movement, etc. is essentially becausewe are describing a machine moving through aseries of controlled falls.
So far, you may have noticed that there has been no discussion of measuring the figure orproportion. In this particular approach, there is an emphasis on achieving proportion throughoverall quick assessment of size. Work through the gesture lines from the head to the foot, thentake a moment to decide if what you've done looks correct. This is not to say that this approach isbetter than another (because, ultimately, all should be considered); however, this approach allowsfor the emphasis to be placed on capturing the feeling of movement and position. One of thenegative aspects of measuring is that, at times, it tends to produce static, stiffened poses with verylittle fluidity.The figure should bedrawn using the straight,“C”, and “S” curve linesto quickly capture thestory or intention in thepose. Proportion shouldbe judged based on theoverall appearance ofwhat you have drawn.25
26GESTURE DRAWING
Consider the gesture as the your animated way of capturing the lyricism of the entire figure.Do your best to keep the fluidity of the gesture, but still include the mechanics (skeleton,anatomy, perspective) in order to give believability to the overall figure.The next chapter will discuss using the gesture as a framework for developing a functionaldesign for the skeleton. Adding the landmarks is the first step into a rigorous demonstration ofhow that gesture is possible. Regardless of the chapters and information to come, it is crucialto begin with a gesture.
Itisimdrawings instages, and to always startwith a gestureprior tothis step.
LANDMARKSLooking for the skeleton is the second stage in developing your figure drawings.This step is meant to give your drawings the look and feel of weight provided bythe skeleton, as well as be a transitional stage in developing volume.29
RIB CAGE anp PELVISThe skeleton can be used to look at the figuresymmetrically. In a full-frontal or back view, a linedown the center of the skeleton splits the figure intotwo equal halves (Examples A and E on the oppositepage). Landmarks give us this line of symmetry.The landmarks we need are color-keyed in thedrawing to make their identification easier. Allof these landmarks are areas of bone that visiblypush through the flesh. For the time being, we areconcerned with the landmarks of the rib cage andpelvis. Keep in mind that these are simplified designsbased on knowledge of the skeleton.The “pit” of the neck at the bottom of the throat.@ The clavicles. Shape-wise, the clavicles resemblethe handlebars of a bicycle, or a simplified bow.These two bones act as levers, enabling the armsto move around and away from the rib cage. Theorientation of the clavicle will change dependingon the position of the arm. The manubrium. This is an area of bone that thetwo clavicles pivot from.BB The sternum.This is a bone that fuses the bonesof the rib cage together in the front. With theaddition of the shape of the manubrium, these twobones resemble a neck tie.IB The ends of the thoracic arch of the rib cage.BB The belly button.IB The ends of the iliac crest of the pelvis and thebottom of the pubic bone.Remembering these areas helps to give your drawings the feel of an active skeleton. Observingthe tilts across these points reveals the distribution of weight. These landmarks also help give thefigure volume, perspective, and aid in the placement of anatomical shapes.
THE BACKThe drawing above shows the landmarks of the back. These include:The base of the cranial notch.The spine. The spine flows from the bottom of the cranial notch all theway down to the pelvis, ending at the sacrum.The sacrum.The seventh cervical vertebrae.lower portion of the neck.This is a very pronounced area of bone towards theThe scapulae. The scapulae are two free-floating bones, which guide and aid themovement of the arms.Examples B, C, and D show the positions of the landmarks as the figure starts to move throughspace. Notice that the line of symmetry on the three-quarter, side, and three-quarter back hasremained, but now begins to favor, or move closer to, one side of the figure. Where the lineof symmetry had previously divided the figure into two equal parts, now it helps to align theshape of the landmarks and show a turn. As the flat view (shown in the two drawings at top)becomes a slightly angled view, the rib cage and pelvis are shown with an interior corner. Thisinterior corner will be used to show the perspective by allowing the rib cage and pelvis to beturned into a box. e-The line of symmetrywill alway tea C oethe rib cage and pelvis are facing the same direction.When the rib cage and pelvis are twisting, the line of —symmetry will always be an “S” curve.31
VOLUMEThis diagram details the process of how to use your knowledge of the landmarks to show volume.The first drawing shows the shape of the rib cageand pelvis in the gesture stage.The second drawing shows how to begindeveloping the landmarks. This is a fullfrontal pose, so all of the landmarks are shownsymmetrically. The problem with this type ofview is that it is very flat, emphasized in thisdrawing by the box drawn around the rib cageand pelvis. In making drawings that show formand volume, try to avoid focusing on shapes,such as the boxes, that only have two points(outside to outside).If the line of symmetryis approaching one sideof the figure, it meansthe side plane (of theperspectival box) is onthe opposite side of theaeThe third drawing shows the landmarks ina slightly-rotated view. Notice that the line ofsymmetry (found by placing the landma
teaching of life drawing and anatomy classes. It is aimed at students in a myriad of disciplines (animation, game art, concept design, comics, GED, etc.), and so does its best to remain consistent in the emphasis of many artistic fundamentals. In addition, the drawing process presented here can be tre