Transcription
vOLVO XC90Quick GuideWEB EDITIONWELCOME TO THE GLOBAL FAMILY OF VOLVOOWNERS!Getting to know your new vehicle is an exciting experience.This Quick Guide provides a brief overview of the most commonfeatures and functions in your Volvo.However, for the most up-to-date and detailed descriptions andinstructions, as well as important warnings and other information notincluded in this folder, please refer to your Owner’s Manual.An asterisk (*) indicates optional equipment.For additional information, contact Customer Service:U.S.A.: 1-800-458-1552 www.volvocars.usCanada: 1-800-663-8255 www.volvocars.ca
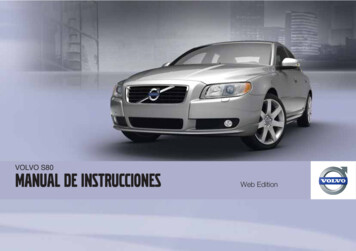
remote keyLocks the doors, fuel filler door,tailgate and arms the alarm.Unlocks the doors, fuel filler door,and tailgateA and disarms the alarm.Unlocks (but does not open) thetailgate.Approach lighting illuminates lightsin door mirrors, cabin, footwells,license plates. Turn signals and parking lights illuminate.“Panic” alarm.– Press and hold for approx. 5seconds to sound the alarm. Turn offalarm by pressing the unlock/lockbutton twice.A.Automatic relock occurs if no door/tailgate isopened within 2 minutes after unlock.The key blade can be used to lock/unlock theglove compartment.cold STARTnoteAfter cold starts, your engine will idle at ahigher speed for a short time to bring theengine to normal operating temperature asquickly as possible, enabling the emissioncontrol system to function optimally.AUTOSTARTDepress the brake pedal. Turn the key toposition III and release it. The engine will startautomatically.wipers and rain sensor*ASingle wiper sweep.0OffB123Rain sensor On/Off with the lever in the0 position.Turn to adjust intermittent wiper speed orrain sensor sensitivity where applicable.Tailgate wiper – normal/interval.Intermittent wipers. Turn (2) to adjustinterval.CNormal wiper speed.DHigh wiper speed.EWindshield and headlight washer.FTailgate washer.A green LED in button 1 illuminateswhen the rain sensor is switched on.
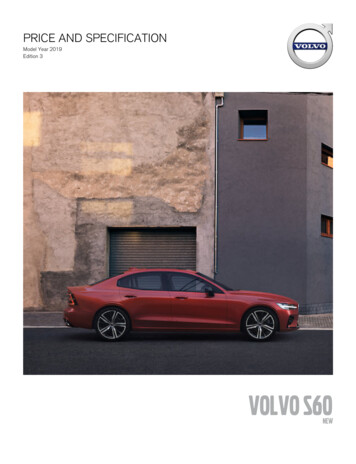
Lighting panelHeadlights off. High beam flash only.Parking lights.Headlights: turn off when ignition isswitched off, high/low beams.Display & instrument panel lighting.Fuel filler door unlock.Press to turn onA the LED DRL (DaytimeRunning Lights) function.Rear fog light (driver’s side only).A.AHigh beam flash.BToggle between high/low beams, homesafe lighting.The headlight switch must first be turned to theposition.driver’s door control panel2112L RAdjusting the door mirrors. Select Lor R. Adjust with the control.1Open/close a window partially.2Open/close a window fully.Locks/unlocks all doors, fuel fillerdoor and tailgate.Lockout switch for rear windows.parking brakeApplying the parking brake1. Press firmly on the brake pedal and thenpress the parking brake pedal (1).2. Release the brake pedal. If the vehicle rolls,press the parking brake pedal again.3. Park – put the gear selector in P.Releasing the parking brake1. Press firmly on the brake pedal and then pullthe handle (2) – the parking brake pedal willcome up.2. Release the brake pedal.
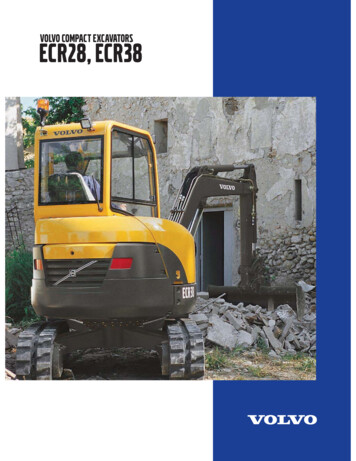
audio system1 Press to turn on/off.Turn to adjust volume.2 Sound settings:Press to select e.g., BASS, TREBLE, etc.– turn to adjust.Sound source:Turn to select e.g., CD, SiriusXM satelliteradio*, Bluetooth streaming audio or theAUX/USB socketsA.CD playeRB3 CD selectC.Press 1–6.4 Press to eject current CD.Press and hold to eject all CDs.C6 Change tracks.A.AUX/USB sockets for e.g., mp3 player. Set the devices’s volume to medium for best sound quality. An iPod connectedto the USB socket will also be charged.B.CDs containing files in mp3 and WMA formats canalso be played.C.Optional CD changer only.REFUELINGRADIO5 Autostore stations by pressing for 2 seconds. AUTOSTORE is displayed duringthe search. The 10 strongest stations arestored.Press 0–9 to select a station.6 Search for stations with left/right arrows.Store up to 20 stations by pressing andholding one of the preset buttons 0–9 inFM1 and 0–9 in FM2, until the stored station is confirmed in the displayHD radioHD radio reception is subject to coverage limitations. See your Owner’s Manual for details.Blind Spot InformationSystem (BLIS)*If the BLIS indicator lights illuminate occasionally even when there are no other vehicles inthe blind area, this may be caused by light reflected from a wet road surface, the vehicle’sown shadow against a large, light, smoothsurface, or sunlight directly in the camerawhen the sun is low on the horizon.Hang the fuel filler cap on the hook whilerefueling.In the event of a fault, Blind spot syst.service required will be displayed. Seethe Owner’s Manual for other BLIS-relatedmessages.
electronic climate control (Ecc)*AUTOMATIC CONTROLIn AUTO mode, ECC controls all functionsautomatically and makes driving more pleasantwith optimal air quality.4 Turn to individually set the desired temperature on the driver’s and passenger’s sides.The selected temperature will be shown inthe display.6 Press AUTO to maintain automatic cabintemperature, balanced airflow and othersettings.MANUAL CONTROL1 Blower speed.2 Recirculation/Interior air quality sensor* on or off3 Air conditioning on or off to cool thecabin and defog the windows.5 Air distribution. Direct airflow to thefloor, panel vents, windshield, etc.7 Front seat heating* on or off.8 Max. defroster to quickly defog thewindshield and side windows.9 Heated rear window and door mirrors.Direct airflow to the floor, panel vents,windshield, etc.Integrated booster cushionRaising1. Pull the handle at the front of the cushionforward.2. Lift the rear edge of the cushion and usingboth hands, push the cushion rearward anddownward until it locks in place. Move theseat belt latch to the side if necessary.Lowering1. Pull the handle at the front of the cushionforward.2. Pull the cushion forward and press thecenter section down until the cushion locksin place.The booster cushion must be fully presseddown before the backrest can be folded down.
trip computer and odometer1 Trip computer display, select information with (9).2 A short press toggles between T1 & T2.A long press resets the displayed odometer.3 Display row 1: OdometerDisplay row 2: Two separate trip odometers, T1 & T2.4 Display row 1: Clock.Display row 2: Ambient temperature.898 Press to display or erase a message.9 Turn to show trip computer informationalternatives.10 A short press resets the current function.A long press resets all functions.5 Set the clock: Turn clockwise/counterclockwise as far as possible and hold toset the time (4).6 Fuel gauge.7 Low fuel level indicatorWhen the symbol illuminates, refuel assoon as possible.10noteThe display text MILES TO EMPTY TANK isan approximation, based on recent averagefuel consumption.Indicator and warning lightsSee the information in the display.Brake failure warning light, stopsafely. Check brake fluid level A .Yellow symbol: caution - take theaction shown in the display.Red symbol: warning - stop safelyas soon as possible and take theaction shown in the display.Low oil pressure, stop safely andcheck the oil levelA.DSTC stability system, flashes whenthe system is working.AHave the vehicle towed if the symbol remains illuminated.
accessing the third row ofseatsturn signalsABTilting the outboard backrests in the second row of seats:1. Pull up the handle (1), tilt the backrestforward and move the seat forward.Lane-change sequence, three flashes.Full turn sequence.Steering wheel adjustment2. To return the seat, pull up the handle (1)and return the backrest to the uprightposition.Car careHand washing is gentler on the paint than anautomatic car wash. Since the paint on a newvehicle may take several months to hardencompletely, we recommend washing thevehicle by hand during this period. Use cleanwater, a suitable car washing detergent anda sponge. Keep in mind that dirt or grit on thesponge can scratch the paint.warningNever adjust the steering wheel whiledriving.Tire pressure monitoringsystem (TPMS)grocery bag holderWhen a low tire pressure warning message(LOW TIRE PRESS. CHECK TIRES or VERYLOW TIRE PRESSURE) has been displayedand the tire pressure warning light () hasilluminated, one or more tires has low inflation pressure.Check the inflation pressure of all four tireswith a tire pressure gauge as soon as possible and pump the tire(s) with low pressureto the recommended inflation pressure.Refer to the inflation pressure tables in thechapter “Wheels and tires” in the Owner’sManual.
Adjusting the power seat1 Adjusts lumbar support.2 Raises/lowers the front edge of the seatcushion.Remote key and the power seatEach of the remote keys can be used by different drivers to store the driver’s seat position inthe following way: Adjust the seat to your preferences. Lock the vehicle by pressing the lock button on the remote key that you normallyuse. This stores the seat’s current positionin that remote key’s memoryA. Unlock the vehicle (by pressing the unlockbutton on the same remote key) and openthe driver’s door. The driver’s seat willautomatically move to the position stored inthe remote key (if the seat has been movedsince you left it).A.This setting does not affect the separate power seat memory.Consult your owner’s manual for detailed information.Storage spaces1 Rear seat cup holders.2 Control for lifting out the center console (not available on models with the optional Rear SeatEntertainment system).TP 14363 (USA & Canada) AT 1146. Printed in Sweden, Göteborg 2011, Copyright 2000-2012 Volvo Car Corporation3 Moves the seat forward/rearward.4 Raises/lowers the seat.5 Backrest tilt.
Adjust with the control. 1 Open/close a window partially. 2 Open/close a window fully. Locks/unlocks all doors, fuel filler door and tailgate. Lockout switch for rear windows. lighting panel Headlights off. High beam flash only. Parking lights. Headlights: turn off when ignition is switched off, high/low beams.