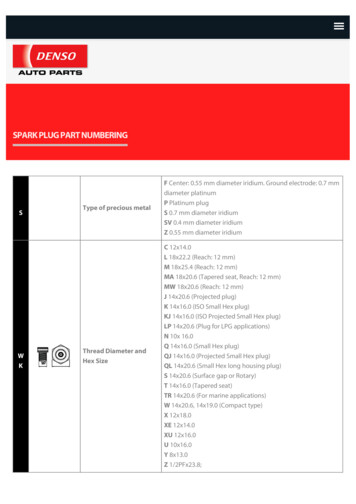
Transcription
Renault MASTERVehicle user manual
A passion for performanceELF, partner ofRENAULT recommends ELFPartners in cutting-edge automotive technology, Elf and Renault combine their expertise on boththe racetrack and the city streets. This enduring partnership gives drivers a range of lubricantsperfectly suited to Renault cars. Lasting protection and optimum performance for your engine –guaranteed. Whether changing the oil or simply topping up, to find the approved ELF lubricantbest suited to your vehicle, ask your Renault dealer for a recommendation or consult your vehicle maintenance handbook.www.lubricants.elf.comA brand from
Welcome to your new vehicleThis driver’s handbook contains the information necessary:– for you to familiarise yourself with your vehicle, to use it to its best advantage and to benefit fully from the all the functions andthe technical developments it incorporates.– to ensure that it always gives the best performance by following the simple, but comprehensive advice concerning regular maintenance.– to enable you to deal quickly with minor faults not requiring specialist attention.It is well worth taking a few minutes to read this handbook to familiarise yourself with the information and guidelines it containsabout the vehicle and its functions and new features. If certain points are still unclear, our Network technicians will be only toopleased to provide you with any additional information.To help you, you will find the following symbols: andThese appear in the vehicle and indicate that you should consult the manual for detailed information and/orlimits on operations with respect to your vehicle’s equipment.anywhere in the manual indicates a hazard, danger or a safety recommendation.The descriptions of the models given in this handbook are based on the technical specifications at the time of writing. This handbook covers all items of equipment (both standard and optional) available for these models but whether or not these arefitted to the vehicle depends on the version, options selected and the country where the vehicle is sold.This handbook may also contain information about items of equipment to be introduced later in the model year.Enjoy driving your new vehicle.Translated from French. Copying or translation, in part or in full, is forbidden unless prior written permission has been obtained from the car manufacturer.0.1
0.2
CONTENTSSectionsGetting to know your vehicle .1Driving2.Your comfort.3Maintenance.4Practical advice.6.7Technical specificationsAlphabetical index50.3
0.4
Section 1: Getting to know your vehicleKey, remote control . . . . . . . . . . . . . . . . . . . . . . . . . . . . . . . . . . . . . . . . . . . . . . . . . . . . . . . . . . . . . .Deadlocking . . . . . . . . . . . . . . . . . . . . . . . . . . . . . . . . . . . . . . . . . . . . . . . . . . . . . . . . . . . . . . . . . . . .Hands-free access transmitter/receiver . . . . . . . . . . . . . . . . . . . . . . . . . . . . . . . . . . . . . . . . . . . . . . .Locking/unlocking the doors . . . . . . . . . . . . . . . . . . . . . . . . . . . . . . . . . . . . . . . . . . . . . . . . . . . . . . .Doors . . . . . . . . . . . . . . . . . . . . . . . . . . . . . . . . . . . . . . . . . . . . . . . . . . . . . . . . . . . . . . . . . . . . . . . . .Steering wheel/power-assisted steering . . . . . . . . . . . . . . . . . . . . . . . . . . . . . . . . . . . . . . . . . . . . . .Headrests . . . . . . . . . . . . . . . . . . . . . . . . . . . . . . . . . . . . . . . . . . . . . . . . . . . . . . . . . . . . . . . . . . . . .Front seats. . . . . . . . . . . . . . . . . . . . . . . . . . . . . . . . . . . . . . . . . . . . . . . . . . . . . . . . . . . . . . . . . . . . .Seat belts. . . . . . . . . . . . . . . . . . . . . . . . . . . . . . . . . . . . . . . . . . . . . . . . . . . . . . . . . . . . . . . . . . . . . .Methods of restraint in addition to the front seat belts . . . . . . . . . . . . . . . . . . . . . . . . . . . . . . . . . . . .Side protection devices . . . . . . . . . . . . . . . . . . . . . . . . . . . . . . . . . . . . . . . . . . . . . . . . . . . . . . . . . . .Child safety: General information . . . . . . . . . . . . . . . . . . . . . . . . . . . . . . . . . . . . . . . . . . . . . . . . . . .choosing a child seat mounting . . . . . . . . . . . . . . . . . . . . . . . . . . . . . . . . . . . . . . . . . . . . . . .fitting a child seat, general information. . . . . . . . . . . . . . . . . . . . . . . . . . . . . . . . . . . . . . . . . .Child seats: attachment by seat belt or by Isofix system . . . . . . . . . . . . . . . . . . . . . . . . . . . . . . . . . .deactivating/activating the front passenger airbag . . . . . . . . . . . . . . . . . . . . . . . . . . . . . . . . .Rear view mirrors . . . . . . . . . . . . . . . . . . . . . . . . . . . . . . . . . . . . . . . . . . . . . . . . . . . . . . . . . . . . . . .Driving position: left-hand drive . . . . . . . . . . . . . . . . . . . . . . . . . . . . . . . . . . . . . . . . . . . . . . . . . . . . .Driver’s position, right-hand drive . . . . . . . . . . . . . . . . . . . . . . . . . . . . . . . . . . . . . . . . . . . . . . . . . . .Warning lights . . . . . . . . . . . . . . . . . . . . . . . . . . . . . . . . . . . . . . . . . . . . . . . . . . . . . . . . . . . . . . . . . .Trip computer . . . . . . . . . . . . . . . . . . . . . . . . . . . . . . . . . . . . . . . . . . . . . . . . . . . . . . . . . . . . . . . . . .Clock . . . . . . . . . . . . . . . . . . . . . . . . . . . . . . . . . . . . . . . . . . . . . . . . . . . . . . . . . . . . . . . . . . . . . . . . .Exterior temperature . . . . . . . . . . . . . . . . . . . . . . . . . . . . . . . . . . . . . . . . . . . . . . . . . . . . . . . . . . . . .Windscreen washer/wiper . . . . . . . . . . . . . . . . . . . . . . . . . . . . . . . . . . . . . . . . . . . . . . . . . . . . . . . . .Exterior lighting and signals. . . . . . . . . . . . . . . . . . . . . . . . . . . . . . . . . . . . . . . . . . . . . . . . . . . . . . . .Electrical adjustment of the dipped beam headlights . . . . . . . . . . . . . . . . . . . . . . . . . . . . . . . . . . . .Audible and visual signals . . . . . . . . . . . . . . . . . . . . . . . . . . . . . . . . . . . . . . . . . . . . . . . . . . . . . . . . .Fuel tank . . . . . . . . . . . . . . . . . . . . . . . . . . . . . . . . . . . . . . . . . . . . . . . . . . . . . . . . . . . . . . . . . . . . . .Reagent tank . . . . . . . . . . . . . . . . . . . . . . . . . . . . . . . . . . . . . . . . . . . . . . . . . . . . . . . . . . . . . . . . . . 1001.1011.1021.1041.1
KEY, RADIO FREQUENCY REMOTE CONTROL: general information (1/3)BA323211Driver’s responsibilitywhen parking or stoppingthe vehicle4Radio frequency remotecontrol ARadio frequency remotecontrol B1 Locking all the opening elements.1 Locking all the opening elements.2 Unlocking all the opening elements.3 Key for ignition switch, doors andfuel filler cap.4 Locking/unlocking the luggage compartment and, depending on the vehicle, the sliding side doors.2 Unlocking all the opening elements.3 Key for ignition switch, doors andfuel filler cap.The key must not be used for anyfunction other than those describedin the handbook (removing the capfrom a bottle, etc.).1.2AdviceAvoid leaving the remote control inhot, cold or humid areas.Never leave an animal,child or adult who is not self-sufficient alone on your vehicle, even fora short time.They may pose a risk to themselvesor to others by starting the engine,activating equipment such as theelectric windows or locking thedoors.Also, in hot and/or sunny weather,please remember that the temperature inside the passenger compartment increases very quickly.RISK OF DEATH OR SERIOUSINJURY.
KEY, RADIO FREQUENCY REMOTE CONTROL: general information (2/3)CD3221Radio frequency remotecontrol operating range3551Note: on certain vehicles, if a door isnot opened within approximately 2 minutes of the door being unlocked byremote control, the doors will lock againautomatically.6Radio frequency remotecontrol C1 Locking all the opening elements.2 Unlocking all the opening elements.3 Key for ignition switch, doors andfuel filler cap.5 Locking/unlocking the key insert forremote control C.To release the insert from its housing, press button 5, it comes out automatically.Press button 5 and guide the insertback into its housing.This varies according to the environment: take care not to lock or unlockthe doors by inadvertently pressing thebuttons on the remote control.Radio frequency remotecontrol D1 Locking all the opening elements.2 Unlocking all the opening elements.3 Key for ignition switch, doors andfuel filler cap.5 To release the insert from its housing, press button 5, it comes out automatically. Press button 5 and guidethe insert back into its housing.6 Locking/unlocking the luggage compartment and, depending on the vehicle, the sliding doors.InterferenceInterference by factors in the immediate vicinity (external installations orthe use of equipment operating on thesame frequency as the remote control)may affect the operation of the remotecontrol.1.3
KEY, RADIO FREQUENCY REMOTE CONTROL: general information (3/3)EHands-free accesstransmitter/receiver EThis enables the vehicle doors to belocked/unlocked without using theremote control unit. Refer to the information on “Hands-free access transmitter/receiver: use” in section 1.1.4Replacement, additional remotecontrol or transmitter/receiverYou must only contact an approvedDealer.– To replace a remote control, thevehicle must be taken to an approved Dealer as both the vehicle and the remote control areneeded to initialise the system.– Depending on the vehicle, youmay use up to four remote controls or two transmitter/receivers.Remote control unit failureMake sure that the correct batterytype is being used, and that thebattery is in good condition and inserted correctly. These batterieshave a service life of approximatelytwo years.Refer to the information on the “Key,radio frequency remote control: batteries” in Section 5 for the batterychanging procedure.Driver’s responsibilitywhen parking or stoppingthe vehicleNever leave an animal,child or adult who is not self-sufficient alone on your vehicle, even fora short time.They may pose a risk to themselvesor to others by starting the engine,activating equipment such as theelectric windows or locking thedoors.Also, in hot and/or sunny weather,please remember that the temperature inside the passenger compartment increases very quickly.RISK OF DEATH OR SERIOUSINJURY.
KEY, RADIO FREQUENCY REMOTE CONTROL: use (1/2)ABTo lock/unlock the doors from inside,refer to the information on “Centraldoor locking/unlocking” in section 1.112Remote controls A and B are used tolock and unlock the doors.They are powered by a battery whichmust be replaced (refer to the information on the “Key/radio frequency remotecontrol: batteries” in section 5).Locking the doorsPressing button 1 locks the doors andtailgate. The hazard warning lights andside in- dicator lights flash twice to indicate that the doors have locked.2Driver’s responsibilitywhen parking or stoppingthe vehicleNever leave an animal,child or adult who is not self-sufficient alone in your vehicle, even fora short time.Note: depending on the vehicle, whena door or the tailgate is left open or notproperly closed, all the doors and thetailgate lock/unlock quickly without thehazard warning lights flashing.They may pose a risk to themselvesor to others by starting the engine,activating equipment such as theelectric windows or locking thedoors, for example.Unlocking the doorsAlso, in hot and/or sunny weather,please remember that the temperature inside the passenger compartment increases very quickly.Pressing button 2 unlocks the doorsand tailgate. The hazard warning lightsand side in- dicator lights flash once toindicate that the doors have unlocked.RISK OF DEATH OR SERIOUSINJURY.1.5
KEY/RADIO FREQUENCY REMOTE CONTROL: use (2/2)Unlocking the doorsCDPressing button 2 unlocks the doorsand tailgate.1A short press on button 3 locks/unlocksthe tailgate and, depending on the vehicle, the sliding side doors. The hazardwarning lights and side in- dicator lightsflash once to indicate that the doorshave unlocked.1223Remote controls C and D are used tolock and unlock the doors and the luggage compartment.They are powered by a battery whichmust be replaced (refer to the information on the “Key/radio frequency remotecontrol: batteries” in section 5).3The hazard warning lights and side indicator lights flash twice to indicatethat the doors have locked.Note: depending on the vehicle, whena door or the tailgate is left open or notproperly closed, all the doors and thetailgate lock/unlock quickly without thehazard warning lights flashing.Locking the doorsPressing button 1 locks the doors andtailgate.A short press on button 3 locks/unlocksthe luggage compartment and, depending on the vehicle, the sliding sidedoors.1.6The key must not be used for anyfunction other than those describedin the handbook (removing the capfrom a bottle, etc.).
DEADLOCKING1112If fitted to the vehicle, this allows thedoors to be locked and prevents themfrom being opened with the interiorhandles (for example, by breaking thewindow and then trying to open thedoors from the inside).To activate deadlockingPress button 1 twice in quick succession.The side indicator lights and hazardwarning lights flash five times to indicate that the doors have locked.To deactivate deadlockingUnlock the vehicle using button 2.The hazard warning lights and side indicator lights flash once to indicate thatthe doors have unlocked.Never use deadlocking ifsomeone is still inside thevehicle.22121.7
HANDS-FREE ACCESS TRANSMITTER, RECEIVER: use (1/2)122Driver’s responsibilitywhen parking or stoppingthe vehicle2For vehicles equipped with transmitter/receiver 1, in addition to the functionsof the remote control, it can be used tolock/unlock without using the remotecontrol locking unit when it is in accesszone 2.Note: the hands-free access transmitter/receiver only works with the frontdoors and the tailgate.1.8It is powered by a battery which mustbe replaced (refer to the information onthe “Hands-free access transmitter/receiver: batteries” in Section 5).Never leave an animal,child or adult who is not self-sufficient alone on your vehicle, even fora short time.They may pose a risk to themselvesor to others by starting the engine,activating equipment such as theelectric windows or locking thedoors.Also, in hot and/or sunny weather,please remember that the temperature inside the passenger compartment increases very quickly.RISK OF DEATH OR SERIOUSINJURY.
HANDS-FREE ACCESS TRANSMITTER, RECEIVER: use (2/2)22342InterferenceUnlocking the vehicleLocking the vehicleInterference by factors in the immediate vicinity (external installations orthe use of equipment operating on thesame frequency as the remote control)may affect the operation of the remotecontrol.With the transmitter/receiver in oneof the access zones 2, press button 3or 4, and all the doors will unlock.With the transmitter/receiver in oneof the access zones 2, press button 3or 4, and all the doors will lock.The hazard warning lights flash onceto indicate that the doors have been unlocked.The hazard warning lights flash oncefor 4 seconds to indicate the doorshave been locked.Note: when a door or the tailgate isleft open or is not properly closed, allthe doors and the tailgate lock/unlockquickly without the hazard warninglights flashing.1.9
CENTRAL DOOR LOCKING, UNLOCKINGLocking the openingelements without the remotecontrol1Interior locking/unlockingdoor controlThis enables all the doors to be lockedsimultaneously.Lock or unlock the doors by pressingswitch 1.If a door or the tailgate is open or notclosed properly, the doors and tailgatelock/unlock quickly.1.10With the engine off, the rear doorsclosed and a front door open, pressswitch 1 for more than five seconds.Make sure you have your key with youbefore you leave your vehicle.When the door is closed, all the doorsand tailgate will be locked.Unlocking the driver’s door from outside the vehicle is only possible with thekey or the remote control.Locking the doors with thetailgate openTo lock the vehicle leaving a door open(e.g. when transporting something inthe luggage compartment which prevents it from being closed), or whenthe vehicle is located in a zone of highelectromagnetic radiation, or if the keyis faulty: with the engine switched off,press and hold switch 1 for more thanfive seconds.Doors and tailgate statusindicator lightWhen the ignition is on, the indicatorlight integrated in switch 1 informs youof the status of the doors and tailgate:– indicator light on, the doors and tailgate are locked;– light off, the doors and tailgate areunlocked.When the ignition is off, the indicatorlight remains lit and then goes out whenyou lock the doors.Never leave your vehiclewith the key, remote control or transmitter/receiverinside.Driver’s responsibilityIf you decide to keep thedoors locked when you aredriving, remember that itmay be more difficult for those assisting you to gain access to thepassenger compartment in theevent of an emergency.
MANUAL DOOR LOCKING, UNLOCKING312Manual controlLocking the doors manuallyUsing the keyLock or unlock the doors equippedwith locks by inserting the key fully intolock 1, then turning it.With the door open, turn screw 2 (usingthe end of the key) or press button 3and close the door. This means that thedoors are then locked from the outside.The doors may then only be openedfrom inside the vehicle or with the keyfor the front doors.1.11
RAID (AUTOMATIC LOCKING WHEN DRIVING)To deactivateWith the ignition on, press and holdswitch 1 for approximately 5 seconds,until you hear a beep. The indicatorlight in the switch goes out.Operating principle1When the engine is started, the systemautomatically locks the doors when thevehicle reaches a speed of approximately 4 mph (7 km/h).Operating faultsYou can decide whether you want toactivate this function.To activateWith the ignition on, press switch 1for approximately 5 seconds until youhear a beep.The indicator light built into the switchcomes on when the doors are locked.If you notice an operating fault (automatic locking impossible), first checkthat all doors are correctly locked. Ifthey are correctly locked and the faultis still present, contact an approvedDealer.Also make sure that locking has notbeen inadvertently deactivated.If it has, switch the ignition off and onagain and reactivate it.Driver’s responsibilityIf you decide to keep thedoors locked when you aredriving, remember that itmay be more difficult for those assisting you to gain access to thepassenger compartment in theevent of an emergency.1.12
FRONT DOORS (1/2)451236Opening the doors from theoutsideUnlock a door equipped with lock 2using the key.Vehicles with a remote controlPull handle 1.Opening from the insidePull handle 6 and open the door.Closing from the insidePull the door using only handle 5.Vehicles with a transmitter/receiverPress button 3 and pull handle 1.Closing from the outsidePush the door. Use the key in lock 2 tolock it, or use the remote control or thehands-free access transmitter/receiverby pressing button 3.As a safety precaution,the doors should only beopened or closed when thevehicle is stationary.1.13
FRONT DOORS (2/2)Manual lockingWith the door closed, lock the door bypressing button 4.NOTEThe front door mechanism cannotbe locked if the door is open.Lights-on reminder buzzerIf you have switched off the ignitionand left the lights switched on, a reminder buzzer will sound when a dooris opened.Driver’s responsibilitywhen parking or stoppingthe vehicleNever leave an animal,child or adult who is not self-sufficient alone on your vehicle, even fora short time.They may pose a risk to themselvesor to others by starting the engine,activating equipment such as theelectric windows or by locking thedoors.Also, in hot and/or sunny weather,please remember that the temperature inside the passenger compartment increases very quickly.RISK OF DEATH OR SERIOUSINJURY.1.14
SLIDING SIDE DOOR (1/2)Closing from the outside1Pull handle 1 and slide the door towards the front of the vehicle until itcloses completely. Lock with the key orusing the remote control.23Closing from the insidePull lever 2 towards the front and closethe door until it latches.Manual locking from insideLower button 3.Opening the doors from theoutsideUnlock the lock with the key or withthe remote control, if the vehicle isequipped with this function.Pull handle 1 towards you and slide thedoor towards the rear.Note: the transmitter/receiver does notwork on the sliding side door (no buttonon the handle).Opening from the insidePull lever 2 towards the rear and openthe sliding door until it locks into position.As a safety precaution,the doors should only beopened or closed when thevehicle is stationary.1.15
SLIDING SIDE DOOR (2/2)Recommendations concerning the sliding sidedoor.4Care must be taken whenopening or closing the sliding door,as is the case for any of the openingelements on the vehicle:– Check that the door will not comeinto contact with any person, partof the body, animal or object.– Only use the handles on theinside and outside of the door tooperate it.Child locksWith the door open, turn lever 4 andclose the door.This means that the door is then lockedfrom the inside.The door can only be opened from theoutside of the vehicle.1.16– Take care when opening andclosing the door.– Take particular care when the vehicle is parked on a slope: openor close the door fully until itlatches into its locking position.– Before moving off, always ensurethat the sliding door is properlyclosed.
REAR DOORS (1/2)5214173Opening the doors from theoutsideUnlock lock 1 using the key or, onequipped vehicles, use the remote control or the hands-free access remotecontrol by pressing button 3. Pullhandle 2 towards you and open thedoor.Do not leave the hingedrear doors open in case ofstrong winds. Risk of injury.6Lower lever 4 to open the door.Opening the doors to 180 Open the door, but not fully.Remove tie rod 7 from its housing 5.Lock the tie rod on the hook 6.Open the door as far as possible.If the vehicle is parked onthe hard shoulder with tailgate open, the rear lightsmay be obscured. Youshould make other road users awareof your vehicle by using a warningtriangle or other equipment specified by the road traffic regulations ofthe country you are driving in.For your safety, check thatall the vehicle’s doors areproperly closed beforestarting the engine.1.17
REAR DOORS (2/2)9678A10BABOpening the doors to 270 Opening from the insideClosing from the insideRemove the check-strap from its housing as when opening to 180 . Openthe door fully until the magnets 6 makecontact.Lower lever 7 and push door A.Partially close door B, then slam it shut.Pull lever 8 and open door B.Do the same with door A usinghandle 9.Locking/unlockingClosing from the outsideTurn button 10.Partially close the left-hand door, thenslam it shut.Then repeat this with the right-handdoor.Lock.1.18For your safety, check thatall the vehicle’s doors areproperly closed beforestarting the engine.
STEERING WHEEL/POWER-ASSISTED STEERINGPower-assisted steeringWith the engine running, do not leavethe steering wheel at full lock while stationary as this may damage the powerassisted steering pump.1Steering wheel heightadjustmentPull lever 1 and move the steeringwheel to the required position.Then, push the lever back fully, beyondthe point of resistance to lock the steering wheel.Make sure that the steering wheel iscorrectly locked.For safety reasons, onlyadjust the steering wheelwhen the vehicle is stationary.With the engine switched off, or ifthere is a system fault, it is still possible to turn the steering wheel. Theforce required will be greater.Never switch off the ignition when travelling downhill, and avoid doing so innormal driving (assistanceis not provided).1.19
HEADRESTS1AB2To raise the headrestTo refit the headrestSimply slide it up.Insert the rods into the holes, with thenotches to the front, and lower theheadrest to the desired height by pressing tab 1.To lower the headrestPress tab 1 and lower it at the sametime.To remove the headrestRaise the headrest then press tabs 1and 2 to release it.1.20Adjusting the angle of theheadrest(depending on the vehicle)Move section B towards or away fromyou to the required position.The headrest is an important safety component:ensure that it is in place andin the correct position. Thedistance between your head and theheadrest and the distance betweenthe head and section A should beas small as possible.
FRONT SEATS (1/3)Heated seats(depending on the vehicle)With the ignition on, press switch 5.The integrated indicator comes on.341A2Adjusting seat ATo move forwards or backwardsLift handle 1 to release. Release thehandle once the seat is in the correctposition and ensure that the seat islocked.To adjust the height of the seat baseLower or pull lever 2 as many times asis necessary to raise or lower the seatbase.5The system, which has a thermostat,decides whether or not the heating isneeded.Lumbar adjustment(depending on the vehicle)Turn control knob 3 to increase or decrease support.To tilt the seatbackMove lever 4.For safety reasons, carryout any adjustments whenthe vehicle is not beingdriven.We would advise you not to reclinethe seatbacks too far to ensure thatthe effectiveness of the seat belts isnot reduced.Nothing should be placed on thefloor (area in front of driver) as suchobjects may slide under the pedalduring braking manoeuvres, thusobstructing its use.1.21
FRONT SEATS (2/3)Heated seats(depending on the vehicle)With the ignition on, press switch 8.The integrated indicator comes on.7The system, which has a thermostat,decides whether or not the heating isneeded.B61110981213Adjusting seat B withsuspensionLumbar adjustmentTo move forwards or backwardsLift handle 11 to release. Release thehandle once the seat is in the correctposition and ensure that the seat islocked.Press switch 13 to make it less firm.To tilt the seatbackLower or pull control 7 towards you.To adjust the height of the seat baseMove control 9 to adjust the rear of theseat base or control 10 to adjust thefront of the seat base.1.22Activate bulb 12 to make it firmer.To adjust the seat suspensionTurn control knob 6 to the right to stiffenthe suspension and to the left to reduceit.
FRONT SEATS (3/3)To pivot the seats1914C1615Adjusting pivoting seats CTo move the seat forwards or backMove handle 15 to unlock it. Releasethe handle once the seat is in the correct position and ensure that the seatis locked.To move the seat forwards or backLift handle 18 to move the seat baseforwards or back.1817222120Adjusting the angle of the seat baseMove handle 16 to adjust the angle ofthe seat base.Adjusting the height of the armrestsTurn control knob 17 or 19.– Detach the seat belt buckle from itsunit;– raise the armrests;– move the seat as far back as possible;– adjust the seat base to its lowest position;– adjust the seatback to the verticalposition;– open the door;– lift handle 20 and pivot the seat tounlock it from its “forward-facing” position, then release handle 20.Returning to the driving position– Pivot the seat to the “forward facing”position;– make sure the seat is correctlylocked in position;– adjust the seat to your driving position.Lumbar adjustmentActivate bulb 22 to make it firmer.Press switch 21 to make it less firm.To tilt the seatbackLower or pull handle 14 towards you.ning.The “rear facing” seat position should only be usedwhen the vehicle is stationary and the engine not run-1.23
SEAT BELTS (1/3)Always wear your seat belt when travelling in your vehicle. You must alsocomply with the legislation of the particular country you are in.Before starting, first adjust your driving position, then ask all occupantsto adjust their seat belts to ensureoptimum protection.Adjusting your drivingpositionSeat belts which are incorrectly adjusted or twistedmay cause injuries in theevent of an accident.Use one seat belt per person,whether child or adult.Even pregnant women should weara seat belt. In this case, ensure thatthe lap belt is not exerting too muchpressure on the abdomen, but donot allow any slack.1.24– Sit well back in your seat (havingremoved your coat or jacket etc.).This is essential to ensure your backis positioned correctly;– adjust the distance between theseat and the pedals. Your seatshould be as far back as possiblewhile still allowing you to fully depress the clutch pedal. The seatbackshould be adjusted so that your armsare slightly bent when you hold thesteering wheel;– adjust the position of your headrest. For maximum safety, your headmust be as close as possible to theheadrest;– adjust the height of the seat. Thisadjustment allows you to select theseat position which offers you thebest possible view.– adjust the position of the steeringwheel.12Adjusting the seat beltsSit with your back firmly against theseatback.Shoulder strap 1 should be as close aspossible to the base of the neck but noton it.Lap belt 2 should be worn flat over thethighs and against the pelvis.The belt should be worn so that it isas close as possible to your body, i.e.:avoid wearing heavy clothing or keeping bulky objects under the belts, etc.
SEAT BELTS (2/3)671
3 Key for ignition switch, doors and fuel filler cap. 4 Locking/unlocking the luggage com-partment and, depending on the ve-hicle, the sliding side doors. Radio frequency remote control A 1 Locking all the opening elements. 2 Unlocking all the opening elements. 3 Key for ignition switch, doors and fuel filler