Transcription
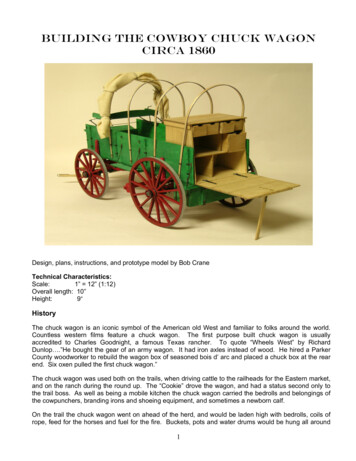
BUILDING THE COWBOY CHUCK WAGONCIRCA 1860Design, plans, instructions, and prototype model by Bob CraneTechnical Characteristics:Scale:1” 12” (1:12)Overall length: 10”Height:9”HistoryThe chuck wagon is an iconic symbol of the American old West and familiar to folks around the world.Countless western films feature a chuck wagon. The first purpose built chuck wagon is usuallyaccredited to Charles Goodnight, a famous Texas rancher. To quote “Wheels West” by RichardDunlop .”He bought the gear of an army wagon. It had iron axles instead of wood. He hired a ParkerCounty woodworker to rebuild the wagon box of seasoned bois d’ arc and placed a chuck box at the rearend. Six oxen pulled the first chuck wagon.”The chuck wagon was used both on the trails, when driving cattle to the railheads for the Eastern market,and on the ranch during the round up. The “Cookie” drove the wagon, and had a status second only tothe trail boss. As well as being a mobile kitchen the chuck wagon carried the bedrolls and belongings ofthe cowpunchers, branding irons and shoeing equipment, and sometimes a newborn calf.On the trail the chuck wagon went on ahead of the herd, and would be laden high with bedrolls, coils ofrope, feed for the horses and fuel for the fire. Buckets, pots and water drums would be hung all around1
the rear, and a water barrel might be lashed to the side. Often a cowhide would be stretched acrossbetween the wheels under the wagon box and this “possum belly” was used to stow wood and/or cowchips, picked up on the trail for fuel.Before you BeginThe model kit was designed to be as faithful to historical chuck wagon construction and detailing asreasonably possible. Research revealed a wealth of detail from reliable sources including plans drawnfrom an actual historical wagon. Nearly all wooden parts are laser cut in basswood leaving very few partsto be made from strip wood. There was a great deal of hand forged ironwork on these wagons which in amodel might be beyond the ability of all but experienced modelers to create. We have reproduced thisironwork in the form of photo-etched brass requiring only some shaping to add these essential details tothe model. While it is possible to build the model omitting many of these details, we encourage you toinclude them resulting in a model that is as close to an historical wagon as possible. The results will berewarding. The comments that follow are addressed to model making practices in general and may notapply to this particular model.1. The PlansSix plan sheets are provided. Many drawings on the plans are done in an isometric formatillustrating the construction sequence and identifying the parts and their placement. Note that sheet 6 isfor parts identification only and is not to scale.2. Making Allowances Along the WayTry to be exact when following the plans and instructions, but use common sense. Adjustments maybe necessary to compensate for small differences in how your model is shaping up. Perhaps a bit ofshaving here, a little shim there, a little filler there, etc., will alleviate any annoyances. Use logic and donot fret over exactness. An old saying in the building craft is that “if it looks right, it is right.”3. Kit LumberStrips, laser cut sheets of basswood and plywood, are supplied in the kit. The laser cut boards arelabeled CKW-1 through CKW-11. Sorting the wood in the kit by dimension will save time. After selectingand cutting what you need, return the remaining stock to the proper dimension pile. Don’t worry aboutusing a piece for one item intended for another. Model Trailways supplies enough extra wood tocomplete the model before running out.4. Working with BrassThere are many photo-etched brass parts in the kit which represent the forged iron parts on the realwagon. Many of these parts require bending to shape. For your convenience the bend lines have beenetched into the parts. The line is etched halfway through the brass making it easy to bend the part. Use apair of needle nose pliers to make the bends. Study the plans and figures to understand which way thebend goes for each part. Some parts have left and right configurations which require bends in oppositefashion. An identifier sheet is included showing the part numbers of the photo-etched parts. Brass partsare given identifying numbers as B1, B2, B3, etc. Brass kit parts represent the many forged ironworkparts that were used to build the original wagons. The iron parts were typically painted black. To blackenphoto-etched brass there are products on the market formulated to chemically blacken the brass. Onesuch product is BLACKEN-IT. It is available at hobby stores and can be ordered from Model Expo. TheModel Expo part no. is AW2. It is important that the brass parts to be blackened are clean. It is best towash the parts in a solvent such as Acetone or Lacquer Thinner and handle only with tweezers beforeimmersing in the blackening solution. Follow the directions on the bottle. Brass can also be blackenedwith markers such as the Sharpie brand. Markers leave a slight sheen on the parts which can beremoved with an overspray of Testors Dullcote.2
GluesWhite or woodworker’s glue in yellow or tan will suffice for most of the model. Five-minute epoxyprovides extra strength for some cases. Super glues, such as Jet, Flash, or Zap, produce quick adhesion.For most applications, the medium viscosity, gap-filling variety is best. For some applications the gel typeworks best. The thin type is recommended for filling a narrow crack and wicking into laminate joints. Theprototype model was built using tan woodworkers glue, gel type CA and an occasional use of epoxy andthin CA.A word about gluing laser cut parts. Laser cutting burns through the wood and leaves a charredsurface. This charred surface does not make good glue joints. It is recommended to lightly sand orscrape away the loose char before gluing. It is not necessary to remove all the char, just what comes offwith light sanding or scraping. In most cases simply scraping with a no.11 blade is sufficient.ClampsClamps are an essential part of the model building experience. In the full size building arena it is oftensaid, “A builder cannot have too many clamps.” This is true of model building also. There are so manysituations in the course of building a model that require a particular type of clamp. The photo belowshows a typical collection of clamps that are useful in model building. Fortunately very few clamps werenecessary in the course of building the prototype model.Painting the ModelBeginning this manual with directions on applying finishes may seem strange. Not so! Much time andeffort can be saved and more professional results obtained if the finishing process is carried onthroughout construction. Proper timing in applying finishes and using masking tape to define paintededges should eliminate unsightly glue marks and splotchy, stained surfaces. Many parts in the kit canand should be pre-finished before assembly. This is much easier to do before assembly than after.If you are not in a hurry to begin construction, think through what kind of finish you like, what partsare going to be exposed, etc. Research revealed that a most common paint scheme for chuck wagonswas red and green, red wheels and undercarriage and green wagon box. Iron work was painted black.The prototype model was finished in this manner. The paint was thinned to the consistency of a wash togive a weathered, faded, look to the finish. Another possibility is to not paint at all but stain the wood as ifweathered wood. The choice is yours. We will address the finishing of individual parts as we proceedthrough the construction sequence. Take advantage of these general suggestions:Choosing paint: Glossy surfaces are not desirable on models. A flat finish or one with a slight sheen isbest, because it doesn’t reflect daylight or artificial lights. Consequently, details show up better. However,the undercoat or primer should be dead flat. A primer gives the surface a little tooth and helps top coatsadhere better. A quick finish procedure for basswood parts is to spray them where possible with commonaerosol primers, then steel wool with 0000 steel wool, this fills and smoothes the surface for painting.3
Any of the hobby paints are satisfactory such as Model Shipways, Testors, Humbrol, and Tamiya. JoSonja artists’ paints (used by bird carvers) are also acceptable. They are a combination acrylic-gouacheand dry dead flat. Hobby paints have a variety of reflectance levels from flat to gloss. When using amixed group of reflectance levels, finish the completed model with a flat, clear coat. It also providesdurability and seals any decals or dry transfer lettering.Brush painting: Painting with fine, soft bristle brushes is probably best for the beginner. Many skilledmodel makers prefer the brushed-on technique, because its subtle imperfections impart a more lifelikeappearance to the model. Brushes must be soft and of the highest quality. Artist grade sable orsynthetics are the best. Use wider brushes for painting broad surfaces. If too narrow, the bristles willcause excessive streaking. When applying paint or stain with a brush, lay down one thin coat in a singlestroke, then move to an adjacent area and coat it with a single stroke. Never go back over fresh paint.That will tear up the surface. Wait until it has dried to a hard finish before applying a second coat.Spray painting: Although slightly expensive, a Paasche, Badger, Testors, Revell-Monogram, or similarairbrush will produce a first-rate job and is worth the investment. Airbrushes are either single action(trigger controls only airflow) or double action (trigger controls air and paint) and easy to use. Spraypatterns can vary from thin to about 1/2" wide by either adjusting the needle or installing a different,sealed nozzle. In some brands, paint travels through the airbrush body to the needle. These requiredisassembling to clean. Other designs bypass the body and bring paint directly to the nozzle. Theseclean by simply spraying solvent through them.Paints are either water (acrylic) or solvent based. Solvent-based paints spray best. Acrylics aredifficult to spray and must definitely be used with the manufacturer’s special thinner.Thinning water-based paints with water creates surface tension problems, resulting in poor coverageand spray atomization. If a manufacturer's thinner is not available, alcohol can be used as a substitute.Experiment when using acrylics as some modelers have success and others don’t. When using solventbased paints, work outdoors or equip your shop with a spray booth. These fumes are toxic.Many brands of aerosol paints produce good results. However, test them on scrap wood beforespraying the model. Aerosols put out a lot more paint than an airbrush, so be careful to avoid runs. Sprayon several light coats. A tip from the automotive industry is to heat the spray cans a bit which increasesthe internal pressure and produces a finer spray. Heat only in hot water from your household sink; doNOT use a flame of any kind or boiling water.Most paint manufacturers have special thinners for their various paint lines. Follow eachmanufacturer’s recommendations. Mixing brands is not a good idea, because they may not becompatible. Sometimes, however, no other option exists. If so, apply each brand separately and allow tothoroughly dry before adding the next. Always test to make sure the final flat or gloss finish is compatiblewith the paint it will cover.Masking surfaces: Masking can be a tricky process. Some brands of masking tape are worthless formodel work, because they allow paint to seep underneath their edges. For masking fine stripes or straightand curved lines, use a graphic arts tape such as Chart Pak. It comes in widths as fine as 1/64". ChartPak tapes have superb adhesion and won’t bleed when firmly applied (burnishing is recommended).Scotch Removable Magic Tape is also excellent. Scotch tape has the same, low stick adhesive as itsfamous Post-It pads. In fact, Post-It tape flags can be used for masking.Building the UndercarriageIMPORTANT: Before beginning construction check the fit of the axle spindles with the wheel hubs. Fileoff any casting flash first if the hubs do not fit freely on the spindles; work the spindles down with a fileuntil the fit is satisfied. It is important to do this now as it would be very difficult to do after construction.In the days of the chuck wagon era bolt heads and nuts were square. This was especially true in thecoach; wagon, carriage, and farm implement industries. Square head bolts and nuts at our model scaleare not available and are very expensive to manufacture in small quantities.4
We have solved the problem for the kit by using rod material to simulate bolts and providing laser cutsquare nuts. The nuts are cut from a homogeneous tough material and can be readily glued in place.These are found on laser cut sheet CKW-11. Once painted this combination of rod and nut representscale bolted connections very well. Four nut sizes are provided, Two scaled to fit a simulated bolt madefrom 1/32 diameter rod and 1/16 dia. rod, one scaled to fit the axle clips and one to represent the axlenuts which retain the wheels.The undercarriage of a chuck wagon is a curious structure that was probably developed overhundreds of years of wagon building. The front wheels and rear wheels are attached to structures calledrespectively front hounds and rear hounds. Each of these structures resembles a two wheeled cart.They are connected together with a pole called the coupling pole. Each is pinned to the coupling polewith a heavy bolt. It is thought that this design evolved to be sturdy and flexible to take the punishment oftravel over rough terrain. Study the plans to familiarize yourself as to how the parts of the undercarriagego together. Refer to Detail 1-1 and 1-2 and familiarize yourself with the names of the parts.Building the Rear CarriageNOTE: There are many laser cut holes in the wooden parts in this model. In some cases the center ofthe hole does not freely drop out of the part. It is a good idea before working with these parts to punchout the centers with an appropriate piece of rod. It is much easier to do so now rather than later.Rear axle and axle bed: Refer to Detail 1-3. Locate axle bed parts 1, 2, and 3. It is a good idea tolightly number these parts with a soft pencil as they are removed from the laser cut boards so as to avoidany confusion during assembly. Laminate these parts as shown. Sand away the laser char and lightlychamfer corners. Carve and clean up the slots as shown. Test fit part 17, rear hound in the slots. Adjustif necessary. The rear axle is a Britannia metal casting. Fit the axle bed to the axle and glue the axle tothe bed as shown making sure the axle is properly centered on the axle bed. Epoxy glue isrecommended for this.Rear body bolster: Refer to Detail 1-4. Locate parts 4, 5 and 6. Laminate these parts as shown, cleanup, chamfer, and carve the slots as before. Test fit part 17, rear hound in the slots. Adjust if necessary.Front axle and axle bed: Refer to Detail 1-5. Locate parts 12, 13, and 14. Assemble as shown, cleanup, chamfer, and carve the slots as before. Test fit part 24, front hounds in the slots. Adjust if necessary.The front axle is a Britannia metal casting. Fit the axle bed to the axle and glue the axle to the bed asshown making sure the axle is properly centered on the axle bed. Epoxy glue is recommended for this.Drill through the bed and metal axle as shown with a #51 bit. This hole is for the king pin, which is a 1/16dia. rod. Test the fit of the rod and adjust if necessary.Front sand bolster: Refer to Detail 1-6. Locate parts 9, 10, and 11. Assemble as shown, clean up,chamfer, and carve the slots as before. Test fit part 24, front hounds in the slots. Adjust if necessary.Brass part B5 fits to the top of the sand bolster as shown. This may be done now or later.Front body bolster:chamfer.Refer to Detail 1-7. Locate parts 7 and 8. Assemble as shown, clean up, andNOTE: With these carriage parts completed, you may want to consider painting or otherwise finishingthese parts now. It is easier to finish them in the unassembled state. Do not paint gluing surfaces.Rear hounds and coupling pole: Refer to Detail 1-8. Locate parts 16 and 17. Use the pattern sheetsupplied to assemble and glue two parts 17 to part 16 as shown. Align parts 17 with the laser etchedlines on part 16.Rear axle and brake hanger beam: Refer to Detail 1-9. Fit the hounds and pole to the rear axle. Useparts B2 temporarily to position the hounds on the axle beam. When fitted, glue the assembly together.5
Add two axle clips B1 and clip plates B8 as shown. These parts may be glued to the axle and beam, butdo not add square nuts at this time. Locate part 18, brake hanger beam and glue in place. Secure withparts B3R and B3L. Square nuts may be applied to these. Parts B9 may be added at this time. Gluethese parts to the assembly making sure the bolt holes line up.Rear bolster: Refer to Detail 1-10. Dry fit the bolster and parts B2R and B2L. Mark the locations of thebrass across the top of the bolster. Remove the brass and carve a slot for the brass as shown so thebrass fits flush with the top of the bolster. Glue the rear bolster in place and secure with parts B2R andB2L. Add parts B8 but do not apply square nuts at this time.Add the ironwork: Refer to Detail 1-11. Prepare the tie rods and hound braces, parts B6 and B7 bybending to shape. Apply as shown. Note that 1/32 dia. rod is required at six places All square nuts maybe now added. Carve the tenon on parts 15 to a 1/8” width and install as shown. Shape and install partB23.Brake mechanism: Study Detail 1-12 and 1-13. Make up the brake crank assembly, the brake beamhanger, and the brake lever assembly as shown. These parts are also shown on the pattern sheet.Anneal the brass rod before bending up the beam hanger. It is important to maintain the correct length ofthe hanger’s legs. If you are not comfortable with soldering, use epoxy glue. Assemble the brake crankto the rear axle as shown with two parts B11. Glue up the brake beam parts 19 and 20 and B17. Drill anappropriate size hole in the center of the aft face of part 19 for part B17. Note that the brake shoes, parts20 are not symmetric. Refer to the end view shown for the correct orientation. Attach the brake beamhanger to part 18 with two parts B10. Connect the brake crank to the brake beam with part B18 using00-90 bolts. When working with these very small bolts, it is useful to make yourself a nut starter. Attacha small piece of double sided tape to the end of a small dowel, and then stick the nut to the tape. It isalso a good idea to spread a soft cloth under your work area to catch any wayward nuts and bolts. Oneextra set of nut and bolt is included in your kit for just such a mishap. Connect the brake crank assemblyto part B15 with 00-90 bolts. It is best to do this now as it would be difficult to connect these parts afterthe wagon box is installed. Do not attach the brake lever assembly at this time. It will be connected afterthe wagon box is installed and will attach to the underside of the wagon box later.Building the Fore CarriageFore hounds and drop tongue: Study Detail 2-1 and Detail 2-2. Glue up the drop tongue, parts 21, 22,and 23 using the full size plan view in Detail 2-3 or on the pattern sheet. Note: Part 21 is a stub tongue;a usual arrangement for models. If you wish a full length tongue this detail is included on plan sheet 2.Materials are not supplied for this. Assemble drill jig parts J1, and J2 as in Detail 2-4. Refer to Detail 2-5.Clamp the jig and the fore hounds to a surface and carefully drill through the hound with a #51 bit.Reverse the process and drill through the other side. Position the drop tongue in place, clamp and drillthrough as shown. If your drill is not long enough, drill through the other side. Cut 1/16 dia. brass rod tothe correct length for the cross bolt and temporarily fit in place. Brass part B22 can be added to the droptongue now or later.Remove the cross bolt and drop tongue. Refer to Detail 2-6. Apply 4 axle clips, parts B1 and B8 asshown. Square nuts may be applied to the center two axle clips but do not apply square nuts to the outertwo clips at this time. Glue the fore hounds to the front axle using parts B4 to locate the hounds withrespect to the axle. Refer to Detail 2-7. Glue the sand bolster in place and secure with two parts B4.Refer to Detail 2-2 as well, form the ironwork parts B19L, B19R, B21L, and B21R to shape and fit toposition. Prepare six simulated bolts from 1/32 dia. rod as shown. Assemble the iron work parts asshown. All square nuts may now be applied. The drop tongue and cross bolt may now be put in placepermanently.Double tree and single trees: Refer to Detail 2-8. Locate double tree part 27 and brass parts B24 andB26. Shape parts B26 as shown and glue in place. Use brass pins to align parts B26 to the double tree.6
If desired, added realism can be had by permanently adding blackened brass pins to all holes. Glue inplace and snip off on the bottom side. Add part B24 as shown. Assemble the single trees from parts 28,and parts B25 and B27. Connect the single trees to the double tree with split rings as shown. It wascommon practice with wagons of this type to have a double tree pin that also served as a hammer. Makeup the double tree pin from part 29 and 1/16” dia. brass rod. Connect the double tree to the drop tongue.Connect the double tree to the axle with slack black chain and split rings as shown in Detail 2-9.Finishing the undercarriage: Refer to Detail 1-10. Complete the body bolster as shown. Carve a 1/16”tenon on two parts 15 and glue in place. Cut a piece of 1/16” dia. rod to length for the kingbolt. Thekingbolt true length is shown in Detail 1-11. Test fit the rear and fore carriages and connect with the kingbolt. Make adjustments if necessary. Note that the front body bolster rotates relative to the fore carriage.The bolster will be glued to the wagon box later. Do not permanently install the king bolt or apply squarenuts at this time, this will come later.Photo 1: the completed undercarriageBuilding the Wagon BoxWagon box bottom: Study Detail 3-4 and 3-5. Locate the bottom parts as shown in Detail 3-5, parts 33,34, 35, 36, 41, and 42. Layout the floor boards as shown and glue the sills, 41 and 42 to the boards.Ensure that the hole in part 41 lines up with the hole in part 37. The crossbeams, middle and rear requirea 3/64 dia. hole as shown. It is best to drill these now before assembly. Glue the beams to the floorboards.Wagon box sides: Layout the wagon side parts 38 and 39 as shown in Detail 3-6. Use brass pins toalign parts 40 and glue parts 40 to the sides, both part 38 and 39. Parts 40, called “straps”, were boltedor riveted to the top side board and the straps inserted into the staples on the lower side board. Thus thetop side board was removable. For model purposes it is best to glue the straps to both side boards.Note: There are many places on the Chuck Wagon where holes are provided where bolts, rivets or nailswould have been. Added realism can be gained by using blackened brass pins at these locations. Forexample the straps can be pinned as in Detail 3-5. Push the pins through the strap and side. On theinside snip off the pins a bit proud of the surface and use an ultra fine marker to draw a line around thenail protrusion. This resembles a washer and rivet.Add the 8 parts B33 as shown. These staples are designed to push through the sides and then theprotrusion be bent over to secure it in place. Install 8 parts B32 temporarily using a bow end for proper7
spacing as shown in Detail 3-6. The bows are found on laser cut sheet CKW 10. Drill and install the tworingbolts in the locations shown in Detail 3-1.On the inside of the box side glue on the 1/16” square strips using the laser etched guide lines. UseDetail 3-2 to mark the locations of the 4 parts B34 and install.Front boards and foot rest: Refer to Detail 3-8. Layout parts 30 and 31 and glue together with two1/16” x 3/16” strips as shown. Position these strips about 3/8” from the edge as shown. Bend part B34to the approximate angle shown in Detail 3-2 or on the pattern sheet and apply in the approximateposition shown. Fit and glue part 32, foot rest to parts B34. Bend and fit parts B35 as shown.Assembling the wagon box: Refer to Details 3-9 and 3-10. Glue the front board and backstop, part44, in place as shown. Glue to the other side and ensure the structure is square while the glue dries.Prepare two tie rods of 1/32” dia. rod and install as shown. Refer to Detail 3-11. Glue the bottom to thesides. Glue the front bolster to the fore sill as shown. Ensure that the king pin holes are aligned and thebolster is squared. Glue parts 43 in place on the cross beams, aligning the holes. Shape part B30 andinstall as shown with square nuts. Shape parts B31 and install.Seat assembly: Refer to Detail 3-12. Assemble the seat parts as shown. Locate parts 45approximately 15/16” from the front edge of the sides and glue. This is also shown in Detail 3-10. Gluethe parts 46 to the seat spring castings. Use the side view on the pattern sheet to center these parts onthe springs. Glue the seat assembly to parts 46. The seat spring castings are somewhat fragile as theywere mastered to scale and the Britannia metal is a bit soft. Treat them gently. It is best to leave thefinal installation of the seat and springs as a final step to avoid distorting them as you work on the model.Assembling the pan box: Refer to Detail 3-13. Assemble part 50, bottom, to part 51 back. Note thatthe back sits on top of the bottom. Ensure the parts are square. Add the ends, parts 52 as shown.Shape parts B37 and apply. Apply the 1/16 x 3/16 verticals to the pan box flap, part 53. Prepare thesmall pads and glue to the top of the verticals. Parts B38 may now be applied.Make up the hinges as shown in Detail 3-14. Begin by starting the bend in the tangs using a piece of1/32 dia. rod as shown. Note the orientation of the half etched areas on parts B29 and B28. Remove therod and assemble part B28 to B29 and complete the bend of the tangs. Apply the hinges to the flap andthe flap to the pan box as shown. The pan box may now be glued to the wagon box. Drill through theslot in part B38 and into the rear cross beam for the eye bolts. Install the eye bolts. Make up two L pinsto secure the flap. Your Wagon box should now look like Detail 3-15 but without the seat and springs asin photo 2.Photo 2: the completed wagon box8
Building the Chuck BoxRefer to Detail 4-1. Assemble bottom part 55, and back part 56 assuring the assembly is square. Notethat the back locates on top of the bottom. Add the two sides, parts 57. Locate the bottom partition, part58 using the laser etched lines and glue in place. Add the middle shelf and middle partition, parts 59 and60. Add the top shelf, part 61 and the partitions, parts 62. Assemble the four drawers as shown in Detail4-1 and check for proper fit in the chuck box. Add the 1/16” x 1/4” strips and then the top. Center the topon the structure.Make up the box flap as shown, parts 64 and 65. Add the 1/16” x 1/4” strips. Use the full size propdrawing to size the flap prop. Make up the three hinges and attach as shown. Place the chuck box in thewagon box. The chuck box flap was secured in the closed position by an iron rod as shown. Make therod from 1/32” dia. brass and square nuts. If you want your flap to open apply a square nut to one endonly.Assemble the WagonInsert the king bolt in the undercarriage connecting the rear undercarriage to the fore undercarriage.Carefully pass the brake pushrod, part B15 behind the two water barrel braces, part B30. Lower thewagon box onto the king bolt and seat the wagon box in place. You may want to glue the wagon box tothe rear undercarriage although this was not done on real wagons. Apply square nuts to the king pin.Connect the brake lever to the pushrod, part B15 with a 00-90 bolt and nut. Turn the assembly over andglue the brake lever assembly in place. Part B39 may now be installed.Building the WheelsRefer to the wheel building sequence on the plan sheet titled Chuck Wagon wheel construction. Get outthe wheels and wheel assembly jig from the plywood sheet CKW1. As before noted do not try to punchthese parts out of the sheet but cut where necessary from the back side until the wheels are easilyremoved. First it is necessary to add spacer blocks to both sides of the jig as shown.Cut out the paper wheel and spoke patterns from the pattern sheet. Carefully cut out the center holes.Glue one pattern to each side of the jig using a wheel hub to center and align the pattern with the centerhole. Note that the outboard end of the hub goes down. The outboard end is the end with the recess.Use only a few spots of carpenters glue or similar to avoid wrinkling and distorting the pattern.Locate a wheel on the pattern. You may clamp the wheel in place or better, drill for small brass nails tohold the wheel to the pattern. These holes may be filled later. Carve and sand the spokes to shape.Begin fitting spokes into the hub and securing them to hub and wheel with CA gel. Work across thewheel rather than inserting adjacent spokes. Constantly check to be sure the hub is squarely seated inthe center hole lest you end up with a wobbly wheel. Note the scrap 1/64” plywood or similar spacers ofapproximately 1/64” thickness. These center the spokes to the wheel. When all spokes have beeninstalled and the glue has set, remove the wheel from the jig.Finish paint each wheel and apply the tires. The tires are the laser cut strips found on CKW11. If youwish to have your tires exhibit a metallic hue, they can be pre-painted silver before removing then fromthe laser cut sheet. To
Sonja artists’ paints (used by bird carvers) are also acceptable. They are a combination acrylic-gouache and dry dead flat. Hobby paints have a variety of reflectance levels from flat to gloss. Whe