Transcription
RolandUnofficial User GuideIan Wilson1
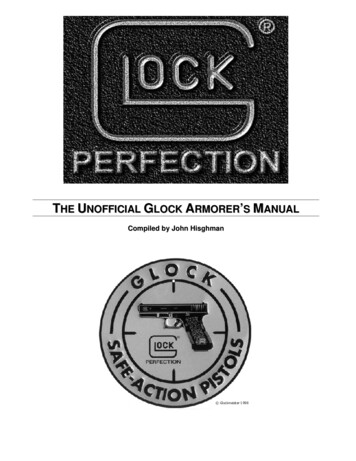
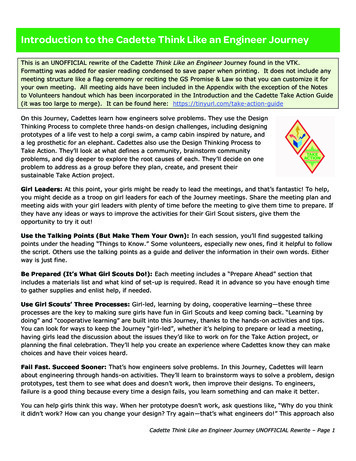
ACDEGFHIPOWER SwitchTurns on the unit’s power.A BBAfter you’ve made connections correctly, turn on thefirst and then the connected system. Poweringon in any other order could cause a malfunction or damage. When turning the power off, turn off theconnected system first and then the.The unit has a protection citcuit that causes a short delay between powering the unit on, and normaloperation of the unit.Lower the volume before turning the unit on or off. Even with the volume turned down, you may hearsound when switching the unit on/off. This is normal and does not indicate a malfunction.Micro-USB PortAllows you to connect the unit to an external power source or computer via a USB 2.0 (A-microB) cable.Use a commercially available USB 2.0 cable (A-microB) to connect this port to your computer. It can be used totransfer MIDI and audio data over USB. The USB driver needs to be installed when connecting theto yourcomputer, and can be downloaded from the Roland website. For details, refer to the Readme.htm file includedin the download from http://www.roland.com/support/.CVOLUME KnobAdjusts the output volume of the unit.DPHONES JackConnect headphones or equivalent monitoring equipment.EOUTPUT JackConnect an external amplifier, monitors, or mixer.FINPUT JackConnect an external audio device. Sound will be routed through the headphone and output jacks of theGMIDI Out JackConnect a 2ndunit to increase polyphony using Chain Mode.2.
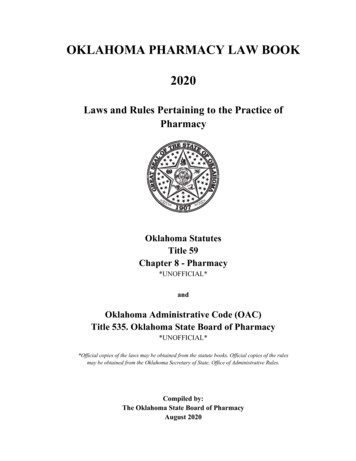
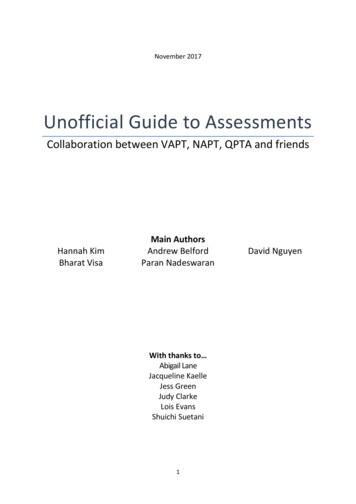
HMIDI In JackPlug in your external MIDI device (controller or keyboard) using a standard MIDI cable to control theIKensington LockStandard Kensington lock to secure the unit from theft.2a2b63478.5911Allows selection of patches and presets, along with programming the step sequencer and selecting othergeneral effects.The Default mode is when the unit is not in step sequencer mode.PATCH NUMBER [1] – [8]Loading a Stored patchYou can recall up to 64 stored patches using the patch numbers as a number pad. For example pressing [1]followed by [3] will recall patch number 13 into the unit’s memory. Likewise selecting [7] followed by [6] willrecall patch number 76. There are a total of 64 patches comprising numbers 11 thru 88.Saving the Current patchYou can save up to 64 patches using the patch numbers as a selection pad. An edited patch is indicated by a dotin the PATCH NUMBER display. To permanently save an edited patch, press and release one of the patch presetbuttons [1] to [8], and then hold down (long-press) a 2nd patch preset button [1] to [8]. For example to save thecurrent patch to slot 27, press and release [2] and then hold down [7] until the dot in the patch number displaydisappears - this confirms that saving is complete. There are 64 slots available to save custom patches 11 thru88. Note that saving a patch will overwrite the contents of the original.3
PATCH PRESET [1] – [8]The patch preset buttons [1] thru [8] allow you to store 8 of your favorite patches. For example instead ofrecalling patch number 37 by pressing patch number [3] followed by [7], you can simply save this to one of the 8patch preset buttons, and recall it later by selecting the same button. Additionally, the status of the DUAL1mode will also be saved so the patch preset button will recall a “patch preset” that is setup to play two patchessimultaneously.Loading a Stored presetPress one of the patch preset buttons [1] thru [8] to recall a favorite patch.Saving the Current presetPress-and-hold one of the patch preset buttons [1] thru [8] to save the current patch. Completion of the savewill be confirmed when the button flashes. Note that this will not save adjustments to the patches made while ina preset. For example if you select patch preset [1], which consists of patch numbers 34 and 72 in Dual Mode,and then change the filter or ADSR settings, these changes will not be included in the save. It saves thecombination of patches and the Dual Mode rather than the settings of each patch.1DUAL, UPPER/LOWERThehas the ability to play two patches simultaneously by using the DUAL button to select Dual Mode. Thiscauses both an “upper” and “lower” patch to play back in parallel – one to the left stereo channel, and a secondto the right stereo channel.In Dual Mode, pressing the UPPER/LOWER button will toggle between selection of upper and lower parts. If theUPPER/LOWER button is lit while in Dual Mode, selecting a patch using the patch number buttons will place itinto the lower part. If the UPPER/LOWER button is unlit while in Dual Mode, selecting a patch using the patchnumber buttons will place it into the upper part.MANUALPressing the MANUAL button will copy the physical settings of the buttons, knobs, sliders, and switches, to thecurrent patch. This allows the physical settings to be copied to the virtual memory so they are in sync and thesound of the patch represents the physical settings of the buttons.DUAL [14]Enters solo mode where playback is monophonic. Ie. Only a single note can sound at any given time.DUAL [15]Enters unison mode where all sounds are played in unison. Ie. All 4 notes of polyphony are played with one keypress.DUAL [16]Enters Polyphonic mode where up to 4 notes of polyphony can be played. Playing more than 4 notes results in“note stealing”, where each successive note above 4-note polyphony cuts off prior notes to maintain the 4-notemaximum.DUAL [4] thru [13]Shifts the keyboard range in steps of one octave from button [4] (-4) thru button [13] ( 5). The default of 0 is[8].4
DUAL C1Switches portamento on and off to create a smooth change in pitch between notes played.DUAL C2Adjusts the portamento time for the pitch change from 1 (slow) to 100 (fast). This affects how quickly the pitchchanges between note plays.MANUAL [1] [1] thru [16]Specifies the master tuning from [1] (433Hz) to [16] (448Hz). The default of 440Hz is [8].MANUAL [2] [1] thru [16]Specifies the MIDI receive/transmit channel 1 thru 16.MANUAL [3] [1], [2]Specifies the MIDI Clock source.[1] AUTO (default). This will synchronize the’s tempo to the external MIDI clock signal coming fromthe MIDI IN connector.[2] INTERNAL. This will cause theto operate at the tempo of the unit itself.MANUAL [4] [2] thru [13]Transpose the keyboard range up or down in semitones, where the default of 0 is [8].MANUAL [5] [1] thru [3]Adjusts the key velocity value that will be transmitted when playing the keyboard.[1] TOUCH. Transmits the actual keyboard velocity.[2] (64). Transmits a fixed velocity of 64 (half) regardless of the actual velocity.[3] (127). Transmits a fixed velocity of 127 (max) regardless of the actual velocity.MANUAL [6] [1] thru [3]Sets the velocity curve of the keyboard[1] LIGHT. Sets the keyboard to a light touch.[2] MEDIUM. Sets the keyboard to the standard touch.[3] HEAVY. Sets the keyboard to a heavy touch.MANUAL [7] [1], [2]Sets Auto Off.[1] OFF. Prevents the unit from powering down automatically.[2] 30 min. Causes the unit to turn off automatically after 30 minutes of inactivity. Auto Off will not occurwhile the unit is plugged in via USB.MANUAL [8] [1] thru [4]Specifies the length of inactivity before the LED demo turns on.[1] OFF. Prevents the unit from entering the LED demo.[2] 1 min. Causes the LED demo to engage after 1 minute.[3] 3 min. Causes the LED demo to engage after 3 minutes.[4] 10 min. Causes the LED demo to engage after 10 minutes.5
MANUAL [9] [1], [2]Sets Chain Mode on or off. Chain Mode can be used to increase polyphony by connecting moreunits viaMIDI cable.[1] OFF. Prevents communication with additionalunits.[2] ON. Allows additional polyphony with moreunits attached via MIDI cable. In this mode, the 5thand subsequent notes are passed through to additionalunits via MIDI out.MANUAL [10] [1] thru [16]Sets the ribbon controller note scale. The default is [1].MANUAL [11] [1], [2]Sets the modulation hold of the C2 ribbon controler.[1] HOLD OFF (default)This is like having a spring on the mod-wheel – the second you take your finger off it, the modulation effectjumps back down to zero.[2] HOLD ONThis forces the mod wheel to remain at the point you take your finger off it, which is like a standard modwheel without a spring.MANUAL [13] [1] thru [13], [16]Specifies the Pitch Bend range in semitones.[1] thru [12] 1 thru 12 semitones, with a default of [2][13] 2 Octaves[16] OFFMANUAL [14] [1] thru [16]Adjusts the delay level applied to the patch. [1] is no delay, and [2] thru [16] adjust it incrementally for a morepronounced effect.MANUAL [15] [1] thru [16]Adjusts the delay time applied to the patch in incremental adjustments of [1] thru [16]. Note that this delay timerefers to the length of time before the delay takes effect, not how long the delay effect is.MANUAL [16] [1] thru [16]Adjusts the delay feedback applied to the patch. [1] is no feedback, and [2] thru [16] adjust it incrementally for alonger delay.The step sequencer lets you input notes in up to 16 steps, and then play the notes back in a repeating loop. Thenumber of steps can be adjusted from 1 to 16, and a maximum of 16 individual patterns can be stored.Press both the DUAL and MANUAL buttons (SEQ) simultaneously to enter or exit step sequencer mode.Step Buttons [1] thru [16]In Step Sequencer mode, the PATCHNUMBER and PATCH PRESET buttonsrepresent the 16 steps of the6
sequencer. While in this mode, the following button press options are available:MANUALStarts and stops playback of the sequence.DUAL C1Sets the tempo of the playback sequence. Up on the C1 ribbon controller is faster and down is slower.[1] thru [16]These represent the 16 steps of the sequencer. Press one of the 16 buttons to toggle the step on (lit) or off(unlit). Lit steps will sound during sequence playback, while unlit steps will not.[1] thru [16] C1 (or a note on the keyboard)Assigns the note in the selected step. Hold down the step button and press a note on the keyboard, or usethe C1 ribbon controller to select a note.Step Button Next Step Button (eg. [1] [2])Enters a tie between the two step buttons.[1] thru [16] C2Adjusts the gate time of the selected step/note. This is the length of the note, where UP on the C2 ribboncontroller is longer, and DOWN is shorter.DUAL C2Adjusts the gate time of all steps in the sequence. This is the length of all notes in the sequence, where UPon the C2 ribbon controller is longer, and DOWN is shorter.DUAL [1] thru [16]Selects a stored sequencer pattern.DUAL [1] thru [16] (long press)Saves the current pattern to the button selected.MANUAL [1] [1] thru [16]Assigns the number of steps in the sequence (min 1, max 16).MANUAL [2] [4] thru [12]Sets the shuffle (default is 8). This plays the notes “out-of-time” or a little offbeat, the higher the number.MANUAL [3] [1] thru [4]Sets the scale (default is 2).MANUAL [15] [1] thru [7]Sets the step order, much like an arpeggiator. Choices are:1 Normal (default)2 Even/Odd reverse3 Odd Only4 Even Only5 Odd Only Even Only6 Even Only Odd Only7
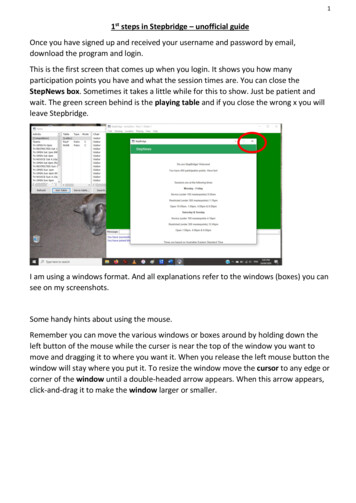
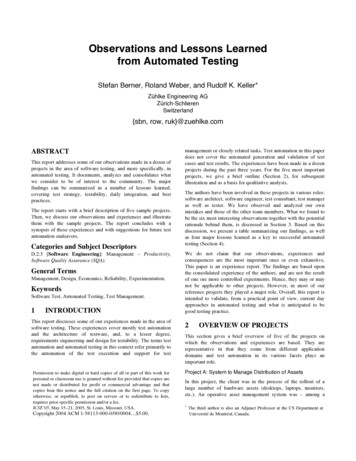
7 RandomMANUAL [16] [1] thru [2]Sets Off Step mode as follows:1 Rest (Default)2 Skip2a2b3This is a touch-type ribbon controller that emulates a pitch bend wheel. It will also play a preview sound whentheis not connected to a controller, and is also used to adjust settings in various modes.This is a touch-type ribbon controller that emulates a modulation wheel. It is also used to adjust settings invarious modes.The LFO section can be used to create cyclic changes (modulation) in the sound over time, by applying a LowFrequency Oscillator (LFO).RATE SliderThis determines the speed of the LFO, or how fast the cyclic changes take place.DELAY TIME SliderThis determines how long it takes before the LFO kicks in after playing the sound.WAVEFORM KnobThis selects the waveform used for the cyclic changes. The options for this are: SINE TRIANGLE SAWTOOTH SQUARE RANDOM (RND) NOISE4The VCO MOD section can be used to vary the sound by modulating the VCO (Voltage Controlled Oscillator).LFO MOD SliderAdjusts the depth by which LFO modulates the VCOENV MOD SliderAdjusts the depth by which ENV-1 modulates the VCOFREQ MOD SwitchThis selects the VCO that is modulated by the LFO MOD or ENV MOD sliders. The options are:1 VCO-12 VCO-21 2 Both VCO-1 and VCO-28
PULSE WIDTH MOD Slider SwitchThe slider has different effects depending on the 3 choices for the switch:LFO The slider adjusts the depth of the modulation from the LFOM (manual) The slider adjusts the size of the pulse-widthENV-1 The slider adjusts the depth of the modulation from ENV-15Here you can select the pitch of the sound, as well as the waveform that determines the timbre or “character”of the sound.CROSS MOD SliderThis modifies the frequency of VCO-1 according to the waveform that is set for VCO-2. Moving the slider upgives OSC-1 a more complex timbre and allows the creation of metallic sounds, noises, or effects.RANGE (64-2) KnobThis specifies the octave of VCO-1, with 64 being the lowest and 2 being the highest.WAVEFORM KnobThis selects the waveform used as the basis of the sound. The waveform options are: SINE TRIANGLE SAWTOOTH PULSE-WIDTH SQUARE WHITE NOISE LOW FREQSYNC SwitchThis switches ON or OFF the synchronization of VCO-2 and VCO-1, and is referred to oscillator sync. If set to ON,VCO-2 is reset to the start of its waveform cycle each time VCO-1 reaches the start if its waveform cycle. Nomatter what frequency VCO-2 is set to, it will always retrigger at the same frequency as VCO-1.TUNE KnobThis adjusts the frequency of VCO-2.SOURCE MIX KnobThis adjusts the output volume of VCO-1 and VCO-2 in relation to each other, like a “balance” setting. Turningthe knob anti-clockwise increases the volume of VCO-1, while turning it clockwise increases the volume of VCO2.6HPF is a High-Pass Filter that only allows higher frequencies to pass through to the output.CUTOFF SliderThis sets the cutoff frequency of the high-pass filter. Frequency bands below the cutoff are filtered out whilethose above are allowed to pass through, removing bass and giving the sound a “thinner” timbre.9
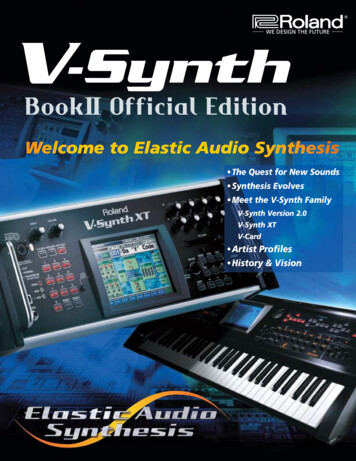
7VCF is a Low-Pass Filter that only allows lower frequencies to pass through to the output.CUTOFF SliderThis sets the cutoff frequency of the low-pass filter. Frequency bands above the cutoff are filtered out whilethose below are allowed to pass through, removing higher frequencies and giving the sound a mellower, subtle,or rounded timbre.RES SliderThis controls the resonance, which boosts the sound around the filter’s cutoff frequency. Higher resonanceprovides more emphasis to the frequencies around the filter cutoff frequency, producing more electronic orsynthesizer textures. To an extent, it also deemphasizes some of the lower frequencies in the sound.SLOPE SwitchThis selects the steepness or slope of the low-pass filter. The -24dB setting eliminates more of the highfrequencies than does the -12dB setting, often leading to a brighter sound at higher settings.LFO MOD SliderAdjusts the depth by which LFO modulates the cutoff frequency.ENV MOD SliderAdjusts the depth by which ENV controls the cutoff frequency.ENV-1/ENV-2 SwitchSelects which envelope (1 or 2) controls the cutoff frequency. If ENV-1 is selected then the ADSR (Attach, Decay,Sustain, and Release) settings of ENV-1 will control the cutoff frequency. Likewise if ENV-2 is selected then theADSR settings of ENV-2 will control the cutoff frequency.KEY FOLLOW SliderThis allows the cutoff frequency to be adjusted automatically depending on the notes you play. This is needed tocounteract some of the negative impacts that a filter can have on frequencies as you play up and down akeyboard. For example with a low-pass filter, the sound becomes more muted and less precise as you playhigher notes. To counteract this, moving the KEY FOLLOW slider upward will cause the cutoff frequency toincrease as you play progressively higher notes.8VCA is a Voltage Controlled Amplifier that allows you to adjust the volume of the patch, as well as themagnitude of the effect that the LFO has on the volume of the sound.LEVEL SliderThis adjusts the volume of the patch.LFO MOD SwitchAllows the for tremolo effects by having LFO to modulate the VCA volume, depending on the level selected –higher settings produce more pronounced tremolo effects.10
9This allows you to adjust how the sound changes over time using an ADSR (Attack, Decay, Sustain, and Release)envelope. It is important to note that this applies to both Amplitude (volume) and Filter Cutoff Frequency.A-SliderAttack Time. How quickly the envelope reaches the maximum value.D-SliderDecay Time. How quickly the envelope reaches the Sustain Level while a note is held down.S-SliderSustain Level. The level at which the sound will remain while a note is held down.R-SliderRelease Time. How quickly the envelope reaches minimum values after the note is released.ENVELOPE SwitchThis selects the polarity (direction) of the envelope.KEY FOLLOW SwitchThis selects the envelopes for which Key Follow is turned on, with options being: OFF ENV-1 ENV-2 ENV-1 ENV-2If Key Follow is turned on, the Attack, Decay, and Release of the envelope(s) become longer as you play lowernotes on the keyboard, and shorter as you play higher notes.Perform the following steps to return yourback to the default factory settings:1. Turn the POWER button [A] to ON while holding down the PATCH NUMBER [1] button.The MANUAL button should blink, indicating that the unit is ready to be reset. Simply turn the POWER button tothe OFF position if you choose to cancel the reset at this point, otherwise continue with step 3.2. Press the MANUAL button to perform the factory reset.3. When all buttons blink, switch the’s power button to OFF, and then back to ON again.The unit is now reset back to the default factory settings.11
To make a backup copy of yourdata, perform the following steps:1.2.3.4.5.6.Turn the POWER button [A] to ON while holding down the PATCH NUMBER [2] button.Connect theUSB port to your computer via USB cable.Once recognized, open the “” driver on your computer.Navigate to the “BACKUP” folder under the “” drive.Copy the backup files from this folder to your computer.When the copy has completed, safely eject the USB drive and disconnect the USB cable from the computer.Windows Right-Click on the “” icon in “My Computer” and execure “Eject”.Mac OSDrag the “” icon to the trash icon in the Dock.7. Turn the POWER button [A] to OFF.To restore a previos backup copy of yourdata, perform the following steps:1.2.3.4.5.6.Turn the POWER button [A] to ON while holding down the PATCH NUMBER [2] button.Connect theUSB port to your computer via USB cable.Once recognized, open the “” driver on your computer.Navigate to the computer folder containing your backed-updata.Copy thebackup files from this folder to the “RESTORE” folder on the “” drive.When the copy has completed, safely eject the USB drive and disconnect the USB cable from the computer.Windows Right-Click on the “” icon in “My Computer” and execure “Eject”.Mac OSDrag the “” icon to the trash icon in the Dock.7. Press the MANUAL button.8. After the LED’s have completely stopped blinking, turn the POWER button [A] to OFF.9. When you turn on the unit, the sounds will be restored.Maximum PolyphonyPower SupplyCurrent DrawDimensionsWeight (incl batteries)AccessoriesOptions4 VoicesUSB Power; 4xAA batteries500mA (USB Power)300 (W) x 128 (D) x 46 (H) mm / 11-13/16 (W) x 5-1/16 (D) x 1-13/16 (H) inches970g / 2lbs 3ozOwner’s Manual, “Using the Unit Safely” leaflet, 4xAA batteriesKeyboard Unit K-25m12
These represent the 16 steps of the sequencer. Press one of the 16 buttons to toggle the step on (lit) or off (unlit). Lit steps will sound during sequence playback, while unlit steps will not. [1] thru [16] C1 (or a note on the keyboard) Assigns the note in the selected step. Hold down