Transcription
EYOUNG MAKERS’ GUIDEthrough the peninsula of DIY-ingSAMPLUnleash the innovator in you as you explore:THE GATEWAY OF ELECTRONICSTHE LAND OF CODE-O-NUTSTHE ROBO RANGESwith the Starter Kit,the perfect companion for an adventure like this.
Starter Kitevive's Starter KitPLEBeginning the adventure in 3, 2, 1 Now!Copyright Agilo Research Pvt. Ltd., 2019SAMContact UsAgilo Research Pvt. Ltd.215, Sahajanand Arcade, Helmet CrossMemnagar, Ahmedabad, GujaratIndia – 380 052Email: contact@thestempedia.comwww.thestempedia.comAll rights reserved. No part of this publication can be reproduced, stored in a retrievalsystem, or transmitted in any form or by any means, electronics, mechanical,photocopying, recording or otherwise, without prior written permission of thepublisher. Some graphics are modified from content created by Freepik. All disputesare subject to the jurisdiction of competent courts in Ahmedabad, India.Due care and diligence has been taken while editing and printing the book. Neitherthe author nor Agilo Research hold any responsibility for any mistake that may havecrept in inadvertently.Please give your suggestions and feedback at contact@thestempedia.comSecond Edition 2019.Printed in India
132. Plug & Play4. The Signals City215. The Land ofCode-o-Nuts9. Space Ba le11. Joys ckControlled Robot73794610. The Robo Ranges5712. SmartphoneControlled Robot307. Beetle in a Maze40SA51256. Programmingwith PictoBloxM358. The Hungry Shark3. Museum of ElectronicsPL1610E1. Introduc on Content6213. Follow MeRobot6614. ObstacleAvoiding Robot8588whenclickedwhen evive starts up15. Pick & PlaceRobot16.Light TrackingRobot17. Explore More18. Appendix
Starter KitComponent List8 x Light Sensor [Photo-resistor]10 x Switch [Pushbutton]LEDs5 x Yellow LED, 5 x Green LED2 x Micro Servo MotorPL(Includes 3 servo horns andself-threading screws)2 x Capacitor [220 or 100 µF]ResistorsE5 x Blue LED, 5 x Red LED15 x 220 Ω Resistor, 10 x 1 kΩ Resistor10 x 4.7 kΩ Resistor, 15 x 10 kΩ ResistorM10 x 1 MΩ Resistor6 x Alligator ClipsSA1 x Joystick1 x Bluetooth ModuleJumper Wires20 x 20 cm Jumper Wire (Male-Male)20 x 20 cm Jumper Wire (Male-Female)20 x 20 cm Jumper Wire (Female-Female)1 x Distance Sensor [Ultrasonic Sensor]
Component List1 x Distance Sensor Holder2 x IR SensorE2 x Dual Shaft Motor (with 2 Brackets)PL2 x Wheel1 x Base Plate [Chassis]M1 x Base Servo Motor HolderSA1 x Servo Mounting Plate1 x Servo Motor Holder1 x Light Tracker Plate 11 x Light Tracker Plate 21 x Gripper Claw 11 x Gripper Claw 2
Starter Kit1 x Gripper Base Plate1 x Gripper Plate 11 x Gripper LinkNuts and BoltsPL6 x M2 bolts of 12 mm Length25 x M3 bolts of 8 mm Length10 x M3 bolts of 12 mm Length6 x M3 bolts of 25 mm Length4 x M4 bolts of 16mm Length6 x M2 Nut25 x M3 Nuts4 x M4 Lock NutsE1 x Gripper Plate 2Spacers [Standoff]M2 x 15mm M3 (Male to Female)5 x 20mm M3 (Female to Female)4 x 30mm M3 (Male to Female)SACable Ties1 x Castor Wheel1 x Screw Driver( & - Type)evive (Brain)Young Makers' Guide (Book)
Chapter 1PLDear Youngster,EIntroductionSAMToday, we live in a world full of electronic gadgets, robots, space missions, drones andwhat not. In a time when technology has taken root in every aspect of our lives, you,being the future, are destined to drive its progress.Every now and then you must have felt curious about how things work, inculcating inyou, a desire to innovate, stimulating your creative mind to come up with innovativeideas to solve everyday problems, to make your life simple and fun, like a fancy IronMan dream.But Iron Man didn't become a great innovator overnight; he started from scratch, fellin love with technology, and kept innovating. What if you could make such marvels foryourself, and grow to become the Iron Man?Sounds exciting, right? So what are you waiting for, start right away and Do-it-yourself!1
Starter KitThe All New 'Maker' CultureEInnovators, like you, who make exciting, out-of-the-box things are called makers.A maker is curious, loves technology, and is on a constant lookout for innovativesolutions to everyday problems. He ideates, creates, implements, and brings arevolution. When you become a maker, you become a very important contributor tohumanity’s technological progress.In this book, we’ll take you on an adventurous journey through the peninsula ofDIYing and help you become a maker by developing important skills in electronics,robotics, and programming: the important pillars of today’s technology.Once you finish making everything in this book, we'll honor you with the title'STEMpedia’s super-maker', because a maker today, a revolutionist tomorrow!How Will This Help Me?PLThis book will take you through a series of exciting projects - from making animatedgames to beautiful art, from making fun electronic projects to complex robots. Theskills you will develop while making them will help you interact with and controlthings around you; the aptitude gained will help you solve real-life challenges.Youngsters like you are the most powerful beings among all humans. They are curiousand can put in endless efforts to achieve what they love. Exploiting your interest intechnology at an early age will pave way for a brighter future. By the time you becomean adult, you will be well-informed, well-equipped, and will be set to perform better.MPumped Up and Ready?SAYour starter kit comes with evive, your versatile project-making buddy, and hundredsof components for your projects which you will use them in the coming projects.But how to use them? Don’t you worry! You will learn that as well in their respectivechapters.So, ready to innovate? Grab your Starter kit and buckle up for an exciting journey oflearning and building!You ready, Alvin? This surelooks exciting.You bet! I can’t waitto make all the coolcircuits and robots!GNDVCCFC-51OUT1 336232
Chapter 2EPlug & PlayPLIntroductionMWhat controls all your movements, how you act and react? And who told you tochoose nothing but the best for yourself, like the Starter kit, to take on the ride of yourlife in the world of DIYing?Your brain! Just like your brain controls your body and everything that you do,electronic circuits and robots also need a brain to control them. The Starter kit comeswith one of the most hi-tech and intuitive e-brains out there - evive, a plug-and-playprototyping device that makes DIYing fun!In this chapter, we will introduce you to evive, what it is, how it works, and how to useit for making cool projects and developing the 21st-century skills as you delve deepinto project-making.evive: Your Project’s BrainSAevive is THE project-making device you will ever need. It is an all-in-one STEM learningand prototyping platform that stays at the center of your projects and controls them.Its plug-and-play interface allows you to easily connect components such as motorsand sensors to it and make complex projects with ease. It comes with a variety offeatures such as an inbuilt battery, display, Bluetooth compatibility, and prototypingessentials, and much more thus helping you make a wide range of projects with justone device!1 3362 3FC-51OUT GND VCCSensor(Input)evive(Brain)Actuator(Output)3
Starter KitPower & ChargingIndicatorLi-ion BatteryTiny BreadboardTFT ScreenMicro SD CardNavigation KeyBuzzerHardware InteractionTactile & Slide SwitchesJoystick PotentiometersCommunication HubWiFi XBee BluetoothPower SwitchShield stackArduino GPIOEPower SupplyVariable Supply5V 3.3VTouch SensorsPlug & Play Hardware InterfaceMotors Steppers Relays Servos Motor DriversReal Time ClockPLPower InStatus IndicatorsUSBVariable Supply ControlI-V Sensing ChannelDigital to Analog ConverterI/O 3.3VData Acquisition ChannelsMevive FeaturesSASetting up evive: The very first step is to installthe battery. The Starter kit contains a leaflet whichdescribes the whole procedure.Switching on evive: Slide the Power switch to INT;the red power indicator LED will turn ON and amenu will appear on the screen.Charging the Battery: Slide the power switch UPto EXT and connect evive to your computer viaa USB cable. You can observe the charging statusby monitoring the orange colored LED below thedisplay screen. When evive is fully charged, theevive's MenuLED will stop glowing.Now that evive is ready for action, let us perform some fun activities!If no menu appears on the screen, center press the navigation key. If itstill doesn’t appear, go to chapter 6 to see how to upload the firmware toevive. Then center press the navigation key; the menu will appear.4
Plug & Playactivitysinging fruitsMPLEIn this activity, we will make an eight-key DIY Piano using evive’s capacitive touchsensors. They are the 12 pins present in the bottom left corner under the magic lid.evive's capacitive touch input monitors the capacitance level and notifies the user ifthe capacitance is above threshold (touched) or below it (not touched).The sound will be generated by a buzzer which is in-built in evive. We will make apiano that plays the following notes - C4, D4, E4, F4, G4, A4, B4, C5. Let's begin!SAComponent Required: evive Male-to-male jumper wires (8) Fruits/vegetables (8)Steps1. Take one male-to-male jumper wireand insert one of its ends in a fruit orvegetable.2. Next, insert the other end insideevive's touch sensor 1.3. Similarly, connect the other 7 fruits orvegetables.4. Switch on evive. In the menu, navigateto Touch Sensor using the navigationkey and touch any fruit/vegetable.You will hear its respective tone. Enjoy5
Starter KitEcreating fruit and veggie symphonies!You can use any conducting material with touch sensors like aluminumfoil.PLIf no sound is produced, reset evive. While doing so, do NOT touch thefruits or jumper wires.activitytobi’s head movesMIn this activity, we’re going to move the head of a cutout of our learning buddy, Tobiwith the help of a servo motor. We will fit the servo motor in the cutout of Tobi’s headand control its movement using evive’s potentiometer. Let's begin!1SAComponent Required: evive Servo motor Screwdriver Tobi’s cutouts Scissors23645
Chapter 5EThe Land of Code-o-NutsWhat is Programming?PLAfter the Museum of Electronics and the Signals City comes the Land of Code-o-Nuts,a place where you will learn the basics of programming and PictoBlox, a programmingsoftware that will make learning to program easy and fun for you! Let’s get started.MProgramming is the process of writing a set of instructions in a definite order for thecomputer to follow. These instructions are called programs. Let's look at an exampleto understand it better. Imagine that you're making a robot for the biggest science fairin your school. After working on it for a long time, you start feeling tired and realizethat you need something to boost your energy. But you can't leave work! Suddenly,an idea strikes your mind. You can instruct your robot to make you a cup of coffee bywriting a program. Problem solved!SATime to upload the program to the robot!Programming is an important skill to have today as it helps develop the must-have21st-century skills such as logical reasoning and problem-solving and prepares buddinginnovators like you for the future that is going to be loaded with technology.PictoBlox: The Fun Way to Learn ProgrammingPictoBlox is a visual programming software that lets you write programs usinggraphical elements known as blocks. The blocks are like pieces of a jigsaw puzzle thatyou must put together to solve the puzzle. This approach makes learning to programeasy, interactive, and super fun!21
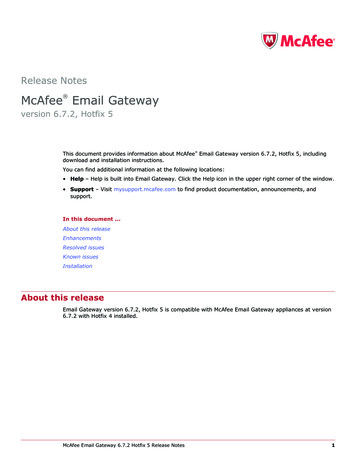
22Add ExtensionFor adding new pale esto the block pale eScripting AreaUpload ModeWrite scripts for the board tocontrol them even whendisconnected from the computerBackdropsPossible backgroundsof the StageESpriteAn object, or a character,that performs ac ons basedon the scriptStageStage ModeWrite scripts for the spriteand boards to interactwith them in real- mePLMScriptA stack of blocks interlockedwith one another in a specificorder to perform a taskBlock PaletteStageThe area where thesprite performs ac onsbased on the scriptSABlocksPuzzle-piece shapesused to write scriptsStarter Kit
The Land of Code-o-NutsInstallationLet’s begin by installing PictoBlox. Follow the steps below to install Pictoblox on yourcomputer:1. Go to ds or scan the QRcode for detailed instructions.2. Download the version compatible with your OS (Windows,macOS, Linux).3. Run the .exe or .dmg file and sit back and relax!EYou are all set for your programming experience in PictoBlox.Let us take you on a tour of the software.Download PictoBloxBlock PalettePLThe block palette consists of different palettes such as Motion, Sound, and Control.Each palette has different blocks that perform functions specified by the palette name.Below is the list of palettes and the functions their blocks perform:PalettesColorFunctionMotionMedium BlueTo control sprite's movementLooksVioletTo control sprite's appearanceSoundLight PurpleControlBurnt OrangeTo control the flow of script (using conditions)EventsOccur YellowTo sense events, which trigger scripts to run. Theseare essential for every projectSensingLight BlueOperatorsLight GreenVariablesOrangeMy BlocksLight PinkPenGreeneviveBlueActuatorsLight GreenSensorsLight BlueDabblePurpleDisplayLight RedSAMTo play sound. Explore Sounds tab to record, uploada music or edit sounds.To detect different factors of a projectTo do math calculations and handle stringsTo hold values and string in variables and displaythem on the screenTo make custom blocksTo control the pen that allows sprite to draw shapesTo control evive boardTo control motors such as servos and DC motorsTo get readings from sensorsTo enable projects to communicate with DabbleTo control display screen on boards23
Starter KitThere are other block palettes which can be loaded from Add Extension buttonlocated in the bottom-left corner.In this book, blocks will be mentioned in bold letters, block palettes orsoftware buttons in bold italics, and dropdown options in italics.PLConclusionEModesPictoBlox has two modes:1. Stage Mode: In this mode, you can write scripts for the sprite and boards likeevive to interact with sprites in real-time. If you disconnect the board withPictoblox, you cannot interact anymore.2. Upload Mode: This mode allows you to write scripts and upload it to the boardso that you can use even when it is not connected to your computer, for example,you need to upload a script for making moving robots.SAMIn this chapter, you learned about programming and PictoBlox, a graphicalprogramming software that makes programming fun. In the next chapter, you’ll learnto write scripts in PictoBlox!24
Chapter 6EProgramming with PictoBloxPLIn the previous chapter, we learned what programming is and explored PictoBlox.Now, let’s dig deeper into the world of programming and experience it first-hand withthree short and sweet activities. Let’s begin!activityjump using the space key!MIn this activity, we will make Tobi, our coding partner in PictoBlox, jump using thespace key on the keyboard. We’re going to write this script in the Stage mode.SAStepsFollow the steps below:1. Open Pictoblox and try to recognizeall the sections you saw in theprevious chapter on page 22.2. Drag and drop the glide () secs tox:() y:() block in the scripting area.Set the seconds as 0.5 secs, x as0 and y as 100. Now, click on theblock; you will observe that Tobiglides in upward direction.3. Now, to bring him back to its initialposition, we need another glideblock. So, duplicate it by right-clicking on itand drop it below the previous glide block;change y to 0.4. Now, click on the two blocks. You will seeTobi jump.25
Starter Kit6. Now, we want to check continuouslywhether the space key is pressed ornot. For that, we’re going to use theforever block from the Control palette.PL7. As of now, we have to manually startthe script to make it run. To trigger itwith a particular event, there are hatblocks in PictoBlox. Generally, in mostscripts, the green flag above the Stageis used as a trigger. So, drag and dropthe whenclicked block from theEvents palette above the forever block.That's it!E5. How do we make Tobi jump using thespace key? Using the key () pressedblock from the Sensing palette! And tocheck whether the space key has beenpressed or not, we need an if blockfrom the Control palette. Drag and dropboth the blocks in the scripting area andarrange them as shown in the figure.M8. Maximize the Stage, click on the greenflagto run the script, and make Tobi jump!activitySAjump using evive!In the previous activity, we made Tobi jump using the space key in Stage mode. Thistime, we’re going to do the same with evive, the e-brain. This is where you officiallybegin your journey as a young innovator!StepsFollow the steps below:1. Connect evive to yourcomputer using theUSB cable and openPictoBlox.2. Go to the toolbar andclick on the Board menu. Then select evive as your board.3. Next, click on the Connect menu and from the dropdown, select the Port to which evive is connected e.g.COMXX or ttyXX.26
Programming with PictoBloxEOnce you select the port, the iconbeside the Connect menu willbecome connected.Most of the script is going toremain the same. All we need todo is replace the key () pressed?Block.4. Go to the evive palette anddrag and drop tactile switch() pressed? block in place ofthe key () pressed? block inthe if block.PL5. To work with evive in theStage mode, we need to first uploadfirmware to it so that it can communicatewith your computer in real-time. For that,click on theUpload Firmware button;you will find it above the top right cornerof the Stage. The firmware will take a few seconds to upload.activityM6. Click on theto run the script and press tactile switch 1 on evive to makeTobi jump!To see if the communication between PictoBlox and evive is happeningor not, you can watch the Rx/Tx LED on evive. If it is blinking, all is OK;otherwise, remove the USB cable and reconnect evive.SAmake evive expressive!We wrote the scripts of the previous activities in the Stage mode; however, thosescripts won’t work when you disconnect evive from your computer.But don’t you worry! We have a solution for that. Put your hands together for theUpload mode! Writing and uploading the script in this mode lets you take evive27
Starter Kitto your friend and show the cool stuff you do or program a robot and control itindependently.In this activity, we are going to write a script to display emojis on evive’s TFT display.Let’s begin!MPLESteps1. Connect evive to your computer and choose the appropriate port in PictoBlox thesame way we did in the previous activity. Switch to Upload mode by toggling themode button. You will observe that the Stage is replaced by an editor window.2. Go to the Display palette and drag and drop the display () of size () at position() () color () & backdrop () block in the scripting area.3. Select or create an expression in the drop-down.SA4. Next, set the size as 8, the position as 0, 0, color as yellow, and background asblack by moving the sliders in the drop-downs.28
Programming with PictoBlox5. Go to the Control palette and drag and drop a wait () seconds block below it.6. Duplicate all the blocks by right-clicking on them and snap them below; changethe expression from the drop-down of the second display block.7. Add the forever block from the Control palette to run the whole scriptcontinuously.8. To start with a blank screen, add a fill screen with () color block above theforever block and set the color as black from the drop-down.10. To upload the code, click onENow comes the most important step:9. Go to the evive palette and drag and drop the when evive starts up block ontop of the script. It is a must for uploading the code to the evive and running itafter disconnecting.Upload Code button . It will take a few seconds.PL11. Remove the USB cable, power on evive, and enjoy!If uploading fails, then remove the USB cable, reconnect evive and tryagain.ConclusionSAMIn this chapter, you had your first hands-on experience with PictoBlox with three easyand fun activities in which you worked in both the Stage and Upload modes. However,the real fun will begin in the coming chapter where you will get to create your veryown game! See you there! Explore more activities based on PictoBlox available in thetutorial hub by clicking on the Tutorial tab in the menu bar.29
Beetle in a MazeEChapter 7Bringing in the BeetlePLThe time has come to do something super exciting! We are going to create aninteresting game in PictoBlox! The aim of the game is to help the beetle reach theapple at the end of the maze without touching the walls. We are going to use evive’snavigation key to control the beetle. Let’s begin!MPictoBlox has an inbuilt library from where you canchoose any sprite you want. Follow the steps below tobring in the beetle:1. Right below the stage, you will see a purple buttonwith a bear on it. Take the cursor over it and selectChoose a Sprite; the sprite library will open.2. Select the beetle sprite from the library.SANow, there are two sprites: beetle and Tobi. Right click onTobi's icon and click on the delete option.Giving the Beetle Its MovesLet’s write the script for the beetle. Since we’re controlling it usingevive’s navigation key, the beetle must move in the direction we pushthe key. Let’s begin!1. Connect evive to your computer and openPictoBlox. Then, select evive as your board fromthe Board menu in the menu bar and select theappropriate port from the Connect menu. In doingso, some palettes specific to evive will appear inthe block palette.2. To make the beetle point in a direction, we will usethe point in direction () block from the Motionpalette. Drag and drop it in the scripting area andwrite 0 in the space. 0 corresponds to the upward30
Beetle in a Mazedirection.E3. To move the beetle, drag and drop move () steps below the point in direction (0)block. Now, click on these blocks; the beetle will move 10 steps forward.4. From the evive palette, drag and drop the navigation key is in state () ? blockand select up from the drop-down.PL5. To make the beetle move forward only when we press the navigation key, wewill use the if block from the Control palette.6. Place the navigation key is in state () ? block inside the space in the if block.Place the point in direction () and move () steps blocks inside the C shape ofthe if block.7. The steps for writing the script for the down, right, and left directions are similarto those for right. So, instead of dragging and dropping each block, just duplicatethe script as shown by right-clicking on it and make changes in the state in thenavigation key is in state () ? and point in direction () blocks as given below:M For ‘down’, set the direction as 180. For ‘right’, set the direction as 90.SA For ‘left’, set the direction as -90.8. Now stack all the if blocks together.9. To make evive continuously check and execute these instructions, drag and dropthe forever block from the Control palette above the script we’ve written so far.10. Finally, go to the Events palette and select the whenabove the forever block. The script is ready!clicked block; place it31
SAMPLEStarter Kit11. To test the script, upload the firmware to evive using the Upload Firmwarebutton and click on the green flag . The beetle should move as you press thenavigation key.NEVER centre press the navigation key. Otherwise, communicationbetween evive and your computer will stop. In case you press it bymistake, stop the script, reset evive, and run the script again.Setting Up the StagePictoBlox has an inbuilt library from where you can choose any backdrop you want.Follow the steps below to add the maze backdrop:32
Beetle in a Maze1. Click on the purple colored icon which says Choose a Backdrop.E2. Select the maze backdrop from the library.PLWhenever you add a new backdrop or a sprite, the scripting areabecomes empty. To get back to the script you were writing, click on theicon of the sprite you were working on, in our case the beetle.Sensing the EnvironmentNow, it's time to write the script for safely taking the beetle to the end of the maze.Follow the steps below to write the script:Make sure that the beetle’s icon is selected in the sprite palette.M1. Go to the Events palette and drag anddrop the whenclicked block in thescripting area.SA2. From the Motion palette, drag and dropthe point in direction () block below thewhenclicked block.3. Then, drag and drop the glide () secs to x:() y: () block and set the seconds as 0.5, xas -150 and y as -150. The x and y valuesare the coordinates of the beetle’s initialposition.4. Drag and drop the set size to () % block from the Looks palette to adjust thebeetle’s size.5. Whatever we write next must execute continuously because we want to keeptrack of whether the beetle touches the walls or not. So, drag and drop a foreverblock.6. Drag and drop an if block inside the forever block and the touching color () ?block from the Sensing palette inside the space of the if block. This block willhelp us check if the beetle touches the walls. Select the black color of theboundaries from the drop-down.33
Starter Kit7. Whenever the beetle touches any wall it should return to its initial position andif it safely reaches the end, i.e. touches the color red , the game should stop. Forthat, we will use the stop () block.MPLEBelow is the complete script.SAEnjoy the game!Facing any difficulties? Scan the QR Code.ConclusionIn this chapter, you made your very first game in PictoBlox! Inthe coming chapter, we’re going to make another interestinggame which will be a little challenging than this one anddouble the fun!34
Chapter 8EThe Hungry SharkSetting Up the StagePLSharks are hungry creatures. And so is the one in our game! The aim of the game isto feed the shark as many fish as you can by controlling it with evive’s potentiometer.More the number of fish it eats, higher will be the score.Since we have a shark and a lot of fish in our game, our background should be asuitable environment for them. Therefore, choose any of the underwater backdropsfrom PictoBlox’s backdrop library as we did in the previous chapter.MBringing in the SpritesSAIn this game, we need two sprites: the shark and the fish. Open the sprite library aswe did in the previous chapter and choose the fish and Shark2 sprites.FishShark2Assigning Movements to SharkFollow the steps below to write the script:1. Connect evive to your computer and open PictoBlox. Then, choose it as yourboard and select the appropriate port from the Connect menu. Don’t forget toupload the firmware because we are working in Stage Mode!2. Drag and drop the whenpalette.clicked block to scripting area from the Events3. Drag and drop the set size to () % block from the Looks palette to adjust theshark’s size. Set it as 80% of the original.35
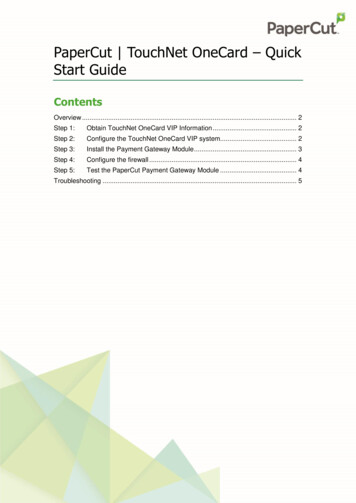
The Robo RangesEChapter 10SAAssemblyMPLWelcome to the Robo Ranges! In this chapter, we are going to talk about robots,specifically mobile robots, and make one of our own! But, what IS a robot?A robot is a machine that can take decisions and perform tasks on its own but onlyafter being told how to using programming. Mobile robots are robots that can movefrom one place to another just like us. Though making a robot like us will take a lotof knowledge and efforts, what you will be learning here will give you a good idea ofrobotics.In this chapter, you will learn how to assemble and test a mobile robot. In the comingchapters, you will learn how to control it using different methods such a Joystick and aSmartphone. Then, we will provide some senses to the robot and make it autonomousto make an object-following robot and an obstacle avoiding robot. Lastly, we will makea pick and place robot which will have a gripper mounted in front of it, just like yourarms. Let’s begin!The annotated base is shown on right. This is the bottom side. There is evive's logo onthe top side for your reference. So be careful while using the base.1. Fix the motor mounting brackets to the chassis using M3 bolts of 8mm lengthand M3 nuts. Be careful about the holes you are using; refer to the figure of thebase plate.2. Attach the two motors, oneto each bracket, side by sideand fasten using M3 bolts of25mm length and M3 nuts.Observe the placement andorientation in the figuregiven below (right) carefully.3. Now, fit the wheels into theprotruding motor shafts.The motor shafts would fit46For Motor ClampMountingFor Castor WheelMountingBottom Side
The Robo RangesPLEperfectly into slots provided for them on the wheels. If required, adjust themotor brackets.MThe motor wires should be inside, otherwise they will collide with thewheel. Also, while assembling the robot, be careful about the holes youare using. Fasten all the nuts and bolts tightly for smooth functionality.SA4. We’ll attach the Castor wheel now. Remember, any body needs a minimum of3 contact points to be stable. First, we will mount the M3 standoffs (20 mm) onwhich the Castor will be attached. Fasten the standoffs to the chassis using M3bolts of 8mm length.5. Place the Castor on top of the standoffs in the configuration shown and fastenusing M3 bolts of 12 mm length.Keep in mind, that what we have assembled so far (motors and castor)will be pointing downwards.47
Starter Kit6. Flip the assembly and place evive on the top of the chassis.PLE7. Using the holes on the back of evive (align evive so that you can see at least 3holes matching), fasten it to the chassis using M3 bolts of 12mm length. Thereare nuts already built in evive, hence you just have to fasten it using bolts. See thefigure in the case of any confusion.Your basic mobile robot is now ready. This is the framework for almostevery robot that we’ll work with. Modify it according to your need touse it as a Bluetooth controlled robot, obstacle avoiding robot, or lightt
Starter Kit 4 Setting up evive: The very first step is to install the battery. The Starter kit contains a leaflet which describes the whole procedure. Switching on evive: Slide the Power switch to INT; the red power indicator LED will turn ON and a menu will appear on th