Transcription
Simplified Aquaponics ManualText & Photos ByDrs. Paul & Bonnie RangeUnless otherwise notedWith research, help & advice from:Travis Hughey and Ed & Gloria HaswellPaul & Bonnie:2449 FM 3509 Burnet, Texas 78611 512/755-3098 mail@oneseedling.com1
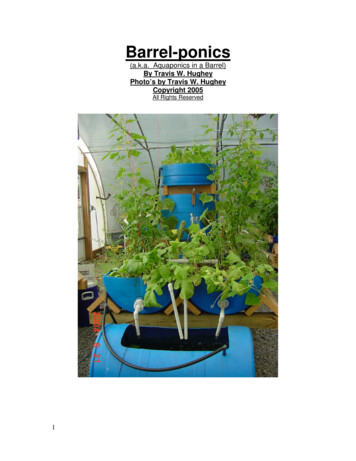
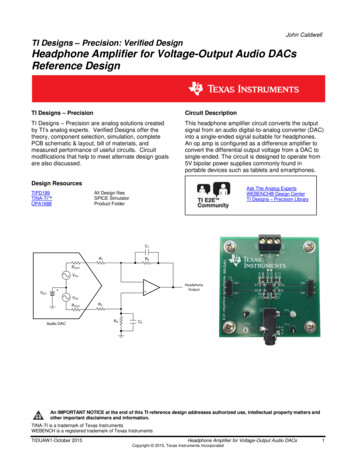
Simplified Aquaponics ManualWater is becoming a commodity that will be worthmore than oil. There is a finite amount of fresh wateravailable and it seems that the world population is doubling every few years. Already, areas in the United Stateshave surpassed their ability to hydrate the present population. Farming accounts for 75-80 % of fresh water usagein the world. Current irrigation techniques waste preciouswater and the runoff pollutes streams and rivers withleached soil and fertilizers.Aquaponics is the gentle blending of Aquaculture,fish farming, with Hydroponics, soil-less production ofplants. Aquaculture, as you know, has various problemsinherent to its nature, first it takes up a great deal of landand worse, the effluent is toxic downstream to the point ofkilling other fish and causing massive algae blooms due tothe high nitrogen content. Hydroponics, on the otherhand, is even worse in that the nutrients or chemicals areFox Springdifficulttodisposeofdue to high chemical salts.Aquaponics solves all of those problems andthere are no chemicals or runoff to contend with.Waste does not exist in an aquaponics system as oneportion utilizes the waste from another. Good farmershave always used manure to fertilize crops; aquaponicsdoes it with fish effluent. Water usage is cut 80% as itis recycled endlessly and losses are due to evaporationand removing portions of plants for consumption. Fishand plants alike qualify under current guidelines for“Organic” and thus fetch a higher price at market.A family of four could do the same type of system within the same space required to park a compactcar and meet all their nutritional requirements. Withtwice that space the same family would be able to selltheir surplus and possibly remove the need of one adultto work outside the home. Generally speaking, one tonof fish waste will produce seven tons of edible produce.Paying careful attention to growing plants in successionwill result in production up to 10 times that of a squarefoot of garden space.Pictured to the left, Figure 1 is one type of sysFigure 1tem which will just about produce enough for one adult(considering minimum nutrition) and is 1/4 the size of a compact car and will fit in most kitchens anduses 55 gallon barrels which are available almost anywhere. Aquaponic setups like these can beconfigured in any number of ways and not limited to those depicted in the pictures shown in thismanual.The system in Figure 1 was developed & photographed by Travis Hughey of S. Carolina.2
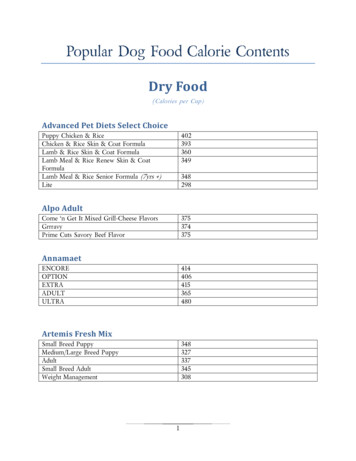
How it worksFish waste is mostly ammonia and when it builds up the fish die. Plants require water, light,co2 and a bunch of trace elements and if any are missing or lacking they either wither or die. Bacteria, like Nitrosamines, eat ammonia and give off nitrites, which Nitrobacterium eat and excrete nitrates. This process consumes oxygen, carbon, inorganic nutrients and generates nitrate. The pHlowers as the nitrifying bacteria multiply. Our water runs clear enough to read the lettering on thepump in the bottom of the fish tank. If the water turnscloudy or green then quit feeding for a couple of daysand it will clear up. Fish can handle 10-100 times asmuch nitrate as ammonia and nitrates are the form ofnitrogen that plants love to eat.So, simply put, fish produce the ammonia;bacteria in the grow beds break the ammonia downto nitrates which plants feed on to produce food, thewater circulates, now cleaner and oxygenated andthe cycle never ends. Plants can be eaten by bothhumans and fish, left over plant parts can feed earthworms which in turn can feed the fish.Water circulation solves several problems.Stratification tends to occur when water stands stilland nitrates settle to the bottom as does the waterwith the least amount of dissolved oxygen, importantFigure 2 to fish survival. Recirculation and the subsequentoxygenation of the water conserve local reserves and help decrease demand on aquifers. Figure 2.Total water usage in the system depends on several factors. First, higher temperatures tend to affect the amount of evaporation and second, the amount of vegetation and vegetablesbeing consumed will remove water from the system. Generally, water losses of 10-20% can be expected per month. This is considered minimal compared to conventional farming and gardeningwhere losses of 85-95% are common. Water added to the system should not be from city watersources that are chlorinated as this can adversely affect both fish and plants. City water should beallowed to sit in an open container for 24 hours prior to adding. Most well water is acceptable andwe have found that rainwater works great unless you live under the smokestacks of the local coalfired electric company or factory.Simplified SystemHere are the basics. The simplified system has five components, 1. Fish tank, 2. Dumptank, 3. Grow beds, 4. Drain line, 5. Bilge pump. In most systems you had to have a fish tank, twopumps, grow beds, drain lines for each bed and a sump tank. Ours is simpler as you will see.Fish TankOne of the more important components of any aquaponics system is the fish tank. Tankscome in every shape and size, limited only by the imagination. We have used square, rectangularand round tanks, made from everything from plastic to metal. Polyurethane tanks seem to work thebest with the least problems. If the tank does not have a floor sloping to the middle or one side thenit should be propped up so everything drains to one corner or side. This will facilitate in allowing thepump to remove solids.3
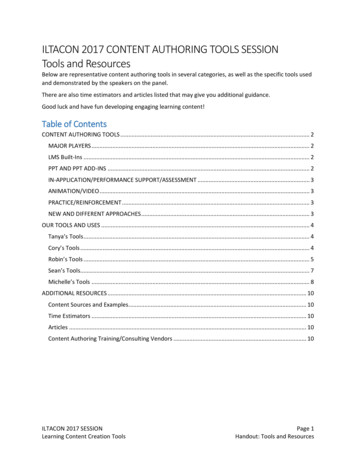
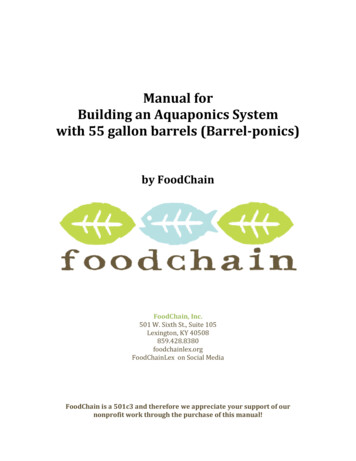
The tank should be configured to allow easy harvesting of fish and if need be cleaning although ours seems to be self cleaning.PumpIn the simplified system you only need one 500 GPH 12 volt bilge pump that is currently selling for about 9.95 at Wal-Mart. For those who wishto use 110V, we recommend a pump like the M350Fountain pump by Beckett, available at Home Depotstores.The pump connects to a 3/4 inch PVC linewhich goes to the top of a plastic 55 gallon barrelwith the top cut out. Put a 3/4 inch cap on the linedropping into the barrel and drill 3/8 inch hole in it.This assures that the flow will remain the same. By Figure 3placing a “T” on the line at the top of the barrel(shown in Figure 3) the other side of the line will actually supply another 55 gallon barrel and another complete system. Cap this system also and drill 3/8 inch hole. Do not exceed 6 feet in pumping height.Dump TankUsing the jigsaw cut the top from the barrel, leaving the rim intact. Drill a 7/8 inch hole in thebottom of the barrel 2-3 inches from the side and install a 1 inch siFigure 4 phon system like Figure 4. This also shows a vertical barrel dump.Notice that the left side of the siphon is about an inch off the bottomof the barrel. On the right side of the barrel where the pipe goesthrough the bottom of the barrel, the simple way to do this is use thetwo 1 inch connectors with the male and female threads (you cansee one and the other is on the bottom side of the barrel) and threadthe male connector up from the bottom. Run a bead of good gradesilicone sealant around both sides of the bottom of the barrel, putcleaner on and glue one side of each of the 1 inch connectors andscrew together until tight. This should push up a small bead of silicone sealant up around the edges of the connectors. Use your fingerto smear it around between the bottom of the barrel and the connector to make a good seal. Let this dry a few hours before making therest of the siphon or it will leak. The dump barrel can also be laid onits side with an access hole in the top to glue in the siphon. If thedump barrel is laid on its side the siphon should be raised 6 inches from the bottom to facilitateproper refill and siphon action. Dump barrels laid ontheir side tend to deliver water slower to the supplyports in the grow beds so some adjustment will be necessary to insure proper watering.When the sealant is dry to the touch, constructthe rest of the siphon and glue all the joints. We purposely did not give measurements for the siphon for thesimple reason that not everyone will want to dump 55gallons of water into their system. By varying theheight of the siphon or the height of the intake one canadjust the volume of the dump. Figure 5 is of a horiFigure 5zontal barrel dump.4
Grow BedsOne vertical plastic 55 gallon dump barrel will supply eight 55 gallon barrel halves. Eightgrow beds seems to be the absolute upper limit for a 55 gallon vertical dump system. Six grow bedsis the limit for the 55 gallon horizontal system. These barrel halves, once filled with gravel, areknown as grow beds.Do not use any barrels that have had either plant or insect poison in them!! Most other barrels are acceptable. CLEAN THOROURGHLY WITH LOTS OF SOAP AND WATER. Cut alongmolding line so the barrel halves are lengthwise. Drill a 7/8 inch hole in each barrel half as shown inFigure 5, about 3 inches from either end. Drill one hole per barrel. Spread silicone sealant aroundopening on both sides as before and screw in a 2 inch piece of 3/4 inch PVC nipple until about 1/2inch protrudes on the inside so loose gravel cannot stop up the hole in the cap. Smear the sealantaround on both sides to insure a good seal and let dry. Drill a 1/4 inch hole in a threaded 3/4 inchPVC cap and screw on lightly to the outside part so as not to disturb the seal around the threadednipple. This is the drain for the grow bed. Once monthly unscrew these caps while the system iscycling and clean the holes. This will insure that the caps remain open and the area under the fielddrain halves remains clear.Barrel RacksNext build the racks to hold the barrels. The barrel halves must be supported along thesides as shownin Figure 6,Figure 6whichalsoshows the drainsystem for barrels placed endto end. Cut thesupport legs totheproperheightwitha 452X6 side supportsdegree angle ontop as shown in45 degree angle Figure 6. Thesupportlegsshould be 19inchesapart.We have notfound the needto support thebottom of thebarrels. Leave enough room on the 2X4 bracebeneath the barrel half to support standard plastic guttering with enough room to get your handin to screw on cap drain. We build our racksfrom scrounged lumber but can be built from anymaterial that will support the weight of the growbeds. It is recommended that the 2X6 shownsupporting the barrel half in the Figure 6 be continuous for strength when used with barrels endto end. If barrels are placed side by side then5Figure 7
use the support system in Figure 7, photo byTravis Hughey. Placing the barrels side byside uses slightly more lumber when compared to end to end but takes up less linearspace.When the sides are not supportedproperly they will tend to push outward asshown here in Figure 8. This will tend to letwater run over the bulged portion.Figure 8UnsupportedBulgeGutters and DrainsFigure 9Figure 9 depicts hanging thegutter for barrels laid side by side.Once a month during drain cycle remove cap and clean. Notice waterflowing from the hole in the cap. This3/4 in. Cap w/ 1/4in. holeparticular drain gutter is being used onbarrel halves placed side by side. Thedark material in the bottom of the gutter is algae and should be loosenedonce a month and allowed to drainback into the fish tank where it will beconsumed by the fish in the system.The height of the stand willdepend on the amount you want tobend over to tend to plants or adjustflow. It is easier to construct the stands from lumber unless you want to stack one row of grow bedson top of the other and in that case we recommend metal pipe.The stand should connect to barrels end to end for the easiest operation and the leastthings to go wrong. Eight barrel halves will stretch 24 feet and you need a stand for dump barrel 2feet square. This stand should elevate the dump barrel above the grow beds 4 inches for gooddrainage.Next, place the barrel halves or grow beds in the racks and align end to end with bung endnesting to bottom end of next barrel. Screw these together at the top edge of the barrel about 1inchdown from the edge using coated deck screws. Do not screw together so tightly as to warp the barrels. Snip off any protruding ends of the screws. Once the barrel halves are in the rack straight andlevel along the top edges use three 1 in coated deck screws along each side of the barrel half whereit contacts the 2X6 brace to secure the barrel halves to the rack. These screws will not leak ifscrewed in, not predrilled.Overflow drainsMeasure down 3 inches from the edge of the barrel ends, center the bit, and drill a 7/8 inchhole. Cut a piece of ¾ inch PVC pipe so 1/2 inch protrudes on each sideSilicone around the hole and glue a 90 degree elbow on each end on the inside with theopen end down. One inch “T’s” will connect each barrel to the next. This will be a drain betweeneach grow bed to keep the water level from exceeding 2 inches from the top of the gravel. Screw ona piece of 1 inch clear tubing to the end of a ¾ slip to ¾ male thread to drain to the gutter. The drainwill also keep the beds from overflowing and spilling on the floor. At each end of the grow bed rowdo the same and run a short section of ¾ inch to the top of the gutter to allow drainage of overflow at6
either end. All overflow and drain linesshould run slightly downhill for properdrainage. Clean out any plastic shavingsat this time or they will stop up the systemat a later date and cause no end of problems. See Figure 10.Drill 7/8 inch hole in the bottom ofeach barrel half and install 3/4 inch PVCnipple. Figure 11APurchase a section of flexibledrain field line at a home improvementFigure 11AFigure 11B3/4 in PVCnippleFigure 103/4 inElbowSlip toMalethread3/4in. T3/4 in, 90degree elbowcenter and cut it along the molded seam lengthwise. Cutto fit snug in the bottom of the barrel half as shown inFigure 11B.One quarter inch pea gravel should be placedinto the grow beds at this time, being careful to hold downthe black drain line as the gravel in poured on top. Verylittle gravel should be allowed under the drain pipe due topossibility of stoppage at a later date. The pea gravel(Figure 12, photo by Travis Hughey) should come towithin 1 inch of the top of the grow beds and approximately 2 inches above the connecting drains at the top.1/2 Field drainDump LinesFigure 12Place the dump barrel on top of thestand and connect dump line as shown in Figure 13. One inch pipe makes up the dumpline and a “T” is placed in the center of eachgrow bed and a 2 inch piece of pipe is con-Figure 13proper drainage. Outlets should point slightly uphill so1 inch pipe cap is slightly above level of supply line.This will insure that when the siphon initiates it will flowrapidly throughout the line.7nected to the “T” and a cap with ½ inch holeon the end. The idea is for water to enterthe pipe and flow out a ½ inch hole, fill thegrow bed to about 2 inches from the top ofthe grow bed and drain slowly out the 1/4inch hole.Nitrogen rich water is pouring fromthe outlet in this picture. See Figure 14.The pipe is laying on the edge of the barrels. All lines should run slightly downhill forFigure 14
OperationFill the fish tank with non-chlorinated water. Start the pump. When the dump barrel initiatescheck for leaks. Ideally eachgrow bed should drain out before the next load of waterFigure 15comes in from the dump tank.Using a 500 GPH pump and thedump barrel insures this cyclewill be 30-40 minutes long.This is enough time for the growbeds to empty. There shouldalways be a small steady dripfrom the grow bed drain cap atthe end of the cycle. This system is known as ebb and flow.Plants love it!!!The gravelkeeps the roots from standing in water and yet moist while providing a home for the nitrifying bacteria. Pump failure will not harm the plants for up to 24 hours; however the fish will start to die withinhours.To visually check the water level in the grow beds we have developed a tool to help. Take a12 inch piece of 1 inch PVC pipe and insert a 14 inch section of broom stick so that the rounded endsticks out. Simply push the assemblage into the gravel bed either side of the field drain and removethe broom handle section. See Figure 15. This will allow visual inspection of the water level. Thispart of the system is not necessary but a good tool to gage water level. Water level can be adjustedby raising or lowering the “T’s” in the delivery line.These next photos show how fast growth is using this system.Catnip on left at 10 days,Tomatoes with old delivery system.peppers and catnip at 30 days with new deliverysystem.Catnip at 60 days.Peppers and tomatoes at 60 days.8
Initializing the SystemThere are several ways of initializing the system. To insure proper balance within the system nitrifying bacteria needs to be present in the grow beds to convert the nitrites produced by thefish into usable nitrates for the plants. The best way to do this is to gather a five gallon bucket oflocal water from a creek or pond and pour it into the fish tank. This water will have all the properbacteria present to initialize the system. It will take two to three weeks for the bacteria to growenough to handle both fish and plants properly. During this period the system cannot handle largeamounts of mature plants or fish. We have found that sowing the beds with some fast growing smallseeds like rye grass or Black Seeded Simpson Lettuce will start the process faster. I like to rungoldfish in my system because they tend to clean up the algae growth better than some other fishand are cheap if you lose a few due to the inevitable learning curve. The fish tank will run cloudy forseveral weeks then clear up. The system is properly initialized at this point.Actually, fish can be eliminated from the system altogether by simply running manure teainstead of fish. The system will run just as well but requires addition of one gallon of manure tea toa 400 gallon tank daily. For those who object to raising or eating animals this is a viable alternative.FishFish are an interregnal part of our system. Plants require nitrogen to grow and fish providethis with elimination of both urine and feces. As in any system, open or closed, these nitrates mustbe cleaned from the water or the fish will die.Just a few of our babies in 4 foot deep tank.Aquariums require filtering systems that must be either cleaned or replaced on a regularbasis. The grow beds of the aquaponics system act as this filter without the hassle of cleaning orreplacing. Plants must be present in the grow beds to use the nitrates for this to be true.We have found that almost any freshwater fish can be raised in the system although theoperating temperature prohibits rearing of species such as trout. For those who do not care abouteither eating or selling the fish we recommend 1/2 goldfish and 1/2 common carp. One fish per 19
1/2 gallon water is the maximum the system can handle especially as the fish grow larger. These canbe bought cheaply at bait stores in most parts of the country. Carp can be eaten or be sold to Chineserestaurants. In Texas, raising tilapia requires special licensing and permits so we raise carp and goldfish in our system.The following is a list of fish recommended for rearing in an aquaponic system along with somehelpful sites for information specific to that bs/alt-ag/tilapia.htmYellow ch.htmLake ng/aquanotes-fishid/bluegill.htmChannel rid Striped wh.htmNorthern 0.htmLargemouth mb.htmSmallmouth mb.htmAll rium.com/10pacu.htmKoiwww.euronet.nl/users/w solarz/koiv.htmMost freshwater ornamentalsPlantsPlants are what this is all about. Without plants the system cannot function properly. Growingplants in soil is fairly easy but takes up valuable space because of moisture and spacing requirements.Dirt farming is kind of a knee jerk response. You see the plants wilting and add water, plants yellowingand add nitrogen or compost. Aquaponics takes care of this automatically, without much thought exceptto insure the flow of water. If the electricity quits or a pump fails the plants will survive several days upto two weeks depending on the temperature, but of course the fish will die within hours.Even plants needing large amounts of nitrogen, like tomatoes, can exist side by side with plantsthat require little, like lettuce. The nutrient rich water reaches all plants and because it only passesthrough, only what is needed is used. Even with good plant coverage there are a lot of nitrates flowingout the drains back to the fish tank, enough in fact to power up another group of grow beds. This is not aconcern unless the water is cloudy in the fish tank. We have found that 6-8 grow beds per 400 gallontank is a good operating number. Transplanting seedlings is easy. Bury the seedling up to the last couple of leaves, removing all others and hand water for a couple of days until established.Plant ListThis is a partial list of plants that do well within the simplified aquaponics system.TomatoesPeppersSpinachOnionsCucumbersPak Choy10SquashLettuceBasil
BegoniasImpatiensBlack Seeded SimpsonBeetsSwiss chardPeasWatercressChivesWatermelonCabbageRedina lettuceEndiveAmaranthCeleryTatsoiCollardGarlic chivesOkraCilantroRecaoZucchiniCantaloupeCommon chivesEndiveMost common household leDillRiceNew TomatoesLots of Basil! The more you cut it the more you have!Fish FoodFish food need not be expensive. Two simple systems exist for creating fish food. First, israising duckweed in 55 gallon barrel halves.Duckweed will double itself each 24 hours under the correct conditions.Thewatertemperatureneeds to be 60-70 degreesF. and rich in nutrients. Weget these nutrients from manure tea made from donkeydung. Fish eat duckweedslower than commercialfeeds so we feed at the firstof the day and if all is eatenby dark then we add a littlemore. If there is duckweedleft over from the night before then we simply feedDuckweed Floating on top of Manure Tea less. The nice thing aboutduckweed is that it just floatsaround and too much does not constitute nitrate buildup like with uneaten commercial pellets. Eventually it will be eaten and, meanwhile, it is making more duckweed. In nature, duckweed can befound floating in calm waters, either fresh or brackish.11
Virtually all the plant is metabolically active and totallyuseful as a feed or food. Duckweed has high concentrations ofessential amino acids, lysine, methionine, carotene, xanthophyllsand trace minerals making it one of the best animal feeds available for either fish or animals like rabbits, sheep, goats or cattle.It can be fed wet or dried without significant loss of nutrients.Nitrogen Ammonium is the preferred form of food forduckweed. This is fortunatefor us as the aquaponic system produces an abundance ofthis material. Therefore duckweed does great in such systems except for trace mineralsDuckweed growing in half barrel which because of the soil-lessnature in aquaponics, aresadly lacking. This factor can be solved as it exists for not onlythe duckweed but both the plants and fish as well. We will coverFloating container for manurethe addition of evaporated sea salt to the system later.Worm CompostingThe second type of fish food that can be done easily is through vermiculture, the ancient artof raising worms. Thankfully, like duckweed, they raise themselves in the proper conditions. Wormslike some moisture, something to eat and darkness.Worms can be eaten by fish and humans alike. Nutritional Content: Protein 19%, fat 14%, carbohydrates 4%, fiber 2%, moisture 63%.Worms to useEarthworms can generally be classified intothree different types. Deep burrowing, shallow dwelling, and litter dwellers. Deep burrowing worms arebest known as night crawlers. They need deep undisturbed burrows to live and reproduce. The shallow dwelling worms do not have permanent burrowsbut keep burrowing through the top twelve inches ofsoil. The litter dwellers live in the top layer of litter ontop of the soil. (Photo by Gloria Haswell)The best worms to use for composting arethe litter dwellers, Redworms (Lumbrieus rubellus) or Red Wigglers (Eisenia fetida). One pound ofthese worms can convert on one half pound of food scraps into compost per day.Constructing a worm binItems needed:Figure 16Large plastic container ( wood can be used also)Foam scraps that will absorb and hold liquids,Hardware cloth, Figure 16 photo by Gloria HaswellScreen or ground cloth, cut to size to fit on top of wiremeshPaper, computer paper, newspaper or corrugated cardboard works fine. Do not use the colored glossypages.12
Drill 1/2 inch holes about every 2 inches aroundbottom of container to allow air flow. Figure 17 photo byGloria Haswell. Place foam scraps in bottom of container. These will absorb liquids if they pool in bottom ofcontainer so you do not need to have a tray underneaththe container. Cut the wire mesh to fit the length of thecontainer and at least 3 inches wider than the width. Foldthe wire on both long edges to form a rack to keep wireoff of bottom of container and allow air movement. Placein bottom of container. Cut ground cloth or screen to fit onFigure 17top of wire rack. This keeps the bedding from fallingthrough to the bottom of container. Shred the paper or tear the newspaper into strips. Newspapertears easily from top of pages. Cardboard works best when used with paper. Tear cardboard intomanageable pieces. Soak the paper in water for about 10 minutes. Pull paper out of water. Papershould feel like a damp sponge. You should be able to squeeze the paper without water drippingout. Fill the worm container with the damp paper. Fluff the paper as you place it in the container toallow for air circulation. Place your worms in a pile in the middle of the bedding. Do not spreadthem through the bedding. Put the cover on the bin and place your worm bin where the temperaturestays between 59 and 77 degrees F.Feeding your wormsA couple of days later bury food in one corner of bedding. Cover food with at least twoinches of bedding. This helps keep the smell under control and pests from getting into the food.Worms can be fed raw and cooked vegetable scraps, coffee and tea grounds bag and filters included, crushed eggshells, breads and pastas. Basically you can add any thing that does not havemeat scraps, fat or dairy products. Some people add small amounts of these things to their wormcolony successfully but I have not. I have used large amounts of coffee grounds and citrus peelssuccessfully which some worm growers do not recommend. Start with small amounts of food andincrease the amount as your worm bin becomes more mature.ProblemsFigure 18If your worm bin has a bad odor there couldbe several causes such as too much food added.Wait a few days before adding more food. Make surefood is covered by at least two inches of bedding thiswill help control smell and flies. There may be to muchmoisture in your bedding or it may be to compactedwhich can cause lower oxygen levels. Add more drybedding, mix and fluff the bedding to add more oxygen. Meat and dairy products can go rancid if theyare placed in the bin. Worms will not try to crawl outof the bin if the conditions are correct. If the moistureis incorrect, the bin is too wet or to dry, the worms willtry to crawl out. Some people place a light above thebin to keep the worms in. I have found this not necessary.HarvestingWhen the bedding in the worm bin has decreased in volume by half add a Figure 19piece of screen to the bin large enough to fit in the bin and up over thesides. When you put the lid back on it will hold the screen in place, Figure18 photo by Gloria Haswell. Fill the screen with new bedding and startfeeding in the top layer. The worms will crawl through the screen to the13
area where the new food is. Figure 19 photo by Gloria Haswell. About two months later all of theworms should have moved to the top level. You can then carefully pick up the screen and remove thecastings from the bottom of the container. Dump the contents of the container on a tarp or large garbage bag. Sort out any remaining worms and other items that did not compost. Replace the foam, wirerack, cloth or screen cover and dump the contents of the screen in the bottom of the container. Placethe screen back into the container and add more bedding. Again feed in the top layer and the wormswill move to where the new food is. The worm castings can be used in potted plants or the garden. Youcan also make a tea with them to spray on plants.An interesting addition to the nutrients in your system! Ours loves it!Sea saltThe loss of arable lands due to salt accumulation is estimated bysome at 2.5 million acres per year, with even more experiencing significantyield reductions at the margins. Some 30% of all irrigated lands, more than50% in some countries, are considered economically unproductive. Findingenough arable land and water to meet world n
2 Simplified Aquaponics Manual Water is becoming a commodity that will be worth more than oil. There is a finite amount of fresh water available and it seems that the world population is dou-