Transcription
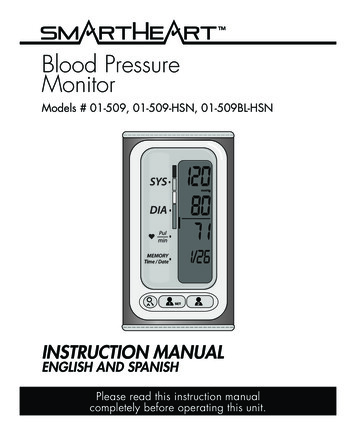
Blood PressureMonitorModels # 01-509, 01-509-HSN, 01-509BL-HSN12INSTRUCTION MANUALENGLISH AND SPANISHPlease read this instruction manualcompletely before operating this unit.
STOP!PLEASE ENSURE YOU HAVE ALL OF THEFOLLOWING COMPONENTS BEFORE USINGYOUR BLOOD PRESSURE MONITOR12MonitorStorage CaseDC Wall AdapterInstruction ManualQuick Start GuideBlood Pressure Reading Tracking LogFAQ Information SheetIF YOU ARE MISSING ANY PARTS, INCLUDING INSERTS ORINSTRUCTION MANUALS, DO NOT RETURN TO PLACE OFPURCHASE. CONTACT CUSTOMER CARE AT 866-326-1313.2 ENGLISH
INDEXCare & Safety Information.4-7Introduction & Indications for Use. 8STOP Notification Page. 9Blood Pressure Monitor Features. 10Getting Started. 11Charging the Battery .12-13Setting Date/Time.14-15Fitting & Applying Your Cuff.16-17Taking Your Blood Pressure Reading.18-19Interpreting Your Results.20-21Memory Functions .22-23Care & Maintenance.24-25Device & Label Symbols. 26Display Symbols. 27Troubleshooting. 28Error Codes. 29FCC Statement. 30Complied Standards. 31Electromagnetic Compatibility.32-34Product Specifications. 35Warranty. 36Instrucciones en Español.37-72Toll-Free Customer Care Help Line: 1-866-326-1313Monday – Friday 8:30 a.m. – 4:30 p.m. CSTSmartHeart Manufactured forVeridian Healthcare1175 Lakeside DriveGurnee, IL 60031Made in China#93-1399 10/19 2019 Veridian Healthcare, LLCENGLISH 3
CARE & SAFETY INFORMATIONNOTE: Read all instructions carefully before use. The following basic precautions areneeded when using an electrical product.CAUTION: Failure to read and observe all precautions could result in personalinjury or equipment damage.Improper care or use of your blood pressure monitor may result in injury, damageto the unit or ineffective treatment. Following these instructions will ensure the bloodpressure monitor’s efficacy and long life. GENERAL CAUTIONS AND WARNINGSMeasurement results should be discussed with your physician or healthcareprofessional; never self-diagnose or attempt treatment as this may be dangerous.Intended for adult use only; this device is not approved for infant or child.Keep out of reach of children.Do not use the unit if it has any damaged parts, if it has been submersed inwater or dropped.If any abnormality occurs, discontinue use until the unit has been examined andrepaired.Only use included attachments and parts; do not use attachments from otherbrands or models as these may not be properly calibrated for use with thisdevice and may result in measurement error.Do not share with an infected person.Do not disassemble the unit or attempt to repair it; substitution of a componentdifferent from that supplied may result in measurement error and will voidmanufacturer warranty.Always follow local regulations for proper disposal of the monitor, cuff andbatteries.This device is intended for non-invasive measuring and monitoring of arterialblood pressure.It is not intended for use on extremities other than the arm or for functions otherthan obtaining a blood pressure measurement.4 ENGLISH
CARE & SAFETY INFORMATION To verify the calibration of this device, please contact the manufacturer.This device may be used only for the purpose described in this booklet. Themanufacturer cannot be held liable for damage caused by incorrect applicationand use.ITRODThe service life of the cuff may vary by the frequency of washing, skin conditionof the user, and adherence to proper storage conditions. The typical service lifeis 10000 measurements.It is recommended that the performance should be checked every 2 years andafter maintenance and repair, by retesting at least the requirements in limitsof the error of the cuff pressure indication and air leakage (testing at least at50mmHg and 200mmHg).The device doesn’t need to be calibrated within two years of reliable service.Keep the unit out of reach of infants, young children or pets to avoid inhalationor swallowing of small parts. It is dangerous or even fatal.OPERATING CAUTIONS AND WARNINGSProlonged over-inflation may cause congestion, swelling or bruising in somepeople.Wait a minimum of 2 minutes between measurements (20-minutes isrecommended); excessive frequent measurements may restrict blood circulation.Do not use this device while connected to any monitoring equipment on the samelimb.Consult with your healthcare professional for guidance for use if you have any ofthe following: intravascular shunt; mastectomy on the arm corresponding to themeasurement side of the body.Consult with your healthcare professional before using the device in pregnancyincluding pre-eclampsia, or if diagnosed with arrhythmia or arteriosclerosis.If you experience any discomfort or an abnormality occurs, stop using thedevice immediately; to stop the device during operation, press the U1 or U2(POWER) buttons and the cuff will automatically deflate.ENGLISH 5
CARE & SAFETY INFORMATION Operation outside of stated operating temperature may result in measurementerror or device malfunction; operation environment temperature is: 41 F – 104 F(5 C – 40 C); Humidity: 15% to 90% RH (non-condensing).Never use this unit while operating a vehicle or in the bathtub or shower.To avoid measurement errors, please avoid the condition of strongelectromagnetic field radiated interference signal or electrical fast transient/burstsignal.The blood pressure monitor, its adaptor, and the cuff are suitable for use withinthe patient environment. If you are allergic to polyester, nylon or plastic, pleasedon’t use this device.During use, the patient will be in contact with the cuff. The materials of the cuffhave been tested and found to comply with requirements of ISO 10993-5:2009and ISO 10993-10:2010. This cuff will not cause any potential sensation orirritation reaction.Wireless communications equipment such as wireless home network devices,mobile phones, cordless telephones and their base stations, walkie- talkiescan affect this equipment and should be kept at least a distance d away fromthe equipment. The distanced is calculated by the MANUFACTURER from the80MHz to 5.8 GHz column of Table 4 and Table 9 of IEC 60601-1-2:2014, asappropriate.The equipment is not AP/APG equipment and not suitable for use in the presenceof a flammable anesthetic mixture with air of with oxygen or nitrous oxide.On the rare occasion of a fault causing the cuff to remain fully inflated duringmeasurement, open the cuff immediately. Prolonged high pressure (cuff pressure 300mmHg or constant pressure 15mmHg for more than 3 minutes) applied tothe arm may lead to an ecchymosis.If the cuff pressure reaches 40 kPa (300 mmHg), the unit will automaticallydeflate. Should the cuff not deflate when pressures reaches 40 kPa (300 mmHg),detach the cuff from the arm and press any button to stop inflation.The operator shall not touch output of batteries /adapter and the patientsimultaneously.6 ENGLISH
CARE & SAFETY INFORMATION The plug/adapter plug pins insulates the device from the main supply. Do notposition the device in a position where it is difficult to disconnect from the supplymains to safely terminate operation of ME equipment.STORAGE CAUTIONS AND WARNINGS Storage outside of stated storage temperature may result in measurement error ordevice malfunction; storage environment temperature is: -4 F – 140 F (-20 C –60 C); Humidity: 93%RH (non-condensing) at water vapor pressure to 50hPa.Keep the unit out of reach of children.After charging, unplug the adapter; do not store while plugged in or with adapterattached.When not in use, store the device with the adapter in a dry room and protect itagainst extreme moisture, heat, lint, dust and direct sunlight. Never place anyheavy objects on the storage case.CLEANING CAUTIONS AND WARNINGS Never immerse the unit in water to clean as it may damage the unit.Follow the ‘Care & Maintenance’ portion of this manual for instruction on how toclean and care for your monitor.Don’t use any abrasive or volatile cleaners.ENGLISH 7
INTRODUCTION & INDICATIONS FOR USEIt is recommended that you first seek the advice and recommendation of yourphysician or healthcare professional when using home diagnostic devices,including blood pressure monitors.Blood pressure monitors are for use in measuring blood pressure and heartbeatrate for those with an arm circumference ranging from 8.6” to 16.5” inches(about 22 – 42 cm). It is intended for adult indoor use only.Blood pressure monitors use the oscillometric method to electronically measureyour blood pressure. The monitor detects your blood’s movement through the arteryin your arm and converts the movements into a digital reading. The oscillometricmethod does not require a stethoscope, making the monitor ideal for home use.Blood pressure readings determined with this device are equivalent tomeasurements obtained by a trained healthcare professional using the cuff/stethoscope auscultation method, within the limits prescribed by the AmericanNational Standard for Electronic or Automated Sphygmomanometers.Thank you for purchasing a Blood Pressure Monitor. With proper care and use,your monitor will provide you with many years of reliable readings.PLEASE READ THIS INSTRUCTION MANUALCOMPLETELY BEFORE OPERATING THIS UNIT.8 ENGLISH
STOP!This device includes an ON/OFF switch locatedat the top of the monitor. It is necessary to move the switch tothe ON position for all functions ofthis blood pressure monitor. It is also strongly advised that theswitch is left in the ON position if youare a daily or frequent user. Turningthe switch to OFF will result in having to resetthe time/date feature and over long periodsmay erase memory history. This device will “power down” after readingswith a blank screen and will not activate untilthe POWER (U1 or U2) button(s) are pressedeven when the switch is left ON. Leaving the device in the ON position mayslowly drain the rechargeable battery. Besure to follow the battery prompts to knowwhen to recharge (pg 12-13 of this manual).ENGLISH 9
BLOOD PRESSURE MONITOR FEATURESTOP VIEWON/OFFSwitchDC er1/SetButton2Wide RangeArm CuffUser 2ButtonNOTE: The USER 1 and USER 2 buttons also act asPOWER buttons for this modelDETAILS OF THE DIGITAL DISPLAY SCREEN ANDINTERPRETATION OF THE SYMBOLS ARE INCLUDEDTHROUGHOUT THIS MANUAL.10 ENGLISH
GETTING STARTEDBefore taking a measurement1. Your readings should only be interpreted by your physician or healthcareprofessional with access to your individual medical history. Regular use of ahome blood pressure monitor will allow you to track and record your readingsfor discussion with your physician.2. Conduct your measurement in a quiet place while seated in a relaxed position.Rest for 15 minutes before taking your reading. If an error occurs or you desireto take a second reading, allow 15 minutes between readings for your bloodvessels to return to normal.3. Avoid smoking, eating, taking medication, alcohol, physical activity or anyother stressful activity for 30 minutes prior to taking a reading.4. Always remove any jewelry or constrictive clothing that may interfere with thecuff placement.5. Keep yourself and the monitor still during measuring; do not talk during thereading.6. It is recommended that you take your readings as the same time each day tobetter monitor any indications in your results.7. Record your daily measurement on the included chart or some other writtendocument to share with your physician.Contraindications1. The device should not be used by any person who may be suspected of, or ispregnant.2. The device is not suitable for use on patients with implanted, electrical devices,such as cardiac pacemakers, defibrillators.ENGLISH 11
CHARGING THE BATTERYThis device includes an internal rechargeable batterywith DC Wall Adapter.It is necessary to charge the battery when the unit will notpower up, the low battery symbol appears on the display, whenthe display dims or when the display does not illuminate.Before first use, the device should be fully charged.Charging time may take up to 90 minutes from depletedbattery.Never attempt a measurement while the monitor ischarging or connected to a wall outlet.1.The switch at the top of the device must be in theON position to charge; it will not charge if not inthe ON position.2.Connect the DC cable to the arm monitor and pluginto a standard power outlet.3.When initially connected, the display willilluminate; after several seconds the displaywill dim but the battery icon will remain. Whilecharging the battery symbol will flash to indicatethe current charge level.4.When the device is fully charged, the batterysymbol will stop flashing and remain solid on thedisplay as long as the power cable is plugged in.12 ENGLISHThe ‘Low Battery’ symbolwill appear on the lowerright of the display.
CHARGING THE BATTERY5.Unplug the charger and monitor when fully charged. The ‘battery’ symbolwill not be visible on the display during regular use until it displays as a ‘lowbattery’, indicating it is time to charge the monitor.6.To maintain the settings in the monitor – date, time, stored measurementresults – it is recommended that the battery not be allowed to fully depletewhenever possible.7.A fully charged monitor can take approximately 1 month of dailymeasurements.AdapterType: BLJ06L060100P-UInput: 100-240V, 50-60Hz, 0.2AmaxOutput: 6V1000mAENGLISH 13
SETTING DATE/TIMEThe date/time feature is on the bottomof the display screen. This unit storesthe date, time and year allowing for adate/time stamp on all readings in thememory recall function. The date/timealternate view while in use.1The switch at the top of the device mustbe on the ON position to set the dateand time feature.MEMORYRecall Button2U1/SETButtonU2ButtonThe MEMORY RECALL and U1buttons are necessary for setting thedate/time of this device.HOW TO SET DATE AND TIME1. When the unit is off (a blank display screen), press and hold the U1/SETbutton for 3-5 seconds to enter clock setting mode.2. HOURS/MINUTES—first the hour will flash on the display. Press theMEMORY button to advance the display to the desired hour, press the U1/SET button to confirm your selection and advance to the minute setting. Pressthe MEMORY button to advance to the correct minute, press U1/SET toconfirm.3. MONTH—next the Month will flash on the display. Press the MEMORYbutton to advance the display to the desired month, press the U1/SET buttonto confirm your selection and advance to the date settings.14 ENGLISH
SETTING DATE/TIME4. DATE—repeat the same sequence of step 2 to confirm the MONTH.5. YEAR—repeat the same sequence of step 2 to confirm the YEAR.6. After confirming YEAR, the LCD will display “dONE” and then shut off.PLEASE SET DATE AND TIME BEFORE INITIAL USE TO ENSUREYOUR READINGS ARE LABELED AND STORED IN MEMORYPROPERLY.HourMinutesMonthDateYearCompleteIt is strongly advised that the ON/OFF switch is left in the ONposition if you are a daily or frequent user. Turning the switchto OFF will result in having to reset the time/date feature and over longperiods may erase memory historyENGLISH 15
FITTING & APPLYING YOUR CUFFPROPER CUFF FIT AND PLACEMENT IS CRITICAL IN OBTAININGACCURATE BLOOD PRESSURE MEASUREMENTS. PLEASE READTHESE INSTRUCTIONS CAREFULLY AND CONSIDER CONSULTINGWITH YOUR PHYSICIAN FOR FURTHER DIRECTION.Before applying your blood pressure cuff,be sure your arm is within the appropriatecuff range:Arm Circumference Range Suitable for8.6” – 16.5” (22 – 42 cm).To determine the proper cuff size, measure the circumference of your left upperarm at the point midway between inside bend of your elbow and your shoulder,Fig 1. If your arm is outside of this range, this device may not be suitable for youand your results may be inaccurate.Reminder, it is important to avoid smoking, eating, taking medication, alcoholconsumption or physical activity 30 minutes prior to taking a reading.If for any reason you are unable to or should not use your left arm, please modifythe instructions for cuff application to your right arm. Your physician can help youidentify which arm is best for you to take measurements from.16 ENGLISH
FITTING & APPLYING YOUR CUFFApplying Your Cuff1. Remove any constrictive clothing orjewelry that may interfere with cuffplacement.2. Be seated at a table or desk with yourfeet flat on the floor.3. Hold your left arm in front of you withyour palm facing upward.4. Apply the cuff to your left arm so thatthe digital display face is positionedon the inside area of your arm facingyou, and the word ‘ELBOW’ iscentered over the inside bend of yourelbow.5. Adjust the cuff 3/4” - 1” from thebend of your elbow.6. The cuff should fit comfortably, yetsnugly around your arm. You shouldbe able to insert one finger easilybetween your arm and the cuff.If you are not comfortable with applying your cuff,please seek the assistance of another member of yourhousehold or work with your physician to practice thecuff application. Incorrectly applied cuffs may result ininaccurate readings.ENGLISH 17
TAKING YOUR BLOOD PRESSURE READINGPlease read the preceding portions of this manual prior to taking your first reading.Reminder, it is important to avoid smoking, eating, taking medication, alcoholconsumption or physical activity 30 minutes prior to taking a reading.The switch at the top of the device must be in the ON position to take yourmeasurement; it will not take a reading if not in the ON position.Select the desired user, 1 or 2,beforemeasurement; this selection will determinewhere the measurement is stored forreview.When the monitor is off, press U1/SET OR U2 button toPOWER on the monitor. Throughout the measurement, thecorresponding icon will show on the bottom of the digitaldisplay.1.Rest your elbow on a solid surface with your palm facingupward. Elevate your arm so that the cuff is at the same levelas your heart, Fig 1. Be certain that cuff is elevated to theproper level; you may choose to support your hand with afolded towel or book. Relax your left hand.2.When the monitor is off, press the U1/SET or U2 (POWER)button to POWER on the monitor; the unit will run a self test,Fig 2.3.The display will briefly show ‘0’ before the measurementbegins.4.You will see the numbers increase on the digital display duringFig. 1Fig. 2YOU CAN STOP THE INFLATION OR DEFLATION PROCESS ATANY TIME BY PRESSING THE POWER (U1/U2) BUTTONS.18 ENGLISH
TAKING YOUR BLOOD PRESSURE READINGmeasurement as the cuff inflates.5.When the measurement is complete, the cuff willautomatically deflate and your blood pressuremeasurement and pulse reading results willshow on the display screen at the same time,Fig 3.6.The Hypertension Indicator will indicate yourreading range on the display, Fig 3. See page21 for information regarding interpreting theHypertension Indicator results.7.If an irregular heartbeat was detected duringthe reading, the Irregular Heartbeat Detectionindicator will appear on the display, Fig 4. Seepage 20 for more information on the IrregularHeartbeat Detection feature.8.The reading will automatically be stored in theUSER Memory Bank selected at the start of thereading, up to 250 readings per user.9.Select U1/SET or U2 (POWER) button to turnthe unit off and conserve energy and batterylife.Fig. 310. The unit will automatically shut-off approximately1 minute after use.Fig. 4ENGLISH 19
INTERPRETING YOUR RESULTSIrregular Heartbeat DetectionAn irregular heartbeat is defined as a heartbeat rhythm that is excessively sloweror faster than the average measurement detected while the monitor is conductingthe measurement. When this device detects an irregular rhythm two or more timesduring the reading, the IHB symbol will appear on the display screen.This monitor will operate if the icon appears, but the results may be compromised,especially if this symbol appears often. Please consult with your physician ortrained healthcare professional for further information regarding an irregularheartbeat and if this symbol appears frequently.Normal HeartbeatPulseBloodPressureIrregular HeartbeatShortBeatPulseBloodPressure20 ENGLISHLongBeat
INTERPRETING YOUR RESULTSHypertension IndicatorThis unit features our unique Hypertension Indicator.The color bars on the left side of the monitor displaycorrespond with an icon on the digital display, indicatingwhere the measurement results fall within the AmericanHeart Association standards.The American Heart Association has established globallyaccepted standards for the assessment of high or lowblood pressure readings. The below chart should beconsidered only as a guideline, always consult with yourphysician or health care professional to interpret yourindividual results. Never adjust your medication(s) dosage,or severely alter your diet or exercise routine withoutconsulting with your ) (mmHg)GreenNormal 120and 80GreenPrehypertension / Elevated120-139or80-89YellowHigh Blood Pressure,Stage 1 Hypertension140-159or90-99OrangeHigh Blood Pressure,Stage 2 Hypertension160-180or100-110RedHypertensive Crisis 180or 110ENGLISH 21
MEMORY FUNCTIONSRecalling Measurements in MemoryThe switch at the top of the device must be inthe ON position to review the memory banks; itwill not allow review if not in the ON position.1.When the monitor is off, press and releasethe MEMORY button to access thememory bank.2.Select U1/SET or U2 to review therespective readings in memory.3.The unit will first display the average ofthe last three measurements, Fig 1. If there MEMORYare less than 3 readings in memory, theRecall Buttonmost recent reading will display.4.Press the MEMORY button again tobegin scrolling through the savedmeasurements. Measurements will appearon the display from most current to oldest;the memory number alternate in the sameposition as the date/time stamp.5.All results for a given measurement willdisplay, including measurement results,pulse rate, Hypertension Indicator andIrregular Heartbeat alert (if applicable).The date/time stamp of the measurementwill alternate as well, Fig 2.6.When the number of readings exceeds250, the oldest data will be replaced withthe new record.22 ENGLISH12U1/SETButtonFig. 1U2ButtonFig. 2
MEMORY FUNCTIONSClearing Measurements From MemoryTo delete a all results in a given bank:1.When the monitor is off, press andrelease the MEMORY button toaccess the memory bank feature.2.Press and hold the MEMORY buttonfor 3 seconds; the display will flash dELALL, Fig 1.3.Press the MEMORY button again toconfirm you would like to delete thememory bank, Fig 2; the display willshow dONE and turn off.4.Repeat the same steps for the secondmemory bank if desired.Fig. 1Fig. 2ENGLISH 23
CARE & MAINTENANCEProper care and maintenance of your blood pressure monitor will help ensure longlife for the product; improper use of the monitor may void the included warranty.Before taking a measurement At least 30 min required for ME equipment to warm from the minimum storagetemperature between uses until it is ready for intended use. At least 30 minrequired for ME equipment to cool from the maximum storage temperaturebetween uses until it is ready for intended use. Before use, make sure the device functions safely and is in proper workingcondition.Monitor Care and Maintenance Do not use any liquids on the monitor; use a soft, dry cloth to clean the monitoras needed. Storage outside of stated storage temperature may result in measurement erroror device malfunction; storage environment temperature is: -4 F – 140 F (-20 C– 60 C); Humidity: 10% to 93%RH (non-condensing). Do not attempt to disassemble your monitor; disassembling your monitor mayvoid the manufacturers warranty. Do not subject the monitor to strong shocks; take care not to drop the monitor. No component of this device can be maintained by the user; the circuitdiagrams, component part lists, descriptions, calibration instruction or otherinformation which will assist the user’s appropriately qualified technicalpersonnel to repair those parts of equipment which are designated repairablecan be supplied.24 ENGLISH
CARE & MAINTENANCECuff Care and Maintenance The cuff should not be submerged or washed in a washing machine, but may bespot cleaned with a mild-detergent as needed. Never attempt to iron or dry the cuff; if the cuff becomes wet, allow the cuff toair dry completely before use or storage. To disinfect the cuff, wipe the inside (skin contact side) of the cuff using a clothlightly moistened with 70% - 90% ethyl rubbing alcohol and allow to air dry; itis suggested to disinfect the cuff frequently when used in clinical sittings or if thecuff is contaminated in any way.ENGLISH 25
DEVICE & LABEL SYMBOLSThese symbols may appear on your device, instructions or packaging andmay vary by make and model.Symbol Meaning Symbol MeaningRead This Manual—Allincluded manuals shouldbe read prior to first use.Warning—Symbol2012indicates a warning,prohibition or mandatoryaction that mitigates arisk that is not necessarilyobvious to the deviceoperator. Direct Current.Typ e BF Applied Parts—Indicates that a part ofthis unit comes in contactwith the patient in orderto carry out it’s intendedfunction.Environment Protection—dispose of this productproperly; consult withyour local recyclingordinances for properrecycling and disposal.Serial Number.26 ENGLISHKeep Dry—This deviceshould be kept dry;never submerge the unitor cuff. Consult with theCare & Maintenancesection of this manual forinformation on cleaningyour monitor.Symbol for“MANUFACTURE DATE”.Symbol for indoor useonly.Symbol for “ Class IIEquipment”.F1T1A/250V3.6*10CCC
DISPLAY SYMBOLSSymbolMeaningSYSSystolic Blood Pressure—The ‘top’ blood pressure resultDIADiastolic Blood Pressure—The ‘bottom’ blood pressureresultPULSE/MINPulse Rate—Pulse rate per minute during themeasurementMilligrams of Mercury—Unit of blood pressuremeasurement for this deviceLow Battery—Battery life indicatorPulse Reading—Appears when pulse reading isdisplayedIrregular Heartbeat Symbol—An irregular heartbeat wasdetected during the measurementUser 1/User 2—Indicates which user is activeAverage—The display shows the average of the lastthree measurements in memoryMemory—The display shows the measurementsstored in memoryMovement—Excessive movement was detected duringreading; retake measurementENGLISH 27
TROUBLE SHOOTINGProblemDisplay shows anabnormal result.Display is blankwhen power is on.28 ENGLISHPossible CauseSolutionCuff position was not corrector was not tight enough.Apply the cuff properly and attempta new measurement.Body posture was not correctduring measurement.Review the ‘Taking Your BloodPressure Reading’ portion ofthis manual and attempt a newmeasurement.Speaking, excessivemovement, angry, excitedor nervous anxiety duringmeasurement.Wait a period of time and attempta new measurement after calm hasreturned; do not speak or moveduring measurement.Battery may be dead /without charge.Recharge the battery; follow the‘charging the battery’ instructionportion of this manual.
ERROR CODESProblemSymptomCheck ThisRemedyNo PowerDisplay will notlight up.Power is exhausted.Charge the power.LowBatteriesDisplay is dim orshowsPower is low.Charge the power.The cuff is not secure.Refasten the cuff, relax for amoment and remeasure.The cuff is very tight.Readjust the cuff, not tooloose or tight. Remeasure.E3The pressure of the cuff isexcess.Relax for a moment andremeasure.E 10The monitor detected motion,talking or the pulse is toopoor while measuring.Relax for a moment andremeasure.The measurement processdoes not detect the pulsesignal.Loosen the clothing on thearm and then remeasure.E 21The treatment of themeasurement failed.Relax for a moment andremeasure.EexxA calibration error occurred.Retake the measurment. Ifthe problem persists, contactthe retailer or customerservice for futher assistance.E1ErrorMessagesE2E 11E 20IF AN ERROR CODE PERSISTS OR IS NOT REMEDIED,PLEASE CONTACT CUSTOMER CARE AT 866-326-1313.ENGLISH 29
FCC STATEMENTNOTE:POTENTIAL FOR RADIO/TELEVISION INTERFERENCE (for U.S.A. only)This device complies with Part 15 of the FCC Rules. Operation issubject to the following two conditions: (1) this device may not causeharmful interference, and (2) this device must accept any interferencereceived, including interference that may cause undesired operation.30 ENGLISH
COMPLIED STANDARDS LISTRisk managementEN ISO 14971:2012 / ISO 14971:2007 Medical devicesAp
Veridian Healthcare 1175 Lakeside Drive Gurnee, IL 60031 Made in China #93-1399 10/19 2019 Veridian Healthcare, LLC. 4 .