Transcription
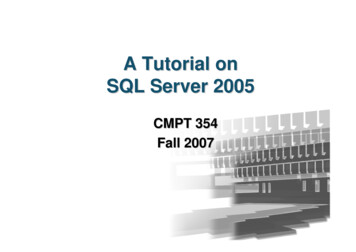
A Tutorial onSQL Server 2005CMPT 354Fall 2007
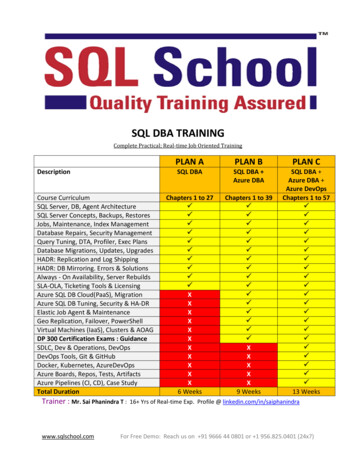
Road MapCreate Database ObjectsCreate adatabaseCreate atableSet aconstraintCreate aviewCreate auserQueryManage the DataImportdataExportdataBackup thedatabaseRestore thedatabase2
Client-Server ArchitectureUser runsa query1Query is sent to the server234Workstation5Results sent backto workstationsDatabase Query is runServeron serverResults aregiven to user3
Versions of SQL Server 2005 Enterprise (only support Windows Server OS)– Includes all of the features of SQL Server 2005 and meets the high demands ofenterprise online transaction processing and data warehousing applications Standard (mostly support Windows Server OS)– Includes the essential functionality needed for e-commerce, data warehousing,and line-of-business solutions Workgroup– Includes the core database features of the SQL Server product line, and is thedata management solution for small organizations that need a database with nolimits on size or number of users Express (free)– A free, easy-to-use, lightweight, and embeddable version of SQL Server 2005,includes powerful features such as SQL Server 2005 Reporting Services andSQL Server 2005 Management Studio Express Developer (can support Windows XP OS)– Includes all of the functionality of Enterprise Edition, but is licensed only fordevelopment, test, and demo use Compact– A free, easy-to-use embedded database engine that lets developers build robustWindows Desktop and mobile applications that run on all Windows platformsReference: 5.aspx4
Administrator’s Duties Install and configure SQL Server 2005Plan and create databasesBack up the databasesRestore the databases when necessarySet up and manage users for SQL ServerManage security for new users and existing usersImport and export dataSet up and manage tasks, alerts, and operatorsManage the replication environmentTune the SQL Server system for the optimalperformance Troubleshoot any SQL Server problems5
Installing SQL Server2005
A Simplified Installation Process Starting from setup.exe Click buttons other than “Cancel” in the Wizard(using most of the default setup)– Select components to install: SQL Server Database Services Workstation components, books online and developmenttools– User “Advanced” option to setup installation path andinclude sample databases– Create a default instance– Use the built-in System account: Local System– User Windows Authentication Mode7
Create Database Objectswith Microsoft SQL ServerManagement Studio
Create A Database Start the Management Studio Connect to your SQL Server Right-click the Databases folder in theconsole tree, choose New Database fromthe context menu Fill in the boxes in the database propertiessheet Click OK when you are finished.9
10
Create A Table Open Management Studio, drill down tothe DB354 database, and expand it Right-click on Tables and select NewTable Type the column name and data type, andsetup column properties (in the window atthe bottom of the screen) Click on the Save button, enter a name forthe table and click OK11
12
Create A Constraint Open Management Studio and drill downto target table and expand it Right-click on Constraints and select NewConstraint In the Check Constraint dialog box typethe constraint expression Click OK to create the constraint13
14
Create Views Open Management Studio and drill down to thetarget database Expand the database and locate View Right-click on View and select New View In Tables page, select target table and click Add Edit the view definition in the appearing GUI Click the Save button Name the view and save it15
16
User Management
Security Modes Windows Authentication Mode– The user logs on to a Windows domain; the username and password are verified by Windows– The user then opens a trusted connection with SQLServer– Since this is a trusted connection, SQL does not needto verify the user password Mixed Mode (SQL Server and Windows)– The user logs on to their network, Windows orotherwise– Next, the user opens a non-trusted connection to SQLServer using a separate user name and password– The user name and password should be verified bySQL Server18
Create a standard login Open Management Studio and expand your serverExpand Security and then click LoginsRight-click Logins and select New Login from the contextmenuIn the Logic name box, type Cmpt354Select SQL Server Authentication modeIn the Password text box, type a complex string andconfirm itUncheck “User must change password at next login”Under Default database, select your target database asthe default databaseClick the OK button19
20
Creating Database UserAccounts Open Management Studio and expand your server Expand Databases by clicking the plus sign next tothe icon Expand the target database, then expand Security Right-click the Users icon and from the contextmenu, select New User Input a User name Click the button at the right of Login name box, thenbrowse all the available names Select the target name (Cmpt354, the one you justcreated) Click OK21
22
Granting, Revoking, and DenyingPermissions Open Management Studio, expand your server andDatabases, then select the target database Expand the database, then expand Security and Users Double-click the target user, and select the Securablespage from the dialog window In Securables section, click Add, and in the Add Objectswindow click OK In the Select Objects window, click Object Types, thencheck Tables and click OK Browse available table and check the target table, thenclick OK If necessary, define more detailed permissions on thetarget table Click OK to return to Enterprise Manager.23
24
Query the Database
Query Analyzer Different than SQL Server 2000, the Query Analyzer isintegrated in Management Studio From the Management Studio menu, select File Æ NewÆ Query with Current Connection In the appearing page, enter the following:– SELECT * FROM TargetDatabase.TableName Click Execute button or press Ctrl E or F5 The query will be executed and gives you resultsOR From the Available Databases listbox, select the targetdatabase Run the query: SELECT * FROM TableName You will get the same result set26
27
Save the Query as a Script File Click “File”Select “Save SQLQuery1.sql as ”Type in the file name you wantClick “Save”28
How to Use T-SQL Creating a DatabaseCREATE DATABASE DB354ON PRIMARY(NAME 'DB354Data',FILENAME 'C:\Microsoft SQL Server\MSSQL\Data\DB354Data.MDF',SIZE 4,MAXSIZE 10,FILEGROWTH 10%)LOG ON(NAME 'DB354Log',FILENAME 'C:\Microsoft SQL Server\MSSQL\Data\DB354Log.LDF',SIZE 1,MAXSIZE 4,FILEGROWTH 10%) Dropping databasesDROP DATABASE DB35429
How to Use T-SQL (cont.) Create a table with a constraintCREATE TABLE Table354(Column1 int NULL,Column2 char(10) Null,CONSTRAINT chk id CHECK (Column1 BETWEEN 0 and 100))30
How to Use T-SQL (cont.) Create a viewUSE DB354CREATE VIEW view354 ON dbo.Table354ASSELECT Column1 FROM Table354 Execute queriesUSE DB354SELECT * FROM Table354 WHERE Column1 5031
Importing and ExportingYour Data
Exporting A Table From Management Studio, locate the targetdatabase and select it Right-click on the database, then select TasksÆ Export Data from the context menu Use the Wizard to setup data source, servername, authentication mode, and database (usethe default ones), then Next Setup data destination, such as a flat file (filepath and name need to be specified), then Nextto copy data from a table Choose a table and use default delimiter option Execute immediately33
Importing a Table Use Import Data WizardSpecify data source firstThen specify data destination– The table to which data is imported needs to bespecified34
35
Database Backups andRestorations
Why Backups? Data can be corrupted by a variety ofproblems:– Failure of the hard disk drive– Failure of the hard disk controller– Motherboard failure– Power outage or spike– Virus attack– Accidental change or deletion of data– Malicious change or deletion of data37
SQL Database Backup Modes Three Recovery Model– Full recovery: everything gets logged in thedatabase– Bulk-logged recovery: Inserts, updates, anddeletes get logged, but bulk copies, SELECTINTO statements, and index creations do not– Simple recovery (default mode) : nothing isheld in the transaction log You can set the mode by using theOptions tab of the database property sheet38
Backup Choices Full database backups: The entire database isbacked up Transaction log backups: Add all the changes inthe transaction log to your full database backups Differential database backups: Back up onlydata that has changed since the last full backup– For example, if a person’s bank account changed 10times in one day, the transaction log backup wouldcontain all 10 changes but the differential backupwould contain just the final amount Filegroup backups: Allow you to back updifferent pieces of the database, based on thevarious files that make up the database39
Backing Up Databases Highlight the target database. Open theBackup dialog box by right-clicking andchoosing Tasks Æ Back Up User default setup to do a simple backup Click OK to start the backup After the backup completes, click OK onthe Confirmation screen to close theBackup dialog box40
Restoring a Full Database Restore the target database by right-clicking itand choosing Tasks Æ Restore Æ Database Select the proper backups Go to the Options tab. Make sure that therecovery completion state is set to LeaveDatabase Nonoperational so you can restore thetransaction log later Click OK to start the restoration. Click OK at theRestoration Confirmation screen41
Programming with SQL Server Connecting to SQL Server with C# Make sure that SQL Server Browserservice is running42
Programming with SQL ServerCode Framework:// Specify reference.using System.Data;using System.Data.SqlClient;// Define SQL Server connection.SqlConnection sqlConn null;// Specify connection parameters. Note that we are connecting to the local server with Window authentication mode.sqlConn new SqlConnection("Data Source your-machine-name;Initial Catalog DB354;Integrated Security True");// Open connection.sqlConn.Open();// Define command object.SqlCommand cmd sqlConn.CreateCommand();// Compose SQL command.String strCommand "insert into users (user name) values ('some name')";// Execute SQL command.if(sqlConn ! null) {try {cmd.CommandText strCommand;cmd.ExecuteNonQuery();}catch(Exception) {return;}}// Close connection.if(sqlConn ! null) {sqlConn.Close();sqlConn null;}43
Submitting Answers toAssignment 1
What to Submit Write a pure SQL query for each problemPut all the 5 queries in ONE script fileUse your student # as the script file nameUse “/* comments */” for commentsAn example script file to submit/* Q1 */SELECT *FROM Customer/* Q2 */Put query here/* Q3 */Put query hereIf your student # is 999999999,save the script file as “9999999.sql”,then submit this file/* Q4 /*Put query here/* Q5 /*Put query here45
How to Submit For submission details, please follow thesubmission instruction on the submissionweb server– https://submit.cs.sfu.ca/46
References SQL Server Books Online Microsoft Developer Network– http://msdn.microsoft.com/ MSDN online documentation– http://msdn.microsoft.com/sqlserver/ Microsoft’s Data Access page:– http://www.microsoft.com/data/ Books in the library47
Thank you!
–– A free, easy-to-use, lightweight, and embeddable version of SQL Server 2005, includes powerful features such as SQL Server 2005 Reporting Services and SQL Server 2005 Management Studio Express Developer (can support Windows XP OS) –– Includes all of the func