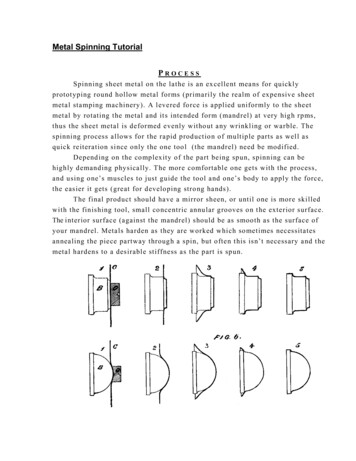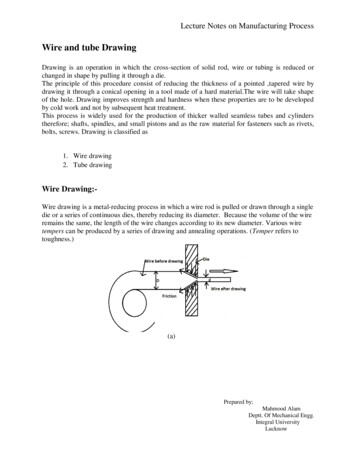
Transcription
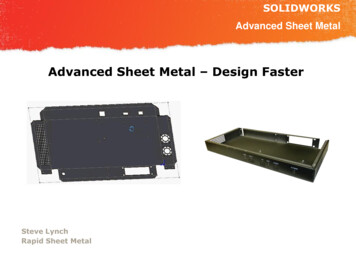
SOLIDWORKSAdvanced Sheet MetalAdvanced Sheet Metal – Design FasterSteve LynchRapid Sheet Metal
Intro Dedicated to quick turn prototypesheet metal parts 15 seats of SolidWorks 2013 CAD Quotes in under 8 hours Unfinished parts in 7 days Plated parts in 9 days We do not design parts 2,500 unique parts quoted a monthon average Quoting & Manufacturing from 3DCAD DataSOLIDWORKSNESWUC 2012
Overview Counter Sinks– Hardware––– Add data to your part, Assembly, and Print fast!Welded box & cover with equations––– Bend RadiiMaterial selectionCustom Properties– Forming tools from our web siteBe careful with SolidWorks Sheet Metal Defaults–– RSM web site tableMate referencesHole Sizes .003 -.000Rapid Forming tools– How to find through hole sizeSave time, make it onceGet the idea completed and manufacturedAdd welding locking features rapidlyAdvanced Bend Relief examples––Using library featureUsing subtract bodiesSOLIDWORKSNESWUC 2012
Overview Cont. Videos– Hem– Offset– Bump forming Design Fast– Use shell– Delete face– Get the idea down then engineer thedesign Pictures of before and after– Welding– Solid parts cut for manufacturingSOLIDWORKSNESWUC 2012
Counter Sinks82 Counter Sink in .119” steel.82 Counter Sink in .047” steel.SOLIDWORKSNESWUC 2012
Counter Sinks82 Counter Sink in .119” steel.82 Counter Sink in .047” steel.SOLIDWORKSNESWUC 2012
Counter SinksSOLIDWORKSNESWUC 201282 Counter Sink in .047” thick steel.
SOLIDWORKSCounter SinksNESWUC 2012Ø.143 BeforeØ.160 AfterØ.017 DeltaØ.160
Counter SinksSOLIDWORKSNESWUC 2012It’s better not dimensioning your through holes
Hardware – RSM Hardware tableSOLIDWORKSNESWUC eference toHardwaredata
Hardware – Mate ReferenceSOLIDWORKSNESWUC 2012Problem Rivets and hardware withcountersunk edges are hard to automate
Hardware – Mate ReferenceSOLIDWORKSNESWUC 2012We have noticed it iscommon to select thistop edge as the defaultMate reference.
Hardware – Mate ReferenceSOLIDWORKSNESWUC 2012We suggest adding a .001” extrude then a .0005” cut to the topface to create a 90 plane intersection to be used as the defaultmate reference
Hardware – Mate ReferenceSOLIDWORKSNESWUC 2012Now as you dragthis part from yourlibrary it will snapinto place everytime.
Hardware – Mate ReferenceProblem Flushstyle hardwaredoes not automate and sitflushSOLIDWORKSNESWUC 2012
Hardware – Mate ReferenceSOLIDWORKSNESWUC 2012We have noticed itis common to selectthis top edge as thedefault Matereference.
Hardware – Mate ReferenceSOLIDWORKSNESWUC 2012This results in thehardware not sittingflush. Or a multiplemates are added.
Hardware – Mate ReferenceSOLIDWORKSNESWUC 2012We suggest cutting .005 then extrude a .0005 from the top faceto create a 90* plane intersection to be used as the default matereference.
Hardware – Mate ReferenceSOLIDWORKSNESWUC 2012Now as you dragthis part from yourlibrary it will snapinto place everytime.
Hardware – Mate ReferenceWhen adding Mate ReferencesTry and use just one line. Thisline should intersect two90 faces. Less is more!SOLIDWORKSNESWUC 2012
Modifying the Hole WizardSOLIDWORKSNESWUC 2012Correcting Hardware hole sizesis the most common edit weneed to make to customersmodels.Step 1Select ConfigureThis is a way to modify your hole wizard which is ADVANCED and done at your own risk
Modifying the Hole WizardSOLIDWORKSNESWUC 2012Step 2Select Hole WizardThis is a way to modify your hole wizard which is ADVANCED and done at your own risk
Modifying the Hole WizardSOLIDWORKSNESWUC 2012Step 3SelectANSI INCHThis is a way to modify your hole wizard which is ADVANCED and done at your own risk
Modifying the Hole WizardSOLIDWORKSNESWUC 2012Step 4Press CopyEnter New Name(I used “Pem CL UNI”)This is a way to modify your hole wizard which is ADVANCED and done at your own risk
Modifying the Hole WizardSOLIDWORKSNESWUC 2012Step 5ChooseStep 6Uncheckeverythingbut StraightHolesThis is a way to modify your hole wizard which is ADVANCED and done at your own risk
Modifying the Hole WizardSOLIDWORKSNESWUC 2012Step 7UncheckEverythingBut LetterDrill HolesThenSelectThis is a way to modify your hole wizard which is ADVANCED and done at your own risk
Modifying the Hole WizardSOLIDWORKSNESWUC 2012Step 8Now addYour dataGet the data fromPEM & split thetolerances.Add .001This is a way to modify your hole wizard which is ADVANCED and done at your own risk
Modifying the Hole WizardSOLIDWORKSNESWUC 2012Step 9By mouse selecting theRow you can press thedelete key to removeextra rowsGet the data from PEMThis is a way to modify your hole wizard which is ADVANCED and done at your own risk
Modifying the Hole WizardSOLIDWORKSNESWUC 2012Step 10Save and closeThis is a way to modify your hole wizard which is ADVANCED and done at your own risk
Modifying the Hole WizardStep 11Add Hole wizardto a part Select“PEM CL UNI”Step 12Choose yourHardwareFor sheet metaluse up to nextSOLIDWORKSNESWUC 2012
Modifying the Hole WizardSOLIDWORKSNESWUC 2012Step 12Enjoy the benefits of A clean nice looking treeStep 12Choose yourHardware
Rapid Sheet Metal online Form ToolsSOLIDWORKSNESWUC 2012Why use a form tool from the Rapid Tooling Library? Save Time! Save Money!www.rapidsheetmetal.com/tooling
Rapid Sheet Metal online Form ToolsStep 1 www.rapidsheetmetal.comStep 2 Click Rapid tooling librarySOLIDWORKSNESWUC 2012
Rapid Sheet Metal online FormToolsStep 3Choose afileStep 4Downloadand dragonto a sheetmetal partSOLIDWORKSNESWUC 2012
SOLIDWORKSSetting I wish could be set as defaultNESWUC 2012Problem: We have noticed the flangeLength settings tend to be set as shown.These settings prevent changing theinside bend radii without modifying thedimensions of the part.
SOLIDWORKSSetting I wish could be set as defaultNESWUC 2012Solution: As long as only the settingsshown are used. This will allow changingthe inside bend radii without modifyingthe dimensions of the part.
SOLIDWORKSSetting I wish could be set as defaultNESWUC 2012Show demonstration
Sheet Metal Material ListSOLIDWORKSNESWUC 2012You can build this list from SolidWorks Materials AISI 304 AISI 316 5052-H32 6061-T6 Galvanized Steel Galvaneal ( Not on the list Copy Galvanized Steel and rename) Plain Carbon Steel (1008 is not on the list)38
Setting I wish could be set as defaultSOLIDWORKSNESWUC 2012Please add these to yourmaterial list. This is an fast easyway to set your material type
Setting I wish could be set as defaultSOLIDWORKSNESWUC 2012SolidWorks Why can’t you add finish optionsdirectly to the model tree. This would be the bestway to link to the drawings
Custom Properties –SOLIDWORKSNESWUC 2012Problem: Adding finish and otherinformation to parts require makingprints. When making prints you haveto type in and remember specialplating codes and finishes.We suggest using the customproperties tab to add, view, and storethis information.
Custom Properties –SOLIDWORKSNESWUC 2012Step 1 Click “Create Now.”
SOLIDWORKSCustom Properties –NESWUC 2012Step 2 Click “List”Step 3 Add your valuesStep 4 Set to Custom Tab
Custom Properties –SOLIDWORKSNESWUC 2012Step 5 Change These to“Finish”Step 6 Save to a place youwill reference in step 7
Custom Properties –SOLIDWORKSNESWUC 2012Step 7 add thefolder you justsaved to “CustomProperty Files”
Custom Properties –Open a part and clickSOLIDWORKSNESWUC 2012
Custom Properties –Now set your finish value and applyThis is now added to your partpropertiesSOLIDWORKSNESWUC 2012
Custom Properties –SOLIDWORKSNESWUC 2012This is saved to your part. It is also linked to your print ifyour using a standard SolidWorks layout
Custom Properties –SOLIDWORKSNESWUC 2012Please use Rapid Sheet Metal’s web site for platingspecifications http://www.rapidsheetmetal.com/resources
Forming toolsSOLIDWORKSNESWUC 2012 Standard tooling saves money. Short flanges can be expensive.
Forming toolsSOLIDWORKSNESWUC 2012 Badly designed return flanges crash into thetooling
Forming toolsSOLIDWORKSNESWUC 2012Rapid Sheet Metal’s 3D Online Tooling Library Has Forming Tools!
Forming toolsSOLIDWORKSNESWUC 2012After downloading the punch tooling add a punch tool toyour assembly. This will show how much room you willhave.
Forming toolsSOLIDWORKSNESWUC 2012 Jogs are useful for stiffening and creating flushmounted overlapping surfaces.
Forming tools How to measure Offset – (JOG)Standard SizesSOLIDWORKSNESWUC 2012
Before and afterBeforeSOLIDWORKSNESWUC 2012After
Before and afterBeforeSOLIDWORKSNESWUC 2012After
Before and afterBeforeSOLIDWORKSNESWUC 2012After
Before and afterBeforeSOLIDWORKSNESWUC 2012After
SOLIDWORKSNESWUC 2012 Paper size – B size is standard in manufacturing Pretty views– easy to read Hidden lines / tangent lines – avoid busy confusion Revision notes – keep it brief Always provide a BOM Welding Notes Grain Direction Material Type - Finish
Simple Flat Flat layouts Overall X length Overall Y length Simple Hole Chart Grain directionExtra Credit Perimeter Side View Dim ThicknessSOLIDWORKSNESWUC 2012
Manufacturer wish list SOLIDWORKSNESWUC 2012Don’t use .030 -.000 DimensionsAdd some space between covers and boxes Min .003Don’t dimension everythingMake documentation that a manufacturer can read quicklyInside bend radii .030 unless Alum and over .090 thick.Min flange length is 4*material thicknessKeep holes 4*material thickness away from bendsClosed hems are easier to manufacture and this more cost effective than Openhems:Closed hem length should be at least 8X the material thickness;The angle on an Embossed feature should be less than 45 degrees and theembossment depth should be less than 4X the material thickness;When using hardware, be aware of any manufacturing requirements such as:– Minimum material thicknesses;– Center Line to the edge– Stainless Steel
SOLIDWORKSNESWUC 2012 Welding– Use a material thickness of .040” or greater;– Aluminum is the most difficult material to weld. Stainless Steel is the nextmost difficult material to weld:– Cold-rolled steel is easiest and thus least expensive material to weld;– Spot weld flanges should be a minimum of .50” long;– Stitch welding produces less warping than seam welding Rapid Sheet Metal Standard Internal Bend Radius Tooling 00
More information availableRapid Sheet Metal’sweb site can IDWORKSNESWUC 2012
Welding –Use a material thickness of .040” or greater; –Aluminum is the most difficult material to weld. Stainless Steel is the next most difficult material to weld: –Cold-rolled steel is easiest and thus least expensive material to w