Transcription
DEPLOYMENT GUIDELoad Balancing RSAAuthentication Managerv1.3.1Deployment Guide
Contents1. About this Guide. 32. Loadbalancer.org Appliances Supported. 33. Loadbalancer.org Software Versions Supported. 34. RSA Authentication Manager Software Versions Supported. 35. RSA Authentication Manager. 46. Load Balancing Authentication Manager. 4Load Balancing & HA Requirements.4Persistence (aka Server Affinity).4X-Forwarded-For Headers.4Port Requirements.4Load Balancer Deployment.5Load Balancer Deployment Mode.5RSA Authentication Manager Configuration. 5RSA Authentication Manager Topology Diagrams.77. Loadbalancer.org Appliance – the Basics. 8Virtual Appliance Download & Deployment.8Initial Network Configuration.9Accessing the Web User Interface (WebUI).9HA Clustered Pair Configuration.108. Appliance Configuration for RSA Authentication Manager. 11Configure Layer 7 Global Settings.11Configure the Virtual Service (VIP).11Define the Real Servers (RIPs).12Finalizing the Configuration.129. Testing & Verification. 12Using System Overview.12Layer 7 Statistics Report.13Appliance Logs.1310. Technical Support. 1311. Further Documentation. 1412. Conclusion. 1413. Appendix. 151 – Clustered Pair Configuration – Adding a Slave Unit.1514. Document Revision History. 172 Copyright Loadbalancer.org www.loadbalancer.org sales@loadbalancer.org
1. About this GuideThis guide details the steps required to configure a load balanced RSA Authentication Manager environment utilizingLoadbalancer.org appliances. It covers the configuration of the load balancers and also any RSA AuthenticationManager configuration changes that are required to enable load balancing.For more information about initial appliance deployment, network configuration and using the Web User Interface(WebUI), please also refer to the relevant Administration Manual: v7 Administration Manual v8 Administration Manual2. Loadbalancer.org Appliances SupportedAll our products can be used with Authentication Manager. The complete list of models is shown below:Discontinued ModelsCurrent Models *Enterprise R16Enterprise R20Enterprise VA R16Enterprise MAXEnterprise VAEnterprise 10GEnterprise R320Enterprise 40GEnterprise UltraEnterprise VA R20Enterprise VA MAXEnterprise AWSEnterprise AZURE **Enterprise GCP *** For full specifications of these models please refer to: http://www.loadbalancer.org/products/hardware** Some features may not be supported, please check with Loadbalancer.org support3. Loadbalancer.org Software Versions Supported V7.6.4 and later4. RSA Authentication Manager Software Versions Supported RSA Authentication Manager – v8.0 & later3 Copyright Loadbalancer.org www.loadbalancer.org sales@loadbalancer.org
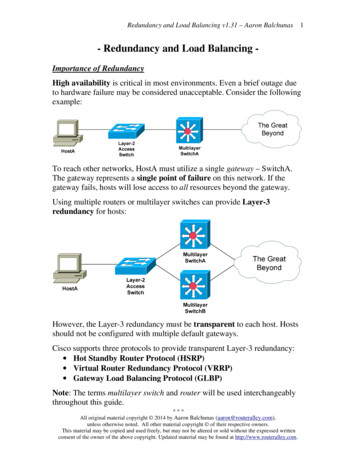
5. RSA Authentication ManagerRSA Authentication Manager is a multi-factor authentication solution that verifies authentication requests and centrallyadministers authentication policies for enterprise networks. Authentication Manager can be used to to manage securitytokens (RSA SecureID Tokens), users, multiple applications, agents, and resources across physical sites, and to helpsecure access to network and web-accessible applications, such as SSL-VPNs and web portals.6. Load Balancing Authentication ManagerNote: It's highly recommended that you have a working RSA Authentication Manager environmentfirst before implementing the load balancer.Load Balancing & HA RequirementsA load balancer distributes authentication requests and facilitates failover between multiple Web Tier Servers. Adding aload balancer to your deployment provides the following benefits: The load balancer distributes Risk Based Authentication (RBA) requests between the primary and the replicaWeb Tiers. The load balancer can be configured to forward Self-Service Console requests coming through the HTTPS portto the Web Tier or the primary instance hosting the Self-Service Console. If the primary in stance is notfunctioning and a replica instance is promoted to take its place, users can continue to use the same URL forthe Self-Service Console. Provides failover if one of the Authentication Manager instances or Web Tiers experiences downtime.Persistence (aka Server Affinity)The load balancer must send a client to the same server repeatedly during a session. The load balancer must send theclient to the same Authentication Manager instance or Web Tier server, depending on your deployment scenario, duringan authentication session.X-Forwarded-For HeadersSince the load balancer acts as a proxy, all Web Tier requests appear to come from the load balancer. RSA/EMCrecommend that X-Forwarded-For headers should be enabled on the load balancer – this is the default configurationfor layer 7 VIPs.Port RequirementsThe following table shows the port list that must be load balanced.TCP PortUses443 or 7023HTTPS or HTTPS alternative port4 Copyright Loadbalancer.org www.loadbalancer.org sales@loadbalancer.org
Load Balancer DeploymentTo load balance the Web Tier, a single VIP is required as shown below. Clients then connect to the Virtual Service (VIP)on the load balancer rather than connecting directly to a one of the Web Tier servers. These connections are then loadbalanced across the Web Tier servers distribute the load according to the load balancing algorithm selected.Web TeirServer 1clientconnectionsLBVIPClusteredPairWeb TierServer 2VIPs Virtual IP AddressesNote: The load balancer can be deployed as a single unit, although Loadbalancer.org recommends aclustered pair for resilience & high availability. Please refer to section 1 in the appendix on page 15 for moredetails on configuring a clustered pair.Load Balancer Deployment ModeLayer 7 SNAT mode (HAProxy) is recommended for RSA Authentication Manager and is used for the configurationpresented in this guide. This mode offers good performance and is simple to configure since it requires no configurationchanges to the RSA servers.Layer 4 DR mode, NAT mode and SNAT mode can also be used if preferred. For DR mode you'll need to solve the ARPproblem on each RSA server (please see the Administration Manual and search for “DR mode considerations”), for NATmode the default gateway of the RSA servers must be the load balancer.RSA Authentication Manager Configuration1.Log on to the Operation console and go to: Deployment Configuration - Virtual Host & Load Balancing5 Copyright Loadbalancer.org www.loadbalancer.org sales@loadbalancer.org
2.Enter your SuperAdmin credentials and click OK3.Check the box: Configure a virtual host and load balancers then fill in the FQHN (Fully Qualified Host Name) ofyour Load Balancer and the IP Address, leave the default port number to 443 and finally click on save6 Copyright Loadbalancer.org www.loadbalancer.org sales@loadbalancer.org
RSA Authentication Manager Topology Diagrams7 Copyright Loadbalancer.org www.loadbalancer.org sales@loadbalancer.org
7. Loadbalancer.org Appliance – the BasicsVirtual Appliance Download & DeploymentA fully featured, fully supported 30 day trial is available if you are conducting a PoC (Proof of Concept) deployment. TheVA is currently available for VMware, Virtual Box, Hyper-V, KVM and XEN and has been optimized for each Hypervisor. Bydefault, the VA is allocated 1 CPU, 2GB of RAM and has an 8GB virtual disk. The Virtual Appliance can be downloadedhere.Note: The same download is used for the licensed product, the only difference is that a license key file(supplied by our sales team when the product is purchased) must be applied using the appliance'sWebUI.Note: Please refer to the Administration Manual and the ReadMe.txt text file included in the VA download8 Copyright Loadbalancer.org www.loadbalancer.org sales@loadbalancer.org
for more detailed information on deploying the VA using various Hypervisors.Initial Network ConfigurationThe IP address, subnet mask, default gateway and DNS settings can be configured in several ways as detailed below:Method 1 - Using the Network Setup Wizard at the consoleAfter boot up, follow the instructions on the console to configure the IP address, subnet mask, default gateway and DNSsettings.Method 2 - Using the WebUIUsing a browser, connect to the WebUI on the default IP address/port: https://192.168.2.21:9443To set the IP address & subnet mask, use: Local Configuration Network Interface ConfigurationTo set the default gateway, use: Local Configuration RoutingTo configure DNS settings, use: Local Configuration Hostname & DNSAccessing the Web User Interface (WebUI)1.Browse to the following URL: https://192.168.2.21:9443/lbadmin/(replace with your IP address if it's been changed)* Note the port number 94432.Login to the WebUI:Username: loadbalancerPassword: loadbalancerNote: To change the password , use the WebUI menu option: Maintenance Passwords.Once logged in, the WebUI will be displayed as shown below:9 Copyright Loadbalancer.org www.loadbalancer.org sales@loadbalancer.org
HA Clustered Pair ConfigurationLoadbalancer.org recommend that load balancer appliances are deployed in pairs for high availability. In this guide asingle unit is deployed first, adding a secondary slave unit is covered in section 1 of the Appendix on page 15.10 Copyright Loadbalancer.org www.loadbalancer.org sales@loadbalancer.org
8. Appliance Configuration for RSA Authentication ManagerConfigure Layer 7 Global SettingsTo ensure that client connections remain open during periods of inactivity, the Client Timeout and Server Timeoutvalues must be changed from their default values of 43 seconds and 45 seconds respectively to 5 minutes. To do thisfollow the steps below:1.Using the WebUI, navigate to: Cluster Configuration Layer 7 – Advanced Configuration2.Change Client Timeout to 300000 as shown above (i.e. 5 minutes)N.B. You can also enter 5m rather than 3000003.Change Real Server Timeout to 300000 as shown above (i.e. 5 minutes)N.B. You can also enter 5m rather than 3000004.Click the Update button to save the settingsConfigure the Virtual Service (VIP)1.Using the WebUI, navigate to: Cluster Configuration Layer 7 – Virtual Service and click Add a New VirtualService2.Enter the following details:11 Copyright Loadbalancer.org www.loadbalancer.org sales@loadbalancer.org
3.Enter an appropriate label for the VIP, e.g. RSA-WEB4.Set the Virtual Service IP address field to the required IP address, e.g. 192.168.10.1005.Set the Virtual Service Ports field to 4436.Click UpdateDefine the Real Servers (RIPs)1.Using the WebUI, navigate to: Cluster Configuration Layer 7 – Real Servers and click Add a new Real Servernext to the newly created VIP2.Enter the following details:3.Enter an appropriate label for the RIP, e.g. WT14.Change the Real Server IP Address field to the required IP address, e.g. 192.168.10.1015.Change the Real Server Port field to 4436.Click Update7.Repeat the above steps to add your other Web Tier server(s)Finalizing the ConfigurationTo apply the new settings, HAProxy must be restarted as follows:1.Using the WebUI, navigate to: Maintenance Restart Services and click Restart HAProxy9. Testing & VerificationUsing System OverviewThe System Overview is accessed using the WebUI. It shows a graphical view of the VIP and the RIPs (i.e. the Web TierServers) and shows the state/health of each server as well as the state of the each cluster as a whole. The examplebelow shows that both servers are healthy and available to accept connections.12 Copyright Loadbalancer.org www.loadbalancer.org sales@loadbalancer.org
Layer 7 Statistics ReportThe Layer 7 Statistics report gives a summary of all layer 7 configuration and running stats as shown below. This can beaccessed in the WebUI using the option: Reports Layer 7 Status. In this example, WT1 is up and available, WT2 isdown.Appliance LogsLogs can be very useful when trying to diagnose issues. Layer 7 logging is not enabled by default (because its extremelyverbose) and can be enabled using the WebUI option: Cluster Configuration Layer 7 – Advanced Configuration, andthen viewed using the option: Logs Layer 7.10. Technical SupportIf you have any questions regarding the appliance or would like assistance designing your deployment, please don'thesitate to contact our support team: support@loadbalancer.org.13 Copyright Loadbalancer.org www.loadbalancer.org sales@loadbalancer.org
11. Further DocumentationThe Administration Manual contains much more information about configuring and deploying the appliance. It's available nistrationv8.pdf12. ConclusionLoadbalancer.org appliances provide a very cost effective solution for highly available load balanced RSA AuthenticationManager environments.14 Copyright Loadbalancer.org www.loadbalancer.org sales@loadbalancer.org
13. Appendix1 – Clustered Pair Configuration – Adding a Slave UnitIf you initially configured just the master unit and now need to add a slave - our recommended procedure, please referto the relevant section below for more details:Note: A number of settings are not replicated as part of the master/slave pairing process andtherefore must be manually configured on the slave appliance. These are listed below: Hostname & DNS settings Graphing settingsNetwork settings including IP addresses, bonding configuration and VLANsRouting configuration including default gateways and static routesDate & time settingsPhysical – Advanced Configuration settings including Internet Proxy IP address & port, Firewalltable size, SMTP relay and Syslog server SNMP settingsFirewall Script & Firewall Lockdown Script settingsSoftware updatesVersion 7:Please refer to Chapter 8 – Appliance Clustering for HA in the v7 Administration Manual.Version 8:To add a slave node – i.e. create a highly available clustered pair: Deploy a second appliance that will be the slave and configure initial network settings Using the WebUI, navigate to: Cluster Configuration High-Availability Configuration15 Copyright Loadbalancer.org www.loadbalancer.org sales@loadbalancer.org
Specify the IP address and the loadbalancer users password (the default is 'loadbalancer') for the slave (peer)appliance as shown above Click Add new node The pairing process now commences as shown below: Once complete, the following will be displayed: To finalize the configuration, restart heartbeat and any other services as prompted in the blue message box atthe top of the screenNote: Clicking the Restart Heartbeat button on the master appliance will also automatically restartheartbeat on the slave appliance.Note: Please refer to chapter 9 – Appliance Clustering for HA in the Administration Manual for moredetailed information on configuring HA with 2 appliances.16 Copyright Loadbalancer.org www.loadbalancer.org sales@loadbalancer.org
14. Document Revision HistoryVersionDateChangeReason for ChangeChanged By1.3.014 August 2019Styling and layoutGeneral styling updatesRJC1.3.128 August 2020New title pageBranding updateAHUpdated Canadian contactdetailsChange to Canadian contactdetails17 Copyright Loadbalancer.org www.loadbalancer.org sales@loadbalancer.org
About Loadbalancer.orgLoadbalancer.org’s mission is to ensure that its clients’ businesses are never interrupted. The load balancerexperts ask the right questions to get to the heart of what matters, bringing a depth of understanding to eachdeployment. Experience enables Loadbalancer.org engineers to design less complex, unbreakable solutions - andto provide exceptional personalized support.United KingdomCanadaLoadbalancer.org Ltd.Compass House, North HarbourBusiness Park, Portsmouth, PO6 4PSUK: 44 (0) 330 380 Loadbalancer.org Appliances Ltd.300-422 Richards Street, Vancouver,BC, V6B 2Z4, CanadaTEL: 1 866 998 United StatesGermanyLoadbalancer.org, Inc.4550 Linden Hill Road, Suite 201Wilmington, DE 19808, USATEL: 1 ncer.orgLoadbalancer.org GmbHTengstraße 2780798,München, GermanyTEL: 49 (0)89 2000 2179sales@loadbalancer.orgsupport@loadbalancer.org Copyright Loadbalancer.org www.loadbalancer.org
Aug 14, 2019 · RSA Authentication Manager is a multi-factor authentication solution that verifies authentication requests and centrally . Note: The same download is used for the licensed product, the only difference is that a license key file (supplied by our sales team when the pr