Transcription
RISA-3D Rapid Interactive Structural Analysis – 3 DimensionalVersion 4.1 User’s GuideRISATECHNOLOGIES26212 Dimension Drive, Suite 200Lake Forest, California 92630-7801(949) 951-5815(949) 951-5848 (FAX)www.risatech.com
Installation,QVWDOODWLRQ RISA-3D has been written specifically for 32 bit Windows operating systems.More specifically, RISA-3D has been written for Windows95/98/2000 andWindowsNT Version 4.0 (or later). There are no additional requirements; if yoursystem is running Windows 95/98/2000/NT, you will be able to run RISA-3D.To install RISA-3D please follow these instructions:1) Put the RISA-3D disk 1 in your computers “A” (3.5inch) drive.2) Click the Windows Start button and select Run.3) In the Run dialog box type “a:setup” and then click the OK button.4) Follow the on-screen instructions.After you have installed RISA-3D, be sure to send us your registration card!'LVFODLPHU We intend that the information contained in this manual and the RISA-3Dcomputer program be accurate and reliable, but it is entirely the responsibility ofthe program user to verify the accuracy and applicability of any results obtainedfrom RISA-3D and any related software programs.RISA-3D is intended for use by professional engineers and architects who possessan understanding of structural mechanics.In no event will RISA Technologies or its officers be liable to anyone for anydamages, including any lost profits, lost savings or lost data. In no event willRISA Technologies or its officers be liable for incidental, special, punitive orconsequential damages or professional malpractice arising out of or in connectionwith the usage of the RISA-3D computer program or any other computerprograms or documentation, even if RISA Technologies or its officers have beenadvised of or should be aware of the possibility of such damages.If you do not agree with the terms of this disclaimer or the terms of the LicenseAgreement, return this manual and the program disk to RISA Technologieswithin thirty days for a full refund. You also must delete any installations orcopies of RISA-3D./LFHQVH JUHHPHQW Copyright 1985-2000 by RISA Technologies. All rights reserved.This document may not be duplicated in any way without expressed writtenconsent of RISA Technologies. Making copies of this document or any portion ofit is in violation of United States copyright laws and various international treaties.Version 4.11
RISA-3D User’s GuideThe computer software program RISA-3D provided to you on electronic media isprotected by United States copyright laws and various international treaties. Youare specifically limited to the use of this program on no more than one CPU at anygiven time. The network edition of RISA-3D is licensed for simultaneous use ona certain maximum number of network stations; this maximum number of stationsmay vary on a per license basis.As part of the license to use RISA-3D, the program user acknowledges thereading, understanding and acceptance of all terms of the Disclaimer listedabove.RISA-3D may not be reviewed, compared or evaluated in any manner in anypublication without expressed written consent of RISA Technologies.You may not disassemble, decompile, reverse engineer or modify in any way theRISA-3D executable modules.The terms of this license agreement are binding in perpetuity.7HFKQLFDO 6XSSRUW Complete program support is available to registered owners of RISA-3D and isincluded in the purchase price. This support is provided for the life of theprogram. See the Technical Support section in the Help File for a list of yoursupport options.The “life of the program” is defined as the time period for which that version ofthe program is the current version. In other words, whenever a new version ofRISA-3D is released, the life of the previous version is considered to be ended.RISA Technologies will support only the current version of RISA-3D.0DLQWHQDQFH Program maintenance includes all upgrades to RISA-3D, defect notifications anddiscounts on new products.The first year of program maintenance is included in the purchase price. After thefirst year, you will be given the opportunity to continue program maintenance onan annual basis. You are under no obligation to continue program maintenance, ofcourse, but if you decide to discontinue maintenance you will no longer receiveRISA-3D program upgrades.If you let your maintenance lapse and decide later that you wish to reinstate it,you will have to catch up# on the maintenance fees with the following terms: Ifyour maintenance expired more than a year ago, you will need to pay themaintenance fee for the previous year, plus the maintenance fee for the comingyear, for a total of two years, to get reinstated. You would then receivemaintenance for the next year. If your maintenance expired less than a year ago,you would only need to pay the maintenance fee for the current year to getreinstated, but your maintenance would expire again once the current year is up.2Version 4.1
Tutorial – Getting Started78725, / This tutorial is intended for the first time user of RISA-3D or those who need arefresher on how the program works. To complete this tutorial in its entirety willtake 3 to 4 hours. We’ve broken the tutorial up into three parts so you don’t haveto do it all at once.The tutorial is intended to teach you the basics of defining and solving models inRISA-3D, and also how to review the results. We won’t go into a lot of depthregarding the analytical aspects of RISA-3D here; that’s what the on-line help fileis for. What we will cover is how and when to apply RISA-3D features to helpyou be most productive. For example, we’ll perform steel and wood code checksin this tutorial, but we won’t discuss the specifics of how those code checks arecalculated; that is covered in excruciating detail in the sections Steel CodeChecking and Design and Wood Code Checking and Design in the help file.2YHUYLHZ Before we get started on the actual tutorial a general overview is in order. This issimply an introduction to the layout of the program and it’s basic concepts. Don’tworry if you don’t fully understand the features and the process here because thatis what the tutorial is for. This is simply a rough picture of where we are going.All the details will be explained in the tutorial sections that follow.Using computer software to perform structural design is essentially a three-stepprocess. First, you define your model. Next you solve that model to obtainsolution results. Last, you review those solution results to see how your modelperformed and determine if changes are needed. Usually you will need to repeatthe cycle several times before you arrive at a final design. The purpose of RISA3D is to speed up this process.RISA-3D mainly has two complementary sets of tools; graphics based drawingtools and customized spreadsheets. We say “complementary” because these toolswork together very closely. Everything that you do graphically is automaticallyrecorded in the spreadsheets for you. You may view and edit these spreadsheets atany time. The converse is also true with few exceptions; what you enter and viewin the spreadsheets may be viewed and edited graphically at any time. You willbe thoroughly exposed to both sets of these tools in this tutorial.Defining the ModelSome data such as cross section properties, load combinations, oddball jointcoordinates , etc. are most easily entered numerically, and the best tool fornumeric input is a spreadsheet. Other data such as regularly spaced joints,member connectivity, regular loadings and wholesale changes are better handledusing graphic drawing tools.Version 4.13
RISA-3D User’s GuideTypically you’ll use the spreadsheets to define some preliminary information suchas material and section properties. Then you will proceed to the drawing grid andgraphically draw the bulk of your model and apply loads. RISA-3D allows you tospecify drawing grids with equal and/or unequal increments to make drawing themodel easier.Other graphic edit options are built around RISA-3D’s graphic selection tools.These features let you graphically edit the model or parts of it. For example, tomodify boundary conditions, you would choose the condition you want to applyand select the joints to modify.Keep in mind that almost all the model data can be edited either way (graphicallyor numerically in the spreadsheet). You can decide for yourself which method ispreferable.Solving the ModelOnce you’ve got the model defined, you’ll need to solve the model. RISA-3Dfeatures fast 32-bit solution speed, so your model solutions will be pretty quick.Once the model is solved you’ll be presented with the results.Reviewing the ResultsResults review is similar to data editing in RISA-3D in that you can do itgraphically and via the spreadsheet. All of the spreadsheet solution results(displacements, forces, stresses, etc.) will be listed in the Results menu. You cansort and filter these results as you are viewing them. For example you could go tothe Steel Code Check results, sort based on code check values, then exclude allmembers with a code check value below 0.7, leaving results only for thosemembers you’re most interested in.For the graphics, you can click on the Plot Optionsbutton and choose theresults that you want to display. For example, you can specify that momentdiagrams be displayed on all the members. You can also view rendered models,plate stress contours, animated deflections or mode shapes and much more.,PSRUWDQW VVXPSWLRQ The tutorial is written with the assumption that RISA-3D has not been customizedand is in the default, installed state. RISA-3D allows you to customize its settingsso that it best suits your needs. If the installation of RISA-3D that you are usinghas been customized then the options may not agree with those that are assumedhere, which may lead to some confusion. You may reset the program defaults byselecting this option on the Options menu.4Version 4.1
Tutorial – Getting Started&RQYHQWLRQV 8VHG LQ WKH 7XWRULDO Action ItemsThis tutorial builds upon itself from start to finish and it is important that you donot miss a step and get off track. To help you avoid overlooking a step we haveunderlined the action items that call for you to actually do something on yourcomputer. If you wish to work through the tutorial quickly you may scan for theaction items and read the details that interest you.Using the MouseFor the purposes of this tutorial, when we say to “click” something with themouse, we mean move the mouse such that the mouse pointer you see on thescreen is on the object to be clicked and, once there, press and quickly release theleft mouse button. From time to time we will want you to click the RIGHTbutton, and when we do we will expressly say to click the RIGHT button. If wesay click something without mentioning which button, click the left button.Using the KeyboardDuring the tutorial, entries you are to type will be shown like this:12 , 10 , .When you see an entry such as this, type it in exactly as listed, except don’t typethe commas! When something is listed in brackets ([ ]), it means press theparticular key. For example, [Enter] means press the “Enter” key, [Spacebar]means press the space bar, etc. “Alt-” and “Ctrl-” mean press the listed keywhile holding down the Alt or Ctrl key. [F1], [F2], . mean press the indicatedfunction key at the top of the keyboard.Version 4.15
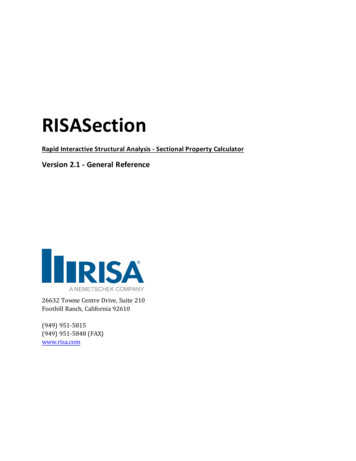
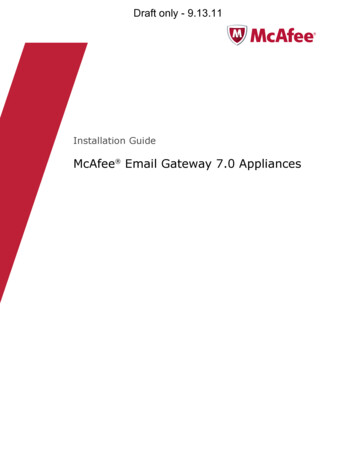
RISA-3D User’s Guide6WDUWLQJ 5,6 ' So lets take a quick first look at RISA-3D and then we’ll begin the tutorial.Start the program as shown below by clicking on the Start button and then choosePrograms and then RISA and finally RISA-3D.RISA-3D will open full screen as in the figure below.Title BarStatus BarMain MenuRISA ToolbarWorkspaceMinimizeMaximize/RestoreClose ButtonData Entry ToolbarThe RISA-3D logo image in the center of the screen will disappear after a fewseconds. Lets take a moment to explain what you have in front of you.6Version 4.1
Tutorial – Getting Started5,6 ' 6FUHHQ Title BarThe bar along the top of the screen is called the title bar. It contains the name ofthe file that is currently open in RISA-3D. The three buttonson the farright side of the title bar are used to control the main window. The button willshrink RISA-3D to a button on the taskbar. The button will shrink the RISA3D window on your screen. The button will close RISA-3D, prompting you tosave changes if necessary. You will also see these buttons in other RISA-3Dwindows and they have basically the same functions there as well.Caution!: We will not be using these buttons in the tutorial so do not click onthem by accident. We will use similar buttons that will be in the spreadsheettitlebars and model view titlebars so be careful not to mistakenly click on these.Main MenuJust beneath the title bar is the RISA-3D main menu beginning with File on thefar left and ending with Help on the far right. These menus provide access to allof the features RISA-3D has to offer. Clicking on each of these menus willdisplay sub-menus that contain options that you may choose from. The toolbarbuttons mentioned in the next section provide easy access to many of these menuoptions.File Menu - The File menu helps you access file operations such as opening andsaving, importing, exporting and appending files.Edit – The Edit menu provides spreadsheet editing tools that help you modifyand manipulate the spreadsheets. You may use this menu to add or removeinformation from the spreadsheets or to sort and mathematically operate currentspreadsheet data.Options – Program options may be set with this menu. The options include steeldesign code, program units, global axes orientation and the toolbars that you wantto use.View – Use the View menu to open a new model view or to adjust the currentview.Insert – The Insert menu is used to insert nodes, members, plates and loads intothe model. All of these items may be input graphically or entered in thespreadsheets. This menu gives access to the graphical methods that RISA-3Dprovides and the Spreadsheet menu helps you access the spreadsheets.Modify – The Modify menu is used to modify existing nodes, members, platesand loads. This menu also gives access to the graphical methods and theSpreadsheet menu helps you access the spreadsheets.Version 4.17
RISA-3D User’s GuideSpreadsheets – You may open any of the input spreadsheets from this menu.Solve – Use this menu to access the analysis options provided with RISA-3D.Results – All analysis result spreadsheets may be accessed from this menu.Utilities – RISA-3D provides many utilities to help you organize, identify andcorrect problems as you model the structure.Window – The Window menu can be used to manage all of the windows that youhave open in RISA-3D whether they are spreadsheets or model views. Specialtiling options are provided here that are geared to specific modeling tasks.Help – Use this menu to access the extensive on-line help system provided withRISA-3D.RISA ToolbarRISA-3D has toolbars with buttons to help you access common commands andpopular options. All you need to note at this time is where the toolbar is. If at anytime you are not sure what a particular button does, simply let your mouse hoverover the button and a helpful tip will pop up and explain the button.The RISA toolbar is the first horizontal row of buttons beneath the menu. Thesebuttons perform general actions such as opening and closing files, changingdesign parameters, printing, and solving the model.Data Entry ToolbarThe vertical toolbar on the right of your screen is the DataEntry toolbar. It looks a bit different because it has largerbuttons with text on them, instead of pictures. This toolbar is toassist you in accessing the spreadsheets while building a model.The buttons are generally in the order in which you wouldtypically build a model. We will use this toolbar frequently aswe work through the tutorial.A similar Results toolbar is presented afterthe model has been solved to help you accessthe result spreadsheets.These toolbars may be turned on and off byclickingandon the RISA Toolbar.8Version 4.1
Tutorial – Getting StartedNow is a good time to note that there are many ways to access the featuresavailable to you in RISA-3D and the method that you will use will simply be amatter of personal preference. The good news is that RISA-3D gives you theoptions. The tutorial will tend to lean to the use of toolbar buttons but be awarethat the menu contains the same options and there are shortcut keys and hot keysthat can’t be beat in the interest of speed.WorkspaceThe actual work that you do in RISA-3D will be in the main area on the screen,which we will call the workspace. Currently the workspace is blank (dark gray)except that it contains the floating Data Entry Toolbar.Status BarThe status bar across the bottom of the screen is to pass information to you as youwork with RISA-3D. This bar has four parts. The left side of the bar has theletters “S”, “D” and “R” to indicate the solved state of the model for Static,Dynamic and Response Spectra solutions. The letters are currently gray toindicate that none of these solutions have been performed. After performing asolution you will notice these letters become blue and a checkmark is placed infront of them.To the right of the solved status flags are three boxes which will pass youinformation while you work. These are called status boxes. The first status box isused to pass general information that is relevant to what you are currently doing.Currently the message is “Press Ctrl-N to start a new file”. Look to this box forhelp as you need it.The middle message box is used to report the units of the current spreadsheet cell.As you move from cell to cell look to the middle status box for the appropriateunits. Currently the box is empty because we are not working in a spreadsheet.The status box on the right is used to pass the mouse coordinates to you as youwork in the model view. We will point this out again and use it to help usthroughout the tutorial.Version 4.19
RISA-3D User’s Guide6WDUWLQJ D 1HZ )LOH Click on the New Filenew file.button in the upper left corner to start working on aYour screen should look like the figure above. A blank (white) model view ispresented with a drawing grid. On top of the drawing grid is a dialog window tohelp you get started. Additional toolbars are provided to help you work with themodel view. Let’s explain these and then move on.Window ToolbarThe Window Toolbar is the second horizontal toolbar. It gets its name because thebuttons change as you move from window to window in order to help you withwhat you are currently doing. When you are working in a graphic model view thebuttons above provide tools, such as rotate and zoom, to assist you with that view.When you are working in a spreadsheet, this toolbar will contain the buttonssimilar to those below, which provide spreadsheet tools such as Fill and Math.Drawing ToolbarThe Drawing toolbar is the third horizontal toolbar in the figure above. Thistoolbar may be turned on and off as needed to help you with graphic editing.10Version 4.1
Tutorial – Getting StartedSelection ToolbarThe Selection Toolbar is the vertical toolbar along the left side of the screen.It provides selection tools to help you work with parts of the model. Youwill make selections when you do things like graphically edit only part of themodel or print only part of the results. This toolbar only works with themodel view windows so if you are working in another window such as aspreadsheet, this toolbar will not be seen.:LQGRZV Scroll barbuttonsScroll boxYou will work within model views and spreadsheets, each in their own windowthat may be moved around the workspace and sized as you wish. A powerfulfeature of RISA-3D is the ability to have multiple model views and multiplespreadsheets open at one time. The options in the Window menu are provided tohelp you manage these windows.Notice in the windows above, the same three buttonsare located in theupper right corner to help you minimize, maximize and close the window. Thereare also scroll bars to help you view information that is outside of the windowviewing area. Click the scroll bar buttons or drag the scroll box to advance thedisplay in one direction or another.Version 4.111
RISA-3D User’s GuideModel View WindowsYou may open as many model view windows as you like. This is especiallyhelpful when working in close on large models. You might have one overall viewand a few views zoomed in and rotated to where you are currently working. Youmay also have different information plotted in multiple views.One thing to remember is that the toolbars that RISA-3D displays depends uponwhat window is active. The active window is the one with the colored titlebar.For example, if you are looking for the zoom toolbar button and the activewindow is a spreadsheet, you need to select a model view first before you canaccess the zooming tools.Spreadsheet WindowsHorizontalScroll ButtonsColumnButtonsActive CellRowButtonsSpreadsheets are made up of rows and columns of data cells. If you wish to addor edit data in a spreadsheet cell you click on the cell, making it the “active” cell,and then edit the cell. There is always one and only one active cell, which is thecell that has the “attention” of the keyboard. This “active cell” is simply the green12Version 4.1
Tutorial – Getting Startedcell that moves around the spreadsheet as you hit the cursor keys ( , ), PageUp, Page Down, Home, End, etc.You may also select blocks of cells to work on. To select a block of cells, clickand hold the mouse button on the first cell in the block and then drag the mouse tothe opposite corner of the block and release the mouse. To select an entire row orcolumn simply click the row or column button. You may select multiple rows orcolumns by clicking and dragging the mouse across multiple row or columnbuttons.Dialog WindowsDialog windows are windows that help you perform a specific function within theprogram. For example if you were to select Open from the File menu you will bepresented with the dialog box above, which helps you find the file you wish toopen. You will find that dialogs are very easy to work with. There are Helpbuttons that will bring you directly to the relevant topic in the help file. You mayalso click on the button in the titlebar, and then click on any item in the dialogto get help for that item.Version 4.113
RISA-3D User’s Guide*HWWLQJ HOS RISA-3D offers a variety of ways to find help with the program in general or witha specific feature. There are three types of help available within RISA-3D:General Help Topics, Window Help and “What’s This?”.Help TopicsUse thetoolbar button to open the three-tabbed help window below and searchon your own. The first tab, Contents, displays the list of major content areas thatyou may choose from by double clicking on them. The Index tab allows you tosearch for help topics based on keywords. The third tab, Find, is a more detailedsearch that allows you to search the actual text of the topics to locate thekeywords that you enter.Once you have a topic open there are a number of options available to you thatmake Help even more useful. Click the menu options to do such things asannotate the file with your own notes or place a bookmark.Window HelpWindow help accesses the above help topics for you. Use thetoolbar buttonor thebutton in dialog boxes to open the appropriate help file topic that isrelevant to what you are currently working on."What's This?"“What’s This?” is a Help option that lets you point to an item in a dialog box andfind a brief definition of the item. Click the button on the right side of thedialog title bar and the mouse cursor changes to allow you to then click on an itemin the dialog. A brief description of the item will be displayed. For toolbars youmay simply let your mouse hover over the button to display a description of thebutton.As you proceed through this tutorial, you may wish to review the help informationfor any windows you have questions about.14Version 4.1
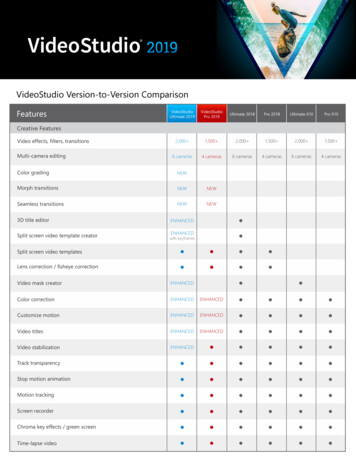
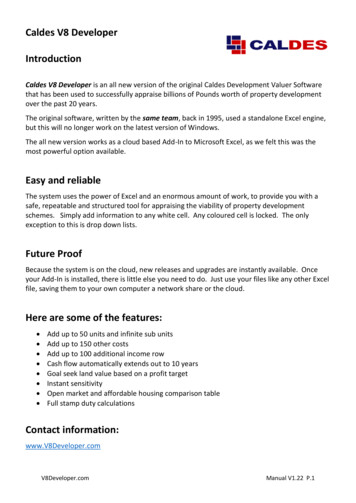
Tutorial – Getting Started:KDW·V KHDG For this tutorial we will be designing this frame:In part one of the tutorial we will create a 2-D frame comprised of two steelcolumns supporting a wood truss. We’ll make use of both the spreadsheet andgraphic drawing capabilities of RISA-3D. In part two we’ll “extrude” this into a3D model, add plates and solve the model. Part three will demonstrate seismicanalysis and design.This tutorial is intended as a “real world” design example. This means we won’tjust enter the data once, solve the model and miraculously have a completeddesign. Just as in the real world, we’ll enter the data, solve the model, reviewresults, go back and make changes, etc. Any program can look good for a “onetime through, no mistakes” data entry procedure; the real test is how easily canyou change your model!Version 4.115
RISA-3D User’s Guide5,6 ' 7XWRULDO 3DUW So we have started RISA-3D and clicked the New Filebutton. We shouldnote here that your picture might not look exactly like the screen above due to thefact that your computer could be set up differently. Your screen resolution andfont sizes can change the appearance of the menu and toolbars. This is simplycosmetic and should not affect your ability to go through this tutorial.1HZ 0RGHOV Clicking the New File button or selecting New from the File menu produce thesame results, they present you with a clean slate with some initial options. Ablank drawing grid is placed in the workspace and you are given options in adialog box with the title Starting a New Model. You can choose to start drawingyour model, generate it automatically, or click Cancel and work on your own.Notice that a box is checked that reads “Also open the Global Parameterswindow.”. We will see what this means in just a minute.'UDZLQJ 0HPEHUV Click thebutton to start drawing members.You should now see a dialog box with the title Set Member Properties, which isshown below.This panel is used to define the parameters for the members to be drawn such aswhat section set to use, end releases and member end offsets.The “Section Set” field is simply the label that refers to the cross-sectionalproperties to be used for the members. We will define these properties in aminute.To the right of the Section Set there are some labeling options. As you work,RISA-3D automatically labels your nodes, members and plates. Unless youspecify otherwise the members will be labeled M1, M2 etc. and the nodes will belabeled N1, N2 etc. You can even change as you go so that say the nodes on level16Version 4.1
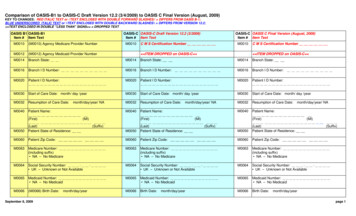
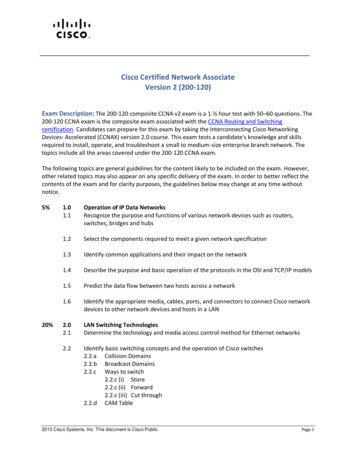
Tutorial Part Ione of the structure have the labels N1, N2 etc. and those on level two might haveN100, N101 etc. This can help later with understanding and sorting the results.Member ReleasesBeneath the Section Set are the member’s end-releases. The end releases are usedto designate whether the forces and moments at the ends of the member areconsidered fixed to or released from the member's points of attachment (the I andJ nodes). Each member has 6 force components at each end (these are: axial, y-y& z-z shear, torque, y-y & z-z bending). Any or all of these force components canbe “released” from the member's point of attachment by setting the individualrelease codes. If a force component is released, that force is not transferred eitherway, either from the attachment point into the member or from the member to theattachment point.You may set the end condition either by choosing from the two standard choicesor by setting them yourself. These standard choices are included because 99% ofthe release configurations you'll ever want to define will be one of these. Forexample a truss member would not be able to transfer moment through its ends soyou might choose the bending moment release option for both the I-end and the Jend.Member Releases vs. Boundary ConditionsA quick note on member releases and boundary conditions: You should usemember releases to model how members are attached to each other, for examplehow beams are connected to columns or other beams. Use boundary conditions tomodel how the structure is attached to its external points of support, for examplehow the columns are attached to the foundation (pinned in this model). We’ll bediscussing boundary conditions a little later.Member OrientationTo discuss member orientations we need to understand the member's local axes.Please review this diagram:Version 4.117
RISA-3D User’s GuideAs can be seen from the diagram, the local x-axis corresponds to the membercenterline. The positive direction is from the I-node towards the J-node. Thecomplicated part is defining the orientation for the local y and z axes. Of course,we only have to define the direction for one of these two (y and z) axes. The thirdaxis direction is based on the directions of the first two.If you do not explicitly define the orientation for a member, the default is for themember’s local z-axis to lie in the global X-Z plane, or as near as possible. If themember is defined in the global Y direction, the member’s local y and z axes bothlie in the global X-Z plane, so the local z-axis is made parallel to the global Zaxis.Note that global axes are referred to with the capital X, Y and Z and that localaxes are referred to with the lower case letters x, y and z.RISA-3D provides two ways to explicitly set the orientation of the y-axis. Thefirst is by defining a K-node for the member. If a K-node is defined, the threenodes (I, J, K) entered for the member are used to define the plane of themember’s x and y axes. The z-axis is defined based on the right hand rule. Seethe following diagram:The second way to explicitly define the orientation is by rotating the memberabout the local x-axis. Positive rotation is counter-clockwise about the x-axis,with the x-axis pointing towards you.The dialog has fields for a
RISA-3D Rapid Interactive Structural Analysis – 3 Dimensional Version 4.1 User’s Guide RISA TECHNOLOGIES 26212 Dimension Drive, Suite 200 Lake Forest, California 92630-7801File Size: 2MBPage Count: 114