Transcription
5 in 1 Removable Plate GrillUSER GUIDEModel HE400CG/18324505 in 1 Removable Plate GrillGUIDE DEL’UTILISATEURModèle HE400CG/1832450
Thank you for choosing a Calphalon 5 in 1 Removable Plate Grill,designed with dual grill and griddle plates to give you the ultimateindoor grilling experience.The Calphalon 5 in 1 Removable Plate Grill features our exclusiveOpti-Heat System. Designed to provide accurate temperature controland even heat delivery, Opti-Heat ensures that foods cook evenly andthoroughly for reliable results you can count on – every time.We know you are excited to begin using your grill; this User Guide isdesigned to help you make the most of your new appliance.Be sure to carefully review this guide before using your grill and keep ithandy for future reference should you have any questions about yourgrill’s operation.Table of ContentsSafety Instructions.page 1Getting to Know Your 5 in 1 Removable Plate Grill.page 4Parts & Features.Operating Your 5 in 1 Removable Plate Grill.page 5Before the First UseAssembly.Operating the Controls.Tips for Successful Operation.page 9Grilling Meats and PoultryGrilling Perfect PaniniCooking GuideCleaning and Care.page 13Before CleaningDisassembling the GrillCleaning the GrillStorage. page 14Frequently Asked Questions. page 14Warranty/Customer Service.page 15Recipes.page 17NOTE: If you have additional questions or concerns, or wish to returnproduct(s), please contact Calphalon Customer Service at1-800-809-7267. Please do not return this product to the store.
Safety InstructionsThe safety instructions appearing in this guide are not meant to coverall possible situations that may occur. Caution must be exercised wheninstalling, maintaining or operating this appliance. Contact your dealer,distributor, service agent or manufacturer with any issues you do notunderstand.Recognize Safety MessagesAlways read and obey the safety messages included in this guide. Look forthe following safety symbols, which will alert you to potential hazards.WARNINGWARNING – Hazards or unsafe practices which COULD result in severepersonal injury or death.CAUTIONCAUTION – Hazards or unsafe practices which COULD result in minorpersonal injury.IMPORTANT SAFEGUARDSWhen using electrical appliances, basic safety precautions should alwaysbe observed, including the following:1. READ ALL INSTRUCTIONS in this guide before attempting to operateyour appliance.2. This product is designed for household use only. Do not use appliancefor anything other than its intended purpose.3. Do not use the plates on any other small appliance or in any othercooking method (including stovetop or oven cooking).4. Do not touch hot surfaces. Use handles or knobs.5. Always remove the plug from the wall outlet before detaching theremovable plates from the grill base.6. Always allow the removable plates to cool completely before detachingthem from the grill base. Do not detach the removable plates while theunit is in use.1
7. To protect against electrical shock, fire, or injury to persons, DO NOTIMMERSE CORD, PLUG, or APPLIANCE in water or other liquid. Do notinstall the removable plates onto the grill base when they are wet.8. Close supervision is necessary when any appliance is used by ornear children.9. Unplug from outlet when not in use and before cleaning. Allow to coolbefore putting on or taking off parts and before cleaning appliance.10. Do not operate any appliance with a damaged cord or plug or afterthe appliance malfunctions or has been dropped or damaged in anymanner. Do not operate if the appliance is deformed or damaged.Contact Calphalon Customer Service at 1-800-809-7267 forexamination, repair, or adjustment.11. The use of accessory attachments not recommended by Calphalonmay result in fire, electric shock, or risk of injury to persons.12. Do not use outdoors.13. Do not leave your removable plate grill unattended during use.14. This appliance generates heat and may create steam during use.Take precautions to prevent burns, fires, or other personal injuryor property damage.15. Do not let cord hang over edge of table or counter, or touchhot surfaces.16. Do not place on or near a hot gas, electric, or induction burner, or in aheated oven.17. Be sure to leave adequate space around the removable plate grill for aircirculation and keep it away from flammable fabrics and surfaces.18. Do not operate the removable plate grill on any surface that may beaffected by heat. Use a heat-resistant mat on these surfaces.19. Turn the unit “Off” and unplug it when finished using.20. Extreme caution must be used when moving an appliance containing hotoil or other hot liquids.21. To disconnect, turn control to “Off”, then remove plug from wall outlet.22. Do not place anything on top of or underneath this product while it isoperating or when it is being stored.NOTE: If this grill malfunctions during use, immediately unplug the powercord from the electrical outlet. Do not use or attempt to repair the grill.Contact Calphalon Customer Service at 1-800-809-7267 forexamination, repair or adjustment.2SAVE THESE INSTRUCTIONSFOR FUTURE REFERENCE.
Electrical RequirementsCAUTIONAvoid Electric ShockYour Calphalon 5 in 1 Removable Plate Grill has a polarized plug with oneblade wider than the other. To reduce the risk of electric shock, this plug isintended to fit into a polarized outlet only one way. If the plug does not fitinto the outlet completely, reverse the plug. If it still does not fit, contact aqualified electrician. Do not attempt to modify the plug in any way.Short Cord InstructionsYour Calphalon 5 in 1 Removable Plate Grill has a short power supplycord as a safety precaution to prevent personal injury or property damageresulting from becoming entangled with or tripping over a longer cord.Do not allow children to be near this appliance without adult supervision.Longer extension cords are available and may be used if care is exercisedin their use.If an extension cord is used:1. The marked electrical rating of the cord set or extension cord should beat least as great as the electrical rating of the appliance.2. The cord should be arranged so that it will not drape over thecountertop or tabletop where it can be pulled on by children or trippedover unintentionally.3. If the appliance is of the grounded type, the extension cord should be agrounding 3-wire cord.SAVE THESE INSTRUCTIONSFOR FUTURE REFERENCE.3
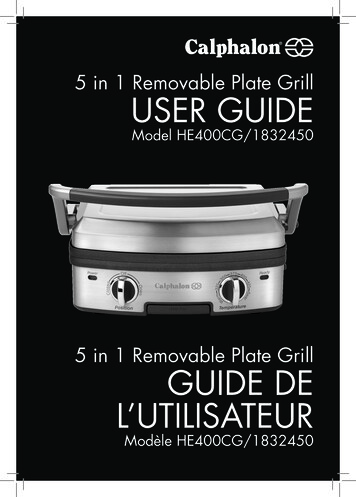
Getting to Know Your5 in 1 Removable plate grill1256397118104Grill sideGriddle SideParts and Features1.2.Stay-Cool Handle – Makes it easy and safe to open and close the grill during useOpti-Heat System – Maintains even and accurate heat across the entire cookingsurface for consistent results every time3. Base – Features a beautiful and durable stainless steel exterior4. Removable Plates – Dual grill and griddle plates are reversible and have a highperformance nonstick coating that is dishwasher safe5. Lid Switch – Pressing this switch allows the grill to open completely and lie flat on thecountertop exposing the entire surface of the grill/griddle plates6. Plate Release Buttons – Located on the right side of the grill base and lid. Pressingthese buttons will release the removable plates, allowing them to be rotated from grill togriddle, or removed for cleaning7. Position Control Knob – Offers options for grilling with the plates open and lyingflat, or closed with the food sandwiched between the plates8. Temperature Control Knob – Allows you to customize the desired setting, from“Warm” to “Sear” with a variety of temperatures in between9. Power Light – Appears when the grill has been plugged into a suitable outlet,indicating the grill has power10. Ready Light – Illuminates when the grill is preheated and ready for use11. Drip Tray – Located at the lower front edge of the grill for easy access and cleaning4
Operating Your 5 in 1removable plate grillBefore the First Use1. Place the grill on a dry, level, stable surface such as a countertop– near a suitable electrical outlet. (See page 3 for ElectricalRequirements.)2. Remove all packing material and prepare parts for cleaning. Detachthe removable plates by pressing the two plate release buttons locatedon the grill’s base and lid, then pulling the plates out of the grill.3. Never immerse the base, cord or plug in water. If needed, wipe witha damp cloth that has been dipped in a watered down mild detergentor soap.4. Carefully wash the removable plates and removable drip tray in thedishwasher OR in warm, sudsy water. Rinse and dry thoroughly.Assembly1. Choose the side of theplates you would like touse (grill, griddle or oneAof each). Attach the plateswith the desired surfacesexposed for cooking.B2. Attach grill/griddle platesto the base by sliding theplates into the clips at theback (A) and snapping intoplace (B). Make sure thedrip tray is inserted in theslot located at the lowerfront edge of the base.3. Make sure the Position Control Knob is turned to “Off”.Operating the ControlsWARNINGNever plug the cord into the wall outlet unless the grill/griddle plates areproperly attached to the base.5
Step 1: CHOOSE THE PLATE STYLEGrill sideGriddle SideMake sure the desired plates areinstalled on the grill. (See page 5for Assembly instructions.) Selectthe grill plates if you want grillmarks on your food or select thegriddle plates if you want a smoothcooking surface. You may alsoselect a combination of one grillplate and one griddle plate.Grill – Use for foods such as steaks, burgers, boneless chicken, pork chops,fish fillets and panini sandwichesGriddle – Use for foods such as French toast, eggs, bacon, pancakes andhash brownsHalf grill/half griddle – Use when making a meal where both types ofplates are needed, such as for steaks (on the grill) and hash browns (onthe griddle)Step 2: CHOOSE A POSITION AND TURN ONSelect from the following options:Off – Choose this option whenever you want to turnthe grill off.Open – Choose this option whenever you want toopen the grill completely flat (180 degrees). Thisdoubles the grilling surface and allows you to cook onboth plates at the same time. 6Lift the handle of the grill and press theLid Switch to release the grill and allowit to open completely and lie flat, parallelwith the countertop.Plug the open grill into a suitableelectrical outlet (See page 3 forElectrical Requirements.) ThePower light will illuminate.
Turn the Position Control Knob to “Open”; the grill will beginto preheat.Closed – Choose this option whenever you want to cook food from bothsides at the same time. For this method, foods are sandwiched betweenthe hot plates for cooking. Plug the closed grill into a suitable electrical outlet. (See page3 for Electrical Requirements.) The Power light will illuminate.Turn the Position Control Knob to “Closed”; the grill will beginto preheat.Step 3: CHOOSE A TEMPERATURETurn the Temperature Control Knob to the desired position. Options rangefrom “Warm” to “Sear”, with temperatures of 325 to 425 in between.Consider the following tips for selecting a heat setting.Warm – Use to keep cooked foods warm until serving325 to 350 – Choose this setting for gentleheat when cooking eggs, French toast, panini-stylesandwiches and quesadillas375 – Select this setting for making foods such aspancakes, hash browns and bacon400 to 425 – Use for foods such as grilled burgers,pork chops, and boneless chickenSear – Choose this highest heat setting for searing the outside of meats,such as steaks, when you want the outside brown and the inside juicyand pinkStep 4: PREHEAT THE GRILLOnce the temperature is selected and the grill heats up to the desiredtemperature, the Ready light will illuminate. This indicates the grill ispreheated and ready for operation.Preheating times will vary. Please use the Ready light as the bestindicator of the grill’s temperature.7
Step 5: PLACE FOOD ON GRILLFor closed grilling, lift the handle of the grill until it rests at the topposition (at about 90 degrees). Place food on lower plate, using heatresistant nonmetal utensils, and gently pull the handle down, sandwichingthe food firmly between the hot plates. The lid has a floating hinge, whichallows it to adjust to accommodate everything from thin quesadillas to largesteaks and thick panini sandwiches.For open grilling, place food on preheated plates using heat resistantnonmetal utensils. Turn halfway through the designated cooking time.See the Cooking Guide found on page 12 in the Tips for SuccessfulOperation section for suggested settings and cooking times.CAUTIONThe control knobs and grill handle are safe to touch during operation.However, the remainder of the unit is hot and should NOT be touched toprevent burns or other injury.Step 6: REMOVE FOOD FROM GRILLWhen the food is done, carefully remove it from the grill using heat resistantnonmetal utensils. Check the internal temperature of meats and poultry tomake sure they are at the desired level of doneness. Please visit the FDA(www.fda.gov) and the Food Safety Inspection Services (www.fsis.usda.gov) for internal food temperature guidelines.Step 7: TURN GRILL OFFWhen finished cooking, turn the Position Control Knob to “Off”. Unplug thecord from the outlet by firmly grasping and removing the plug. Allow to coolthoroughly before cleaning or removing the plates.8
Tips for Successful OperationGrilling Meats and Poultry You may select either closed grilling or open grilling for most meatsand poultry. Very thin meats, such as bacon, are best suited to open grilling.Closed Grilling (sandwiched between the grill plates):Step 1: Insert the removable plates onto the grill, choosing theside with the grill grates.Step 2: Plug the power cord of the closed grill into a suitableelectrical outlet. The power indicator light will illuminate.Step 3: Turn the Position Control Knob to “Closed”. The grillwill begin to preheat.Step 4: Turn the Temperature Control Knob to the desiredtemperature. Refer to the Cooking Guide for recommendations. TheReady light will illuminate as soon as the grill is preheated.Step 5: Using the handle, open the grill lid until it rests at thetop position (at about 90 degrees). Insert the meat or poultry using heatresistant nonmetal utensils. Pull the handle down to firmly close the lid andgrill for the recommended time.Step 6: Check the internal temperature of the cooked meat orpoultry with a meat thermometer to verify the level of doneness.Open Grilling (on a single open grill surface):Step 1: Insert the removable plates onto the grill, choosing theside with the grill grates.Step 2: Lift the handle of the grill and press the Lid Switch to releasethe grill and allow it to open completely and lie flat, parallel with thecountertop.9
Step 3: Plug the power cord into a suitable electrical outlet.The power indicator light will illuminate.Step 4: Turn the Position Control Knob to “Open”. The grillwill begin to preheat.Step 5: Turn the Temperature Control Knob to the desiredtemperature. Refer to the Cooking Guide for recommendations. TheReady light will illuminate as soon as the grill is preheated.Step 6: Add the meat or poultry using heat resistant nonmetalutensils. Grill for the recommended time, turning halfway through, to cookboth sides.Step 7: Check the internal temperature of the cooked meat orpoultry with a meat thermometer to verify the level of doneness.Tips: Be sure to thaw meats and poultry thoroughly before grilling. Choose pieces of meat and poultry that are uniform in size to ensureeven cooking. Use a meat thermometer to verify that meats and poultry meet USDArecommendations for cooked internal temperatures. Please visit the FDA(www.fda.gov) and the Food Safety and Inspection Service (www.fsis.usda.gov) for internal food temperature guidelines. When loading the grill with meats and poultry, allow some spacebetween each piece for best results. For example, the closed grill canaccommodate four hamburger patties or four boneless chicken breasthalves. The open grill can hold eight hamburger patties or eight bonelesschicken breast halves.Grilling Perfect PaniniStep 1: Insert the removable plates into the grill, choosing theside with the grill grates.Step 2: Plug the power cord into a suitable electrical outlet.Step 3: Turn the Position Control Knob to “Closed”. The Powerindicator light will illuminate.10
Step 4: Turn the Temperature Control Knob to 350 F. The Readylight will illuminate as soon as the grill is preheated.Step 5: Using the handle, open the grill lid until it rests at the topposition (at about 90 degrees). Insert the panini. The grill will accommodateone or two panini. Pull the handle down firmly sandwiching the paninibetween the grill grates. Grill for 2 to 5 minutes or until golden brown.Tips: Use good quality bread, sliced somewhat thicker than you might slice itfor a cold sandwich. Brush bread slices (on sides that will touch the hot grill grates) witholive oil. Use any combination of ingredients for the filling, but don’t make thesandwich overly complex. Three to four ingredients is ideal for lettingindividual flavors shine through. Try to select one ingredient that will help bind the sandwich together.Cheese is a good choice because as it melts, it gets sticky. Garlicmayonnaise, olive tapenade, or even barbecue sauce can achieve asimilar effect. Do not overstuff the panini or the exterior will cook before the interior hasa chance to do so. Preheat your removable plate grill at 350 F. The Ready light willilluminate when the grill is preheated and ready for operation. Sprinkle afew drops of water on the surface of the grill plates. If the water sputtersand dances, it is hot enough to begin grilling your sandwich. Place the sandwich in the removable plate grill and close the lid. Grill for2 to 5 minutes or until golden brown.Great panini combinations: Grilled chicken, gruyere, tomato and basil Grilled eggplant, fresh mozzarella and olive tapenade Feta cheese, spinach, pine nuts and roasted garlic Smoked salmon, vegetable cream cheese and fresh dill Sliced beef, cheddar cheese, corn relish and barbecue sauce11
Cooking GuideFoodPlate StyleOpen/ClosedCooking TimeTemp.BaconGriddleOpen7 to 8 minutes*375 FBeef steaks – Thin– ThickGrillGrillGrillGrillOpenClosedOpenClosed4 to 6 minutes*2 to 3 minutes10 to 14 minutes*5 to 7 minutesSearSear425 F425 F– Bonelessbreast half– ThighGrillGrillGrillGrillOpenClosedOpenClosed10 to 16 minutes*5 to 8 minutes10 to 12 minutes*5 to 6 minutes400 F400 F400 F400 FEggsGriddleOpen4 to 5 minutes*325 FFish filletsGrillGrillOpenClosed6 to 8 minutes*3 to 4 minutes400 F400 FFrench toastGriddleGriddleOpenClosed4 to 5 minutes*2 to 3 minutes350 F350 FGround meat pattiesGrillGrillOpenClosed10 to 12 minutes*5 to 6 minutes400 F400 FHash brownsGriddleOpen8 to 10 minutes*375 FLamb chopsGrillGrillOpenClosed6 to 8 minutes*3 to 4 minutes400 F400 FPancakesGriddleOpen3 to 4 minutes*375 FPork chopsGrillGrillOpenClosed10 to 14 minutes*5 to 7 minutes400 F400 FSandwich, panini,focacciaGrillGrillOpenClosed5 to 10 minutes*2 to 5 minutes350 F350 FShrimpGrillGrillOpenClosed4 to 6 minutes*2 to 3 minutes400 F400 FChickenNote: Cooking times will vary depending on the size and thickness of the food. Adjustcooking times, as needed, to make sure foods are thoroughly cooked.* Turn once halfway through cooking time.12
Cleaning and CareBefore Cleaning Turn the grill off by turning the Position Control Knob to “Off”. Carefully unplug the grill’s power cord from the electrical outlet by firmlygrasping the plug. Make sure all food has been removed from the grill. Allow the grill and the removable plates to cool completely.WARNINGAlways remove the plug from the electrical outlet before removing platesfrom the grill. Always allow the grill plates to cool completely beforeremoving plates from the grill. DO NOT remove the plates while the unit isin use, as this may cause burns, electrical shock or other injury.Disassembling the Grill Press the plate release button on the rightside of the lid and carefully remove theupper plate by pulling away from the grill.Repeat this process for the bottomplate, pressing the plate release button andremoving the bottom plate. Pull the drip tray out from thefront lower edge of the grill,keeping it level to avoid spillingany grease or other drippings.13
Cleaning the Grill Make sure grill is turned “Off”, completely cooled and unplugged fromthe power source. Make sure the plates and drip tray are removed. Discard drippings from the drip tray. For everyday clean-up of the driptray and grill plates, place in dishwasher. OR, wash in hot sudsy waterwith a dish cloth; rinse and dry thoroughly. For grease build-up on the grill plate nonstick surface, clean with a nonabrasive sponge or soft bristle brush and a non-abrasive cleaner such asDawn liquid dishwashing detergent to remove any food residue. If needed, wipe the base with a clean, damp cloth that has been dippedin a watered down mild detergent or soap. DO NOT use abrasive cleaners or scouring pads, as they may scratchthe surface of the grill. DO NOT immerse the base, cord or plug in water. Place the removable plates back on the base. Insert the drip tray. (SeeAssembly instructions on page 5.)Storage Make sure the grill is clean, dry and fully assembled. The cord is designed to be stored at the back of the unit, wound gentlyaround the cord wrap. Close the grill and store flat.Frequently Asked QuestionsMy removable plate grill is not getting hot; what am I doingwrong? Be sure the power cord is plugged into a suitable outlet. Seepage 3 for Electrical Requirements. Then, check to make sure thePosition Control Knob is set for either “Open” or “Closed” rather than “Off”.When I grill frozen chicken breasts, they are brown on theoutside and still pink inside. How can I make sure they aresafely cooked? Be sure to thaw meats and poultry first before grilling.Also, be sure to follow the recommended times and temperature settings forcooking chicken. If chicken is overbrowning on the outside but not cookingin the middle, reduce the temperature slightly and extend the cooking time.14
I’m concerned about cooking hamburgers on the grill dueto the drippings that accumulate. Is this safe to do? Yes, theCalphalon 5 in 1 Removable Plate Grill is designed to drain any greaseinto the drip tray, significantly reducing the amount of grease that willaccumulate on the cooking surface.Is it okay to grill a thick cut pork chop alongside a thinnerpork chop? It is best to cook meat of the same thickness at the same time.You have two possible options – cook the pork chops separately (until youreach the desired level of doneness) or butterfly the larger chop so it laysflat and matches the thickness (and the cooking time) of the thinner chop.Is there ever a time you would use the griddle plates forclosed grilling? Yes. You could use the griddle plates for traditionalgrilled cheese sandwiches, French toast or for any foods you would like tocook from both sides without grill marks.WarrantyRegister your 5 in 1 Removable Plate Grill - It’s Easy!Please register your product to ensure that we have the correct informationin our system for any warranty inquiries. Retain the original sales receipt.Without registering your product or having the original salesreceipt, we will consider the warranty start date to be thedate of manufacture.Taking a few moments to register your product greatly expedites warrantyinquiries and helps us continue to develop new products and services thatmake your culinary experience even better. Please visit www.calphalon.com for complete details.Limited One Year Warranty andFive Year Nonstick WarrantyCalphalon will repair or replace any removable plate grill founddefective in material or workmanship within one year of the originalpurchase with the original sales receipt. In addition, Calphalon willrepair or replace any removable plate grill if the nonstick grill plates15
are found defective in material or workmanship within five yearsof original purchase. This warranty applies when the grill is put tonormal household use and is operated and cared for according tothe instructions. Minor imperfections, surface markings as a result ofshipping, and slight color variation in the grill plate nonstick coating arenormal. This excludes damage from misuse or abuse, such as impropercleaning, use of metal utensils, neglect, accident, alteration, fire, theft,or use in a commercial establishment.This warranty excludes all incidental and consequential damages,except in those states that do not allow the exclusion or limitation ofthese damages. Without an original sales receipt or having registeredyour product with Calphalon, the warranty start date will be consideredthe date of manufacture. This warranty gives you specific legal rights,and you may have other rights that vary from state to state.Customer ServiceWe at Calphalon want to hear from you. If you have a question, commentor a recommendation that will help us help you, please contact us via ourweb site, phone, fax or mailing address.Please do not return the product to the store. Please contactus directly with questions or comments about your grill.Thank you!Web sitewww.calphalon.comToll Free Phone1-800-809-7267(Monday-Friday 8:00am – 5:00pm EST)Fax419-666-2859Write UsCalphalon Customer ServicePO Box 583Toledo, Ohio 43697-058316(Please, DO NOT send returns to this address)
RECIPESProsciutto and Fontina Paniniwith ArugulaIngredients:Makes 1 serving2 slices good quality, European-style bread, about ½-inch thick1 tablespoon olive oil2 to 4 slices Fontina or Swiss cheese, medium thickness2 to 3 slices of very thin prosciutto (or enough to cover each slice of bread)Small bunch of arugula or spinach, washed and driedMethod:Insert the removable plates into the grill, choosing the side with the grillgrates. Turn the Position Control Knob to “Closed” and the TemperatureControl Knob to 350 F. The Ready light will illuminate as soon as the grill ispreheated.While the grill is preheating, assemble the Panini. Brush one side of eachslice of bread with olive oil. Place one slice, oil side down, on work surface.Place the Fontina or Swiss cheese on the bread, being sure to cover theslice, followed by a few leaves of arugula or spinach. Next, add a layer ofprosciutto and another layer of cheese followed by the remaining slice ofbread (oil side facing out).Using the handle, open the grill lid until it rests at the top position (at about90 degrees). Insert the Panini. Pull the handle down firmly sandwiching thePanini between the grill grates. Grill for 2 to 5 minutes or until goldenbrown. (Check the Panini after 2 minutes for doneness and continuetoasting, if needed.) Remove with a heat resistant nonmetal utensil andserve warm.17
Boneless Lemon Dijon Pork ChopsIngredients:Makes 4 servings4 boneless pork loin chops, about ¾-inch thick1 tablespoon olive oilSalt, to tasteCoarsely ground black pepper, to taste¼ cup butter, melted1 teaspoon finely grated lemon peel1 tablespoon Dijon mustard½ teaspoon minced garlicMethod:Remove pork chops from refrigerator about 30 minutes prior to grilling.Insert the removable plates into the grill, choosing the side with the grillgrates. Turn the Position Control Knob to “Closed” and the TemperatureControl Knob to 400 F. The Ready light will illuminate as soon as the grillis preheated.While the grill is preheating, brush the pork chops with olive oil. Sprinklewith salt and pepper. Set aside. Meanwhile, in a small bowl combinemelted butter, lemon peel, Dijon mustard, and garlic.Open the grill and insert the pork chops. Pull the handle down firmlysandwiching the chops between the grill grates. Grill for 5 minutes.Open the grill and brush the chops generously with the butter mixture.Close the lid and grill for 2 more minutes or until chops reach 145 F(medium-rare), 160 F (medium), or the desired level of doneness. Removewith a heat resistant nonmetal utensil and serve warm.18
Orange-Basil French Toastwith Fresh Blueberry SyrupIngredients:Makes 4 servings4 ounces reduced-fat cream cheese, softened¼ cup powdered sugar1 teaspoon finely grated orange peel1 teaspoon finely chopped fresh basil8 slices French bread, ½-inch thick3 eggs, beaten½ cup milk½ teaspoon cinnamonGarnish: 8 orange segments and 4 sprigs of fresh basil, optionalMethod:Insert the removable plates, choosing the side with the flat griddlesurfaces. Turn the Position Control Knob to “Closed” and the TemperatureControl Knob to 350 F. The Ready light will illuminate as soon as thegriddle is preheated.While the griddle is preheating, assemble the French toast. In a small bowlstir together cream cheese, powdered sugar, orange peel, and basil untilthoroughly combined. Divide cream cheese mixture among four slices ofbread, spreading evenly over each slice. Top each with a second sliceof bread.In a shall
GeTTInG TO KnOW yOUR 5 In 1 ReMOvABLe PLATe GRILL Parts and features 1. Stay-Cool Handle – Makes it easy and safe to open and close the grill during use 2. Opti-Heat System – Maintains even and accurate heat