Transcription
Eclipse Scout Beginners GuideMatthias ZimmermannVersion 6.0
Table of ContentsPreface. . . . . . . . . . . . . . . . . . . . . . . . . . . . . . . . . . . . . . . . . . . . . . . . . . . . . . . . . . . . . . . . . . . . . . . . . . . . . . . . . . . . . 21. Introduction. . . . . . . . . . . . . . . . . . . . . . . . . . . . . . . . . . . . . . . . . . . . . . . . . . . . . . . . . . . . . . . . . . . . . . . . . . . . . . 32. “Hello World” Tutorial . . . . . . . . . . . . . . . . . . . . . . . . . . . . . . . . . . . . . . . . . . . . . . . . . . . . . . . . . . . . . . . . . . . . 52.1. Installation and Setup . . . . . . . . . . . . . . . . . . . . . . . . . . . . . . . . . . . . . . . . . . . . . . . . . . . . . . . . . . . . . . . . . 52.2. Create a new Project . . . . . . . . . . . . . . . . . . . . . . . . . . . . . . . . . . . . . . . . . . . . . . . . . . . . . . . . . . . . . . . . . . 52.3. Run the Initial Application . . . . . . . . . . . . . . . . . . . . . . . . . . . . . . . . . . . . . . . . . . . . . . . . . . . . . . . . . . . . . 82.4. Export the Application . . . . . . . . . . . . . . . . . . . . . . . . . . . . . . . . . . . . . . . . . . . . . . . . . . . . . . . . . . . . . . . 102.5. Deploy to Tomcat . . . . . . . . . . . . . . . . . . . . . . . . . . . . . . . . . . . . . . . . . . . . . . . . . . . . . . . . . . . . . . . . . . . . 133. Scout Tooling . . . . . . . . . . . . . . . . . . . . . . . . . . . . . . . . . . . . . . . . . . . . . . . . . . . . . . . . . . . . . . . . . . . . . . . . . . . . 163.1. Motivation for the Tooling . . . . . . . . . . . . . . . . . . . . . . . . . . . . . . . . . . . . . . . . . . . . . . . . . . . . . . . . . . . . 163.2. Eclipse IDE tooling . . . . . . . . . . . . . . . . . . . . . . . . . . . . . . . . . . . . . . . . . . . . . . . . . . . . . . . . . . . . . . . . . . . 163.3. Scout SDK Overview. . . . . . . . . . . . . . . . . . . . . . . . . . . . . . . . . . . . . . . . . . . . . . . . . . . . . . . . . . . . . . . . . . 203.4. Scout Wizards . . . . . . . . . . . . . . . . . . . . . . . . . . . . . . . . . . . . . . . . . . . . . . . . . . . . . . . . . . . . . . . . . . . . . . . 213.5. Scout Content Assistance . . . . . . . . . . . . . . . . . . . . . . . . . . . . . . . . . . . . . . . . . . . . . . . . . . . . . . . . . . . . . 293.6. Scout NLS Tooling. . . . . . . . . . . . . . . . . . . . . . . . . . . . . . . . . . . . . . . . . . . . . . . . . . . . . . . . . . . . . . . . . . . . 314. A One Day Tutorial. . . . . . . . . . . . . . . . . . . . . . . . . . . . . . . . . . . . . . . . . . . . . . . . . . . . . . . . . . . . . . . . . . . . . . . 354.1. The “Contacts” Application. . . . . . . . . . . . . . . . . . . . . . . . . . . . . . . . . . . . . . . . . . . . . . . . . . . . . . . . . . . . 354.2. Tutorial Overview . . . . . . . . . . . . . . . . . . . . . . . . . . . . . . . . . . . . . . . . . . . . . . . . . . . . . . . . . . . . . . . . . . . 374.3. Setting up the Initial Project . . . . . . . . . . . . . . . . . . . . . . . . . . . . . . . . . . . . . . . . . . . . . . . . . . . . . . . . . . 384.4. Adding the Person and Organization Page. . . . . . . . . . . . . . . . . . . . . . . . . . . . . . . . . . . . . . . . . . . . . . 484.5. Creating and Accessing the Database . . . . . . . . . . . . . . . . . . . . . . . . . . . . . . . . . . . . . . . . . . . . . . . . . . 594.6. Adding a Form to Create/Edit Persons . . . . . . . . . . . . . . . . . . . . . . . . . . . . . . . . . . . . . . . . . . . . . . . . . . 744.7. Form Field Validation and Template Fields . . . . . . . . . . . . . . . . . . . . . . . . . . . . . . . . . . . . . . . . . . . . . 974.8. Adding the Company Form . . . . . . . . . . . . . . . . . . . . . . . . . . . . . . . . . . . . . . . . . . . . . . . . . . . . . . . . . . 1104.9. Linking Organizations and Persons. . . . . . . . . . . . . . . . . . . . . . . . . . . . . . . . . . . . . . . . . . . . . . . . . . . 1164.10. Additional Concepts and Features . . . . . . . . . . . . . . . . . . . . . . . . . . . . . . . . . . . . . . . . . . . . . . . . . . . 127Appendix A: Licence and Copyright . . . . . . . . . . . . . . . . . . . . . . . . . . . . . . . . . . . . . . . . . . . . . . . . . . . . . . . . 129A.1. Licence Summary . . . . . . . . . . . . . . . . . . . . . . . . . . . . . . . . . . . . . . . . . . . . . . . . . . . . . . . . . . . . . . . . . . 129A.2. Contributing Individuals . . . . . . . . . . . . . . . . . . . . . . . . . . . . . . . . . . . . . . . . . . . . . . . . . . . . . . . . . . . . 129A.3. Full Licence Text . . . . . . . . . . . . . . . . . . . . . . . . . . . . . . . . . . . . . . . . . . . . . . . . . . . . . . . . . . . . . . . . . . . 130Appendix B: Scout Installation . . . . . . . . . . . . . . . . . . . . . . . . . . . . . . . . . . . . . . . . . . . . . . . . . . . . . . . . . . . . . 131B.1. Overview . . . . . . . . . . . . . . . . . . . . . . . . . . . . . . . . . . . . . . . . . . . . . . . . . . . . . . . . . . . . . . . . . . . . . . . . . . 131B.2. Download and Install a JDK. . . . . . . . . . . . . . . . . . . . . . . . . . . . . . . . . . . . . . . . . . . . . . . . . . . . . . . . . . 131B.3. Download and Install Scout. . . . . . . . . . . . . . . . . . . . . . . . . . . . . . . . . . . . . . . . . . . . . . . . . . . . . . . . . . 132B.4. Add Scout to your Eclipse Installation . . . . . . . . . . . . . . . . . . . . . . . . . . . . . . . . . . . . . . . . . . . . . . . . 137B.5. Verifying the Installation . . . . . . . . . . . . . . . . . . . . . . . . . . . . . . . . . . . . . . . . . . . . . . . . . . . . . . . . . . . . 139Appendix C: Apache Tomcat Installation . . . . . . . . . . . . . . . . . . . . . . . . . . . . . . . . . . . . . . . . . . . . . . . . . . . . 141C.1. Platform Specific Instructions. . . . . . . . . . . . . . . . . . . . . . . . . . . . . . . . . . . . . . . . . . . . . . . . . . . . . . . . 141
C.2. Directories and Files . . . . . . . . . . . . . . . . . . . . . . . . . . . . . . . . . . . . . . . . . . . . . . . . . . . . . . . . . . . . . . . . 141C.3. The Tomcat Manager Application . . . . . . . . . . . . . . . . . . . . . . . . . . . . . . . . . . . . . . . . . . . . . . . . . . . . 142
This document is referring to a past Scout release. Please click here for the recent version.Looking for something else? Visit https://eclipsescout.github.io for all Scout relateddocumentation.1
PrefaceThe goal of this book is to get you familiar with the Scout framework in a short time. Scout’s corefeatures and concepts are introduced and explained by writing actual Scout applications. As Scoutapplications are written in Java, we make the assumption that you are familiar with the Javalanguage and its core concepts.We hope that this book helps you to get started quickly and would love to get your feedback. Thisfeedback is very valuable to us as it helps to improve both the book’s content and the quality for allfuture readers.To allow for contributions to this book, the technical setup and the book’s licence have beenselected to minimize restrictions. According to the terms of the Creative Commons (CC-BY) license,you are allowed to freely use, share and adapt this book. All source files of the book including theScout projects described in the book are available on Github.2
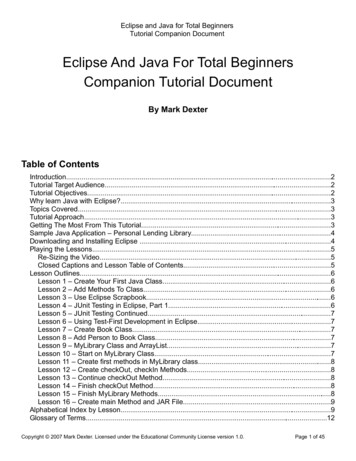
Chapter 1. IntroductionScout is an open source framework for implementing business applications. The framework isbased on Java and HTML5 and covers most recurring aspects of enterprise applications.Scout defines an abstract application model that makes developing applications faster and helps todecouple the business code as much as possible from any specific technologies. This is particularlyuseful as the life span of today’s web technologies is substantially shorter then the life span of largeenterprise applications.Scout comes with multi-device support. With a single code base Scout applications run on desktop,tablet and mobile devices. The framework automatically adapts the rendering of the application tothe form factor of the used device. An example of a commercial application built with Scout isprovided in Figure 1.Figure 1. A commercial enterprise application built with Eclipse Scout.Scout supports a modularization of applications into layers and slices. This helps to define a cleanarchitecture for large applications. The layering is driven by the fact the Scout applications have arending part, a frontend part and a backend part. The modularization into slices is controlled bydifferent business needs such as front office, back office, reporting or the administraion ofapplication users, roles and permissions.The goals of the Scout framework can be summarized as follows. Boost developer productivity Make the framework simple to learn Support building large applications with long life spansBoosting developer productivity is of a very high importance and developers should be able tofocus on the business value of the application. This is why Scout provides abstractions forareas/topics that are needed in most business applications again and again. Example areas/topicsthat are abstracted by the Scout framework are user interface (UI) technologies, databases, client-3
server communication or logging. For each of these abstractions Scout provides a defaultimplementation out of the box. Typically, the default implementation of such an abstractionintegrates a framework or technology that is commonly used.Learning a new framework should be efficient and enjoyable. For developers that have a goodunderstanding of the Java language learning the Scout framework will be straight forward. Therequired skill level roughly corresponds to the Oracle Certified Professional Java SE Programmerfor Java version 7 or higher. As the Scout framework takes care of the transformation of the userinterface from Java to HTML5, Scout developers only needs a minimal understanding ofHTML5/CSS3/JavaScript. In the case of writing project specific UI components a deeperunderstanding of today’s web technologies might be required of course.When needing a working prototype application by the end of the week, the developer just needs tocare about the desired functionality. The necessary default implementations are then automaticallyincluded by the Scout tooling into the Scout project setup. The provided Scout SDK tooling alsohelps to get started quickly with Scout. It also allows to efficiently implement applicationcomponents such as user interface components, server services or connections to databases.In the case of applications with long life spans, the abstractions provided by Scout help thedeveloper to concentrate on the actual business functionality. As all the implemented businessfunctionality is written against abstractions only, no big rewrite of the application is necessarywhen individual technologies reach their end of life. In such cases it is sufficient to exchange theimplementation of the adaptor for the legacy technology with a new one.4
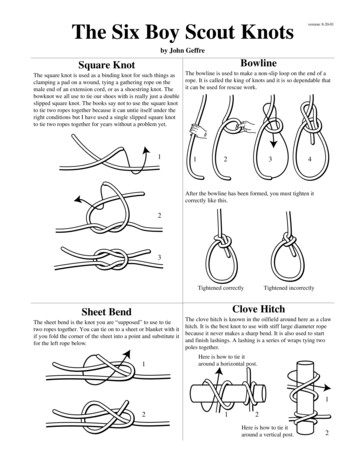
Chapter 2. “Hello World” TutorialThe “Hello World” chapter walks you through the creation of an Eclipse Scout client serverapplication. When the user starts the client part of this application, the client connects to the server.[1]and asks for some text content that is to be displayed to the user. Next, the server retrieves thedesired information and sends it back to the client. The client then copies the content obtainedfrom the server into a text field widget. Finally, the client displays the message obtained from theserver in a text field widget.The goal of this chapter is to provide a first impression of working with the Scout framework usingthe Scout SDK. We will start by building the application from scratch and then we’ll deploy thecomplete application to a Tomcat web server.2.1. Installation and SetupBefore you can start with the “Hello World” example you need to have a complete and workingScout installation. For this, see the step-by-step installation guide provided in Appendix B. Once youhave everything installed, you are ready to create your first Scout project.2.2. Create a new ProjectStart your Eclipse IDE and select an empty directory for your workspace as shown in Figure 2. Thisworkspace directory will then hold all the project code for the Hello World application. Once theEclipse IDE is running it will show the Java perspective.Figure 2. Select a new empty folder to hold your project workspaceTo create a new Scout project select the menu File › New › Project and type “Scout Project” in thewizard search field. Select the Scout Project wizard and press [ Next ]. The New Scout Projectwizard is then started as shown in Figure 3.5
Figure 3. The new Scout project wizard.In the New Scout Project wizard you have to enter a group id, artifact id and a display name foryour Scout project. As the created project will make use of Apache Maven please refer to the Mavennaming conventions to choose group id and artifact id for your project. The artifact id will thenalso be the project name in the Eclipse workspace. The display name is used as the application namepresented to the user (e.g. in the Browser title bar).For the Hello World application just use the already prefilled values as sown in Figure 3. Then, clickthe [ Finish ] button to let the Scout SDK create the initial project code for you.Depending on your Eclipse installation some Maven plugin connectors may be missing initially. Inthat case a dialog as shown in Figure 4 may be shown. To continue click on [ Finish ] to resolve theselected connectors. Afterwards confirm the installation, accept the license and the message thatsome content has not been signed. Finally, the installation of the maven plugin connectors requiresa restart of the Eclipse IDE.6
Figure 4. The Maven plugin connector installation dialog.After the New Scout Project wizard has created the initial Maven modules for the Hello Worldapplication these modules are compiled and built by the Eclipse IDE. In case of a successful EclipseScout installation your Eclipse IDE should display all created Maven modules in the PackageExplorer and have an empty Problems view as shown in Figure 5.7
Figure 5. The inital set of Maven modules created for the Hello World application.2.3. Run the Initial ApplicationAfter the initial project creation step we can start the Scout application for the first time. For this,the following three steps are necessary1. Start the Scout backend server2. Start the Scout frontend server3. Open the application in the browserTo start the Scout backend server we first select the [webapp] dev server.launch file in the PackageExplorer view of the Eclipse IDE and then use the Run As menu as shown in Figure 6.8
Figure 6. Starting the Hello World application.Starting the Scout frontend server works exactely the same. But first select the [webapp] catedundermodulehelloworld.ui.html.app.dev in the Package Explorer.During startup of the Scout applications you should see console output providing information aboutthe startup. After having successfully started the Scout backend and frontend servers the HelloWorld application can then be accessed by navigating to http://localhost:8082 in your favorite webbrowser.The running Hello World application should then be started in your browser as shown in Figure 7.Figure 7. The Hello World application in the browser.9
2.4. Export the ApplicationAt some point during the application development you will want to install your software on amachine that is intended for productive use. This is the moment where you need to be able to buildand package your Scout application in a way that can be deployed to an application server.As Scout applications just need a servlet container to run, Scout applications can be deployed toalmost any Java appliction server. For the purpose of this tutorial we will use Apache Tomcat.2.4.1. Verify the Container Security SettingsFirst you need to decide if the users of your application should communicate via HTTPS with theScout frontend server. We strongly recommended this setup for any productive environment. Thisis why even the Scout “Hello World” example is configured to use HTTPS.As a default Tomcat installation is configured to use HTTP only, we need to first verify if theinstalltion is properly configured for HTTPS too. In case HTTPS support is already enabled for yourTomcat installation, you may skip this section.Otherwise, check out the configuration process described in the Tomcat Documentation to enableSSL/TLS.2.4.2. Create and Install a Self-Signed CertificateThis section describes the creation and usage of a self-signed certificat in a localhost setting.1. Create a keystore file with a self-signed certificate2. Uncomment/adapt the HTTPS connector port in Tomcat’s server.xml configuration3. Export the self-signed certificate from the keystore4. Import the self-signed certificate into the Java certificate storeThe first step is to create a self-signed certificate using the keytool provided with the Java runtime.The example command line below will create such a certificate using the alias tomcat localhost andplace it into the keystore file tomcat localhost.jkskeytool.exe -genkey -keyalg RSA -dname CN localhost -alias tomcat localhost -keystoretomcat localhost.jks -keypass changeit -storepass changeitThe second step is to uncomment the HTTPS connector element in the Tomcat’s server.xmlconfiguration file. Make sure that parameter keystoreFile points to your newly created keystore file(if you are using a windows box, make sure not to use the backslash characters in the path to thekeystore). After a restart of Tomcat you should then be able to access Tomcat onhttps://localhost:8443/manager/html10
Connector port "8443" protocol eads "150" SSLEnabled "true" scheme "https" secure "true"clientAuth "false" sslProtocol "TLS"keystoreFile "file:///c:/keystore/tomcat localhost.jks" keystorePass "changeit"/ The third step is to export the newly created self-signed certificate from the tomcat localhost.jkskeystore file into the tomcat localhost.der certificate file.keytool.exe -exportcert -alias tomcat localhost -storepass changeit -keystoretomcat localhost.jks -file tomcat localhost.derIn the fourth and last step we add the self-signed certificate to the known certificates of the Javaruntime. Make sure that you modify the cacerts file of the Java runtime that is used in your Tomcatinstallation and modify the path to the cacerts file accordingly.keytool.exe -import -alias tomcat localhost -trustcacerts -storepass changeit-keystore C:\java\jre8\lib\security\cacerts -file tomcat localhost.derYour Scout application should now properly communicate over HTTPS in your Tomcat installationand after having installed the "Hello World" application to Tomcat it should become available lloworld.ui.html.In case the Scout frontend server cannot access the Scout backend server your self-signedcertificate might be missing in the Java installation. To verify that the certificate has been includedin file cacerts file use the following command.keytool.exe -list -storepass changeit -keystore C:\java\jre8\lib\security\cacerts find "localhost"Once you no longer need the self-signed certificate file in your Java installation make sure toremove the certificate again.keytool.exe -delete -alias tomcat localhost -storepass changeit -keystoreC:\java\jre8\lib\security\cacerts2.4.3. Update the Scout Application to work with HTTPIf you should prefer to work with HTTP only, you need to modify the security settings of your Scoutapplication. This can be done in module helloworld.ui.html.app.war with the steps described below. In file config.properties (in folder src/main/resources): Add the property scout.auth.cookie.session.validate.secure false to disable the check for11
an encrypted channel (HTTPS). Change the scout.server.url property to use the HTTP port of your Tomcat, typically 8080. In file web.xml (in folder src/main/webapp/WEB-INF) delete the secure true /secure flag in the cookie-config element.More on this topic can be found in the Scout Architecture Documentation.2.4.4. Create WAR FilesWe are now ready to move the Hello World application from our development environment to aproductive setup. The simplest option to move our application into the 'wild' is to build it usingMaven. This produces two WAR files[2].The first WAR file contains the Scout backend server with all business logic. The second WAR filecontains the Scout frontend server that is responsible for communicating with the web browserpart of the Scout application.To start the build right click on the project helloworld and select the context menu Run As Maven build as shown in Figure 8. In the dialog that appears enter clean verify into the Goalsfield and press [ Run ].Figure 8. Starting the Maven build.Afterwards the compilation starts, executes all test cases and bundles the result into two WAR files.The output of the build is shown in the Console view within Eclipse. As soon as the build is12
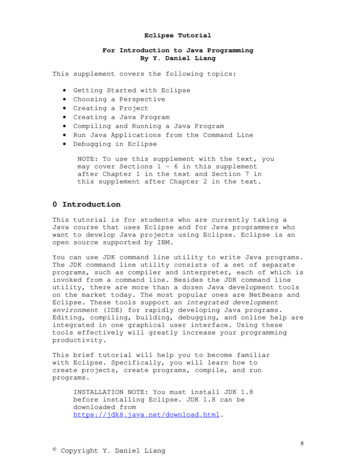
reporting success you can find the built WAR files: The Scout backend WAR file ace root/helloworld.server.app.war/targetinfolder The Scout frontend WAR file org.eclipse.scout.apps.helloworld.ui.html.war in folderworkspace root/helloworld.ui.html.app.war/targetTo see the new files within Eclipse you may need to refresh the target folder below each projectusing the F5 keystroke.2.5. Deploy to TomcatAs the final step of this tutorial, we deploy the two WAR files representing our “Hello World”application to a Tomcat web server. For this, we first need a working Tomcat installation. If you donot yet have such an installation you may want to read and follow the instructions provided inAppendix C. To verify a running Tomcat instance, type http://localhost:8080/ into the address bar ofthe web browser of your choice. You should then see the page shown in Figure 9.Figure 9. The Tomcat shown after a successful installation. After clicking on the “Manager App” button(highlighted in red) the login box is shown in front. A successful login shows the “Tomcat Web ApplicationManager”.Once the web browser displays the successful running of your Tomcat instance, switch to its“Manager App” by clicking on the button highlighted in Figure 9. After entering user name andpassword the browser will display the “Tomcat Web Application Manager” as shown in Figure 10. Ifyou don’t know the correct username or password you may look it up in the file tomcat-users.xmlas described in Section C.2.13
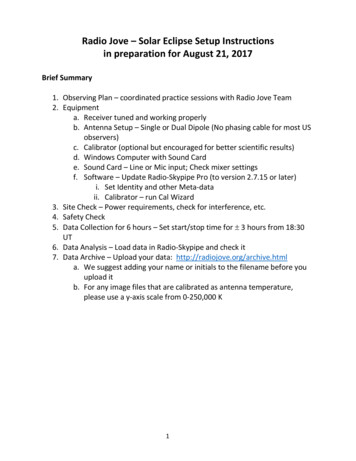
Figure 10. The “Tomcat Web Application Manager”. The WAR files to be deployed can then be selected usingbutton “Choose File” highlighted in red.After logging into Tomcat’s manager application, you can select the WAR files to be deployed usingbutton “Choose File” according to the right hand side of Figure 10. After picking your just builtorg.eclipse.scout.apps.helloworld.server.war and closing the file chooser, click on button “Deploy”(located below button “Choose File”) to deploy the application to the Tomcat web server. Then werepeat this step with the second WAR file org.eclipse.scout.apps.helloworld.ui.html.war.This will copy the selected WAR files into Tomcats webapps directory and unpack its contents intosubdirectories with the same name. You can now connect to the application using the browser ofyour choice and enter the following ps.helloworld.ui.html/14
Figure 11. The “Hello World” login page.Then you will see the login page as shown in Figure 11. Two users have been pre defined: “admin”with password “admin” and “scott” with password “tiger”. You can find this configuration in theconfig.properties file of the application.Please note: In a productive environment it is recommended to deploy the server and the userinterface into two different servlet containers running on dedicated machines. This is becausethese two tiers have different requirements on resources, load balancing and access protection.Furthermore, it is strongly recommended to use an encrypted connection (e.g. TLS 1.2[3]) betweenclient browsers and the Scout frontend server AND between the Scout frontend and backendserver![1] The Scout server part of the “Hello World” application will be running on a web server.[2] Web application ARchive (WAR): http://en.wikipedia.org/wiki/WAR file format %28Sun%29[3] TLS: https://en.wikipedia.org/wiki/Transport Layer Security15
Chapter 3. Scout ToolingThis chapter presents the Scout SDK tooling that is included with the Eclipse Scout. The Scout SDKprovides wizards to create new project and application components, adds code assistance to theJava Editor and comes with a NLS editor to manage all translated text entries of the application.The chapter is organized as follows. Section 3.1 describes the goals and benefits of the toolingincluded. Because the Scout Tooling is based on the Eclipse IDE, Section 3.2 provides a shortoverview of frequently used Eclipse features. A high level description of the Scout tooling isprovided in Section 3.3. Section 3.4, Section 3.5 and Section 3.6 then provide detailed descriptions ofthe functionality offered by the Scout SDK.3.1. Motivation for the ToolingThanks to this tooling, developing Scout applications is made simpler, more productive and alsomore robust. Initially, a solid understanding of the Java language is sufficient to start developingScout applications and only a rough understanding of the underlying Maven/JEE technologies isrequired.The Scout SDK also helps developers to become more productive. Many repetitive and error pronetasks run automatically in the background or are taken care of by the component wizards of theScout SDK.The application code created by the Scout SDK wizards helps to ensure that the resulting Scoutapplication has a consistent and robust code base and is well aligned with the application modeldefined by the Scout runtime framework.3.2. Eclipse IDE toolingThe Scout tooling is an extension of the Eclipse IDE. The goal of this section is not to provide acomplete overview on the features contained in the Eclipse IDE. It provides a short overview of theimportant eclipse features, frequently used during the development of a Scout Application.Experimented Eclipse IDE users might skip this section.3.2.1. Start the New WizardTo start the New Wizard wizard press Ctrl N or use menu File › New › Other . In the first wizardstep type the name of the object you want to create into the Wizards field as shown in Figure 12.16
Figure 12. "New" Wizard3.2.2. Create a new Java classStart the New Wizard and type Class in the Wizards field. Select Class Click on [ Next ] to open theNew class wizard17
Figure 13. "New Java Class" WizardYou can choose define the following properties: Source folder: Click on [ Browse ] to choose the project where the class belongs. Package: Click on [ Browse ] to choose the package in the given project. If the package does notexist it will be created a new one automatically. Name: Type the class name Modifiers: Choose public or default. Or abstract and/or final. Superclass: Choose the parent class clicking on [ Browse ] Interfaces: Click on [ Add ] to add the list of interfaces your class implements. Method stubs: Include methods in your class. Comments: Generate predefine comments.Click on [ Finish ] when you are done with the class definition. The java editor will open and you18
can start editing.3.2.3. Create a new Java packageStart the New Wizard and type Package in the Wizards field. Select Package Click on [ Next ] toopen the New package wizardIn the New package wizard you can define the following properties: Source folder: Click on [ Browse ] to choose the project where the package belongs. Name: Write the name of the package. Package info: Choose the checkbox if you want package-infoClick on [ Next ] to create the project. The Project Browser3.2.4. Organize Java importsThe import section of a java class needs to be kept up-to-date. New imports need to be added and nolonger used ones should be removed. Eclipse offers a the shortcut Ctrl Shift O to accomplish thistask.In case an import cannot be resolved because several candidates exist, a selection list is displayed.19
3.2.5. Rename a classRenaming a class without SDK support is not so easy. The class and possibly the compilation unitneed to be renamed. Then every reference to the class within the workspace needs to be updated.All this work is accomplished by using the Class rename Wizard.1. Open the Wizard using one of the following methods Alt Shift R Context Menu › Refactor › Rename Select the class in the tree and press F22. Choose the new name for the class3. Specify which references need to be updated4. Click [Finish] or [Next] to continueAlternative MethodA class can be renamed by select the class name anywhere in code and pressing Ctrl 1 . The option[Rename in Workspace] will rename the class without using a the wizard.3.2.6. Rename a packageRenaming a package without SDK support would be a tedious undertaking. All classes in thepackage and its subpackages would have to be modified as well as the directory structure on disk.Then every reference to the package within the workspace needs to be updated.All this work is accomplished by using the Package rename Wizard.1. Open the Wizard using one of the following methods Alt Shift R Context Menu › Refactor › Rename Select the package in the tree and press F22. Choose the new name for the package3. Specify which references need to be updated4. Click [OK] or [Prview] to continue3.3. Scout SDK OverviewThe Scout SDK tooling helps the Scou
Chapter 2. “Hello World” Tutorial The “Hello World” chapter walks you through the creation of an Eclipse Scout client server application. When the user starts the client part of this application, the client connects to the server. [1] and asks for some text content that is to