Transcription
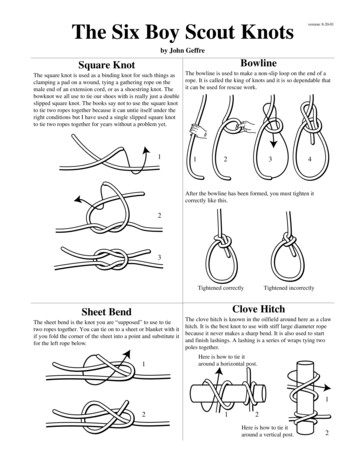
The Six Boy Scout Knotsversion: 8-20-01by John GeffreBowlineSquare KnotThe bowline is used to make a non-slip loop on the end of aThe square knot is used as a binding knot for such things asrope. It is called the king of knots and it is so dependable thatclamping a pad on a wound, tying a gathering rope on theit can be used for rescue work.male end of an extension cord, or as a shoestring knot. Thebowknot we all use to tie our shoes with is really just a doubleslipped square knot. The books say not to use the square knotto tie two ropes together because it can untie itself under theright conditions but I have used a single slipped square knotto tie two ropes together for years without a problem yet.11234After the bowline has been formed, you must tighten itcorrectly like this.23Tightened correctlyTightened incorrectlyClove HitchSheet BendThe sheet bend is the knot you are “supposed” to use to tietwo ropes together. You can tie on to a sheet or blanket with itif you fold the corner of the sheet into a point and substitute itfor the left rope below.1The clove hitch is known in the oilfield around here as a clawhitch. It is the best knot to use with stiff large diameter ropebecause it never makes a sharp bend. It is also used to startand finish lashings. A lashing is a series of wraps tying twopoles together.Here is how to tie itaround a horizontal post.1212Here is how to tie itaround a vertical post.2
Two Half HitchesTaut-line HitchTwo half hitches is my favorite knot. You can tie onto almostanything with it. In the first step, if you go around the postone and a half times instead of just one half time as shown,you will make a knot called “a round turn and two halfhitches” which will grip onto the post extremely well. If yougo around the post two and a half times or more, you willmake a knot called “the pipe hitch” which will form a deathgrip on the post.The taut-line hitch is my least favorite of the six boy scoutknots. It is used as an adjustable knot in tent guy lines andthat’s about all it is used for. This knot has to be internallytightened quite tight for it to work properly. Two half hitchesworks almost as well as this knot for tent guy lines and thetrucker’s knot works even better.This end goes around a tent stake or a tree11234234This end comes from the tentOther Useful KnotsOverhand KnotThe Trucker’s KnotUse this knot on both ends of your rope to keepit from unraveling and as a “stopper” knot. Ihave found that I like a stopper knot betterthan “whipping” because both can come offthe end of the rope but you can retie anoverhand knot quickly and without having tofind some whipping material.This is the most useful knot that I know of. Use it to make a very tight ropebetween two objects. The knot in step 1 can be a clove hitch, two halfhitches, or my favorite the hitching tie as shown. The knot in step 3 is calledthe slip knot. In step 4 after you have pulled the “bight” (bight means “ropefolded in half”) through the slip knot as tight as you can, pinch the crossingwith your left thumb and forefinger so your right hand can tie the knot instep 5. The knot formed in step 5 is called a slippery half hitch or a slippedhalf hitch. By the way, a hitching tie is actually a slipped slip knot foranyone who cares about such things.If you tie the trucker’s knot using a hitching tie as shown, the wholeconglomeration can be untied with only four pulls in the right places. See ifyou can figure out which are the four right places.Coiling a Hitching TieSo cowboy, how do YOURopetie your horse to theLearn how to dohitchin’ rack? Learnthis, it is important. how to tie this knot realfast and you can tie arope to anything inabout 3 seconds anduntie it in nothing flat.11223456
When to Use Knots and LashingsA good knot must pass three tests: 1) It is easy to tie,2) it stays tied, and 3) it is easy to untie.Below are 12 knots that fall into five categories. Alsobelow are methods to prevent rope ends from fraying.The five categories for these knots are bindings,bends, loops, hitches and lashings.BINDI NG K NOTSA binding knot restricts an object(s) with a single line.Tying your shoe and tying up package are examples ofbinding knots.A square knot tied with a single rope line is abinding knot.Use a binding knot to tie bandages, packages ormost any type of object.BEND KNOTSA bend knot joins two separate rope lines together. A square knot, also called a reef knot or joiningknot, can be used to join two lines of the samediameter (thickness).A sheet bend joins two lines of differentdiameters.Use a bend knot to lengthen a rope by tyingtwo lines together.LOOP K NOTSA loop knot creates a closed circle at the end of a line.A bowline ties a loop that will not adjust in sizeonce tied. It is referred to as a rescue knotbecause it can be tied around oneself onehanded, and is used to lift people out ofdangerous situations.A taut-line hitch is actually a loop knot thateasily adjusts its loop size under tension, butremains secure once the knot is taut (pulledtight).Use a loop knot for tying down cargo, holddown a automobile’s trunk lid or hold justabout anything in place.HITCH K NOTSA hitch ties a rope to an object like a post or ring. Thinkof hitching a horse to a “hitching post.”Two half-hitches is knot that holds aline when being pulled from a post inone direction.A clove hitch is a knot that holds a lineto a post when being pulled in twodirections, like a bridge’s rope handrail.Clove means “two” just like a deer’shooves are cloven – in two parts.Use a hitch knot anywhere an attachmentof a line is needed such as posts, eye ring grommets, orstakes. The clove hitch pulls from two directions likesecuring lines along a series of posts, or as starting orending of a lashing (see below).A timber hitch ties a rope to a piece ofwood; it is intentionally difficult to undo.Use a timber hitch to secure a line to atree, a log or to drag a log along theground. The timber hitch is used to starta diagonal lashing (see below).LASHI NG KNOTSA lashing knot holds two poles together; think of thelog wall forts of the American frontier.A diagonal lashing begins with atimber hitch and ends with a clovehitch. This lashing binds poles thatcross each other at a 45 to 90 angle.Cross bracing at 90 is only used if agap exists between poles.A square lashing begins and ends witha clove hitch and binds poles at a 90 angle. It is stronger than the diagonallashing, but the square lashing cannotbe used if a gap exists between poles.A shear lashing begins and ends with aclove hitch and binds poles at a 0 to 45 angle. Use this when poles must flexiblyswing apart in a scissors motion such asthe shear legs of an A-frame.A tripod lashing begins and ends with aclove hitch and binds poles to bearranged to form a pyramid. Use this tohang a pot above a fire or hold a waterdispensing device over the ground.Use lashings to build without nails useful simplestructures like a tripod, a chair, a hang-drying rack or aflagpole. Pioneering is the use of spars and lashings tobuild complex structures with trestle triangles like atower, a shelter or a bridge.There are times to not use lashings. Do not buildstructures without permission while camping – neverbuild lashing structures in backcountry. If lashing ispermitted, only use approved materials, then untie allstructures and practice principles of leave no trace.
WHIPPINGWhipping intends to stop a rope end from unraveling. Tie a rope end with a simple overhand knot andwrap it with duct tape for a temporary fix.A whipping knot uses twine to bindnatural-fiber rope.Heat fusing with a candle or match meltsthe end of artificial-fiber ropes made ofplastic or nylon.References: http://www.ropeworks.biz The Boy Scout Handbook
Square Lashing - Step by StepUsed to fasten two spars or poles together.Start by crossing the two sticks or dowels at perpendicular or 90 degree angles.Make a Clove Hitch on the vertical stick or dowel near the point where the two sticks cross.This fastens the rope to the stick.Weave the rope under and over the crossed sticks alternately.To do this, run the rope over the horizontal bar, around behind the vertical bar, then back overthe face of the horizontal bar on the left.Tighten snugly, and then bring the rope behind the vertical bar and up the right front side of thehorizontal bar.Repeat this three or four times, keeping the rope tight.When you have finished weaving the lashing, then "FRAP" it by wrapping the rope betweenthe poles (in front of the back stick and in back of the front stick), pulling tightly. This tightensthe connected poles.Finish your lashing with another Clove Hitch.- Top -
Diagonal Lashing - Step By StepStep 1Step 2Step 3Step 4Step 5Step 6Step 7Step 8Step 9Step 10UseDiagonal lashing is used to bind poles together that cross each other but do not touch when theirends are lashed in place in a structure.
CommentsThe diagonal lashing gets its name from the fact that the wrapping turns cross the poles diagonally.The diagonal lashing can be used to bind poles that cross each other from 90 to 45 . If the anglebetween the poles is less than 45 a shear lashing should be used. The diagonal lashing makes useof the timber hitch to pull poles together that are not touching each other. The timber hitch allows thepoles to be drawn together without changing the relative positions of the poles. [NOTE] If a squarelashing were used to bind poles that do not touch, the beginning clove hitch would pull the cross poletoward the clove hitch causing unnecessary bowing of the cross pole and could also produce a forcethat would act along the length of the pole to which the clove hitch is tied. These additional forces, ifstrong enough, can place unnecessary strain on other lashing within the structure causing thestructure to twist and fail.Narration1. Tie a timber hitch diagonally around both poles.2. Start the wrapping turns on the opposite diagonal to the timber hitch, by pulling the rope tightso that the poles contact each other.3. Take 3 to 4 wrapping turns; keep the wrapping turns parallel; pull each wrapping turn tight.[NOTE] If the wrapping turns are allowed to cross, the increased friction between the strandsof the rope will make it difficult to tighten the wrapping turns.4. Start the second set of wrapping turns by going past and around the vertical pole.NOTE] Goingaround the pole the rope allows the direction of the rope to be changed without crossing thefirst set of wrapping diagonally.5. Take 3 to 4 wrapping turns; be sure to keep the wrapping turns parallel; pull each wrappingturn tight.6. Start the frapping turns by going past and around one of the poles. [NOTE] Going around thepole with the rope allows the direction of the rope to be changed without crossing the wrappingturns diagonally.7. Take 2 to 3 frapping turns; keep the frapping turns parallel. Be sure to pull each turn tight.8. End the lashing with a clove hitch. Take the first half hitch of the clove hitch by going past andthen around one of the poles. Lock the half hitch tight against the lashing by working it tight.9. Take a second half hitch around the pole.10. Work the second half hitch tight against the first half hitch so that the clove hitch is lockedagainst the lashing.If very smooth rope is used, the lashing can be made more secure by adding a third or fourth halfhitch to the clove hitch.- Top -
Tripod Lashing - Step By StepStep 1Step 2Step 3Step 4Step 5Step 6Step 7Step 8Step 9Step 10Step 11Step 12DescriptionA shear lashing around 3 poles.UseTo bind three poles together, for the construction of a tripod. To bind three poles together that contactat the same point in a structure.CommentsThe tripod lashing is a shear lashing that binds three poles together at the same point. The tripodlashing gets it name from the fact that its most common use is the construction of a tripod. The tripodlashing can be used just about anywhere in a structure that three poles cross each other at the samepoint and the same time in the sequence of construction. Tripod lashing takes two main forms; withracked wrapping turns (the rope is woven between the poles) and with plain wrapping turns (the ropeis wrapped around the poles without weaving the rope between the poles). When the lashing is madewith racking turns the rope contacts each pole around its entire circumference ; this contact makesthe tripod lashing with racking turns the most secure form of tripod lashing: therefore tripod lashing
with racking turns should be used when safety is important. However, for light structures where therewould be no danger if the lashing slipped, the faster to tie tripod lashing with plain wrapping turns maybe usedLaying Out The PolesFor most tripod lashings, lay the pole side by side with the butt ends aligned. The alignment of thebutts of the pole insures that the tripod legs are the desired lengthNoteThe practice of laying the center pole in the opposite direction to the outside poles creates severalproblems. When the poles are laid in opposite directions the wrappings must be put on loosely so thatwhen the center pole is rotated to its proper position the lashing is tightened around the poles. If thewrappings are put on too tight, the rope is stretched causing damage to the rope fibers, thereforeweakening the lashing. On the other hand, if the rope is wrapped two loosely, the lashing will nottighten enough when the center pole is rotated and the lashing will be able to slip along the length ofthe pole. Either way, the rope to loose or the rope too tight, a dangerous situation is created.Setting Up A TripodSet up the tripod by crossing the outside poles so that the cross point of the poles is under the centerpole. Crossing the outside poles under the center pole causes part of the load that is placed on thetripod to be taken up by the wood to wood contact of the poles.
Round Lashing - Step By StepComments1.2.3.4.5.6.Used to lash two poles together (constructing a flagpole).Tie a clove hitch round the bottom pole.Wind the rope around both six or seven times.Finish with two half hitches round both poles.The lashing can be tightened by driving a small wooden peg between the poles.If possible force a wedge under the lashings to make them really tight. If the spars are vertical,bang the wedge in downwards.- Top -Shear Lashing
CommentsA sheer lashing is often used to bind adjacent poles together. It is also a good way to reinforce abroken or weak pole. The frapping turns used to tighten the lashing may be omitted and replaced withwedges inserted between the poles.A loose Sheer Lashing made around the ends of two poles will allow the poles to be opened out andused as an A-frame. It can also be used to form a tripod just like the Figure-of-eight lashing.1. Lay out the poles. For most lashings you will want to lay the poles side by side with the buttends aligned (thicker ends).2. Tie a clove hitch around one of the outside poles and secure the standing part by wrapping itaround the running part (or trap it under the first turns). Note: If you only lashing two polestogether it may be better to simply tie the clove hitch around both poles and pull tight.3. Pass the rope around the poles to form a first turn.4. Pulling each turn tight made a series of turns until the lashing is at least as long as thecombined diameters of the two poles (usually a set of 4 to 6 turns will be sufficient).5. Tighten the lashing with a frapping turn by taking the rope down between two poles at one endof the turns. This should be difficult to do if the turns have been pulled tightly (as they shouldbe). Bring the rope back up between the poles at the other end of the lashing and pull tight.Repeat 2 or 3 times.6. Start the second set of frapping turns by taking the rope around the center pole and frapping.Take the second set of frapping turns in the opposite direction to the first set.7. Repeat for any additional poles.8. Pass the rope once more between the poles then around one pole and tuck it under itself toform a half hitch. Pull this tight and make a second half hitch forming a clove hitch by takingthe rope around the same pole and tucking it under itself.Notes on A-Frame LashingAn A-frame lashing or Sheer Legs is made in the same way as a Sheer Lashing with the lashing andfrapping turns made slightly loose so that the poles can be opened out. It is often used to raise a boatmast or to form the legs of a rope bridge. You must take care to ensure that the legs of the frame donot slip.Notes on TripodsTake a tripod by using a Figure-of-eight lashing on three poles. Set up the tripod by crossing theoutside poles so that the cross point of the poles is under the center pole. This makes sure that partof the load is taken by the wood in contact.If a symmetrical arrangement of the poles is needed within a structure the tripod can be set up byrotating the poles around the lashing. This means that the load is supported only by the ropes and thejoint becomes flexible and so the tripod may become unstable.
- Top -Ladder LashingCommentLadder lashing allows for a quick and secure method for constructing a ladder or for constructing adecking with evenly space decking pieces.This form of lashing has several advantages over the traditional floor lashing. Less material isrequired because unlike floor lashing a space can be left between each piece of the decking. Also,each rung is securely lashed in place by several loops of rope in much the same way as a squarelashing; with the traditional floor lashing only a single loop of the rope holds each end of the deckingin place, therefore if one piece loosens, the entire deck loosens.The ladder lashing has two forms; left and right, each is a mirror image of the other.Step 1:The ladder lashing is3:Place a rung across theStep 2:Lay an overhand loop Steprails so that the standing part of eachstarted by using a clove hitch stopped over each side rail so that thewith two half hitches to secure a rope running end of each loop is to theto the top end of each rail.outside.overhand loop is over the end of therung and the running part of eachoverhand loop is under the rung.
Step 4:Pull the running part side Step 5:Then pull the loop over Step 6:Work each rope until it isof each overhand loop behind and totightened around the rung and thethe end of the rung.the outside of each rail.Step 7:Form an overhand loop ineach running part.rung is in its desired position.Step 8:Place an overhand loopover each end of the rung to form ahalf hitch around each end of therung.Step 9:Work the half hitch tightStep 10:Repeat steps 1 through 8 for each additional rung.END:Finish the lashing by tying a clove hitch around each rail so that the clove hitch is directly under thebottom rung.- Top -
Aug 20, 2001 · Square Knot The square knot is used as a binding knot for such things as clamping a pad on a wound, tying a gathering rope on the male end of an extension cord, or as a shoestring knot. The bowknot we all use to tie our shoes with is really just a double slipped square knot. The books