Transcription
Blood Glucose Monitoring SystemOwner'sBookletInstructions for Use
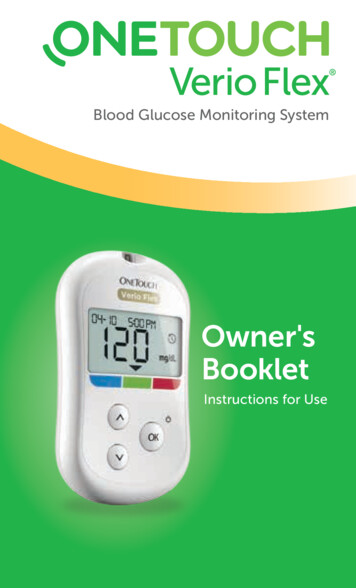
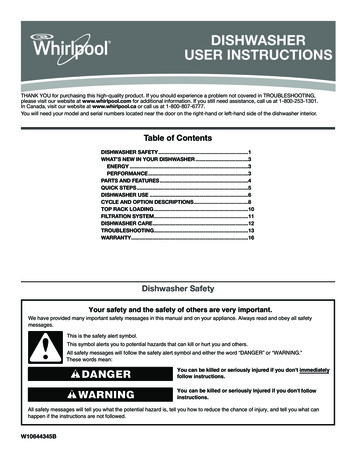
Your OneTouch Verio Reflect Meter includes arange of new colored features, which may helpwith your diabetes management.Results, Meal and Event tagging40mg/dL75 200mg/dLmg/dLBefore MealHighLowBlood Sugar Mentor Messages200 56 104mg/dLPattern foundHigh in the last 5 daysat this time. Hasanything changed?OKmg/dLmg/dLTreat LowLow result, juicemay help. Retest in15 minutes.OKWell doneBack in range after 2Low results in a row.OKAwards, Summaries and Trend 90AwardSummaryTrend 90Test Goal AwardLast 30 daysCurrentAvg.Gold levelYou've met your testgoal 90 times!Lo313In31013Hi213273106mg/dL105Please refer to this Owner's Booklet forfurther details on each of the new features
Blood Glucose Monitoring SystemOwner's Booklet1
Thanks for choosing OneTouch !The OneTouch Verio Reflect Blood Glucose MonitoringSystem is one of the latest product innovations fromOneTouch .Your OneTouch Verio Reflect Meter is designed toconnect (sync) with a variety of compatible wirelessdevices running software applications. By connectingyour meter with the OneTouch Reveal App you canreview and graph your results, set Daily Test Goals,see Blood Sugar Mentor Messages and help identifypatterns. Meter results and other tracked data aresent to the compatible devices either throughBLUETOOTH (wireless) or USB cable connection.Visit www.OneTouch.com for more information aboutthe OneTouch Reveal App.2
Every OneTouch Meter is designed to help you test yourblood glucose and manage your diabetes.This Owner's Booklet offers a complete explanationof how to use your new meter and testing supplies. Itreviews the do's and don'ts of testing your blood glucoselevel. Please keep your Owner's Booklet in a safe place;you may want to refer to it in the future.We hope OneTouch products and services will continueto be a part of your life.3
Meter symbols and iconsRange Indicator icons and Color BarLowResult below target rangeResult at low end of target rangeResult near middle of target rangeResult in middle of target rangeResult near middle of target rangeResult at high end of target rangeHighIn RangeResult above target rangeResult in range (text)4
Meal and Event tagsBefore Meal tagAfter Meal tagEvent tagCarbs Event tagStress Event tagIllness Event tagMedication Event tagExercise Event tag5
Patterns, Test Tracker, and AwardsLow Pattern Message (blue icon)High Pattern Message (red icon)Daily Test Goal metDaily Test Goal not metGold awardSilver awardBronze award6
Main Menu and Settings Menu iconsSummaryResults LogTrend 90Settings MenuRange Indicator icons as emojiRange Indicator icons as textOther meter iconsBLUETOOTH feature onSyncingControl solution resultLow batteryScreen navigation progress dots7
Other symbols and iconsCautions and Warnings: Refer to the Owner'sBooklet and inserts that came with your system forsafety-related information.Direct currentBefore you beginBefore using this product to test your bloodglucose, carefully read this Owner's Booklet, andthe inserts that come with the OneTouch Verio TestStrips, OneTouch Verio Control Solutions and theOneTouch Delica Plus Lancing Device.8
IMPORTANT SAFETY INSTRUCTIONS: This meter and lancing device are for single patientuse only. Do Not share them with anyone else,including family members! Do Not use on multiplepatients! After use and exposure to blood, all parts of this kit areconsidered biohazardous. A used kit may potentiallytransmit infectious diseases even after you haveperformed cleaning and disinfection.For more information see: FDA Public Health Notification:“Use of Fingerstick Devices on More than One PersonPoses Risk for Transmitting Bloodborne Pathogens:Initial Communication 2010” otices/ucm224025.htmCDC website on “Infection Prevention during BloodGlucose Monitoring and Insulin y/blood-glucosemonitoring.html9
Intended useThe OneTouch Verio Reflect Blood Glucose MonitoringSystem is composed of the OneTouch Verio Reflect Meter and OneTouch Verio Test Strips. The OneTouchVerio Reflect Blood Glucose Monitoring System isintended to be used for the quantitative measurement ofglucose (sugar) in fresh capillary whole blood samplesdrawn from the fingertips. The OneTouch Verio Reflect Blood Glucose Monitoring System is intended for selftesting outside the body (in vitro diagnostic use), byindividuals with diabetes at home as an aid to monitorthe effectiveness of diabetes control. The system isintended to be used by a single person and should not beshared. The system should not be used for the diagnosisof, or screening for diabetes or for neonatal use.10
WARNING: This device is not intended for use inhealthcare or assisted-use settings such as hospitals,physician offices, or long-term care facilities because ithas not been cleared by the FDA for use in these settings,including for routine assisted testing or as part of glycemiccontrol procedures. Use of this device on multiple patientsmay lead to transmission of Human ImmunodeficiencyVirus (HIV), Hepatitis C Virus (HCV), Hepatitis B Virus (HBV),or other bloodborne pathogens.LimitationsThe OneTouch Verio Reflect Blood Glucose MonitoringSystem is intended to be used by a single patient andshould not be shared. The OneTouch Verio Reflect System is not to be used for the diagnosis or screeningof diabetes or for neonatal use. The OneTouch VerioReflect System is not for use on critically ill patients,patients in shock, severely dehydrated patients orhyperosmolar patients (with or without ketosis). Do Notuse the OneTouch Verio Reflect System for alternate sitetesting (AST).11
OneTouch Verio Test Strips should not be used ataltitudes above 10,000 feet as there may be an adverseeffect on test results. A hematocrit (percentage of yourblood that is red blood cells) that is either very high(above 60%) or very low (below 20%) can cause falseresults. Talk to your healthcare professional if you don'tknow your hematocrit level. The OneTouch Verio Reflect Blood Glucose Monitoring System should not be usedwithin 24 hours of receiving a D-xylose absorption test asit may cause inaccurately high glucose results with yourmeter. Do Not use the OneTouch Verio Reflect BloodGlucose Monitoring System if you are being treated fororganophosphate poisoning with Pralidoxime (PAM) as itmay cause inaccurate glucose results with your meter.Test principleGlucose in the blood sample mixes with the enzymeFAD-GDH (see page 160) in the test strip and a smallelectric current is produced. The strength of this currentcalculates your blood glucose level. It then displays theblood glucose result and stores it in the meter memory.Use only OneTouch Verio Control Solutions and TestStrips with the OneTouch Verio Reflect Meter. Use ofOneTouch Verio Test Strips with meters for which theyare not intended may yield inaccurate results.12
BLUETOOTH wireless technologyBLUETOOTH wireless technology is used by somesmartphones and many other devices. Your OneTouchVerio Reflect Meter uses BLUETOOTH wirelesstechnology to pair and to send your glucose results tocompatible wireless devices.The OneTouch Verio Reflect Meter is designed to workwith the OneTouch Reveal Mobile App.Visit www.OneTouch.com for information on whichwireless devices are compatible with your OneTouchVerio Reflect Meter, and where/how to download theOneTouch Reveal Mobile App.When using the OneTouch Verio Reflect System, wesuggest you pair your OneTouch Verio Reflect Meterwith a compatible wireless device and track your results.See page 112 for pairing instructions.Changes or modifications not expressly approved by theparty responsible for compliance could void the user'sauthority to operate the equipment.13
This device complies with Part 15 of the FCC Rules.Operation is subject to the following two conditions:(1) this device may not cause harmful interference and(2) this device must accept any interference received,including interference that may cause undesiredoperation.NOTE: This equipment has been tested and foundto comply with the limits for a Class B digital device,pursuant to part 15 of the FCC Rules. These limits aredesigned to provide reasonable protection againstharmful interference in a residential installation. Thisequipment generates, uses and can radiate radiofrequency energy and, if not installed and used inaccordance with the instructions, may cause harmfulinterference to radio communications. However, thereis no guarantee that interference will not occur in aparticular installation. If this equipment does causeharmful interference to radio or television reception,which can be determined by turning the equipmentoff and on, the user is encouraged to try to correct theinterference by one or more of the following measures: Reorient or relocate the receiving antenna. Increase the separation between the equipment andreceiver.14
Connect the equipment into an outlet on a circuitdifferent from that to which the receiver is connected. Consult the dealer or an experienced radio/TVtechnician for help.These guidelines help ensure that your meter will notaffect the operation of other nearby electronic devices.Additionally, other electronic devices should not affectthe use of your meter.If you experience meter interference problems, trymoving your meter away from the source of theinterference. You can also move the electronic device orits antenna to another location to solve the problem.WARNING: The BLUETOOTH feature on your metersends test results to your compatible wireless device. Toprevent other people's results from being sent to yourcompatible wireless device, Do Not let anyone else useyour meter to test their blood glucose. This meter is forsingle patient use only.15
WARNING: In locations where cell phone use is notpermitted, such as hospitals, some healthcare professionaloffices and airplanes, you should turn the BLUETOOTH feature off. See page 108 for more information.Do Not leave your meter unattended or in a public placeso that others may change your personal parameters ormake physical connections to it.The meter has been designed defensively to ward offmalicious intent and has been tested accordingly.BLUETOOTH trademarkThe BLUETOOTH word mark and logos are registeredtrademarks owned by Bluetooth SIG, Inc. and any use ofsuch marks by LifeScan Scotland Ltd. is under license.Other trademarks and trade names are those of theirrespective owners.16
Table of Contents1Getting to know your system. 182 Setting up your system. 283Taking a test. 42Testing your blood glucose.42Testing with control solution. 684Tagging results. 785Understanding Messages.846Summary, Results Log and Trend 90.967Syncing your meter. 1088Adjusting meter settings. 1209Caring for your system. 13410 Batteries. 14211 Troubleshooting. 14612 System information. 15613 Index. 16817
1 Getting to know your systemYour OneTouch Verio Reflect BloodGlucose Monitoring SystemIncluded with your kit:OneTouch Verio Reflect Meter (2 CR2032 lithiumcoin cell batteriesincluded)Lancing deviceLancetsOneTouch Verio Test Strips*18
Getting to know your system 1NOTE: If any item is missing or defective in your kit,contact Customer Service. Contact information forCustomer Service is listed at the end of this Owner'sBooklet.NOTE: If another type of lancing device was included,see the separate instructions for that lancing device.19
1 Getting to know your systemAvailable separately:Items pictured below are required, but may not beincluded in your kit:They are sold separately. Refer to your meter carton for alist of included items.OneTouch Verio Level 3Control Solution*(vial with blue cap)OneTouch Verio Level 4Control Solution*(vial with red cap)OneTouch Verio Test Strips*20
Getting to know your system 1*OneTouch Verio Control Solution and Test Strips areavailable separately. For availability of test strips andcontrol solution, contact Customer Service or ask yourpharmacist or healthcare professional.You can use either OneTouch Verio Level 3 ControlSolution or OneTouch Verio Level 4 Control Solutionwith your OneTouch Verio Reflect Meter.WARNING: Keep the meter and testing supplies awayfrom young children. Small items such as the battery door,batteries, test strips, lancets, protective covers on thelancets, and control solution vial cap are choking hazards.Do Not ingest or swallow any items.21
1 Getting to know your systemGetting to know your OneTouch VerioReflect Blood Glucose Monitoring SystemMeter22
Getting to know your system 11Test strip portInsert test strip here to turn meter on2Battery iconAppears only when batteries are low3mg/dL is the pre-set unit of measure and cannot bechanged*4Micro USB data portConnect to download to a computer5OK button Turns meter on/off (press and hold) Confirms menu selections (press and release)6Back button Go back to the previous screen (press and release) May be used to change a Meal tag or add an Event tag7Up and down buttons Highlight selection (press and release) Increase scrolling speed (press and hold)8Color Bar9Range Indicator icon10 Test Tracker icons23
1 Getting to know your systemWARNING: *Confirm that the unit of measure mg/dL isdisplayed. If your display shows mmol/L rather than mg/dL,stop using the meter and contact Customer Service.Getting to know your OneTouch Verio Test StripTest strip11Channel to apply sample12Silver prongsInsert into test strip port (1)24
Getting to know your system 1Features overviewThe OneTouch Verio Reflect Meter is equipped withfeatures designed to help you manage your bloodglucose in a variety of ways. We hope you will takeadvantage of these features and make them part of yourdiabetes management routine.Blood Sugar Mentor MessagesBlood Sugar Mentor Messages provide insight on howyou're doing and diabetes management guidance,including educational and motivational messages basedon your current and previous glucose results and othertracked data. When you receive your blood glucoseresult, the meter may display Mentor Tips (guidance),Pattern Messages (insight) or Awards (encouragement).25
1 Getting to know your systemExamples of Blood Sugar Mentor Messages20056Pattern foundHigh in the last 5 daysat this time. Hasanything changed?OKTreat LowLow result, juicemay help. Retest in15 minutes.OKInsightGuidancemg/dLmg/dL104mg/dLWell doneBack in range after 2Low results in a row.OKEncouragement26
Getting to know your system 1ColorSure Dynamic Range IndicatorThe ColorSure Dynamic Range Indicator instantly letsyou know if your current result is below (blue), within(green) or above (red) your range limits. It also showswhen your result is near the low or high end of yourtarget range.Test TrackerThe Test Tracker lets you set the number of glucosetests you plan to take each day and automatically tracksprogress towards achieving that goal.Trend 90Trend 90 lets you set your blood glucose 90 Day AverageTarget and tracks progress towards that goal. The Trend90 graph is automatically updated every 14 days andprovides a view of how your overall glucose control istrending over time.27
2Setting up your systemSetting up your meterTurn your meter onTo turn your meter on, press and holduntil theWelcome screen appears. Once the Welcome screen isdisplayed, release . You can also turn the meter on byinserting a test strip.Every time you turn your meteron, a Welcome screen will appearfor a few seconds. If the meterdoes not power on, check thebatteries. See page 142.CAUTION:If you see any missing pixelswithin the Welcome screen,there may be a problem withthe meter. Contact CustomerService. Contact information forCustomer Service is listed at theend of this Owner's Booklet.28Welcome.Let's get started.Example
Setting up your system 2NOTE: Whether you turn the meter on for the first timeusingor a test strip, you will need to perform firsttime setup.Use the display backlight for better visibilityThe backlight comes on automatically whenever themeter is turned on. After a few seconds of no activity, thebacklight will dim. Pressing any button or inserting a teststrip will turn the backlight back on.First time setupBefore using your meter for the first time, you will beprompted to set the language, time, date, range limits,Daily Test Goal, and 90 Day Average Target.29
2 Setting up your systemNOTE: You will not be able to perform a blood glucose testuntil you complete first time setup. Be sure to talk to your healthcare professional aboutsetting the right range limits, Daily Test Goal, and90 Day Average Target for you. When selecting orchanging these settings, you should consider factorssuch as your lifestyle and diabetes therapy. Nevermake significant changes to your diabetes care planwithout consulting your healthcare professional. It is important to select the settings with care toensure the correct information is stored with your testresults.The meter comes pre-set to help you with first timesetup. But if you need to edit a setting, pressortohighlight Edit and press . You can then pressorto change values. After making your selection, highlightSave and pressto confirm your selection and proceedto the next screen.Pressingreturns you to the previous screen.30
Setting up your system 21. Pressorto highlightthe language you want, thenpressto selectThe meter will display aprompt giving the option tocomplete first time setup usingthe OneTouch Reveal App.Visit www.OneTouch.com formore information about theOneTouch Reveal App. If you donot want this option, highlightNo and pressto continue firsttime setup using only the meter.31LanguageEnglishEspañol
2 Setting up your systemSelecting Yes will prompt youto pair the meter with yourcompatible wireless device. Seepage 110. After pairing, theOneTouch Reveal App will guideyou through the process of firsttime setup. The remaining stepsbelow will not be needed.NOTE: The green progress dotwill move from left to right asyou navigate through the firsttime setup screens.32SetupDo you want tocontinue setup usingthe OneTouch Revealmobile app?YesNoProgress dot
Setting up your system 22. Confirm the time, then pressto saveSelecting Edit will allow you tochange the pre-set time.Set Time1:00 pmSaveEdit3. Confirm the date, then pressto saveSelecting Edit will allow you tochange the pre-set date.Set DateJul 4 2018SaveEdit33
2 Setting up your systemNOTE:Please Verify The time and date formatcannot be changed. Once every 6 months, andevery time you change thebatteries, a screen will promptyou to confirm the time anddate set in the meter.Jul 4 20181:00 pmIs this time/datecorrect?YesEditExampleSelecting Edit will allow you to change the time and date.Once correct, select Done.4. Confirm the Before Mealrange limits, then pressto saveBefore MealSet Low/High Limitsfor your range70 – 130mg/dLSaveEditExampleSelecting Edit will allow you to change the pre-set BeforeMeal range limits.34
Setting up your system 2Your meter uses the Before Meal and After Meal rangelimits set in your meter to tell you when a test result iswithin, below or above your mealtime range limits. Themealtime range limits you set during first time setupwill apply to all glucose results. They are used in theColorSure Dynamic Range Indicator feature, to detectPatterns and in the Summary. See page 59, page 85and page 96 for more information.Before Meal range limitspre-set low limit70 mg/dLpre-set high limit130 mg/dLlow limit must be set within60 mg/dL and 110 mg/dLhigh limit must be set within90 mg/dL and 300 mg/dL35
2 Setting up your system5. Confirm the After Meal rangelimits, then pressto saveAfter MealSet Low/High Limitsfor your range70 – 180mg/dLSaveEditExampleSelecting Edit will allow you to change the pre-set AfterMeal range limits.After Meal range limitspre-set low limit70 mg/dLpre-set high limit180 mg/dLlow limit must be within60 mg/dL and 110 mg/dLhigh limit must be within90 mg/dL and 300 mg/dL36
Setting up your system 26. Confirm the Test Trackersetting, then pressto saveSelecting Edit will allow you tochange the pre-set Daily TestGoal for the Test Tracker.The Test Tracker lets you setthe number of glucose testsyou plan to take each day andautomatically tracks progresstowards achieving that goal.The meter is pre-set with a DailyTest Goal of four tests per day.The maximum Daily Test Goal iseight. See page 128 for moreinformation.37Test TrackerSet a Daily Test Goal?Test Goal: 4SaveEdit
2 Setting up your system7. Confirm the 90 Day AverageTarget, then pressto saveSelecting Edit will allow youto change the pre-set 90 DayAverage Target.Trend 90Set your 90 DayAverage Target155 mg/dLTrend 90 lets you set your bloodglucose 90 Day Average Targetand tracks progress towardsthat goal. The Trend 90 graph isautomatically updated every14 days and provides a view ofhow your overall glucose controlis trending over time.The meter is pre-set with a 90 DayAverage Target of 155 mg/dL. Theminimum 90 Day Average Targetis 99 mg/dL and the maximum is265 mg/dL. See page 105 formore information.38SaveEdit
Setting up your system 2Setup complete appearson the screen. Your meter isready for use.Setup completeIf the meter was turned on by inserting a test strip, theApply Blood screen will appear. To perform a bloodglucose test, see page 42.NOTE: After first time setup, you can adjust your settingsat any time. See page 120 for more information.Understanding Basic ModeThe meter comes with many features to help trackdiabetes management progress. Basic Mode will turnoff these features if you prefer not to use the meter inthis way.39
2 Setting up your systemWhen Basic Mode is selected, the Test Tracker, Meal andEvent tagging, Before and After Meal averages, Trend 90,Pattern Messages, Mentor Tips and Awards will be turnedoff. In Basic Mode, range limits are general and are notdefined by mealtime. Range Indicator icons appear as text(for example, In Range ) rather than as emoji (for example,).For more information about turning Basic Mode on or offsee page 127.Turning the meter offThere are three ways to turn your meter off:for several seconds until the meter Press and holdturns off. Remove the test strip. Your meter will turn off by itself if left alone for twominutes.40
Setting up your system 2This page left blank intentionally.41
3Taking a testTesting your blood glucosePreparing for a blood glucose testNOTE: Many people find it helpful to practice testing withcontrol solution before testing with blood for the firsttime. See page 70.Have these things ready when you test:OneTouch Verio Reflect MeterOneTouch Verio Test StripsLancing deviceSterile lancetsNOTE: Use only OneTouch Verio Test Strips. Unlike some blood glucose meters, no separate stepto code your OneTouch Verio Reflect System isrequired. Testing must be done within operating temperaturerange (43-111 F) and 10-90% non-condensing relativehumidity. Make sure your meter and test strips are about thesame temperature before you test.42
Taking a test 3 Keep test strips in a cool, dry place between 41 F and86 F and below 90% relative humidity. See page 134for full storage instruction. Do Not test if there is condensation (water build-up)on your meter. Move your meter and test strips to acool, dry spot and wait for the meter surface to drybefore testing. Do Not open the test strip vial until you are ready toremove a test strip and perform a test. Use the teststrip immediately after removing it from the vial. Tightly close the cap on the vial immediately after useto avoid contamination and damage. Store unused test strips only in their original vial. Do Not return the used test strip to the vial afterperforming a test. Do Not re-use a test strip that had blood, controlsolution, or any contaminants applied to it. Test stripsare for single use only. With clean, dry hands, you may touch the test stripanywhere on its surface. Do Not bend, cut or modifythe test strip in any way.43
3 Taking a test When you first open a vial of test strips, record thediscard date on the label. Refer to the test strip insertor vial label for instructions on determining thediscard date. Comparing your blood glucose test results taken withthis meter to your results taken from a different meteris not recommended. Results may differ betweenmeters and are not a useful measure of whetheryour meter is working properly. To check your meteraccuracy, you should periodically compare your meterresults to those obtained from a lab. See page 156for more information.IMPORTANT: If another person assists you with testing,the meter should always be cleaned prior to use by thatperson. See page 134.44
Taking a test 3CAUTION: Do Not use your test strips if your vial is damagedor left open. This could lead to error messagesor inaccurate results. Contact Customer Serviceimmediately if the test strip vial is damaged. Contactinformation for Customer Service is listed at the end ofthis Owner's Booklet. If you cannot test due to a problem with your testingsupplies, contact your healthcare professional. Failureto test could delay treatment decisions and lead to aserious medical condition. The test strip vial contains drying agents that areharmful if inhaled or swallowed and may cause skin oreye irritation. Do Not use test strips after the expiration date (printedon the vial) or the discard date, whichever comes first,or your results may be inaccurate.45
3 Taking a testGetting to know your OneTouch Delica PlusLancing Device1Release button2Slider control3Depth indicator4Depth wheel5Lancing device cap6Protective cover46
Taking a test 3NOTE: The OneTouch Delica Plus Lancing Device usesOneTouch Delica or OneTouch Delica PlusLancets. If another type of lancing device was included, seethe separate instructions for that lancing device. The OneTouch Verio Reflect Blood GlucoseMonitoring System has not been evaluated forAlternate Site Testing (AST). Use only fingertips whentesting with the system. The OneTouch Delica Plus Lancing System does notinclude the materials needed to perform Alternate SiteTesting (AST). The OneTouch Delica Plus LancingSystem should not be used on the forearm or palmwith the OneTouch Verio Reflect Blood GlucoseMonitoring System.47
3 Taking a testLancing precautionsCAUTION:To reduce the chance of infection and disease spread byblood: Make sure to wash the sample site with soap and warmwater, rinse and dry before sampling. Contaminantson the skin may affect results. The lancing device is intended for a single user. Nevershare a lancet or lancing device with anyone. Always use a new, sterile lancet each time you test. Always keep your meter and lancing device clean.(See page 134.) The meter and lancing device are for single patientuse only. Do Not share them with anyone, includingfamily members! Do Not use on multiple patients! After use and exposure to blood, all parts of this kitare considered biohazardous. A used kit may transmitinfectious diseases even after you have performedcleaning and disinfection. Do Not use lancets after the expiration date printed onthe lancet packaging.48
Taking a test 3Preparing your lancing device1. Remove the lancingdevice capRemove the cap by rotating itand then pulling it straight offthe device.2. Insert a sterile lancet intothe lancing deviceAlign the lancet as shown here,so that the lancet fits into thelancet holder. Push the lancetinto the device until it snapsinto place and is fully seated inthe holder.49
3 Taking a testTwist the protective cover onefull turn until it separates fromthe lancet. Save the protectivecover for lancet removal anddisposal. See page 65.3. Replace the lancing device capPlace the cap back onto the device; turn the cap or pushthe cap straight on to secure it.Ensure the cap is aligned as shown in the image.50
Taking a test 34. Adjust the depth settingThe device has 13 puncturedepth settings (each dot shownbetween numbers 1 to 7 onthe Depth Wheel indicates anadditional available depthsetting). Adjust the depth byturning the depth wheel. Smaller numbers are for ashallower puncture and larger numbers for a deeperpuncture.NOTE: Try a shallower setting first and increase thedepth until you find the one deep enough to get a bloodsample of the proper size.5. Cock the lancing devicePull the slider back until itclicks. If it does not click, itmay already have been cockedwhen you inserted the lancet.51
3 Taking a testPreparing the meter1. Insert a test strip to turn the meter onInsert a test strip into the test strip port with the gold sideof the test strip and the two silver prongs facing you.Silver prongsTest strip portNOTE: No separate step to code the meter is required.52
Taking a test 3The Apply Blood screen appearson the display. You can nowapply your blood sample to thetest strip.Apply BloodSampling blood from the fingertipChoose a different puncture site each time you test.Repeated punctures in the same spot may cause sorenessand calluses.Before testing, wash your hands and the sample sitewith warm, soapy water. Rinse and dry completely
Verio Reflect Blood Glucose Monitoring System is intended to be used for the quantitative measurement of glucose (sugar) in fresh capillary whole blood samples drawn from the fingertips. The OneTouch Verio Reflect Blood Glucose Monitoring System is intended for se