Transcription
OWNERS AND SERVICE MANUALINNOVATIVE CONCEPTS IN ENTERTAINMENT INC.10123 MAIN STREET, CLARENCE, NY 14031SERVICE: 1-716-759-0360FAX: 1-716-759-0884E-MAIL: service@icegame.comWEBSITE: www.icegame.com1
TABLE OF CONTENTSINTRODUCTION .PAGE 3 GAME FEATURESGAME PLAYSET-UP / TESTING / MAINTENANCE .PAGE 4 - 12 SAFETY PRECAUTIONSGAME SET-UPASSEMBLYTESTINGCLEANINGMANUAL SETTINGSAUTO % SETTINGSCLAW SHAPEPROGRAMMING . SEE INCLUDED BOOKLET GAME OPTIONSPROGRAMMING .PAGE 13 TEST MODEERROR CODESACCOUNTING MODEQUICK TROUBLESHOOTING PAGE 14 - 15 PROBLEMS AND SOLUTIONSGAME REPAIR .PAGE 16 - 19 GLASS REPLACEMENTMECHANICAL REPAIRELECTRICAL / ELECTRONIC REPAIRPARTS LISTINGS .PAGE 20CRANE ASSEMBLY DIAGRAMS .PAGE 21 - 24SCHEMATICS / WIRING DIAGRAMS .PAGE 25 - 43WARRANTY INFORMATION .PAGE 44 - 45ICEDOC BC9001REVISION D1-07-082
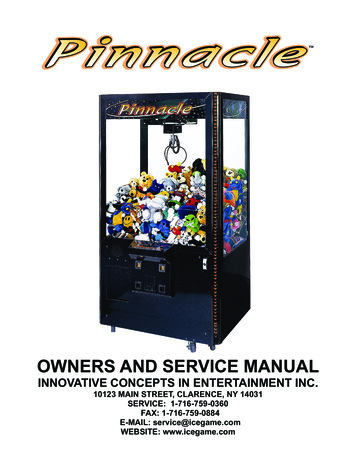
INTRODUCTIONGAME FEATURESGAME PLAYThank you for your purchase of the new PINNACLECRANE game from I.C.E.As coins are inserted into the PINNACLE CRANE all metal game, a customized music is heard. Whensufficient coins have been inserted, the claw clicksclosed and re-opens, which signals the start of thegame. The crane will then position itself in themiddle of the “play field” and remain there, until theplayer is ready.The brand new PINNACLE CRANE all metalcrane game by I.C.E. was designed with theoperator in mind. Reliability, low maintenance,themed cabinetry, and all metal construction are thekey design features, exactly what is needed toensure a combination of long life and profit.When the player has moved the joystick or pressedthe buttons to move the crane, the timer on the rightdisplay will begin to count down. The player will thenposition the crane above the prize they areattempting to win and press the drop button to lowerthe claw.With nearly the entire construction made of metal, itwas only natural to Powder Epoxy Coat everything,inside and out. This provides the owner – operatorwith a game that will certainly outlast its woodencounterparts. A few of the major advantages of allmetal construction include:- Vault like security- Long service life- Low maintenance- High DurabilityIf the nudging option is on, then the player will havethe ability to keep “nudging” the claw each time thebutton is pressed to home-in on the chosen prize. Ifthe nudging option is off, then the player will haveonly one chanceto drop the claw.All windows, of the PINNACLE CRANE , are ¼”tempered glass to provide an easy clean, maximumsafety, scratch resistant surface. Other featuresinclude, 40 strand conductor cables to prevent wirefatigue, full range of operator adjustable software,and a newly designed crane mechanism.When the claw has fully dropped, it will close andretract to its uppermost position. The crane will thenautomatically position itself over the prize chute atthe rear of the cabinet. The claw will then open,releasing the prize into the prize chamber. Theplayer can now remove the prize from the chamberthrough the prize door located in the front, lower leftcorner of the game. The game is now at its homeposition and is ready for the next player in line.The first step in I.C.E.’s new crane design was toselect several leading cranes available on themarket today, observe and determine what problemscan be or are causes of failure and costly down time.I.C.E. then surveyed operators nation wide,requesting information like:-If you have any questions regarding Programming,Troubleshooting or Repair, please call our ServiceDepartment.What are the leading causes of cranefailures in your locationsWhat are some problems in servicingcranesWhat changes would you make to currentcranes to create a better machineI.C.E. Parts/Service Dept.Phone #: (716) - 759 – 0360I.C.E.’s engineers then compiled all critical data,addressed and corrected each problem and usedthis information to create what we call thePINNACLE CRANE .Fax #: (716) – 759 – 0884NORMAL BUSINESS HOURS ARE:MONDAY - FRIDAY, 9:00 AM TO 6:00 PM ESTThis method of design ensures that the needs andconcerns of the owner-operators dictate the finaldesign parameters, for who knows a crane’sattributes and faults better than a crane operator.* The crane will remain in the home position if the game type (option 0) is set to 2, 3 or 4. In these options the player may have only two buttons, onefor right travel and one for forward travel. The crane will remain in the home position to allow the player access to the entire play field.3
SETUP / TESTING / MAINTENANCESAFETY PRECAUTIONSTESTINGIMPORTANT: FAILURE TO FOLLOW THESEDIRECTIONS CLOSELY COULD CAUSE SERIOUSDAMAGE TO YOUR GAME.After the initial setup, it is time to test your game forproper operation.1. Locate the game in its permanent location andlock all casters.2. Be sure the game has been properly pluggedinto a 3-prong grounded outlet, and that thereceptacle is in good working order.3. If using an extension cord, be sure it is a 3-pronggrounded type of at least 16Ga.4. Verify that the game is set up for the propervoltage, and turn the power to the game on.5. The game will run through a test mode at everystartup. (See test mode explanation in theprogramming section for details.)6. Insert coins/bills into the machine at least tentimes into the coin mech/bill acceptor to ensureproper operation.7. Check the credit and prize counters for properoperation.8. Check that the door disconnect switch worksproperly.9. Check game volume during busy time at locationto set it at the proper level.WARNING: WHEN INSTALLING THIS GAME, A3-PRONG GROUNDED RECEPTACLE MUST BEUSED. FAILURE TO DO SO COULD RESULT INSERIOUS INJURY TO YOURSELF OR OTHERS.FAILURE TO USE A GROUNDED RECEPTACLECOULD ALSO CAUSE IMPROPER GAMEOPERATION, OR DAMAGE TO THEELECTRONICS.DO NOT DEFEAT OR REMOVE THE GROUNDINGPRONG ON THE POWER CORD FOR THE SAMEREASONS AS GIVEN ABOVE. USING ANIMPROPERLY GROUNDED GAME COULD VOIDYOUR WARRANTY.GAME SET-UPBEFORE PLUGGING THE GAME IN, OR TURNINGIT ON, BE SURE THE GAME HAS BEEN SET TOTHE PROPER VOLTAGE. YOUR GAME SHOULDCOME PRE-SET FROM THE FACTORYCORRECT VOLTAGE, HOWEVER IT IS A GOODIDEA TO CHECK THE A.C. WALL RECEPTACLEVOLTAGE BEFORE PLUGGING THE GAME IN.CLEANINGRegular cleaning of this game will keep it lookingnew, and greatly enhance its appeal.Clean the windows of your PINNACLE CRANE with a standard window cleaner such as “Windex” .ASSEMBLY INSTRUCTIONS1. Carefully unbox the game from its packaging.2. Using the supplied keys, unlock the front door ofthe cabinet.3. Cut all tie wraps holding the wagon assemblyand crane in place.4. Plug the game into a three prong groundedreceptacle. NOTE: The appliance must bepositioned such that the plug is accessableduring use.5. The game is now ready for start up.Clean the cabinet sides with a good cleaner such as“Fantastik” or “409” and a soft rag. A mild soapysolution can also be used.NOTE: DO NOT USE ALCOHOL, THINNERS OFANY KIND, OR PINBALL PLAY FIELD CLEANERSON ANY OF THE CABINET SURFACESESPECIALLY THE DECALS.IF YOU HAVE ANY QUESTIONS OR COMMENTSREGARDING INSTALLATION OR PROPERFUNCTION OF YOUR GAME, PLEASE CALL OURSERVICE DEPARTMENT AT (716)-759-03604
SETUP / TESTING / MAINTENANCEMANUAL SETTINGInitial adjustment tips It is important to know that a mechanical adjustment is considered a “Macro adjustment” or a large adjustment, and that a software adjustment is considered a “Micro adjustment” or a fine adjustment. NOTE: These adjustments need only be performed when setting up the crane for the first time or whenmajor changes to plush size and/or shape occur. Once a configuration is determined for your particularrequirements, the same configuration in another CRANE GAME may require only minor adjustments. It is advisable that you position your plush such that the “Eyes” are facing forward and looking at your potential customers. To maintain proper payout in either Manual mode or Skill leveling mode, ALL plush in the crane should beof similar size, shape and weight. DO NOT attempt to use 6” plush with 14” plush in the same crane asyou are likely to have very different payout % from week to week which requires constant monitoring andadjusting. Set option 0 (Game mode) for game type you desire. Set option 3 (Game cost) for you particular game. For the following tests, make sure that option 9 (Skill leveling strength) is set to 00. Any setting other than00 and Skill leveling is enabled and incorrect results may occur. Make sure that the claw tips, when closed, are just touching. DO NOT allow them to overlap, for the clawcould mechanically bind, causing down time. CHECK IF YOU HAVE THE CORRECT CLAW SHAPE. Assuming you have a medium claw, standard onmost cranes, set option 8 to 40, 9 to 00 and play the game approximately 25 times. At this level, youshould have difficulty picking up plush. If you are able to pick up plush rather easy, you have the wrong claw shape or size and should goto the end of this section and see CLAW SHAPE. If you are unable to pick up plush, then set option 8 to 99 and play 25 games. You should now beable to pick up plush fairly consistently. If this is true, continue on to the next step. NOTE: Whenthe game is first packed, it is often difficult to pick up plush until an area is cleared to maneuver in.Take this in to account while determining if the claw size or shape is correct. Initially set option 8 (Manual strength) based on your plush size, such that the claw is just able to hold theplush when closed. If you are unsure, a good starting point for option 8 is 60 for average size plush andour standard medium claw. NOTE: When in programming mode at option 8, the claw will begin the openand close at approximately 5 second intervals. The operator can then associate the claw strength numberon the right display with an actual “physical” claw strength at the claw. Knowing the cost of a game, the average cost of a piece of plush and the desired payout %, calculate theproper plush dispensing intervals for your setup, using the following formula:5
SETUP / TESTING / MAINTENANCECalculation Option 11) 100 * (Game cost) A (# of dollars received for 100 games)2) A * (Desired payout %) B (# of dollars worth of plush that should be dispensed in 100 games)3) B / (Cost of plush) C (# of pieces of plush that should be dispensed in 100 games)4) 100 / C Y (Proper plush dispensing intervals)ORCalculation Option 21) (Plush Cost) / (Game Cost) X (# of games required to pay for one piece of plush)2) (X) / (Desired Payout %) Y (Proper plush dispensing interval)EXAMPLEGame costAvg. cost of 1 plushDesired payout % 0.50 2.00 33%Example Calculation Option 11) 100 * ( 0.50) 502) 50 * (.33) 16.5 worth of plush in 100 games to give a 33% payout3) 16.5 / ( 2.00) 8.25 pieces of plush per 100 games to give a 33% payout4) 100 / (8.25) 12.12 round off to 12.ORExample Calculation Option 21) 2.00 / ( 0.50) 42) (4) / (.33) 12.12 round off to 12NOTE: This means that for approximately every 12th game played, 1 piece of plush should be won.6
SETUP / TESTING / MAINTENANCEArmed with the information particular to your game (Proper plush dispensing intervals determined above) play atleast 50 games and see if the correct number of plush have been dispensed. (For the example above, in 50 gamesyou should have dispensed approximately 4 pieces of plush. (Every 12.12 games) NOTE: The more games youplay during the “TEST”, the more accurate your accounting will be). When 50 games have been played, calculatethe payout % using the formula below:1) (# of plush dispensed) * (Cost of 1 pc. of plush)(# of games played) * (Cost of game) Payout %EXAMPLECost of a gameCost of 1 pc. of plush# of plush dispensed# of games played(55)* ( 2.00)(423 * ( 0.50) 0.50 2.00 55 423 52 52% payoutIf the calculated payout is very high, your desired payout 10% or more, it will be necessary to make a macroadjustment or move the claw tips apart slightly by loosening the three screws holding the claw slider to thecoil housing and moving the claw slider up slightly. (See Fig. 1) NOTE: MOVING THE CLAW SLIDER 1/8thOF AN INCH COULD CHANGE YOUR PAYOUT BY AS MUCH AS 40%. BE SURE TO MOVE THE SLIDERIN VERY SMALL INCREMENTS SO AS NOT TO OVERSHOOT YOUR DESIRED PAYOUT.If the calculated payout is slightly high, your desired payout less than 10%, then you can make amicro adjustment or software claw strength adjustment at Option 8.Conversely, if the calculated payout is very low or slightly low, you will need to make a macro or microadjustment accordingly.Repeat the 50 games test and calculate the Payout %. Repeat the mechanical adjustment until youare within 10% of your desired payout. You can now enter the programming mode and adjust Option 8(Mechanical strength) up or down slightly to achieve your desired payout. Your game is now set up accordingto your Desired Payout, Game Cost and Plush Cost.If after using the initial adjustment tips above, you are still having difficulty in setting up your game, please callthe I.C.E. service line at:I.C.E. SERVICE DEPARTMENT716-759-0360NORMAL BUSINESS HOURS ARE:MONDAY – FRIDAY, 9:00 AM TO 6:00 PM EST7
SETUP / TESTING / MAINTENANCEAUTO STRENGTH SETTINGSInitial adjustment tips Before setting up Auto Percentaging, it is highly advisable to set up Manual Percentaging. This is a precaution in the unlikely event that the prize sensor fails or error code 10 or 11 is logged. If either one ofthese situations occurs, the game will AUTOMATICALLY revert to manual percentaging settings, allowingthe game to still function until the error is corrected. If your manual settings are not set up, it may be possible to dispense too much plush resulting in a loss of revenue for that week, or dispensing too little plush,causing your customers to feel as though they can not win, which will eventually result in a loss of playand revenue. It is important to know that a mechanical adjustment is considered a “Macro adjustment” or a large adjustment, and that a software adjustment is considered a “Micro adjustment” or a fine adjustment. NOTE: When using Auto Percentaging, you will be required to reset the computer memory once a week.This is done to clear computer memory of “portions” of plush that were to be dispensed and have notbeen OR “portions of plush that have not been dispensed and should not have been. Since we are human, we think of plush as whole entities. The computer has the ability to track plush as pieces or fractionsof pieces. For example: If we want a 34% payout based on 2.00 average cost plush and 0.50 gameplay, we want APPROXIMATELY 1 piece of plush dispensed every 12 games. The actual number is 1piece of plush for every 11.7647 games. The computer from week to week may have a bunch of the littlepieces of plush that it did not give away and will eventually add up and hit the limit of 8 pieces not dispensed and take you out of Skill leveling Mode. Often this confuses an operator since the game workedvery well for several weeks or even longer, but then kicked into Manual Mode and gave them an Error 11.To prevent this, it is HIGHLY suggested you reset the computer once a week using the following procedure: Once a week, or after a minimum of 500 games, enter the programming mode and change the % payoutnumber up by one number and exit programming mode. The following week, enter the programming modeand change the % payout number down by one number. Example: Week one, the % payout number 33.Week two, change % payout to 34. Week three, change % payout number back to 33, etc. Using % payoutwill have the smallest change on payout yet it will reset memory and keep things working as intended. NOTE: These adjustments need only be performed when setting up the crane for the first time or whenmajor changes to plush size and / or shape occur. Once a configuration is determined for your particularrequirements, the same configuration in another CRANE GAME may require only minor adjustments. It is advisable that you position your plush such that all “Eyes” are facing forward and looking at your potential customers. To maintain proper payout in either Manual Mode or Auto Percentaging Mode, ALL plush in the craneshould be of similar size, shape and weight. DO NOT attempt to use 6” plush with 14” plush in the samecrane as you are likely to have very different payout % from week to week which requires constant monitoring and adjusting. Set Option 0 (Game mode) for game type you desire Set Option 3 (Game cost) for your particular game. Make sure that the claw tips, when closed, are just touching. To check if you have the correct claw shape, set Option 8 to 50, Option 9 to 00 and play the game approximately 25 times. At this level, you should have difficulty picking up plush.8
SETUP / TESTING / MAINTENANCE If you are able to pick up plush, you have the wrong claw shape or size and should go to the end of this sectionand see CLAW SHAPE If you are unable to pick up plush, then set Option 8 to 99 and play 25 games. You should now be able to pickup plush fairly consistently. If this is true, continue on to the next step. NOTE: When the game is first packed, itis often difficult to pick up plush until an area is cleared to maneuver in. Take this into account while determining if the claw size or shape is correct. Make sure Option 8 (Manual strength) is et up as detailed above before setting up Skill leveling. Determine the proper Minimum Claw Strength by setting Option to 9 initially to 60 on the right display. Noticethat the claw is opening and closing on a 5 second interval. Hold an average size piece of plush in the claw asit closes and note whether it has enough claw strength to hold the plush. Repeat this procedure until you findthe breaking point where the claw will hold the piece of plush but if you lower the strength of the claw by 1 or 2points, the claw will no longer be able to old the plush. This will be the number you want to use as your Skillleveling strength (Option 9). It will allow a skilled player to move plush around and have the ability to win at anytime, yet requires a skilled player to win easily. Set Option 16 (Plush cost) based on the cost of your plush. Set Option 17 (Desired payout %) based on your desired payout. Knowing the cost of a game, cost a piece of plush and the desired payout %, calculate the proper plush dispensing intervals using the following formula:Calculation Option 11) 100 * (Game cost) A (# of dollars received for 100 games)2) A * (Desire payout %)3) B / (Cost of plush) B (# of dollars worth of plush that should have been dispensed in 100games) C (# of pieces of plush that should be dispensed in 100 games)4) 100 / C Y (Proper plush dispensing intervals)ORCalculation Option 21) (Plush Cost) / (Game cost) X (# of games required to pay for one piece of plush)2) (X) / (Desired payout %) Y (Proper plush dispensing interval)EXAMPLEGame costAvg. cost of 1 plushDesired payout % 0.50 2.00 33%Example Calculation Option 11) 100 * ( 0.50) 502) 50 * (.33) 16.5 worth of plush in 100 games to give a 33% payout3) 16.5 / ( 2.00) 8.25 pieces of plush per 100 games to give a 33% payout4) 100 / (8.25) 12.12 round off to 12OR9
SETUP / TESTING / MAINTENANCEExample Calculation Option 21) 2.00 / ( 0.50) 42) (4) / (.33) 12.12 round off to 12NOTE: This means that for approximately every 12th game played, 1 piece of plush should be won.Armed with the information particular to your game (Proper plush dispensing interval determined above) playat least 50 games and see if the correct number of plush have been dispensed. (For the example above, in50 games you should have dispensed approximately 4 pieces of plush. (Every 12.12 games) NOTE: Themore games you play during the “TEST”, the more accurate your accounting will be). When 50 games havebeen played, calculate the payout % using the formula below:1) (# of plush dispensed) * (Cost of 1 pc. Of plush)(# of games played) * (
your warranty. game set-up before plugging the game in, or turning it on, be sure the game has been set to the proper voltage. your game should come pre-set from the factory correct voltage, however it is a good idea to check the a.c. wall receptacle voltage before plugging the game in. assembly instructions 1.