Transcription
Nova Max Blood Glucose Monitor Owner’s GuideNova Biomedical200 Prospect StreetWaltham, MA 02454-9141 U.S.A.Telephone:Web site:1-800-681-7390www.novacares.comMade in the USA by Nova Biomedical CorporationU.S. Patent No. 6,258,229, 6,837,976, 6,942,770,CA 2,375,089 and other U.S. and foreign patents pending.Nova Max is a registered trademark of Nova Biomedical.Copyright 2007 Nova Biomedical Corporation40677 Rev E 05/2009
THANK YOUNova thanks you for choosing the Nova Max Blood GlucoseMonitor. This Owner’s Guide contains important information onthe monitor and how it works. Please read it carefully before using your new monitor.The Nova Max Blood Glucose Monitor is designed to be convenient and easy to use. It gives accurate results in just 5 secondsusing a very small blood sample. This small sample allows you touse a thinner lancet because not as much blood is needed to doa blood sugar test. The monitor also has memory that stores yourblood sugar test results to help you and your healthcare professional manage your diabetes care.Before you get started, it is important to complete the WarrantyRegistration Card included in your kit and mail it back to Nova.Doing this will help us better serve your needs.If you need to contact us, please call Customer Service 24 hours aday, 7 days a week, in the US at 1-800-681-7390 or visit our website at www.novacares.com.
Important Information! Before you begin using your new Blood Glucose Monitor,please read all of the instructions provided in this Owner’sGuide.Your monitor uses a CR2450 3-volt coin cell battery. To beginusing your monitor, you need to install the enclosed battery.See Battery Replacement (page 29) to install a new battery.Perform all quality control checks recommended in yourOwner’s Guide.Consult with your diabetes healthcare professional and followhis/her guidance for your blood glucose monitoring routine.These recommendations apply to all blood glucose monitorsand are supported by the American Association of DiabetesEducators (AADE), the American Diabetes Association (ADA),the US Food and Drug Administration (FDA), and the AdvancedMedical Technology Association (AdvMed).Notes, Cautions, and Warnings:NOTES provide helpful operating information.CAUTIONS provide information that is important for instrumentprotection.WARNINGS provide information that is important for user protection or about risk for inaccurate results.
Table of ContentsIntended Use.1Symbols.2Introduction.3Monitor Components.3Monitor Display.4The Nova Max Blood Glucose Monitor.5Overview.5Kit Contents.6Environmental.6Before Testing.7Reasons to Check for Low Blood Glucose.7Important Health Related Information.7Test Strips.8Important Nova Max Test Strip Information.8Lancing Device.9Setting the Time, Date, and Beeper. 10Control Solution. 12Perform a Control Solution Test. 12Important Information for Control Solution. 13Testing a Quality Control Solution. 14Running a Test . 17Getting and Applying a Blood Sample from Forearm or Palm. 20Limitations and Considerations: Forearm and Palm Testing. 22Your Test Result. 24Review Test Results in Memory. 26TOC-1
Basic Upkeep. 28Battery Check. 28Battery Replacement. 29Cleaning and Care. 30Displays, Meanings, Actions. 31Appendix. 37Specifications. 37Chemistry Measurement. 37Limitations. 38Instructional Notes. 40Warranty. 42TOC-2
Intended UseThe Nova Max Blood Glucose Monitor is intended to be usedfor the quantitative measurement of glucose in capillary wholeblood. It is intended for use by people with diabetes mellitus inthe home as an aid to monitor the effectiveness of diabetes control. The Nova Max Blood Glucose Monitor is specifically indicated for the quantitative measurement of glucose in whole bloodcapillary samples obtained from the fingertip, palm and forearm. The Nova Max Blood Glucose Monitor is intended for useoutside the body (in vitro diagnostic use). It should only be used with Nova Max Test Strips and NovaMax Control Solution. It should be used for testing glucose (sugar) and only withfresh capillary whole blood samples. It should NOT be used to diagnose diabetes or to test newborns. It should NOT be stored in the refrigerator or in the car.WARNING: The Nova Max Blood Glucose Monitor contains smallparts. Keep the monitor out of reach of small children and pets.If you have hypoglycemia unawareness, a blood glucose monitor is critical to your care. Since any monitor may fail, break, or bemisplaced, you should always have a backup monitor.1
SymbolsWARNING: Blood samples and blood products are potential sources of hepatitis and other infectious agents.Handle all blood products with care. Wear gloves whenperforming measurements on another person. Items thatare used to measure glucose, i.e., test strips, lancets, and alcoholswabs, must be disposed of in accordance to local regulations toavoid risk to anyone.SymbolsThe following are symbols that are used in this manual, on insertsheets, and on the Nova Max Blood Glucose Monitor.In vitro diagnostic medical deviceCaution, consult accompanying documentsConsult instructions for useBiological riskCatalog number2Temperature limitation
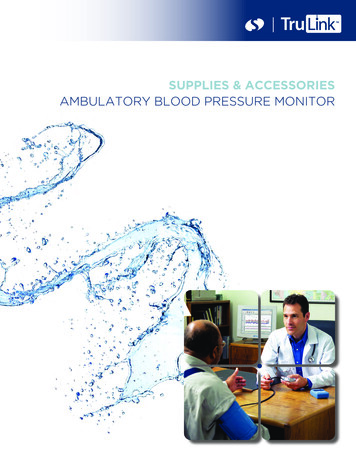
IntroductionMonitor ComponentsTest StripGoes HereLCD DisplayRight ArrowButtonLeft ArrowButtonModeButtonNova Max Blood Glucose Monitor3
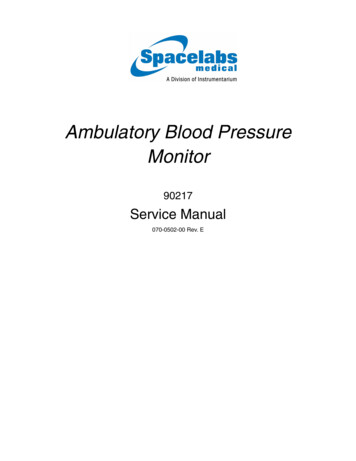
IntroductionMonitor DisplayWhen you turn the Nova Max Blood Glucose Monitor on, the allsegments display appears briefly. This tells you that all the display segments are working properly.ControlMarked TestResultsLow BatteryIndicatorGlucose TestResultsmg/dLMemory ResultBlood or ControlDrop IndicatorDate/DayAverage TestResultsAM or PMIndicatorHour/MinuteNova Max Monitor Screen4
IntroductionThe Nova Max Blood Glucose MonitorThe monitor is a hand-held testing device that measures glucose(sugar) in capillary blood. The test strip is touched to a drop ofblood to initiate the test process. A simple one-step process provides a blood glucose result. Test results are available in 5 seconds. There is memory for one common user’s set of test results(400). The monitor is powered by a battery that can perform for approximately 1000 tests.CAUTION: The monitor should be handled with care. Dropping, roughhandling, etc. may damage the monitor. If the monitor is not to be usedfor an extended period of time, remove the battery to eliminate the riskof battery leakage. Also, protect the monitor from moisture, prolongeddirect sunlight, and extreme temperatures.OverviewTo perform a test, the operator simply inserts a test strip; waitsfor the blood drop symbol to appear on the screen; brings thetest strip to the drop of blood; and obtains a glucose test result in5 seconds. The test result is automatically stored into the monitor’s memory. The operator can recall and review test data storedin the monitor, including the average for user results.5
IntroductionKit Contents1.2.3.4.5.Nova Max Blood Glucose MonitorVial of Nova Max Glucose Test Strips (10)*Lancing device*Lancets (10)*Nova Max Blood Glucose Control Solution, Normal(1 bottle)*6. Battery (CR2450, 3V)7. Quick reference guide8. Owner’s Guide9. Log Book10. Warranty Card11. Getting Started Poster*These items are not included in the mail order version of the monitor.Environmental The storage temperature range for the monitor: -13 F to 115 F(-25 C to 46 C) The storage temperature range for the Test Strips: 59 F to 86 F(15 C to 30 C) The monitor operational temperature range: 57 F to 104 F (14 Cto 40 C) The relative humidity range: 10% to 90% non-condensing6
IntroductionBefore TestingBefore testing and to ensure accurate glucose results, wash yourhands and the testing site then thoroughly dry these areas.The Nova Max Blood Glucose Monitor can test your blood glucose on the fingers, forearm, or palm.The sample size is just 0.3 µL of blood.Reasons to Check for Low Blood Glucose You have symptoms such as weakness, sweating, nervousness, headache, or confusion.You took insulin, but have delayed eating.Your doctor or healthcare professional advises you to do so.Important Health Related InformationIf you are experiencing symptoms that are not consistent withyour blood glucose test results and you have followed all instructions described in the Owner’s Guide, call your doctor or healthcare professional.7
IntroductionTest StripsThe Nova Max Test Strips are designed for use with your NovaMax Blood Glucose Monitor only. Use each test strip only once,then discard. DO NOT reapply blood to the test strip. Requires a very small blood volume: 0.3 µLAutomatically draws blood into the test area of the stripCan be handled with clean, dry hands without affecting glucose readingsInsert ThisEnd IntoMonitorApply BloodDrop to FrontEdgeImportant Nova Max Test Strip Information 8Use only Nova Max Test Strips when testing.Remove the test strip from the vial only when ready to test.Store the test strip package in a cool, dry place below 86 F(30 C). Do not refrigerate or freeze.Do not store near heat or moisture.Store the test strips in their original vial only.After removing a test strip from the vial, immediately replacethe vial cap and close tightly.Do not use test strips beyond the expiration date printed onthe package as this may cause inaccurate results.
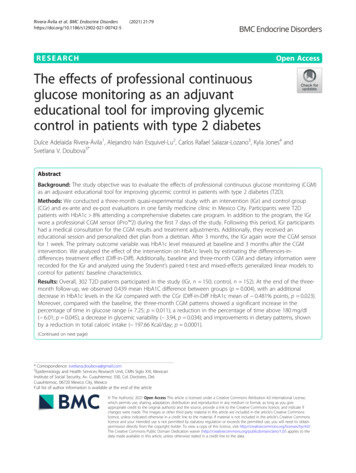
Introduction Test strips should only be stored for 3 months after openingthe vial. When first opening a new vial of test strips, countforward 3 months and write that date on the vial. Discard anyremaining test strips after the date you have written on thevial.Do not tamper with the test strip.WARNING: The test strip vial contains small parts. Keep the teststrip vial away from children and pets.Lancing DeviceThe diagram below shows the components of the LancingDevice. Refer to the Instructions for Use insert sheet for theLancing Device for detailed instructions.Depth AdjustmentRelease ButtonForce Adjustment9
Setting the Time, Date, and BeeperSetting the Time, Date, and BeeperHaving the correct time and date of each blood glucose testresult helps you and your healthcare professional track changesin your therapy. It is important to set the correct time and date soyou have records of when you tested. If you do not set the timeand date, all blood glucose monitoring results will be markedand will not be included in averages.Your Nova Max Blood Glucose Monitor offers a beeper functionthat is preset “On.” This tells you when enough blood is applied tothe test strip, when test is completed, and prompts you throughother steps in using your monitor.NOTE: Remember to adjust time and date settings as needed tomatch the local time or daylight savings time and after you replacethe battery. Once you have completed a blood glucose or controlsolution test, the last result will appear the next time your monitoris turned on. The date and time displayed is the date and time ofyour previous blood sugar or control solution test result, not thecurrent date and time.1. Press the MODEbutton for longer than 3seconds. The monitor, if in Sleep Mode, wakesup, displays all segments for 3 seconds, andenters the SETUP Mode.10
Setting the Time, Date, and BeeperThis brings the monitor display to the firstsetup screen: time.MODESHour (Flashing)Minutes (Flashing)Year (Flashing)Month (Flashing)Day (Flashing)Sample Marking (ON or OFF)Beep (ON or OFF)END (End of Setup Mode)SCREEN DISPLAY“10”:00“AM”10:”55”AM12-28 “2006”“12”-28 200612-”28” 2006“ON”“ON”“END”2. Repeatedly press the MODEyou want to change.button to find the MODE3. Press the left/right arrownew setting for that MODE.buttons to choose a4. Press the MODEbutton to select the new settings or toskip to the next MODE.11
Running Control SolutionControl SolutionControl Solution is a liquid that contains a fixed amount of glucose. Use this solution to test that your monitor and test strips areworking properly. Use this solution to practice or to check that you are followingthe correct testing procedure without using your own blood. If the monitor reading is within the control solution’s acceptable range, the meter is working properly.Perform a Control Solution TestThe control solution test confirms that your monitor and teststrips are working correctly. A control solution test is similar toa blood glucose test, except you use Nova Max Control Solutionand not a blood sample.You should run a control solution test: When you first get your monitor and at least once a weekthereafter Each time you open and begin using a new vial of test strips If you leave the test strip vial cap open for any length of time If the monitor is dropped, damaged, or exposed to liquids If you think your test results are not accurate, or if your testresults are not consistent with how you feel To check the performance of the monitor and test strips Nova Max High and Low Glucose Controls are also recommended as an additional quality control check for your bloodglucose monitoring system.12
Running Control SolutionImportant Information for Control Solution Use only Nova Max Control Solution for the test.Check the expiration date on the control solution vial. Do notuse control solution past the expiration date or you may getinaccurate results.Store only for 3 months after first opening. When you opena new vial of control solution, count forward 3 months andwrite that date on the label of the control solution vial. Discard any remaining solution after the date you have writtenon the vial.Store the control solution tightly closed at room temperaturebelow 86 F (30 C). Do not refrigerate or freeze.Shake the control solution well before using.Caution: The Nova Max Control Solution range printed on the teststrip vial is for control solution only. It is used to test the performance of the monitor and test strip. It is not a recommended rangefor your blood glucose level.If your control solution test results continue to fall outside therange printed on the test strip vial: The Nova Max Blood Glucose Monitor may not be workingproperly. Do not use the monitor to test your blood. Call Customer Service at 1-800-681-7390.13
Running Control SolutionTesting a Quality Control Solution1. Insert a test strip into the monitor. If monitor was off, thescreen displays all segments for 2 seconds then the blinkingblood drop symbol appears.NOTE: If the strip is removed before you start the test, the screengoes blank.2. Press the left/rightbuttons to indicate thissample is a control. (CTL is shown on the display.)NOTE: It is important to select control solution test so the test resultdoes not appear to be one of your blood glucose test results.NOTE: If a test is not performed within 2 minutes from the insertionof the test strip, the screen goes blank. To perform a test, take out then replace the test stripstarting from Step 1.3. Shake the control solution vial. Discarda drop before use. Squeeze a drop ofcontrol solution onto a clean, hard, drysurface, i.e., control cap.4. Pick up the monitor with test strip insertedand touch the test strip to the control solution drop.14
Running Control SolutionNOTE: The on-screen Control Symbol flashes on and off repeatedlyuntil sufficient control solution has been added to the test strip.(Beeper sounds if enabled.)5. A glucose quality control test result is available on-screen in 5seconds. The display does a countdown from 5 to 1.6. Compare the result on the display with the range printedon the test strip vial. If the result falls within the range, yourmonitor and test strips are working correctly.7. The result is automatically stored into memory.8. If test result is above 600 mg/dL, the screen displays HI.If test result is below 20 mg/dL, the screen displays LO.15
Running Control SolutionOut-of-range results may be caused by the following: An error in performing the control test, retest and follow theinstructions carefully. The control solution may have expired or have been contaminated. Check the expiration date on the control solutionvial. Control solution is good for only 3 months after opening.Make sure the control solution vial is closed when not in use. Expired test strip - Check the expiration date on the test stripvial. The test strip may have been damaged. This can be causedby extreme temperature or by leaving the test strip vial capopen. Retest using a new test strip. Monitor malfunction - the monitor may not be working properly.NOTE: If the control solution test result is outside the range (is either higher or lower), your monitor and test strip may not be working as a system. Repeat the process using a new test strip.Do not use the monitor until test results fall within the appropriaterange. If the problem continues, call toll-free, 24 hours a day, 7 daysa week Customer Service at 1-800-681-7390.16
Running a TestRunning a Test1. Insert a test strip into the monitor. If monitor was off, thescreen displays all segments for 2 seconds.NOTE: If the strip is removed before you start the test, the screengoes blank.Apply BloodDrop HereInsert thisEnd IntoMonitor2. After 3 seconds, the blinking blood drop symbol appears.NOTE: If a test is not performed within 2 minutes from the insertionof the test strip, the screen goes blank. To perform a test, take outthen replace the test strip starting from Step 1.3. Wash hands with soap and warm water then dry thoroughly. Oruse alcohol pads to clean area; dry thoroughly after cleaning.NOTE: Cleaning of the puncture site is important.4. Holding hand downward, massage finger with thumb towardtip to stimulate blood flow.17
Testing a Blood Sample5. Use a lancing device, loaded with a newlancet, to puncture the finger. (See lancingdevice instructions for use.)6. Squeeze the finger to form a drop of blood.7. Touch the end of the test strip to the blooddrop until the test strip is full and the onscreen countdown timer begins.(Beeper sounds if enabled.)NOTE: The Blood Drop symbol flashes on and off repeatedly until sufficient blood has been added to the test strip.8. A countdown on screen appears while test is in progress.Glucose result is available on-screen in 5 seconds.9. The result is automatically stored into memory.10. Press the Left/Rightbuttonsto move between marked ( ) or unmarkedresults. Marked results are not included inthe average test results.11. Press the Modebutton to save the Marking Status:Marked ( ) or Unmarked.18
Testing a Blood Sample12. If test result is above 600 mg/dL, the screen displays HI.If test result is below 20 mg/dL, the screen displays LO.NOTE: The monitor will time out after 2 minutes of non-use or ifthe strip is removed. The keys are disabled until a strip is inserted.Results and marking status are saved if the monitor times out, thestrip is removed, or the monitor is turned off.NOTE: Lancets are for one-time use only. Use a new, sterile lanceteach time you test. Test different areas on your fingertips to avoiddeveloping calluses. Remove the used lancet from the lancing device. Follow your local disposal regulations where applicable.WARNING: Your lancing device is for your personal use only. DONOT share with others. Sharing the lancing device or lancets cantransmit serious, even grave infections. To avoid accidental sticks,do not store used lancets in the device after testing or arm the lancing device with a new sterile lancet unless ready to use.NOTE: Do not press the test strip directly against the skin. Touchthe test strip gently to the blood drop.19
Testing a Blood SampleGetting and Applying a Blood Sample from Forearm or Palm1a. Select the Forearm test site in the highlighted areas as shown.NOTE: Thick hair at the sample site maycause the blood drop to smear.ORPalmSide1b. Select the Palm Heel or Palm Side testsite in the highlighted areas as shown.2. Attach the clear cap to the lancing device. Press and hold thelancing device FIRMLY againstthe Forearm (or Palm).3. Continue to hold FIRMLY andpress the release button to lancethe area.20PalmHeelPalmHeel
Testing a Blood Sample4. Continue to hold the device,pressing FIRMLY until a properblood drop forms. The clear capallows you to see the blood drop.5. Apply blood drop to the edge ofthe test strip. The blood is drawn into the test strip. Hold themonitor to the blood drop until you hear a short beep or seethe monitor begin to count down.NOTE: The blood in the strip should look similar to the red bloodyou are accustomed to seeing when you test your finger. If thesample looks clear, pink, or light in color, retest with a fingertipsample.6. The blood glucose test result is displayed and stored. The testis complete.NOTE: If you get an error message when testing on your forearm orpalm or do not get a blood glucose reading after multiple attempts,test on your finger and call Customer Service toll-free, 24 hours aday, 7 days a week, in the US at 1-800-681-7390. This number isnot for emergency or medical information.21
Testing a Blood SampleLimitations and Considerations: Forearm and Palm TestingSome patients test their blood glucose at sites other than thefinger because it is generally less painful.NOTE: Results from the forearm may be different from fingertipresults when glucose levels are changing rapidly, e.g., after a meal,after taking insulin, or during or after exercise. Only use finger orpalm testing during these times.The Nova Max reduces the pain of blood glucose monitoringsignificantly by requiring only 0.3 µL of blood sample.CAUTION: Always seek the advice of your doctor or healthcareprofessional before choosing to use forearm and palm sites.Bruising may occur with forearm and palm testing.22
Testing a Blood SampleDo not use forearm testing: For at least 2 hours after you have eaten or injected insulin If you have recently exercised If you think that your blood glucose is low If you think that your blood glucose may be changing rapidly(e.g., after a meal, after taking insulin, or during or after exercise) If you are not aware of symptoms when your blood glucose islow (hypoglycemic) If your forearm test results do not match the way you feel,retest using your finger or palm.Consider NOT using forearm testing if you: Are ill Are under extra stress Routinely have widely fluctuating blood glucose values thatare often low (hypoglycemic)Values from the palm sample were shown to be equivalent tovalues from the finger samples.23
Your Test ResultYour Test ResultYour blood glucose test result is displayed onthe monitor.If test result is higher than 600 mg/dL, themonitor displays “HI.” You may have highblood sugar. Retest your blood glucoseimmediately using a new test strip. If yourreading is still high, you should treat asprescribed by your healthcare professionaland/or contact your healthcare professionalimmediately.If test result is lower than 20 mg/dL, the monitor displays “LO.” You may have low bloodsugar. Retest your blood glucose immediately using a new test strip. If your reading is stilllow, you should treat as prescribed by yourhealthcare professional and/or contact yourhealthcare professional immediately.If you receive an Error Message, see page 31,Displays, Meanings, Actions of this Owner’sGuide.24
Your Test ResultNOTE: Test results greater than 240 mg/dL may mean high bloodsugar (hyperglycemia). Test results lower than 60 mg/dL may meanlow blood sugar (hypoglycemia). If you get results in these ranges,retest your blood glucose. If your reading is still in these ranges, youshould treat as prescribed by your healthcare professional and/orcontact your healthcare professional immediately.25
Review Test Results in MemoryReview Test Results in MemoryNOTE: If a test strip is inserted while in the Data Review mode, themonitor immediately switches to test mode.To review test results that are stored in memory, start with the monitorin the off position. The monitor is in the off position when the screen isbuttoncompletely blank. To turn off the monitor, hold the Modedown until the screen goes blank then release the button.1. With the monitor off, press the Modebutton. The most recent test result shoulddisplay. If there are NO results in memory,the screen displays 3 dashes.button to2. Press the Left/Rightview all the data in memory. The Left arrowgoes back in time and the Right arrow goesforward in time. All results including controlresults, marked results, and unmarked resultscan be viewed.3. At the end of reviewing individual test results, the screen displays “End Mem.”NOTE: For data averaging, HI results equal600 mg/dL and LO results equal 20 mg/dL.26
Data Review in Memory4. To review 1 day, 7 day, 14 day, and 30 day average results,press the Modebutton.5. If there are less than 2 test results in memory, the screen displays 000. If no results, the screen displays 3 dashes.6. After reviewing the 30 day average, press the Modebutton to shut off the monitor, or press no buttons and themonitor will turn off automatically after 30 seconds.NOTE: When the monitor memory is full (400 test results), each newtest result stored in memory will remove the oldest test result storedin memory.27
Basic UpkeepBattery CheckThe monitor is powered by a single coin cell battery, CR2450(3V). At the first displaying of the battery icon in the upper rightcorner of the screen and the blood drop at the lower left cornerof the screen, the monitor has sufficient charge for 20 more tests.Continue with testing as usual; the battery indicator will remainon-screen.After 20 tests have been performed, there will be insufficient battery charge to continue testing, and the monitor will no longeroperate until the battery is replaced. The battery icon will onlyappear when a strip is inserted and the icon will disappear whenthe strip is removed.Battery low28
Basic UpkeepBattery ReplacementReplace the battery as follows:1. Remove the back batterycover on the monitor.2. Remove the battery and replace with a new one with the side facing up.3. Replace the cover.NOTE: After the battery is replaced, the monitor displays the allsegments screen. Then, the monitor displays the time set up. Resetto the current time and date. If needed, go to page 10 in this guideto review setting the time, date, and beeper. Discard batteriesaccording to your local environmental regulations.29
Basic UpkeepCleaning and CareThe exterior of the Nova Max Blood Glucose Monitor should onlybe cleaned with alcohol wipes/swabs. Keep liquids from enteringthe test strip port or the Left, Right, and Mode buttons.CAUTION: DO NOT attempt to open the monitor to make any repairs. Your warranty and all claims will be void! Only an authorizedservice personnel can repair the monitor. Call Customer Service at1-800-681-7390 if the monitor needs to be repaired or replaced.30
Displays, Meanings, ActionsDisplays, Meanings, ActionsThis section addresses the messages that appear on your displays, what they mean, and what action you need to take.DisplayWhat it MeansWhat to DoSystem Check. Verifiesthat all segments areworking.Appears when: Monitor is turned onfor Setup and MemoryReview. Test strip is insertedinto the monitor.No action required. Ifall segments are notdisplayed on mo
the battery. Once you have completed a blood glucose or control solution test, the last result will appear the next time your monitor is turned on. The date and time displayed is the date and time of your previous blood sugar or control solution test result, not the current date and