Transcription
Owner’s BookletBlood Glucose Monitoring SystemNo Coding Required
Table of ContentsConsult instructions for useTemperature limitationManufacturerBatch codeUse byDo not reuseCE Markin vitro diagnostic medical deviceCatalog numberAuthorised Representative in theEuropean CommunitySerial NumberRecycleENGLISHImportant Information About YourFreeStyle Lite Blood Glucose Monitoring System.2Important Health-Related Information.4The FreeStyle Lite Meter and FreeStyle Lite Test StripThe FreeStyle Lite Meter and How It Works.5The FreeStyle Lite Meter Display .7The FreeStyle Lite Test Strip.9The FreeStyle Control SolutionThe FreeStyle Control Solution. 10Meter SetupSetting Up Your Meter. 12Setting the Reminder Alarms. 12Setting the Sound, Time, Time Format . 14Setting the Date and Date Format . 15Using Your Meter’s Lights. 16The FreeStyle Control Solution TestPerforming a Control Solution Test. 17Testing Your Blood GlucoseTesting Your Blood Glucose . 19Performing a Blood Glucose Test. 20LO and HI Readings. 23Meter ResultsMeter Memory, 7-, 14- and 30-Day Averages. 24Test Results (Blood Glucose, Control Solution). 25Data Download. 26Meter MaintenanceBattery . 27Replacing the Battery. 27Caring for Your Meter. 28System TroubleshootingError Messages. 29Troubleshooting. 32FreeStyle Lite System Specifications. 33
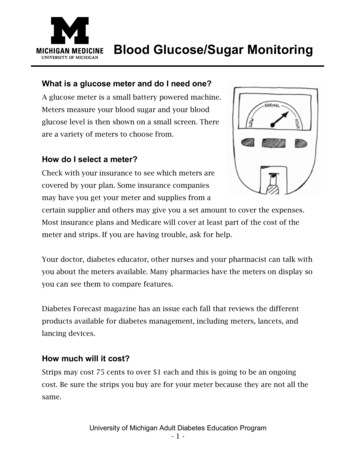
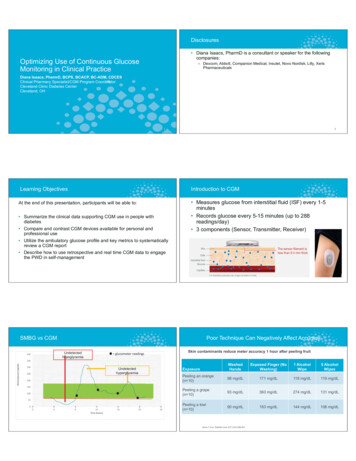
Important Information About Your FreeStyle Lite BloodGlucose Monitoring SystemENGLISHENGLISHThe FreeStyle Lite System Uses a Tiny Sample of0.3μl So You Can Test on a Variety of LocationsHow the FreeStyle Lite System Should Be UsedMany Test Sites Available The FreeStyle Lite system is intended for use outside the body (inother words, in vitro diagnostic use only). The FreeStyle Lite system is used for measuring blood glucose(also known as blood sugar) from samples taken from the forearm,upper arm, hand, thigh, calf, or fingers.Suggested TestAreas for the HandUpper armForearmHandFingersThighCalf The FreeStyle Lite meter should only be used with FreeStyle Litetest strips and FreeStyle control solution. Using other test stripsand control solution with this meter can produce inaccurateresults.Do use the FreeStyle Lite system for: Testing blood glucose. Testing glucose in fresh capillary whole blood samples.Do not use the FreeStyle Lite system for: The diagnosis of or screening for diabetes mellitus. Testing on newborns. Testing of arterial blood.The human figure above shows the areas where you can test with theFreeStyle Lite system. Avoid moles, veins, bones, and tendons.WARNING:We recommend that you test on your fingers if you are testingfor hypoglycaemia (low blood glucose) or if you suffer fromhypoglycaemia unawareness.1www.AbbottDiabetesCare.com2
WARNING:The FreeStyle Lite System contains small parts that may bedangerous if swallowed.Caution: Please read all the instructions provided in this Owner’sBooklet and practice the testing procedures before using theFreeStyle Lite system. Blood glucose monitoring should be donewith the guidance of a healthcare professional.3www.AbbottDiabetesCare.comImportant Health-Related InformationENGLISHENGLISHImportant Information About Your FreeStyle LiteBlood Glucose Monitoring System (continued)Low or high blood glucose readings can indicate a potentially seriousmedical condition. If your blood glucose reading is unusually low orhigh, or if you do not feel the way your reading indicates, repeat thetest with a new test strip. If your reading is not consistent with yoursymptoms or if your blood glucose result is less than 60 mg/dL(3.3 mmol/L) or higher than 240 mg/dL (13.3 mmol/L) you shouldcontact your healthcare professional and follow his or her treatmentadvice. For additional information, consult your test strip productinformation.4
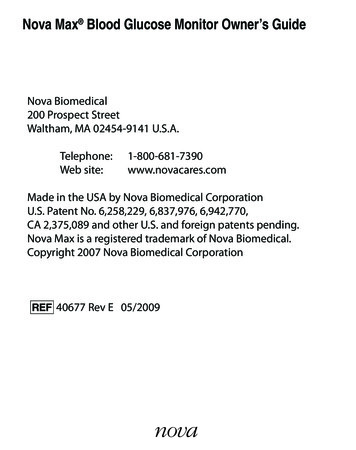
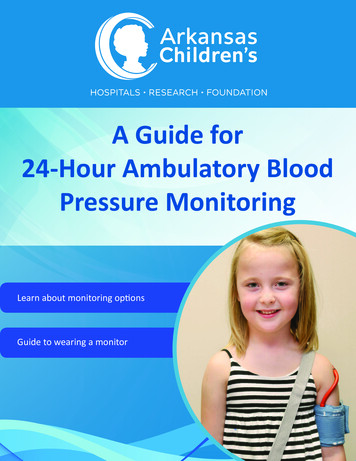
ENGLISHENGLISHThe FreeStyle Lite Meter and How It WorksData PortSystem Check ScreenThis screen always appears when the meter is turned onso that you can make sure the display is working properly.Do not use the meter if the system check screen does notmatch the example here. Please call Customer Care.Download test results. Requiresa compatible data managementsystem. For more information,please go to our website or callCustomer Care.c (Configure) Button Display ScreenDisplays your test results and other important information.m (Mode) Button Move to different mode settings. Scrolls backward. Silences a reminder alarm.Marks a control solution test.Scrolls forward.Displays clock.Silences a reminder alarm.Test Strip PortInsert the Top end of a new FreeStyleLite test strip here. The meter powerson when you insert the test strip.Light ButtonControls the display backlight and test light.TopSample Areas (dark-coloured half-circles on Test Strip)Apply blood or control solution to one Sample Area only.Insert strip into the meter printed side up (see image tothe right).5www.AbbottDiabetesCare.comFreeStyle Lite Test StripBottomSample Area6
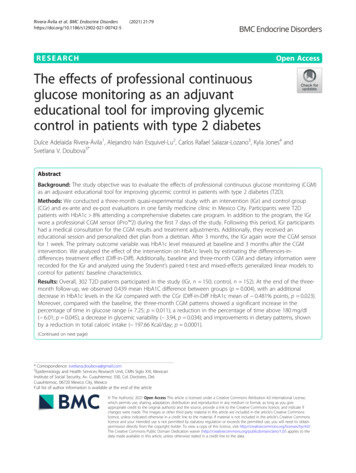
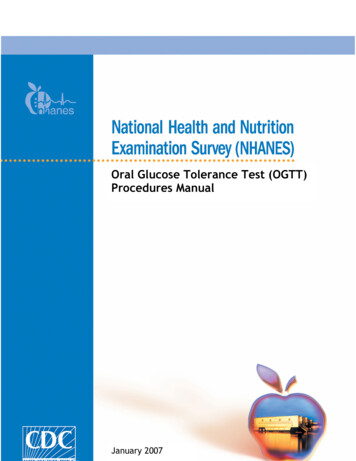
Memory Mode SymbolShows you test results stored in themeter memory.Control Solution Test Result SymbolThermometer Symbolmg/dL or mmol/LAppears if your meteris out of operatingtemperature range.Either mg/dL or mmol/L willdisplay, indicating the unit ofmeasurement setting ofyour meter.The unit ofmeasurementsetting of yourFreeStyle Litemeter is presetand cannot bechanged.Shows that you have marked a test result as acontrol solution test.Battery SymbolAppears when you should replaceyour meter battery.Test Result AreaDisplays test results.Sound LevelSymbolsIndicates high,low, or off soundvolume.ENGLISHENGLISHThe FreeStyle Lite Meter DisplayBlood Drop andTest Strip SymbolsMessage AreaThese symbols work together inan animation to tell you whenthe meter is ready for you toapply blood or control solution.Displays date, time, and number of tests.Day Average SymbolShows the average valueof glucose readingsfrom the last 7-, 14- or30-days.7www.AbbottDiabetesCare.comP SymbolIndicates PM in 12-hour formatonly (for example 4:00 p.m.)8
Apply blood or control solution to only one Test StripSample Area per test.Important: Do not apply blood to both sample areas.Test strips may be used only once. Discard used test strips.You can continue to fill the test strip for up to 60 seconds.Be sure to reapply the sample to the same sample area. Do not use test strips beyond the expiry date. This may causeinaccurate results. Do not bend, cut, or alter FreeStyle Lite test strips.Note: For further information, refer to the FreeStyle Lite test strippackage insert.Test StripSample AreaWARNING:The cap or vial contains drying agents that may be harmful ifinhaled or swallowed and may cause skin or eye irritation.Important: The FreeStyle Lite meter should only be used with FreeStyleLite test strips. Using other test strips with this meter can produceinaccurate results.Important Test Strip Information The FreeStyle Lite System has an operating range of 4 to 40 C(40 to 104 F). Store the test strip package in a cool, dry place between 4 to 30 C(40 and 86 F). Use test strips only within the system operating temperature range. Keep away from direct sunlight and heat. Store your test strips in their original vial only; never transfer themto another vial or any other container. Never store individual test strips outside the vial. After removing a FreeStyle Lite test strip from the vial, immediatelyclose the vial cap tightly. With clean, dry hands, you may touch the test strip anywhere whenremoving it from the vial or inserting it into the meter.9www.AbbottDiabetesCare.comENGLISHENGLISHThe FreeStyle Lite Test StripThe FreeStyle Control SolutionEach FreeStyle control solution vial contains a redliquid with a fixed amount of glucose that is used to: Practice testing without having to use your ownblood. Ensure that your meter and test strips are workingtogether properly.A control solution test should be performed when you question yourresults and want to confirm that your monitor and test strips areworking properly.For information on how to obtain control solution, call CustomerCare.10
Meter Setup Use only FreeStyle control solution with your FreeStyle Lite system. To Change Settings Within the ScreenPress the “c” (configure) button. Replace the cap on the control solution bottle immediately afterusing. Do not use control solution past the expiry date. Do not add water or any liquid to control solution. Control solution tests are specified to be accurate only when usedbetween 15 to 40 C (59 to 104 F). Control solution test results should fall within the range printed onthe test strip vial label. To Enter Setup ModeStart with the meter off (no test stripinserted). Press and firmly hold the “m”display screen appears.button until the To Exit at Any TimePress and hold the “m” button until the meter turns off. To Move Through the ScreensPress the “m” button to move through all the setup screens suchas reminder alarms, sound level, time, date, and so on.Setting the Reminder AlarmsYou may set up any or all of the reminder alarms (1-4).Note: A reminder alarm will never sound during a test.To set a reminder alarm or multiple reminder alarms, please followthese steps.1. Start with the meter off. Press the “m” buttonand hold until thedisplay appears with01234. You are now in the reminder alarmsetting mode and the “0” is blinking.Important: The control solution range is a target range for controlsolution only. It is not a target range for your blood glucose level. If control solution results are out of this range, repeat the test.2. To move to the first reminder alarm press the “c”button once. You are now ready to set reminderalarm 1 (“1” is blinking). If your control solution test results continue to fall outside the rangeprinted on the test strip vial, do not use the FreeStyle Lite system totest your blood glucose. Contact Customer Care.Caution: Results from FreeStyle control solution tests do notreflect your blood glucose ntrol Solution InformationFreeStyle control solution is good for three months after opening thebottle or until the expiry date printed on the label, whichever comesfirst.Important: Count forward three months from the date you open a newbottle of control solution. This is your discard date. Write this date onthe side of the control solution bottle.Example: You open the control solution on January 15th. Countforward three months to April 15th. This is the discard date that yourecord on the bottle.Select reminderalarm12
Setting the SoundENGLISHENGLISH3. Press the “m” button to move to the hour setting.With the hour blinking, press the “c” buttonuntil the correct hour appears.There are three (3) sound volume options:Select hour4. Press the “m” button to move to the minutesetting. With the minute blinking, press the “c”button until the correct minute appears.Select minuteSelect reminderalarm volumeSelect reminderalarm5. Press the “m” button to move to the reminderalarm volume setting. Default setting is off.Press the “c” button to select the desired volumesetting: low, high, or off.6. Press the “m” button to finalize your alarmsetting. This will bring you back to the reminderalarm settingmode.If you wish to set multiple reminder alarms press“c” to move to reminder alarm 2. Repeat.Note: To save your reminder alarm settings and exit setup mode,press and hold the “m” button until the meter turns off. Press the “m”button when “0” is blinking to move to the next setup screen withoutsetting any reminder alarms.Offwww.AbbottDiabetesCare.comHighSetting the Time1. With the hour blinking, press the “c” buttonuntil the correct hour appears. The “P”displays for “PM” times.HourMinuteTime Format13LowThere are three sound volume options to let you know when the teststrip is full, when the reading is done, and when an error occurs:1. Press the “c” button until the desired sound level appears2. Press the “m” button to move to “Setting the Time.”2. Press the “m” button to move to minutesetting.3. With the minute blinking, press the “c” buttonuntil the correct minute appears.4. Press the “m” button to move to “Setting theTime Format.”Setting the Time Format1. With the hour mode blinking, press the “c”button to move between 12-hour and 24-hourformat. The time automatically updates to theformat selected.2. Press the “m” button to move to “Setting theDate.”14
Setting the Date and Date Format1. With the month blinking, press the “c” buttonuntil the correct month appears.2. Press the “m” button to move to the day setting.Month3. With the day blinking, press the “c” button untilthe correct day appears.4. Press the “m” button to move to “Date Format.”Day5. With the date blinking, press the “c” buttonto select month-day or day-month format.The date automatically updates to the formatselected.6. Press the “m” button to move to the year setting.7. With the year blinking, press the “c” buttonuntil the correct year appears.YearYou have completed Meter Setup. To move to “Setting the User Reminder Alarms” press the “m”button. To exit press and hold the “m” button.Using Your Meter’s LightsDepending on what mode your meter is in, pressing the light button() turns on either the display backlight or the test light.Using the Display BacklightENGLISHENGLISHPressing the light button powers on the displaybacklight in all modes except when applying asample. When applying a sample, the light buttonturns the test light on.The display backlight goes out when you press the light button (again or when the meter is inactive for 10 seconds.)Using the Test LightPressing the light button while the Blood Drop andTest Strip symbols appear on the display screenpowers on the test light.The test light goes out: When you press the light button again. When the meter receives the correct amount of blood for a test (theFreeStyle Lite test strip is filled). After 60 seconds of no activity. When a FreeStyle Lite test strip is removed from the meter.If you use either the backlight or the test light during the test mode,the backlight lights again to show you the test results after themeasurement is complete.15www.AbbottDiabetesCare.com16
1Insert the top of the test strip into your meteruntil it stops. This will power on the meter.System Check ScreenWhen the meter powers on, this screenwill appear so that you can make sure thedisplay is working properly.System Check2Wait for the meter to display the BloodDrop and Test Strip symbols.The result will appear on the display screen and if the sound is on,your meter will beep twice. To mark the result as a control solutionresult, press and hold the “c” button for two seconds until the controlsolution symbol ( ) appears at the top left of the display screen.ENGLISHENGLISHPerforming a Control Solution TestIf you have marked a blood glucose test as a control solution test bymistake, you can unmark it by pressing and holding the “c” buttonagain for two seconds.4Compare your control solution test result to therange printed on your test strip vial label. Yourcontrol solution results should fall within therange printed on the side of your test strip vial.Out of range test results may be caused by: Error in performing the test. Expired or contaminated control solution. Test strip deterioration.3Gently touch only the Sample Area of the teststrip to the control solution. Meter malfunction.Important: Do not apply control solution to bothTest Strip Sample Areas.If the sound prompt is on, your meter will beep when the test stripis full. A short line then moves clockwise around the display screenwhile the sample is processing.17www.AbbottDiabetesCare.com18
Important: To ensure accurate results, wash yourhands and test site (for example, your forearm) withsoap and water. Make sure there is no cream or lotionon the test site. Thoroughly dry your hands and testsite. With the FreeStyle Lite meter, you can test your blood glucose onyour forearm, upper arm, hand, thigh, calf, or fingers. Testing with the FreeStyle Lite meter requires a very small samplesize, 0.3 microlitres of blood; about the size of pinhead(example: ).WARNING:We recommend that you test on your fingers if you are testingfor hypoglycaemia (low blood glucose) or if you suffer fromhypoglycaemia unawareness.Performing a Blood Glucose Test1Prepare Your MeterInsert a FreeStyle Lite test strip into the meteruntil it stops. The meter will power on.Note: If you do not start the test within two minutes, the meter willturn off. To restart your meter, take out the unused FreeStyle Lite teststrip and reinsert it into the meter.System Check ScreenWhen the meter powers on, this screen willappear so that you can make sure the display isworking properly.System CheckThe Blood Drop and Test Strip symbols willappear on the display screen. Your meter is nowready to apply blood sample.Times when you may be checking for low blood glucose include: When you are feeling symptoms such as weakness, sweating,nervousness, headache, or confusion. When you have delayed a meal after taking insulin. When your healthcare professional advises you to do so.ENGLISHENGLISHTesting Your Blood GlucoseBlood Drop andTest Strip SymbolsPotential BruisingIt is possible you may experience bruising at the test site. If bruisingdoes occur, you may choose to lance another test site.19www.AbbottDiabetesCare.com20
Obtain a Blood SampleSelect a test site. There are differences in testing on fingers versusother alternative sites.Use your lancing device to obtain a blood sample. Refer to thelancing device insert for detailed instructions on how to use theFreeStyle lancing device.WARNING: If you are testing for hypoglycaemia (low bloodglucose), or if you suffer from hypoglycaemia unawareness, werecommend that you test on your fingers.3Important Test Strip Information Do not press the FreeStyle Lite test strip against the test site.Do not scrape the blood onto the FreeStyle Lite test strip.Do not apply blood to the flat side of the FreeStyle Lite test strip.Do not apply blood to the FreeStyle Lite test strip when theFreeStyle Lite test strip is out of the meter. Do not put blood or foreign objects into the FreeStyle Lite teststrip port.4Waiting for Result Do not pull the FreeStyle Lite test strip awayfrom the sample until you hear one beep orsee the short line moving clockwise on yourmeter screen. This means you have enoughblood and the meter is reading your glucose.Filling the FreeStyle Lite Test Stripwith Blooda. Make sure that the FreeStyle Lite test stripis in the meter and the meter is poweredon. You are now ready to apply the bloodsample.b. Bring the FreeStyle Lite test strip to theblood sample at a slight angle.c. The FreeStyle Lite test strip pulls the bloodinto the strip through the sample area.ENGLISHENGLISH2 If after five seconds your meter does not show a short line movingaround the display screen, the sample may be too small. You mayadd blood to the same sample area of the test strip from which youstarted for up to 60 seconds from the time of the first application. The test result is complete when your bloodglucose test result is shown on the displayscreen and you will hear two beeps. 5.7 mmol/L The time that the meter takes to display areading depends on your blood glucose level.The higher your glucose level, the longer ittakes to get a result.Test Strip Sample Area21www.AbbottDiabetesCare.com22
Important: Low or high blood glucose readings can indicate apotentially serious medical condition. The FreeStyle Lite meter displaysresults from 20 to 500 mg/dL (1.1 to 27.8 mmol/L).If your test result is lower than 20 mg/dL (1.1 mmol/L), LO willappear on the meter display screen. This reading indicates severehypoglycaemia (low blood glucose).LO Reading with SymptomsLO ReadingIf you have a LO reading and have symptomssuch as weakness, sweating, nervousness,headache or confusion, then follow your doctor’srecommendation to treat hypoglycaemia.LO Reading without SymptomsMeter ResultsMeter Memory To EnterStart with the meter off (no test strip inserted). Press the “m” buttonand release; the first memory screen to appear will be your 7-dayaverage. To ExitPress and hold the “m” button until the meter turns off.7-, 14-, 30- Day AverageThe first memory display screen you see is your 7-day average. Thisincludes all the readings from the last 7 days starting from the currentdate and time shown on the meter. (Control solution, LO, and HIreadings are not included in the average.)If you get a LO reading, but have no symptoms of low bloodglucose, then retest with a new test strip on your fingers. If you stillget a LO reading, follow your doctor’s recommendation to treathypoglycaemia.If your test is above 500 mg/dL (27.8 mmol/L), HI will appearon the display screen. This indicates severe hyperglycaemia(high blood glucose).HI Reading with SymptomsIf you feel symptoms such as fatigue, thirst, excessurination, or blurry vision, then follow yourdoctor’s recommendation to treat hyperglycaemia.HI ReadingENGLISHENGLISHLO and HI ReadingsExample:7davg your 7-day averagen indicates the number of resultsincluded in your average 6.8 mmol/LThe “c” button allows you to scroll forward to 14- and 30-dayaverages. Continue to press the “c” button to view stored test results.Your most recent result will display first.The “m” button allows you to scroll backward.HI Reading without SymptomsIf you get a HI reading, but have no symptoms of high blood glucose,then retest with a new test strip. If you still get a HI reading, followyour doctor’s recommendation to treat hyperglycaemia.23www.AbbottDiabetesCare.com24
The meter stores the last 400 test readings with time and date. Youmay scroll through all of the readings by pressing and holding the “c”button. The first reading you see is the most recent result. 7.0 mmol/LTemperature: A result with a thermometersymbol indicates that the reading was takenoutside of the meter’s specified operatingtemperature range and may not be accurate.This value is included in your 7-, 14- and 30-dayaverages.Data DownloadThe “PC” symbol displays when a data cableis inserted in the meter data port. You cannotperform a test while the data cable is in the meterdata port.ENGLISHENGLISHTest ResultsThe meter will display “PC” until the data cable isremoved from the data port.(Requires a compatible data management system.)For more information, please go to our website or call Customer Care.LO Reading: A LO reading (under 20 mg/dL or 1.1 mmol/L) isincluded in the memory as LO.HI Reading: A HI reading (over 500 mg/dL or 27.8 mmol/L) isincluded in the memory as HI.Blood Glucose Test 4.7 mmol/LA result without a control solution symbol ( )indicates that it is a blood glucose reading. Thedate and time of the test will appear on thebottom of the screen.Control Solution Test 7.7 mmol/L25A value with ( ) indicates that you have markedthis reading as a control solution test. The dateand time of the control solution reading willappear on the bottom of the screen.www.AbbottDiabetesCare.com26
BatteryYour FreeStyle Lite meter comes with one preinstalled, #2032,3 volt, lithium battery. The battery provides enough power for themeter to perform about 500 tests. If your battery runs low, the batterysymbol () appears on every display screen until you change thebattery. When the battery runs low, the display backlight and test lightmay not power on.Replacing the Battery (continued)2Install the battery with the positive ( ) sign uptoward you.3To close, angle the battery door back onto themeter and swing down until it snaps into place.ENGLISHENGLISHMeter MaintenanceImportant: When this symbol appears, or when the backlight and testlight begin to dim, you should replace the battery immediately. To avoid losing the time and date settings, replace the batterywithin one minute of removing the old battery. If you take more than one minute to replace the battery, you mayneed to reset the time and date to get the correct 7-, 14- and 30-dayaverages. If the time and date settings are lost, the time and datedisplays flash 00:00 and 00-00 until they are reset. Removing the battery does not affect the meter’s memory log orpreviously-stored user settings (such as date and time format). Even if you lose your time and date settings – you can perform ablood glucose test, and results will not be affected.Replacing the Battery1Note: The European Battery Directive requiresseparate collection of spent batteries, aimingto facilitate recycling and to protect theenvironment. The batteries in this productshould be removed and disposed in accordancewith local regulations for separate collection ofspent batteries.Caring for Your MeterAvoid getting dirt, dust, blood, control solution, water, or any otherliquid in the meter’s test strip and data ports.Turn the meter over. Press in the batterydoor clip to open. Swing the battery doorup to open and then off the meter.Clean the outside of the meter using a cloth dampened with one ofthe following:To remove the battery, push the batterydownward to release the battery. 70% isopropyl alcohol. Mild detergent/mild soap and water. A mix of one part household bleach, nine parts water.27www.AbbottDiabetesCare.comImportant: Never immerse the meter in water or any other liquid.28
Error MessagesError 1Possible Causes Sample is too small. Problem with the meter. Very low blood glucose (less than 20 mg/dL or1.1 mmol/L).3. If the retest using control solution does not work or the errorpersists, call Customer Care.What You Should Do1. If you have symptoms such as weakness, sweating, nervousness,headache, or confusion, follow your doctor’s recommendation fortreating hypoglycaemia.2. Conduct a control solution test using a new FreeStyle Lite teststrip. If the results of the control solution test are within the rangeprinted on the side of your test strip vial, retest using blood and anew FreeStyle Lite test strip.3. If the retest using control solution does not work or the errorpersists, call Customer Care.Possible Causes Problem with the FreeStyle Lite test strip. Problem with the meter. Very high glucose (above 500 mg/dL or27.8 mmol/L). HIGH control solution applied whentemperature is too cold. (This applies only tocontrol solution that is labeled as HIGH.)291. If you have symptoms such as thirst, fatigue, excess urination, orblurry vision, follow your doctor’s recommendation for treatinghyperglycaemia.2. Conduct a control solution test using a new FreeStyle Lite teststrip. If the results of the control solution test are within the rangeprinted on the side of your test strip vial, retest using blood and anew FreeStyle Lite Test Strip. Problem with the FreeStyle Lite test strip.Error 2What You Should Dowww.AbbottDiabetesCare.comError 3ENGLISHENGLISHSystem TroubleshootingPossible Causes Incorrect test procedure. For example, puttingblood on the test strip before inserting the teststrip into the meter or applying blood before theBlood Drop and Test Strip symbols display. Problem with the FreeStyle Lite test strip. Problem with the meter.What You Should Do1. Be sure you see the Blood Drop and Test Strip symbols on thedisplay screen before you apply blood or control solution.2. Conduct a control solution test using a new FreeStyle Lite teststrip. If the results of the control solution test are within the rangeprinted on the side of your test strip vial, retest using blood and anew FreeStyle Lite test strip.3. If the retest using control solution does not work or the errorpersists, call Customer Care.30
Possible Causes Problem with FreeStyle Lite test strip. Problem with the meter.What You Should Do1. Conduct a control solution test using a new test strip. If the resultsof the control solution test are within the range printed on the sideof your test strip vial, retest using blood and a new FreeStyle LiteTest Strip.2. If the retest using control solution does not work or the errorpersists, call Customer Care.TroubleshootingMeter does not enter the test mode after inserting a test strip.Probable CauseWhat to DoThe battery is dead.Replace the battery (and reset the date andtime, if necessary.)The battery is installedincorrectly or there is nobattery in the meter.Check that the battery is installed correctly witht
Control solution test results should fall within the range printed on the test strip vial label. Important: The control solution range is a target range for control solution only. It is not a target range for your blood glucos