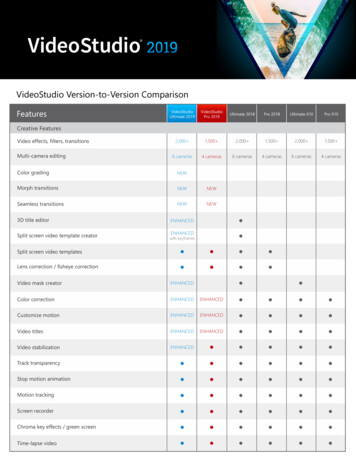
Transcription
1
Live Version 5.2 for Windows and Mac OSCreated by Bernd Roggendorf, Gerhard Behles, Robert Henke, awi, Reiner Rudolph, StefanHaller, Torsten Slama, Eduard Mueller, Stefan Franke, Frank Hoffmann, Andreas Zapf, HansThomas Mueller, Henrik Hahn, Ralf Suckow, Gregor Klinke, Matthias Mayrock, FriedemannSchautz, Ingo Koehne.Reference Manual by Rose Knudsen, Gerhard Behles, Jakob Rang, Robert Henke, TorstenSlama.Loops and samples provided by Big Fish Audio.Web: www.big shaudio.comE-mail: info@big shaudio.comAddress: 11003 Penrose Street, Suite C, Los Angeles, CA 91352Copyright 2006 Ableton AG. All rights reserved.This manual, as well as the software described in it, is furnished under license and may be used or copied only in accordance withthe terms of such license. The content of this manual is furnished for informational use only, is subject to change without notice andshould not be construed as a commitment by Ableton. Ableton assumes no responsibility or liability for any errors or inaccuraciesthat may appear in this book.Except as permitted by such license, no part of this publication may be reproduced, stored in a retrieval system or transmitted, inany form or by any means, electronic, mechanical, recording or otherwise, without the prior written permission of Ableton.Macintosh, Audio Units and QuickTime are registered trademarks of Apple Computer, Inc. Windows is a registered trademarkof Microsoft Corporation. VST is a trademark of Steinberg Media Technologies GmbH. ReWire is a trademark of PropellerheadSoftware AB. Mackie Control is a trademark of LOUD Technologies Inc. Ogg Vorbis and FLAC are trademarks of Xiph.Org. Abletonis a trademark of Ableton AG. All other product and company names are trademarks or registered trademarks of their respectiveholders.
Chapter 1Welcome to Live1.1The Ableton Team Says: Thank YouLive is the result of musicians wanting a better way to create, produce and perform musicusing a computer. A great deal of effort has been put into making Live easy and fun touse, yet at the same time capable of helping you create music with unlimited depth andsophistication. This effort continues even as you read these lines. in fact, a new, improvedLive version might already be available for download! Please check on our website now1 ,or choose Check for Updates from the Help menu.We hope you enjoy using Live and that it enhances your creative process. Should you havesuggestions about how we can improve Live, please let us know2 .1 http://www.ableton.com/downloads2 contact@ableton.com1
1.2. WHAT'S NEW IN LIVE 5?Your Ableton Team.1.21.2.1What's New in Live 5?Remix Features Support for MP3, Ogg Vorbis, Ogg FLAC and FLAC compressed audio les Auto-Warp Complex Warp Mode for warping music containing beats, tones and textures Clip scrub, nudge and improved transport controls1.2.2Organizational Tools for Files and Sets File search function Better browsing for les and folders Live Clip format for easy storage and retrieval of clip and device settings Import and export of Live Sets and their components directly from the Browser Open Recent Set command1.2.3Clip and Track Enhancements Track Freeze for conserving CPU resources and simplifying project sharing2
1.2. WHAT'S NEW IN LIVE 5? Track Delay controls to control for human, acoustic and hardware delays Multi-selection clip editing Clip deactivation option1.2.4Working with Arrangements Launchable Arrangement Locators New Arrangement Transport Track I/O in the Arrangement View1.2.5Editing MIDI Detailed and adaptive MIDI quantization options Preview in the MIDI Editor MIDI note deactivation option1.2.6MIDI and Key Remote Control Mackie Control support Improved mapping for the crossfader3
1.2. WHAT'S NEW IN LIVE 5?1.2.7Resources Valuable library of clips, device presets and Live Sets Library expansion and customization with Live Packs New interactive built-in program lessons1.2.8Live Effects and Instruments Beat Repeat for reorganizing and shredding beats and vocals Phaser and Flanger Auto Pan for LFO-driven manipulation of amplitude and panning Saturator for subtle-to-drastic distortion effects Arpeggiator New features for Simpler and Operator1.2.9Using Devices Browser-based device preset management Device groups for saving multi-effect combinations together with instruments Device delay compensation for Live and plug-in instruments and effects Live can receive MIDI messages from plug-ins VST Plug-ins can be stored in various directories4
1.2. WHAT'S NEW IN LIVE 5?1.2.10 5Miscellaneous(PC) /Ctrl(Mac) context menus for many commands and settings Zoom-adaptive or xed grid options Count-in recording Monitoring status easily visible when the In/Out section is hidden Files, Sets and presets can be dragged into Live from the Explorer (Windows) / Finder(Mac)
Chapter 2First StepsWhen you install Live and run it for the rst time, you will be presented with the ProductsPreferences tab.If you own Live, you can authorize your copy of the software by selecting it from the listedproducts and clicking the Unlock button at the bottom of the window. Please see the chapteron unlocking Live should you have questions or concerns that arise during the unlockingprocess.If you do not (yet) own Live, you can close the Preferences and proceed, as Live will run inDemo Mode by default. In Demo Mode, you will be able to work with all of Live's featureswith the exception of saving and exporting.6
2.1. LEARN ABOUT LIVE2.17Learn About LiveLive comes with a set of interactive lessons to take you step by step through the key featuresof the program. The lessons are organized in a table of contents, which can be openeddirectly in the program via the Help menu. We highly recommend following the lessons.Many users have told us that the lessons helped them get familiar with the program veryquickly.We also recommend that you read the Live Basics chapter, which encapsulates everythingthat Live is and can do, and is therefore a worthwhile read for both beginners and experienced users. The remaining chapters of this manual serve as in-depth reference for thematerial introduced in Live Basics.2.1.1Using the Info View and IndexLive's Info View tells you the name and function of the user interface element currently underthe mouse.
2.2. SETTING UP PREFERENCES8The Info View.If you require more information on a speci c user interface element or topic, please consultthis reference manual. The index, found at the end of the manual, contains the names of alluser interface elements and will lead you to the relevant section.2.2Setting up PreferencesLive's Preferences dialog is where you can nd various settings that govern how Live looks,behaves and interfaces with the outside world. This dialog is accessed with the Optionsmenu's (Windows) / Live menu's (Mac OS X) Preferences entry.Live's Preferences are distributed over several tabs: The Audio Preferences are used to set up Live's audio connections with the outsideworld via an audio interface. Please take the time to follow the program's built-inSetting up Audio I/O lesson, which will walk you through all the steps required toset up and optimize the settings for any given system. To access the lesson, choose
2.3. THE MAIN LIVE SCREEN9Lessons Table of Contents from the Help menu. The MIDI/Sync Preferences are used to help Live recognize MIDI devices for threeseparate and distinct purposes:Playing MIDI notes. To learn how to route an external device into Live for MIDIinput, or how to send MIDI to an external device, please see the chapter onrouting.Controlling parts of the interface remotely. This subject is covered in detail in thechapter on remote control.Syncing the program with an external sequencer or drum machine, either as amaster or a slave. Please see the manual section on sync for details. The Plug-In Preferences pertain to the use of plug-in virtual instruments and effects,as described in the chapter on using plug-ins. The Default Preferences allow customizing the default state for new projects and theircomponents, as well as selecting options for new recordings. The Misc(ellaneous) Preferences include various options. Here, you can select Live'ssystem language and a color scheme, or skin, for the Live user interface. The Products Preferences are used to manage licensing and installation of the Liveplatform, and add-on components like the Operator instrument and Live Pack librarypackages.2.3The Main Live ScreenMost of your work in Live happens in the main Live screen. This screen consists of a numberof views. Each view manages a speci c aspect of your project. As screen space is limited,the Live views cannot all be up at the same time.
2.3. THE MAIN LIVE SCREEN10Each one of the selector buttons at the screen borders calls up a speci c view; click this one,for instance, to access the Live devices:A View Selector.To hide one of Live's views and free up screen space, click on the triangle-shaped buttonnext to it. To restore the view, click the button again.A View Show/HideButton.You can run Live in Full Screen Mode by selecting Full Screen from the View menu. Toleave Full Screen Mode, click the button that appears in the lower right corner of the screen.Full Screen Mode can also be toggled by pressing the F11 key.You can adjust the main window's horizontal split by dragging.
2.3. THE MAIN LIVE SCREEN11Adjusting the MainWindow Split.
Chapter 3Unlocking LiveLive is protected against illegal use by a copy protection scheme. This scheme has beendesigned to meet the highest security standards while avoiding hassles for the customer. Ifyou nd this procedure to be an inconvenience, please understand that the copy protectionsecures your investment: It allows Ableton to provide you with support and to continuedeveloping Live.Authorization of Ableton products takes place in the Preferences' Products tab, which willappear when you start Live for the rst time.Here you can choose to authorize ( unlock ) or purchase any Ableton products available toyou, for example the Operator instrument.Please note that products such as Operator are sold separately from Live but are unlockedusing the same procedure described in the following sections. They can also be individuallyset to Demo Mode in the Products tab so that you can try them out.12
13The Products Tab in thePreferences.Clicking on any product listed in the Products tab will give you the option of unlocking orbuying that product. Please click the Unlock button here to complete the unlocking processin two steps. If you have not yet purchased the product, you can do so online by clicking theBuy button. You can always return to the Products Preferences tab later or visit the Abletonwebshop1 to make a purchase. Live's Preferences are available via the Options menu (orthe Live menu in Mac OS X).Selecting the UnlockButton in the ProductsTab.1 http://www.ableton.com/shop
3.1. STEP 1: ENTERING YOUR SERIAL NUMBER3.114Step 1: Entering Your Serial NumberAs an owner of Live, you have received a Serial Number from Ableton, either via e-mail (ifyou ordered Live directly from Ableton), or on a card as part of the Live package.The Fields for EnteringYour Serial Number.After selecting Unlock in the Products tab, you will be presented with six elds for typingin your Serial Number. Each eld holds four characters. The Serial Number is composed ofnumbers 0.9 and letters A.F. If you accidentally type the wrong string into a eld, the eldwill turn red. When you have successfully entered the Serial Number, click the Ok buttonto proceed.The Serial Number identi es your ownership of Live. Because your Serial Number is avaluable good, you should keep it in a safe place and out of reach of unauthorized hands.Please be aware that sharing your Serial Number will render it unusable. The only way forAbleton technical support to help you get back your Serial Number if you lose it is via yourregistration data. Therefore, please register your product2 , as otherwise you might loseyour property!3.2Step 2: Unlocking LiveThe second step of authorizing Live is called unlocking. Unlocking means associatingyour Serial Number with a speci c computer. Please be aware that the standard Live licensegrants you the right to use Live on only one computer at a time. You can, however, unlock2 http://www.ableton.com/register
3.2. STEP 2: UNLOCKING LIVE15Live with your Serial Number more than once under the legal and technical conditionsdescribed later.3.2.1The Unlock KeyFor unlocking, you require an Unlock Key that can only be created by the Ableton server.Unlocking therefore requires access to the Internet. The computer from which you connectto the Internet does not have to be the same computer for which you wish to unlock Live,but it does make things easier.3.2.2The Challenge CodeThe Ableton server creates the Unlock Key from your Serial Number and a so-called Challenge Code. The Challenge Code is a ngerprint that Live takes of your computer'scomponents. For details, please see the corresponding section.3.2.3Unlocking OnlineUnlocking Live Online.If the computer you want to unlock Live for is connected to the Internet, the only thing youneed to do is press the Unlock Online button. Live will then create a connection to theAbleton server, send your Serial Number and Challenge Code, and receive the Unlock Key
3.2. STEP 2: UNLOCKING LIVE16from the server. No information other than this is exchanged between your computer andthe Ableton server.3.2.4Unlocking Of ineUnlocking Live Of ine.If the computer you want to unlock Live for is not connected to the Internet, you can useany other computer to access the Ableton server's web interface3 . This is a website withelds for entering your Serial Number and the Challenge Code, which you can copy fromLive's Unlock dialog.The Live Unlocking WebSite.3 http://www.ableton.com/unlock
3.2. STEP 2: UNLOCKING LIVE17If you have entered your Serial Number and Challenge Code correctly, another website willappear to provide you with the Unlock Key. There now are two options for transferring theUnlock Key to the computer that is to be unlocked:Follow the weblink to download the Unlock Key as a le. Transfer the le to the targetcomputer via a diskette or CD-ROM. Then, press the Unlock dialog's Load Unlock Keybutton to load the Unlock Key le.The Unlock Key Can BeDownloaded as a TextFile.OR it might be more convenient to print the webpage with the Unlock Key on it. On thetarget computer, press the Enter Unlock Key button to open a dialog with elds for typingin the Unlock Key. Typing it in is easier than it rst appears, because the elds will turn redif you type the wrong string.
3.2. STEP 2: UNLOCKING LIVE18Manually Enter YourUnlock Key.
3.3. COPY PROTECTION FAQS3.33.3.119Copy Protection FAQsCan I Use Live or Other Ableton Products Without a Serial Number?If you do not (yet) own Live, you can work with Live in Demo Mode. Demo Mode offersLive's complete functionality, but saving and exporting are disabled.Live will run in Demo Mode by default if it has not been authorized. You can try out otherAbleton products, such as the Operator instrument, by individually switching them to DemoMode in the Products tab of the Preferences.Demo Mode can also be deactivated on a product-by-product basis in the Product Preferences.If running Live or another product in Demo Mode raises your interest in purchasing it, pleaseselect it from the Products Preferences tab and then click the Buy button, or visit the Abletonwebshop4 . This site contains information about Ableton's distributor and dealer network.It also offers you the opportunity to buy Ableton products online. Live's Preferences areavailable via the Options menu (or the Live menu in Mac OS X).4 http://www.ableton.com/shop
3.3. COPY PROTECTION FAQS20Click Here if You AreInterested in BuyingLive.3.3.2What if I Change My Computer's Components?If the Challenge Code of your computer changes for some reason, Live will indeed askyou to unlock the software another time. The Challenge Code does not change, however,when computer peripherals are replaced (audio or MIDI hardware, printers, modems). TheChallenge Code may change if the motherboard, processor or network card is replaced. Onsome computers, reformatting a hard drive also changes the Challenge Code.3.3.3Can I Unlock Live More than Once?The standard Live license allows you to use Live on only one computer at a time. However,if you have registered your product5 , the Ableton server will provide you with two Unlock5 http://www.ableton.com/register
3.3. COPY PROTECTION FAQS21Keys in good faith that you will use Live on only one machine at a time. Just proceed asdescribed in the corresponding section.You can therefore run Live on both a studio desktop computer and a tour laptop, but not atthe same time.Should the Ableton server reject your demand for another Unlock Key, please contactAbleton's technical support.They can be reached by: E-mail6 ; Telephone: 49 (0)30 - 288 763 151 (available Monday to Friday 11 to 15hrs CET); Fax: 49 (0)30 - 288 763 11.To speed up the process, please: Register your copy of Live7 ; Include a brief explanation of the circumstances.To use Live on more than one computer at a time, you require a secondary license or a sitelicense. Ableton offers these licenses at special rates. Please contact the sales team8 fordetails.3.3.4Can I Play my Set from a Computer That Is Not Unlocked?In Demo Mode, you can load and perform a Live Set with no time limitation. You cannot,however, save or export your work. When you go on tour, consider taking along your Live6 support@ableton.com7 http://www.ableton.com/register8 orders@ableton.com
3.3. COPY PROTECTION FAQS22program CD and a CD with the last state of your Live Set(s). In case of an emergency, youcan install and run Live on any computer available and play your backup Live Set(s).3.3.5How Can I Turn Demo Mode Off?If Live is unlocked but other products are set to Demo Mode, Live will also run in DemoMode, and you will not be allowed to save or export your work. To turn Demo Mode offin this case, activate the Hide option for each additional product in its respective ProductPreference page.Click Here to Hide aProduct's Features.You can always choose to show a product again later, and then try out its features by usingthem in Demo Mode.
3.3. COPY PROTECTION FAQS3.3.623What Do I Do About Problems or Questions Regarding Copy Protection?Please contact technical support9 . They are happy to help!9 support@ableton.com
Chapter 4Live BasicsThis chapter introduces the essential concepts of Live. We advise you to read this chapterearly in your Live career, as a solid understanding of the program's basic principles will helpyou fully exploit Live's potential for your music-making.4.1Live SetsThe type of document that you create and work on in Live is called a Live Set. Live Sets canbe opened either through the File menu's Open command or via the built-in File Browsers.24
4.2. ARRANGEMENT AND SESSION25A Live Set in theBrowser, Accessed viathe Library Button.Pressing the Library button in Live's Browser will take you to Live's library of creative tools.There are a number of starter Sets here; double-clicking a Live Set's name in the Browserwill open that Live Set.4.2Arrangement and SessionThe basic musical building blocks of Live are called clips. A clip is a piece of musical material:a melody, a drum pattern, a bass line or a complete song. Live allows you to record andalter clips, and to create larger musical structures from them: songs, remixes, DJ sets orstage shows.A Live Set consists of two environments that can hold clips: The Arrangement is a layout ofclips along a musical timeline; the Session is a real-time-oriented launching base for clips.Every Session clip has its own play button that allows launching the clip at any time and inany order. Each clip's behavior upon launch can be precisely speci ed through a number ofsettings.Clips in the Session View(Left) and in theArrangement View(Right).The Arrangement is accessed via the Arrangement View and the Session via the Session
4.3. TRACKS26View; you can toggle between the two views using the computer's Tab key or their respectiveselectors. Because the two views have distinct applications, they each hold individualcollections of clips. However, it is important to understand that ipping the views simplychanges the appearance of the Live Set and does not switch modes, alter what you hear orchange what is stored.The Arrangement andSession View Selectors.Arrangement and Session interact in useful (though potentially confusing) ways. One can,for instance, improvise with Session clips and record a log of the improvisation into theArrangement for further re nement. This works because Arrangement and Session areconnected via tracks.4.3TracksTracks host clips and also manage the ow of signals, the creation of new clips throughrecording, sound synthesis, effects processing and mixing.
4.3. TRACKS27A Track in theArrangement View.Session and Arrangement share the same set of tracks. The tracks are vertically laid out fromleft to right in the Session View, and horizontally from top to bottom in the ArrangementView. A simple rule governs the cohabitation of clips in a track:A track can only play one clip at a time.Therefore, one usually puts clips that should play alternatively in the same Session Viewcolumn, and spreads out clips that should play together across tracks in rows, or so-calledscenes.A Scene in the SessionView.The exclusivity of clips in a track also implies that, at any on time, a track will either play aSession clip or an Arrangement clip, but never both. So, who wins? When a Session clipis launched, the respective track stops whatever it is doing to play that clip. In particular, ifthe track was playing an Arrangement clip, it will stop it in favor of the Session clip evenas the other tracks continue to play what is in the Arrangement. The track will not resume
4.4. AUDIO AND MIDI28Arrangement playback until explicitly told to do so.This is what the Back to Arrangement button, found in the Control Bar at the top of theLive screen, is for. This button lights up to indicate that one or more tracks are currently notplaying the Arrangement, but are playing a clip from the Session instead.We can click this button to make all tracks go back to the Arrangement. Or, if we like whatwe hear, we can capture the current state into the Arrangement by activating the Recordbutton. Disengaging Record Mode or stopping Live using the Stop button leaves us withan altered Arrangement.4.4Audio and MIDIClips represent recorded signals. Live deals with two types of signals: audio and MIDI. In thedigital world, an audio signal is a series of numbers that approximates a continuous signalas generated by a microphone or delivered to a loudspeaker. A MIDI signal is a sequenceof commands, such as now play a C4 at mezzo piano. MIDI is a symbolic representationof musical material, one that is closer to a written score than to an audio recording. MIDIsignals are generated by input devices such as MIDI or USB keyboards1 .It takes an instrument to convert MIDI signals into audio signals that can actually be heard.Some instruments, such as Live's Simpler, are for chromatic playing of one sound via thekeyboard. Other instruments, such as Live's Impulse, have a different percussion soundassigned to each keyboard key.Audio signals are recorded and played back using audio tracks, and MIDI signals are1 For an introduction to digital audio and MIDI, please see http://img.uoregon.edu/emi/emi.php andhttp://www.midi.org/The Play, Stop, Recordand Back toArrangement Buttons.
4.5. AUDIO CLIPS AND SAMPLES29recorded and played back using MIDI tracks. The two track types have their own corresponding clip types. Audio clips cannot live on MIDI tracks and vice versa.Information about inserting, reordering and deleting audio and MIDI tracks is found here.4.5Audio Clips and SamplesAn audio clip contains a reference to a sample (also known as a sound le or audio le )or a compressed sample (such as an MP3 le). The clip tells Live where on the computer'sdrives to nd the sample, what part of the sample to play and how to play it.When a sample is dragged in from one of Live's built-in File Browsers, Live automaticallycreates a clip to play that sample. Prior to dragging in a sample, one can audition orpreview it directly in the Browser; the switch in the Browser with the headphone iconactivates previewing.Samples Are Dragged infrom Live's File Browsers.Live offers many options for playing samples in exciting new ways, allowing you to create anabundance of new sounds without actually changing the original sample all the changes
4.6. MIDI CLIPS AND MIDI FILES30are computed in real time, while the sample is played. The respective settings are made inthe Clip View, which appears on screen when a clip is double-clicked.An Audio Clip'sProperties as Displayedin the Clip View.Many powerful manipulations arise from Live's warping capabilities. Warping means changing the speed of sample playback independently from the pitch so as to match the projecttempo as adjusted in the Control Bar's Tempo Field.The Control Bar's TempoField.The most elementary use of this technique, and one that usually requires no manual setup,is synchronizing sample loops to the chosen tempo. Live's Auto-Warp algorithm actuallymakes it easy to line up any sample with the project tempo, such as a recording of a drunkjazz band's performance. It is also possible to radically change the sonic signature of asound using extreme warp settings.4.6MIDI Clips and MIDI FilesA MIDI clip contains musical material in the form of MIDI notes and controller envelopes.When MIDI is imported from a MIDI le, the data gets incorporated into the Live Set, and
4.6. MIDI CLIPS AND MIDI FILES31the original le is not referenced thereafter. In the Live File Browsers, a MIDI le appearsas a folder that can be opened to reveal its individual component tracks, which can beselectively dragged into the Live Set.MIDI Files Are Draggedin from Live's FileBrowsers.As expected, a MIDI clip's contents can be accessed and edited via the Clip View, forinstance to change a melody or paint a drum pattern.A MIDI Clip's Propertiesas Displayed in the ClipView.
4.7. DEVICES AND THE MIXER4.732Devices and the MixerA track can have not only clips but also a chain of devices for processing signals. Doubleclicking a track's title bar brings up the Track View, which shows the track's device chain.The Track ViewDisplaying an AudioTrack's Device Chain.Live's built-in audio effects, MIDI effects and instruments are available from the DeviceBrowser and can be dragged from there into the Track View or onto a track title bar.
4.7. DEVICES AND THE MIXER33Live's Built-in DevicesAre Available from theDevice Browser.You can also use plug-in devices in Live. VST and Audio Units (Mac OS X only) Plug-ins areavailable from the Plug-In Device Browser.Plug-In Devices AreAvailable from thePlug-In Device Browser.Consider an audio clip playing in an audio track. The audio signal from the clip reaches theleftmost device in the chain. This device processes (changes) the signal and feeds the resultinto the next device, and so on. The number of devices per track is theoretically unlimited.
4.7. DEVICES AND THE MIXER34In practice, the computer's processor speed does impose a limit on the number of devicesyou can use at the same time, a topic that deserves separate discussion. Note that thesignal connections between audio devices are always stereo, but the software's inputs andoutputs can be con gured to be mono in the Audio Preferences.When the signal has passed through the device chain, it ends up in Live's mixer. As Sessionand Arrangement share the same set of tracks, so they share the mixer. The mixer can beshown in both views for convenience. To optimize the screen layout, the individual mixersections can be shown or hidden using the View menu's entries.
4.7. DEVICES AND THE MIXER35The Live Mixer in theArrangement View (Top)and Session View(Bottom).The mixer has controls for volume, pan position and sends, which adjust the contributioneach clip track makes to each return track's input. Return tracks cannot host clips, onlyeffects. Via their sends, all tracks can feed a part of their signal into a return track and shareits effects.The mixer also includes a crossfader, which can create smooth transitions between clipsplaying on different tracks. Live's crossfader works like a typical DJ mixer crossfader, exceptthat it allows crossfading not only two but any number of tracks including the returns.
4.7. DEVICES AND THE MIXER36Live's Crossfader.Devices that receive and deliver audio signals are called audio effects. Audio effects are theonly type of device that t in an audio track or a return track. However, two more types ofdevices are available for use in MIDI tracks: MIDI effects and instruments.Consider a MIDI track playing a clip. The MIDI signal from the clip is fed into the track's devicechain. There, it is rst processed by any number of MIDI effects. A MIDI effect receivesand delivers MIDI signals. One example is the Scale effect, which maps the incomingnotes onto a user-de ned musical scale. The last MIDI effect in the chain is followed by aninstrument. Instruments, for instance Live's Simpler and Impulse, receive MIDI and deliveraudio. Following the instrument, there can be any number of audio effects as in an audiotrack.MIDI Effects, anInstrument and AudioEffects in a MIDI Track.If a MIDI track has no instrument (and no audio effects), then the track's output is a plainMIDI signal, which has to be sent somewhere else to be converted into audio. In this case,
4.8. PRESETS AND DEVICE GRO
the terms of such license. The content of this manual is furnished for informational use only, is subject to change without notice and should not be construed as a commitment by Ableton. Ableton a