Transcription
Profe s s io na lSetting Guide
Table of ContentsTaking Photographs1Improving Camera Response . 2Settings by Subject . 6Matching Settings to Your Goal. 12 Reducing Camera Blur: Vibration Reduction .12 Preserving Natural Contrast: Active D-Lighting .13 Quick Setting Selection: Shooting Menu Banks .14 Finding Controls in the Dark: Button Backlights .15 Reducing Noise at High ISO Sensitivities .15 Reducing Noise and Blur: Auto ISO Sensitivity Control. 16 Reducing Shutter Noise: Quiet and Silent Release .17 Optimizing White Balance .18 Varying White Balance: White Balance Bracketing .22 Copying White Balance from a Photograph .26 Creating a Multiple Exposure .28 Choosing a Memory Card for Playback .30 Copying Pictures Between Memory Cards .31 Copying Settings to Other D4 Cameras .31 Keeping the Camera Level: Virtual Horizon .32 Composing Photographs: The Framing Grid .34 Resizing Photographs for Upload: Resize .34ii
Autofocus Tips . 35 Focusing with the AF-ON Button .35 Choosing the Number of Focus Points .35 AF-C Priority Selection .36 AF-Area Mode .38 Focus Point Selection and Camera Orientation.41 Adjusting Autofocus to the Lens: AF Fine-Tune .42 Focus Tracking with Lock-On .44Movies4455Before Filming . 46 Sound.46 Movie Settings .47 Starting Movie Live View.50 Exposure Mode .51 White Balance .51 Using Autofocus.52 Lens Vibration Reduction (VR) .54 Adjusting Settings During Live View .55 The Information Display.56 Checking Focus .57Filming Movies . 58 Starting and Ending Recording .58 Editing Movies .59Time-Lapse Movies . 60 Time-Lapse Movies .60HDMI Output . 64iii
Table of ContentsFirst-Time Users iv6677Customizing the Command Dials .68Reversing Indicators .68Choosing the Primary Slot .69Adjusting Monitor Brightness .69Choosing the Monitor off Delay .69Metering .70
Taking PhotographsThis chapter describes how the cameracan be configured for improved shutterresponse and settings adjusted for different subjects, and gives tips on usingautofocus.1
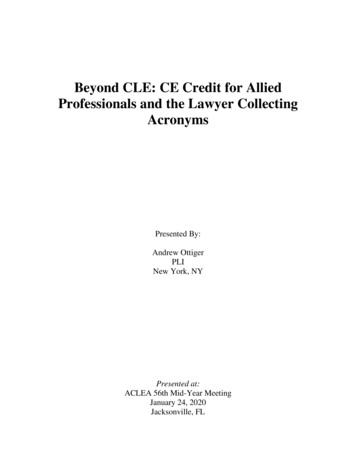
Improving Camera ResponseThis section introduces settings for reliably and quicklyphotographing athletes and other moving subjects.Continuous-Servo AF (AF-C)Press the AF-mode button and rotate the maincommand dial to selectAF-C. Focus is adjustedcontinuously while theshutter-release button ispressed halfway or the AF-modeB button is pressed. buttonMain commanddialDynamic-Area AFPress the AF-mode button and rotate the sub-commanddial until dynamic-area AF is selected in the viewfinderand top control panel. The focus point is selected manually prior to shooting, but if the subject briefly leaves theselected focus point, the camera will focus based on datafrom surrounding focus points (choose from 9, 21, and 51points as described on page 38).Top control panelAF-mode button Sub-command dial2Viewfinder
A Custom Settingsa1 AF-C priority selection Release: The cameragives priority to shutter release over focus, ensuring that you never miss a shot(page 36).a10 Store points by orientation Yes: Selectseparate focus points in landscape andportrait orientations for quick framing(page 41).c2 Standby timer 1 min: Reactivating theexposure meters introduces a slightdelay. Choose settings around 1 minaccording to your subject, but note thatlonger times increase the drain on thebattery.f1 Multi-selector center button Playback mode Zoom on/off: Use the center of the multi selector for close inspection of focus duringplayback.3
Taking Photographsf3 Assign Fn button/f4 Assign preview button Press MY MENU: Add Custom settingsbank to My Menu and then use the Fnor Pv button to quickly select a bank according to the scene. To add items toMy Menu:1Select Add items.In My Menu, highlight Add itemsand press 2.2Add items.Navigate to the item you wish toadd and press J, then position thenew item and press J again to addit to My Menu.Custom Settings BanksCustom settings are stored in four banks (A, B, C, and D).Changes to one bank have no effect on the others.f10 Customize command dials Menus and playback On: Use the main command dial toscroll through pictures in full-frame playback without changing the zoom ratio, ahandy feature when you want to checkfocus for multiple pictures.4
Improving Camera Responsef16 Assign movie record button Press commanddial ISO sensitivity: When taking photos,use your right hand on the movie recordbutton and main command dial to setISO sensitivity without taking your eyefrom the viewfinder.Lens Vibration Reduction (VR)Lens VR switch OFF: Vibration is unlikely toaffect photographs at shutter speeds of1 500 s or faster. For accurate framing athigh shutter speeds, turn vibration reduction off.D Playback MenuImage review Off: Turning image reviewoff improves shutter response duringburst photography. Pictures can beviewed by pressing K.5
Settings by SubjectIn addition to the changes described above under “Improving Camera Response”, you can fine-tune settings toimprove response for specific subjects.SituationMost team sports (e.g., soccer/rugby). Choose thesebasic settings if subjects are often partially obscured by other objects or focus shifts quicklybetween nearby and distant subjects.Subjects are often obscured by other athletes (e.g.,track events). Select a long lock-on to maintainfocus on your subject.Lock-on targetSubjects appear suddenly or are hard to track (e.g.,diving/ski-jumping). Increasing number of dynamic-area focus points ensures that camera willfocus based on information from surroundingfocus points if subject briefly leaves selectedfocus point. Most effective where there is separation between subject and background.6
AF-C priorityselection(page 3636))AF-areamode(page 3838))ReleaseRelease orFocus releaseReleaseFocus trackingwith lock-on(page 4444))3 (Normal)Dynamicarea AF (9points)Dynamicarea AF (21points)See alsoHigh-contrast scenes,backlighting: page 13 Focus tracking with3 (Normal) tolock-on: page 445 (Long) AF-C priority selection: page 363 (Normal)High-contrast scenes:page 137
Taking PhotographsSituationOuter focus points are used (e.g., speed skating). Increase number of dynamic-area focus pointsby one level when framing pictures in “tall”(portrait) orientation. Choose Focus releasefor improved focus when photographingball sports and in other situations in whichprecise timing is not a priority.Subjects move rapidly; camera orientation changesoften (e.g., figure skating). Increase number ofdynamic-area focus points. Increase lock-ontimes for pairs events, where subjects areoften obscured by partner and camera mayfocus background in gap between subjects.For improved framing, choose Yes for CustomSetting a10 (Store points by orientation).Subjects move and/or change rapidly (e.g., hockey orwhen alternately framing the pitcher and a runnerwhen shooting from the bench in baseball). Reducelock-on times for improved response in situations that call for rapid changes of subject.8
Settings by SubjectAF-C priorityselection(page 3636))AF-areamode(page 3838))Focus trackingwith lock-on(page 4444))Focus releaseDynamicarea AF (21points)3 (Normal)Release AF-area mode:page 38Dynamic Focus point selec3 (Normal) orarea AF (9 ortion and camera5 (Long)21 points)orientation: page 41 Focus tracking withlock-on: page 44ReleaseDynamic AF-area mode:area AF (9page 38points) or Off or 1 (Short) Focus tracking withsingle-pointlock-on: page 44AFSee alsoAF-C priority selection: page 369
Taking PhotographsSituationTime between focus and shooting is short and there areobstacles between autofocus target and camera (e.g.,volleyball or swimming). Use single-point AF toprevent camera focusing on obstacles suchas volleyball net or splashes, and set standbytimer to 1 minute or longer for improvedshutter response.If the camera has trouble focusing when high frame advance rates are selected in continuous release mode, trylowering the frame rate.10
Settings by SubjectAF-C priorityselection(page 3636))AF-areamode(page 3838))Focus trackingwith lock-on(page 4444))ReleaseSingle-pointAF3 (Normal)See alsoThe standby timer:page 311
Matching Settings to Your Goal Reducing Camera Blur: Vibration ReductionVibration reduction (VR) is supported with VR lenses. To reduce camera blur, choose a setting suited to the subject.SituationMoving subjects shot at shutter speeds of1 500 s or faster: Because blur is lesslikely, OFF is recommended at fastshutter speeds.VR modeOFFStationary subjects; panning shots of moving subjects: Select ON ON/or NORMAL to reduce the effects of vibration.NORMALPhotos taken from cars, boats, helicopters, or other unstable platforms: SelectACTIVE. Note that the image in theviewfinder may be affected bypanning or excessive vibration.ACTIVEPhotographs taken with a tripod: Select TRIPOD, but note thatNORMAL is suggested if the head is not fixed or you are TRIPODusing a monopod.Note that depending on the lens, some of the above VRmodes may not be available.NoteFrame rates may drop at settings other than OFF.12
Preserving Natural Contrast: Active D-LightingActive D-Lighting helps preserve details in highlightsand shadows. Use ActiveD-Lighting for natural contrast when photographingday matches in stadiumsand other venues that mixsunlight and shade.NoteNoise may appear whenActive D-Lighting is used athigh ISO sensitivities.The following settings are suggested: Active D-Lighting: Auto 1 Metering: Matrix 2 Exposure mode: e, f, or g 21 Choose Extra high 1 or 2 if Auto failsto produce desired results, but notethat noise may increase.2 Desired results may not be achieved with center-weighted or spot metering or in exposure mode h.13
Taking Photographs Quick Setting Selection: Shooting Menu BanksUse the Shooting menu bank option in the shootingmenu when you need to switch rapidly from one groupof settings to another, for example when alternating between sunlight and shade.Shooting Menu BanksShooting menu settings are stored in four banks (A, B, C,and D). To store a particular combination of frequentlyused settings, select a bank using the Shooting menubank option in the shooting menu and set the camerato the desired settings. The new settings will be restoredthe next time the bank is selected. With some exceptions,changes to one bank have no effect on the others.Extended Menu BanksTo include exposure mode, shutterspeed (modes f and h only), and aperture (modes g and h only) settings inthe shooting menu banks, select On forExtended menu banks in the shootingmenu.Shooting Menu Bank SelectionWhen shooting menu bank selection is assigned to the Fnor Pv button using the Press command dials option forCustom Setting f3 (Assign Fn button) or f4 (Assign preview button), menu banks can be selected by pressing thebutton and rotating a command dial.14
Matching Settings to Your Goal Finding Controls in the Dark: Button BacklightsIf you are having troublefinding camera controls inthe dark, rotate the powerswitch toward D to activatethe control panel and button backlights. The backlights remain on for 6 s after the switch is released.The Standby TimerIf On is selected for Custom Setting d10 (LCD illumination), the control panel and button backlights will remainon while the standby timer is active. Extend the timer tokeep the backlights lit longer. Reducing Noise at High ISO SensitivitiesUse the High ISO NR option in the shooting menu to reduce “noise” (randomly-spaced bright pixels or fog) at highISO uce noise, particularly in photographs taken at highISO sensitivities.Noise reduction is only performed at sensitivities of 3200and higher. The amount of noise reduction is less than theamount performed when Low is selected for High ISO NR.15
Taking Photographs Reducing Noise and Blur: Auto ISO Sensitivity ControlWhen On is selected for ISO sensitivitysettings Auto ISO sensitivity controlin the shooting menu, the camera automatically adjusts ISO sensitivity if optimal exposure can not be achieved atthe value selected by the user.Auto ISO sensitivity control can be finetuned using the following options. Maximum sensitivity: Choose the maximum value available for auto ISO sensitivity control (200–Hi 4). The minimum is ISO 100. Minimum shutter speed: In exposure modes e and g, sensitivity will only be adjusted if shutter speed would otherwisebe slower than this value (¼,000–1 s or Auto). If Auto isselected, the camera will adjust the threshold for autoISO sensitivity control according to the focal length ofthe lens.TipsWe recommend that you use matrix metering (L) andchoose exposure mode e or g. Exposure compensationcan be used.16
Matching Settings to Your Goal Reducing Shutter Noise: Quiet and Silent ReleaseTo reduce the amount of noise made by the shutter duringviewfinder photography, rotate the release mode dial to J.In live view, shutter noise can be eliminated by selectingSilent for Live view photography in the shooting menu(note that while FX format pictures taken when Quiet isselected for Live view photography are the same size asthose taken during viewfinder photography—about 16.2megapixels—those taken when Silent is selected are onlyabout 2.5 megapixels in size). The effects of these settingsare summarized below.Release modeViewfinderJ (Quiet)Live viewQuiet2Shutter soundSlightSlightBurst shootingn/aUp to 11 fpsSilent 1None 2Up to 24 fps 31. JPEG only.2. Mirror slap audible at start and end of live view.3. Bursts may be up to 5 s long.17
Taking Photographs Optimizing White BalanceIf auto white balance does not produce the desired results,you can try another setting, choose a color temperature, oruse preset manual white balance as described below.Choosing a SettingPress the U button and rotate the main command dialuntil the desired setting is displayed in the rear controlpanel.U button18Main command dialRear control panel
Matching Settings to Your GoalChoosing a Color TemperatureTo choose a color temperature for the amber (A)–blue (B)axis, select a white balance setting of K (Choose colortemp.) as described opposite and then press the U button and rotate the sub-command dial until the desiredvalue is displayed in the rear control panel.U buttonSub-command dialRear control panelTo enter a value directly in incrementsof 10 K, press the U button and usethe multi selector, pressing 4 or 2 tohighlight digits and 1 or 3 to change.19
Taking PhotographsPreset Manual White BalanceTo choose a white balance preset, select a white balancesetting of L (page 18) and then press the U button androtate the sub-command dial until the desired preset (d-1to d-4) is displayed in the rear control panel.U buttonSub-command dialRear control panelTo measure white balance for the selected preset, place aneutral gray or white object under the lighting that will beused in the final photograph and follow the steps below.1Choose manual focus mode.Rotate the focus-mode selector to M.NoteThe camera may be unable to measure white balanceat high ISO sensitivities. If the camera fails to measurewhite balance, reduce ISO sensitivity and try again.20
Matching Settings to Your Goal2Select direct measurement mode.Press the U button briefly andthen press the button until the Licon in the rear control panel startsto flash. A flashing D will also appear in the top control panel andviewfinder. The displays will flashfor about 6 s.3Measure white balance.Before the indicators stop flashing, frame the reference object so that it fills the viewfinder and press theshutter-release button all the way down. The camerawill measure a value for white balance and store it inthe selected preset. No photograph will be recorded;white balance can be measured accurately even whenthe camera is not in focus.4Check the results.If the camera was able to measurea value for white balance, C willflash in the control panels for about6 s, while the viewfinder will show aflashing a.Choosing a White Balance PresetPress the U button and rotate the sub-command dial toselect from presets d-1 to d-4.21
Taking Photographs Varying White Balance: White Balance BracketingUse bracketing if you have trouble adjusting white balance. Every time you take a photo, the camera will createmultiple copies, each with a different white balance.1Select white balance bracketing.Select WB bracketing for CustomSetting e6 (Auto bracketing set).Note that white balance bracketingis not available with NEF (RAW) image quality options.2Choose the number of copies.Pressing the D button, rotate the main commanddial to choose the number of copies (up to 9).Number of copiesTop control panelD buttonMain command White balance brackdialeting indicatorAt settings other than 0, a W iconand bracketing indicator appear inthe top control panel and M is displayed in the viewfinder.22
Matching Settings to Your Goal3Select a bracketing increment.Pressing the D button, rotate the sub-command dialto choose an increment of 1 (5 mired), 2 (10 mired), or3 (15 mired).Bracketing incrementD buttonSub-commanddialTop control panelPrograms with increments of 1 are shown below.Control panel No. of copies Increment033223511B1A1B1A1 A, 1 B1 A, 1 B71 A, 1 B91 A, 1 BBracketing order01 B/0/2 B1 A/2 A/00/1 B0/1 A0/1 A/1 B0/2 A/1 A/1 B/2 B0/3 A/2 A/1 A/1 B/2 B/3 B0/4 A/3 A/2 A/1 A/1 B/2 B/3 B/4 B23
4Frame a photograph, focus, and shoot.Each shot is processed to create theselected number of copies; witheach copy, white balance is incremented by the selected amount,starting from the value selected forwhite balance fine-tuning.If space is insufficient for all thecopies, n and the icon for theaffected card will flash in the topcontrol panel, j will flash in theviewfinder, and the shutter releasewill be disabled. Shooting can begin when a new memory card isinserted.24
Matching Settings to Your GoalCancelling BracketingTo cancel bracketing, press the D button and rotate themain command dial until the number of copies is 0 (r)and W is no longer displayed. The program last in effect will be restored the next time bracketing is activated.Bracketing can also be cancelled by performing a two-button reset, although in this case the bracketing program willnot be restored the next time bracketing is activated.White Balance BracketingWhite balance bracketing affects color temperature (amber–blue) only. No adjustments are made on the green–magenta axis.In self-timer mode, the number of copies specified in thewhite-balance program will be created each time the shutter is released, regardless of the option selected for CustomSetting c3 (Self-timer) Number of shots.If the camera is turned off while the memory card accesslamp is lit, the camera will power off only after all copieshave been recorded.25
Taking Photographs Copying White Balance from a PhotographFollow the steps below to copy a value for white balancefrom an existing photograph to a selected preset.261Select preset manual white balance.Press G and select White balancein the shooting menu. HighlightPreset manual and press 2.2Select a destination.Highlight the destination preset(d-1 to d-4) and press the center ofthe multi selector.3Choose Select image.Highlight Select image and press2.
Matching Settings to Your Goal4Highlight a source image.Highlight the source image. To viewthe highlighted image full frame,press and hold the X button.To view images in other locations,press W and select the desiredcard and folder.5Copy white balance.Press J to copy the white balance value for the highlighted photograph to the selected preset.Using the Copied ValueTo set white balance to the copied value, press the U button and rotate the sub-command dial to select the presetchosen in Step 2.27
Taking Photographs Creating a Multiple ExposureRecord from 2 to 10 exposures in a single photo.281Select Multiple exposure.Select Multiple exposure in theshooting menu.2Select a mode.Highlight Multiple exposure modeand press 2, then highlight one ofthe following and press J to selectthe highlighted option and returnto the multiple exposure menu. 0 On (series): Shoot a series of multiple exposures.Multiple exposure shooting will continue until youselect Off. On (single photo): Take a single multiple exposure. Normal shooting resumes when the multiple exposurehas been recorded.3Choose the number of shots.Highlight Number of shots andpress 2. Press 1 or 3 to choosethe number of exposures and pressJ to return to the multiple exposure menu.
Matching Settings to Your Goal4Adjust gain.Select Auto gain and choose fromthe following options. On: Gain is adjusted according tonumber of exposures actually recorded (gain for each exposure isset to ½ for 2 exposures, 1 3 for 3exposures, etc.). Off: Gain is not adjusted when a multiple exposure isrecorded. Recommended if background is dark.5Frame a photograph, focus, and shoot.The multiple exposure icon (n)will flash while multiple exposureshooting is in progress. If On (single photo) is selected for multipleexposure mode, normal shooting will resume when amultiple exposure is completed; otherwise, multipleexposure mode will end only when Off is selected.The n icon clears from the display when multiple exposure shooting ends.29
Taking PhotographsInterrupting Multiple ExposuresTo interrupt a multiple exposure before the specified number of exposures have been taken, select Off for multipleexposure mode. If shooting ends before the specified number of exposures have been taken, a multiple exposure willbe created from the exposures that have been recordedto that point. If Auto gain is on, gain will be adjusted toreflect the number of exposures actually recorded. Notethat shooting will end automatically if: A two-button reset is performed The camera is turned off The battery is exhausted Any of the individual exposures is deleted before shooting is complete Choosing a Memory Card for PlaybackWhen two cards are inserted, you canchoose the card from which pictures areplayed back by pressing J and 1 during playback, or by displaying 72 images in thumbnail view and pressing W.A card selection menu will be displayed;highlight the desired slot and press 2,then highlight a folder and press J.30
Matching Settings to Your Goal Copying Pictures Between Memory CardsWhen two memory cards are inserted, you can use theoptions in the playback Copy image(s) menu to copy pictures between the two cards (images will not be copiedif there is not enough space on the destination card or ifEnable is selected for Network Network connection inthe setup menu). Select source: Choose the source card. Select image(s): Select the pictures to be copied. Select destination folder: Choose the destination folder on theremaining memory card. Copy image(s): Copy the selected pictures to the specifieddestination. Copying Settings to Other D4 CamerasThe Save/load settings option in thesetup menu can be used to share settings among D4 cameras. Select Savesettings to save settings to a memorycard (an error will be displayed if thecard is full), Load settings to load saved settings from amemory card. Note that Save/load settings is only available when a memory card is inserted in the camera, andthat Load settings is only available if the card containssaved settings.31
Taking Photographs Keeping the Camera Level: Virtual HorizonRoll and pitch data from the camera tilt sensor can be displayed for assistance in levelling the camera on a tripodand in other similar situations.The MonitorThe Virtual horizon option in the setup menu is used todisplay a virtual horizon in the monitor. The roll referenceline turns green if the camera is tilted neither left nor right,while the pitch reference line turns green and a dot appears in the center of the display if the camera is tilted neither forward nor back. Each division is equivalent to 5 .Camera levelCamera tilted leftor rightCamera tiltedforward or backIn live view, you can display a virtualhorizon over the view in the monitor bypressing the R button.TiltThe displays may not be accurate when the camera is tiltedat a sharp angle forward or back. Tilt will not be displayed ifthe camera is unable to measure it.32
Matching Settings to Your GoalThe ViewfinderWhen Viewfinder virtual horizon is selected for CustomSetting f3 (Assign Fn button) or f4 (Assign preview button) Press, pressing the button displays pitch and rollindicators in the viewfinder.RollCamera tilted rightCamera horizontalCamera tilted leftPitchCamera tilted forwardCamera verticalCamera tilted backThe roles of the indicators are reversed when the camera isrotated to take pictures in “tall” (portrait) orientation.33
Taking Photographs Composing Photographs: The Framing GridFor help composing photographs, select On for CustomSetting d6 (Viewfinder griddisplay) to display a framinggrid in the viewfinder.Framing grid Resizing Photographs for Upload: ResizeUse the Resize option in the retouch menu to create smallcopies of selected photographs.Resized CopiesPlayback zoom may not be available when resized copiesare displayed. Copies created from NEF (RAW), NEF (RAW) JPEG, or TIFF (RGB) photos have an image quality of JPEGfine; copies created from JPEG photos have the same image quality as the original. Photos taken at an image areaof 5 : 4 (30 24) can not be resized.34
Autofocus Tips Focusing with the AF-ON ButtonIf AF-ON only is selected for Custom Setting a4 (AF activation), the B buttoncan be used to focus and the shutter-release button to release the shutter. Tolock focus or suspend autofocus whenan obstacle comes between you andthe subject, release the B button.B buttonIn the AF-ON position, the focus operation selection switch on some telephotolenses functions in the same way as theB button. Choosing the Number of Focus PointsCustom Setting a7 (Number of focus points) can be usedto choose the focus points available for manual focus pointselection. Choose 11 points for faster focus point selectionwhen composing photographs.35
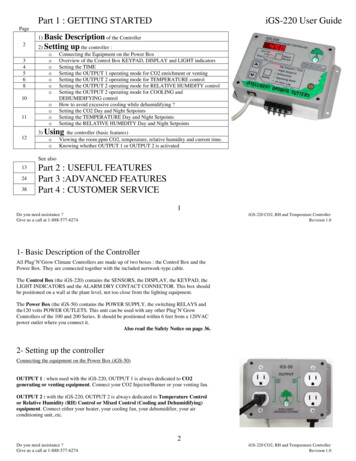
Taking Photographs AF-C Priority SelectionCustom Setting a1 (AF-C priority selection) controlswhether the camera gives priority to focus or shutter release.G Release: Pictures can be takenwhether or not the camera is in focus. Frame rates do not slow duringburst photography.B Focus release: In burst mode,priority is given to focus for the firstframe and to release for later frames.Frame rates do not slow.E Release focus: In burst mode,priority is given to release for thefirst frame and to focus for laterframes. Frame rates slow as neededto allow camera to focus.F Focus: Pictures can only be takenwhen the camera is in focus.36
Autofocus Tips: Subject not in focus: Subject in focus: Shutter released37
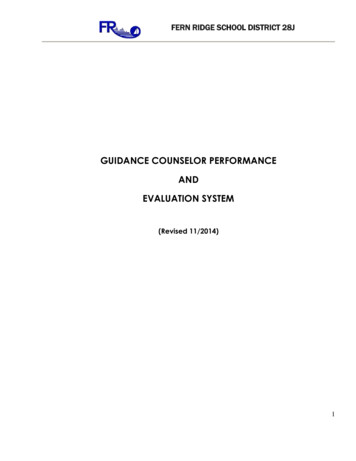
Taking Photographs AF-Area ModeAF-area modes are described below.AF-area modeTop controlSample focuspanel Viewfinder point displaySingle-point AF9-point dynamic-area AF *21-point dynamic-area AF *51-point dynamic-area AF *3D-trackingAuto-area AF* Only active focus point is displayed in viewfinder. Remainingpoints provide information to assist focus operation.38
Autofocus TipsDescriptionThe focus point is selected manually. The camera focuses on thesubject in the selected focus point only. Choose for subjects youcan keep framed in the selected focus point.The focus point is selected manually. Thecamera focuses on the subject in the selectedfocus point when autofocus is initiated, but ifthe subject later leaves the selected point forbrief periods, the camera will focus based oninformation from surrounding points.Choose for low-contrast subjects if the camera has difficulty focusing or for active subjects that are hard to keep framed in a singlepoint, and increase the number of points if the
portrait orientations for quick framing (page 41). c2 Standby timer 1 min: Reactivating the exposure meters introduces a slight delay. Choose settings around 1 min according to your subject, but note that longer times increase the drain on the battery. f1 Multi-selector center button Playbac