Transcription
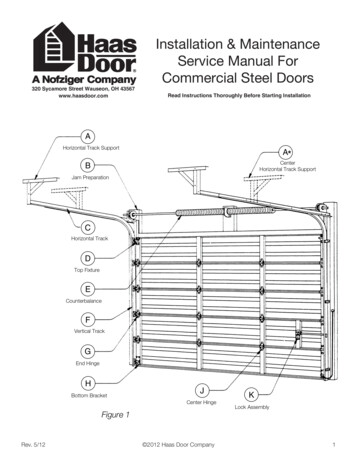
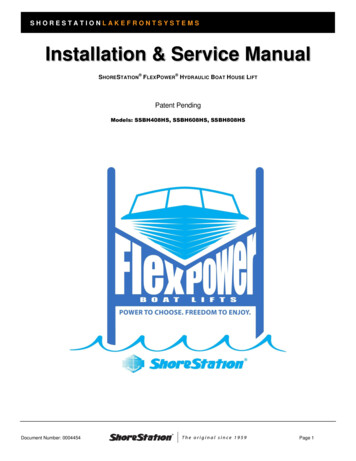
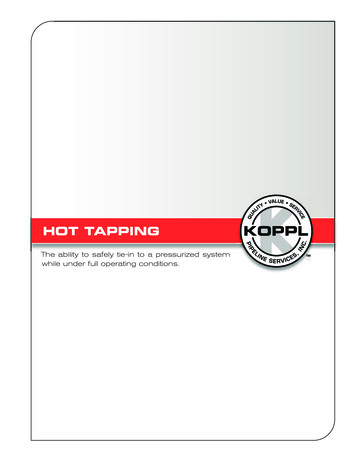
6-583.25H80004A Rev. BMarch, 2009INSTALLATION AND SERVICE MANUALgas-fired unit heatersmodel HD and HDBAll models approved for use in California by the CEC, in NewYork city by the MEA division, and in Massachusetts. Unit heateris certified for residential and commercial applications.FOR YOUR SAFETYWARNING1. Improper installation, adjustment,alteration, service or maintenance cancause property damage, injury or death,and could cause exposure to substanceswhich have been determined by variousstate agencies to cause cancer, birthdefects or other reproductive harm. Readthe installation, operating and maintenanceinstructions thoroughly before installing orservicing this equipment.2. Do not locate ANY gas-fired units in areaswhere chlorinated, halogenated, or acidvapors are present in the atmosphere.These substances can cause prematureheat exchanger failure due to corrosion,which can cause property damage, seriousinjury, or death.FOR YOUR SAFETYWHAT TO DO IF YOU SMELL GAS:1. Open windows.2. Do not try to light any appliance.3. Do not touch any electrical switch; donot use any phone in your building.4. Immediately call your gas supplierfrom a neighbor’s phone. Follow the gassupplier’s instructions. If you can not reachyour gas supplier, call your fire department.The use and storage of gasoline or otherflammable vapors and liquids in opencontainers in the vicinity of this applianceis hazardous.IMPORTANTThe use of this manual is specificallyintended for a qualified installation andservice agency. All installation and serviceof these units must be performed by aqualified installation and service agency.Inspection on Arrival1.2.3.Inspect unit upon arrival. In case of damage, report itimmediately to transportation company and your localModine sales representative.Check rating plate on unit to verify that power supply meetsavailable electric power at the point of installation.Inspect unit upon arrival for conformance with description ofproduct ordered (including specifications where applicable).Table of ContentsInspection on Arrival . . . . . . . . . . . . . . . . . . . . . . . . . . . . . . . . . 1Special Precautions . . . . . . . . . . . . . . . . . . . . . . . . . . . . . . . . . 2SI (Metric) Conversion Factors. . . . . . . . . . . . . . . . . . . . . . . . . 3Before you Begin . . . . . . . . . . . . . . . . . . . . . . . . . . . . . . . . . . . 3Unit Location. . . . . . . . . . . . . . . . . . . . . . . . . . . . . . . . . . . . . . . 4Combustible Material and Service Clearances . . . . . . . . . 4Unit Mounting . . . . . . . . . . . . . . . . . . . . . . . . . . . . . . . . . . 5Unit Installation . . . . . . . . . . . . . . . . . . . . . . . . . . . . . . . . . 5Venting . . . . . . . . . . . . . . . . . . . . . . . . . . . . . . . . . . . . . . . 6Gas Connections. . . . . . . . . . . . . . . . . . . . . . . . . . . . . . . 14Wiring/Blower Speed Adjustment . . . . . . . . . . . . . . . . . . 16Operation. . . . . . . . . . . . . . . . . . . . . . . . . . . . . . . . . . . . . 17Unit Components . . . . . . . . . . . . . . . . . . . . . . . . . . . . . . . . . . 18Dimensions. . . . . . . . . . . . . . . . . . . . . . . . . . . . . . . . . . . . . . . 19Service/Trouble Shooting . . . . . . . . . . . . . . . . . . . . . . . . . . . . 21Unit Wiring Diagram . . . . . . . . . . . . . . . . . . . . . . . . . . . . . . . . 22Serial/Model Number/Replacement Parts . . . . . . . . . . . . . . . 23Residential Warranty . . . . . . . . . . . . . . . . . . . . . . . . . . . . . . . 23Commercial Warranty . . . . . . . . . . . . . . . . . . . . . . . . . . . . . . . 24THIS MANUAL IS THE PROPERTY OF THE OWNER.PLEASE BE SURE TO LEAVE IT WITH THE OWNER WHEN YOU LEAVE THE JOB.
SPECIAL PRECAUTIONSSPECIAL PRECAUTIONSTHE INSTALLATION AND MAINTENANCE INSTRUCTIONS IN THISMANUAL MUST BE FOLLOWED TO PROVIDE SAFE, EFFICIENT ANDTROUBLE-FREE OPERATION. IN ADDITION, PARTICULAR CAREMUST BE EXERCISED REGARDING THE SPECIAL PRECAUTIONSLISTED BELOW. FAILURE TO PROPERLY ADDRESS THESECRITICAL AREAS COULD RESULT IN PROPERTY DAMAGE ORLOSS, PERSONAL INJURY, OR DEATH. THESE INSTRUCTIONSSUBJECT TO ANY MORE RESTRICTIVE LOCAL OR NATIONALCODES.HAZARD INTENSITY LEVELS1.2.3.4.DANGER: Indicates an imminently hazardous situationwhich, if not avoided, WILL result in death or serious injury.WARNING: Indicates a potentially hazardous situationwhich, if not avoided, COULD result in death or serious injury.CAUTION: Indicates a potentially hazardous situation which,if not avoided, MAY result in minor or moderate injury.IMPORTANT: Indicates a situation which, if not avoided,MAY result in a potential safety concern.DANGERAppliances must not be installed where they may be exposedto a potentially explosive or flammable atmosphere.WARNING1. Gas fired heating equipment must be vented - do notoperate unvented.2. A built-in power exhauster is provided - additional externalpower exhausters are not required or permitted.3. If you are replacing an existing heater, it may be necessaryto resize the venting systems. Improperly sized ventingsystems can result in vent gas leakage or the formation ofcondensate. Refer to the National Fuel Gas Code ANSIZ223.1 or CSA B149.1 latest edition. Failure to follow theseinstructions can result in injury or death.4. Under no circumstances should two sections of double wallvent pipe be joined together within one horizontal vent systemdue to the inability to verify complete seal of inner pipes.5. All field gas piping must be pressure/leak tested prior tooperation. Never use an open flame. Use a soap solutionor equivalent for testing.6. Gas pressure to appliance controls must never exceed 14"W.C. (1/2 psi).7. To reduce the opportunity for condensation, the minimumsea level input to the appliance, as indicated on the serialplate, must not be less than 5% below the rated input,or 5% below the minimum rated input of dual rated units.8. Disconnect power supply before making wiring connectionsto prevent electrical shock and equipment damage.9. All appliances must be wired strictly in accordance withwiring diagram furnished with the appliance. Any wiringdifferent from the wiring diagram could result in a hazard topersons and property.10. Any original factory wiring that requires replacement mustbe replaced with wiring material having a temperaturerating of at least 105 C.11. Ensure that the supply voltage to the appliance, as indicatedon the serial plate, is not 5% greater than the rated voltage.12. When servicing or repairing this equipment, use onlyfactory-approved service replacement parts. A completereplacements parts list may be obtained by contactingthe factory. Refer to the rating plate on the appliance forcomplete appliance model number, serial number, andcompany address. Any substitution of parts or controls notapproved by the factory will be at the owners risk.6-583.22CAUTION1. All literature shipped with this unit should be kept forfuture use for servicing or service diagnostics. Do notdiscard any literature shipped with this unit.2. Consult piping, electrical, and venting instructions in thismanual before final installation.3. Do not attach ductwork, air filters, or polytubes to anypropeller unit heater.4. Clearances to combustible materials are critical. Be sure tofollow all listed requirements.5. Do not locate units in tightly sealed rooms or smallcompartments (commonly referred to as confined spaces)without provisions for adequate combustion air and venting.Combustion air must have access to the confined spacethrough a minimum of two permanent openings in theenclosure, at least one near the bottom. They shouldprovide a free area of one square inch per 1,000 BTU/Hrinput rating of the unit with a minimum of 100 square inchesfor each opening, whichever is greater.6. Low profile heaters are designed for use in heating. applications with ambient temperatures between -40 F and 90 F.7. Do not install unit outdoors.8. In garages or other sections of aircraft hangars suchas offices and shops that communicate with areas used forservicing or storage, keep the bottom of the unit at least7' above the floor unless the unit is properly guardedto provide user protection from moving parts. In parkinggarages, the unit must be installed in accordance withthe standard for parking structures ANSI/NFPA 88A, andin repair garages the standard for repair garages NFPA#88B. In Canada, installation of heaters in airplanehangars must be in accordance with the requirementsof the enforcing authority, and in public garages inaccordance with the current CSA-B149 codes.9. In aircraft hangars, keep the bottom of the unit at least 10'from the highest surface of the wings or engine enclosureof the highest aircraft housed in the hangars and inaccordance with the requirements of the enforcing authorityand/or NFPA 409-latest edition.10. Installation of units in high humidity or salt wateratmospheres will cause accelerated corrosion resulting in areduction of the normal life of the units.11. Do not install units below 7' measured from the bottom ofthe unit to the floor in commercial applications (unlessunit is properly guarded to provide user protection frommoving parts)and 5' measured from the bottom of the unitto the floor in residential applications.12. Be sure no obstructions block air intake and discharge ofunit heaters.13. The minimum distance from combustible material is basedon the combustible material surface not exceeding 160 F.Clearance from the top of the unit may be required to begreater then the minimum specified if heat damage, otherthan fire, may occur to materials above the unit heater atthe temperature described.14. Allow 18" of clearance at rear (or 6" beyond end of motor atrear of unit, whichever is greater) and access side toprovide ample air for combustion and proper operation of fan.15. Installation must conform with local building codes or in theabsence of local codes, with Part 7, Venting of Equipment,of the National Fuel Gas Code, ANSI Z223.1 (NFPA 54) latest edition. In Canada installation must be in accordancewith CSA-B149.1.16. Purging of air from gas supply line should be performed asdescribed in ANSI Z223.1 - latest edition “National FuelGas Code”, or in Canada in CSA-B149 codes.
SPECIAL PRECAUTIONS / SI (METRIC) CONVERSION FACTORSBEFORE YOU BEGINCAUTION17. When leak testing the gas supply piping system, theappliance and its combination gas control must be isolatedduring any pressure testing in excess of 14" W.C. (1/2 psi).18. The unit should be isolated from the gas supply pipingsystem by closing its field installed manual shut-off valve.This manual shut-off valve should be located within 6' ofthe heater.19. Turn off all gas before installing appliance.20. Ensure that the supply voltage to the appliance, asindicated on the serial plate, is not 5% less than the ratedvoltage.21. Check the gas inlet pressure at the unit upstream of thecombination gas control. The inlet pressure should be 6-7"W.C. on natural gas or 12-14" W.C. on propane. If inletpressure is too high, install an additional pressureregulator upstream of the combination gas control.22. Servicing or repairing of this equipment must be performedby a qualified service agency.23. Do not attempt to reuse any mechanical or electronic ignition controllers which has been wet. Replace defective controller.CAUTION1. All literature shipped with this unit should be kept for futureuse for servicing or service diagnostics. Leave manual withthe owner. Do not discard any literature shipped with this unit.2. Consult piping, electrical, and venting instructions in thismanual before final installation.3. Do not attach ductwork, air filters, or polytubes to anypropeller unit heater.In the U.S., the installation of these units must comply with the“National Fuel Gas Code,” ANSI Z223.1, latest edition (alsoknown as NFPA 54) and other applicable local building codes.In Canada, the installation of these units must comply with localplumbing or waste water codes and other applicable codes andwith the current code CSA-B149.1.1.2.IMPORTANT1. To prevent premature heat exchanger failure, do not locateANY gas-fired appliances in areas where corrosive vapors(i.e. chlorinated, halogenated or acid) are present in theatmosphere.2. To prevent premature heat exchanger failure, the input tothe appliance as indicated on the serial plate, must notexceed the rated input by more then 5%.3. To check most of the Possible Remedies in the troubleshooting guide listed in Table 21.1 refer to the applicablesections of the manual.3.4.5.All installation and service of these units must beperformed by a qualified installation and service agencyonly as defined in ANSI Z223.1, latest edition or inCanada by a licensed gas fitter.This unit is certified with the controls furnished. Forreplacements parts, please order according to thereplacement parts list on serial plate. Always know yourmodel and serial numbers. The right is reserved tosubstitute other authorized controls as replacements.Unit is balanced for correct performance. Do not alter fanor operate motors at reduced speed.Information on controls is supplied separately.The same burner is used for natural and propane gas.SI (METRIC) CONVERSION FACTORSTo Convert Multiply By To Obtain"W.C.0.249kPa F( F-32) x 5/9 m3/minCFH (ft3/hr)m3/sCFH (ft3/hr) 0.000007870.0283m3/minCFM (ft3/min)m3/sCFM (ft3/min) 0.000472To Convert Multiply By To psig6.89kPapsig27.7"W.C.6-583.23
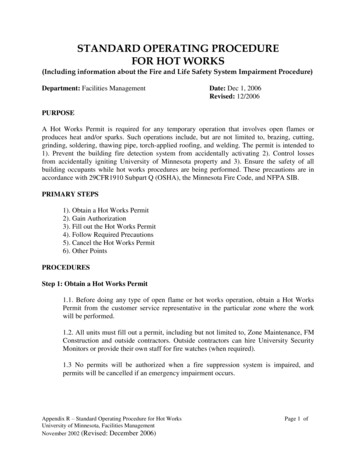
UNIT LOCATIONUNIT LOCATIONTable 4.1 ClearancesDANGERUnit SideAppliances must not be installed where they may be exposedto a potentially explosive or flammable atmosphere.Top and BottomAccess SideNon-Access SideRearVent ConnectorCAUTION1. Clearances to combustible materials are critical. Be sure tofollow all listed requirements.2. Do not locate units in tightly sealed rooms or smallcompartments (commonly referred to as confined spaces)without provisions for adequate combustion air andventing. Combustion air must have access to the confinedspace through a minimum of two permanent openings inthe enclosure, at least one near the bottom. They shouldprovide a free area of one square inch per 1,000 BTU/Hrinput rating of the unit with a minimum of 100 squareinches for each opening, whichever is greater.3. Low profile heaters are designed for use in heating applications with ambient temperatures between -40 F and 90 F.4. Do not install unit outdoors.5. In garages or other sections of aircraft hangars suchas offices and shops that communicate with areas used forservicing or storage, keep the bottom of the unit at least7' above the floor unless the unit is properly guarded.In parking garages, the unit must be installed in accordancewith the standard for parking structures ANSI/NFPA 88A,and in repair garages the standard for repair garages NFPA#88B. In Canada, installation of heaters in airplanehangars must be in accordance with the requirementsof the enforcing authority, and in public garages inaccordance with the current CSA-B149 codes.6. In aircraft hangars, keep the bottom of the unit at least 10'from the highest surface of the wings or engine enclosureof the highest aircraft housed in the hangars and in accordance with the requirements of the enforcing authorityand/or NFPA 409-latest edition.7. Installation of units in high humidity or salt wateratmospheres will cause accelerated corrosion resulting in areduction of the normal life of the units.IMPORTANTTo prevent premature heat exchanger failure, do not locateANY gas-fired appliances in areas where corrosive vapors(i.e. chlorinated, halogenated or acid) are present in theatmosphere.Location Recommendations1. When locating the heater, consider general space andheating requirements, availability of gas and electricalsupply, and proximity to vent locations.2. When locating units, it is important to consider that the exhaustvent piping must be connected to the outside atmosphere.3. Be sure the structural support at the unit location site isadequate to support the unit's weight. For proper operationthe unit must be installed in a level horizontal position.4. Do not install units in locations where the flue productscan be drawn into the adjacent building openings such aswindows, fresh air intakes, etc.5. Be sure that the minimum clearances to combustiblematerials and recommended service clearances aremaintained. Units are designed for installation with theminimum clearances as shown in Table 4.1.4Clearance ToCombustible Materials1"18"1"18"4"RecommendedService Clearance1"18"1"18"4"6. Do not install units in locations where gas ignition system isexposed to water spray, rain, or dripping water.7. Mounting Height (measured from bottom of unit) at whichunit heaters are installed is critical. Refer to mounting heightand heat throw data on pages 19-20 of this manual. Themaximum mounting height for any unit is that height abovewhich the unit will not deliver heated air to the floor.Combustion Air RequirementsThe National Fuel Gas Code defines an “unconfined space” asa space whose volume is greater than 50 cubic feet per 1,000Btu/Hr input of the installed appliance(s). A confined spaceis 50 cubic feet or less per 1,000 Btu/Hr input of the installedappliance(s).It is not recommended to install these unit heaters intoresidential confined spaces. This recommendation is due to theconcern that at some point in time, the combustion air openingsprovided by the installer may become blocked or eliminated bythe owner, either intentionally or unintentionally. Despite thiscommendation, if these units are installed into a residentialconfined space, see National Fuel Gas Code ANSI Z223.1or CSA B149.1 Installation Code, latest edition, for detailedcombustion air provisions. These requirements must be adheredtoo.Units installed into confined spaces in industrial/commercialinstallations must be provided with two permanent openings- one near the top and one near the bottom of the confinedspace. Each opening should have a free area of not less thanone square inch per 1,000 Btu/Hr of the total input rating of allunits in the confined space, freely communicating with interiorareas having, in turn, adequate infiltration from the outside.For further details on supplying combustion or to a confined(tightly sealed) space or unconfined space, see the National FuelGas Code ANSI Z223.1 or CSA B149.1 Installation Code, latestedition.Turning The Unit 180 (Model Sizes 30-75 Only)All units are produced at the factory with left-side controls (whenlooking at the unit). If the installation requires the controls to beon the right side, all heaters - with the exception of the HD/HDB100 and 125 - can be turned-over by following the instructionsbelow. By turning the unit 180 from the way it was received fromthe factory, the sides become opposite but the front andback remain in the same relative position. The bottom panelnow becomes the top panel and vice-versa. Remove the access panel, turn it 180 , and re-attach it tothe unit so that all the information labels can be read. Remove the spring loaded deflector blades, turn them over,replace, and adjust so they are open and in a position todirect the heated air down to the floor.6-583.2
UNIT MOUNTINGCAUTION1. Do not install units below 7' measured from the bottom ofthe unit to the floor in commercial applications (unlessunit is properly guarded to provide user protection frommoving parts) and 5' measured from the bottom of the unitto the floor in residential applications.2. Be sure no obstructions block air intake and dischargeof unit heaters.3. The minimum distance from combustible material isbased on the combustible material surface not exceeding160 F. Clearance from the top of the unit may be requiredto be greater than the minimum specified if heat damage,other than fire, may occur to materials above the unitheater at the temperature
3. If you are replacing an existing heater, it may be necessary to resize the venting systems. Improperly sized venting systems can result in vent gas leakage or the formation of condensate. Refer to the National Fuel Gas Code ANSI Z223.1 or CSA B149.1 latest edition. Failure to fo