Transcription
OPPLEPLUGGINGMACHINEJl. Baung No.3ALenteng Agung JagakarsaSouth Jakarta 12610 - INDONESIAbsm@brilian-sm.com 62 21 7815850www.brilian-sm.com
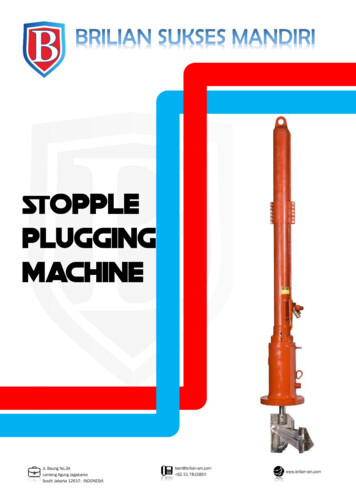
Dimensions and Data SheetBRILIAN SUKSES MANDIRIStopple Plugging MachinePlugging MachinePlugging Heads & Sealing ElementPlugging HeadsSizeInchesSealing 0730642936900302513727735DescriptionLine stopping is a means of temporally inserting a plugging device to shut off the flow of anin-service piping system. Line stopping can be used to isolate sections of pipe for repair,maintenance, or reconfiguration such as adding valve. If used with a bypass, work can beperformed without service interruptions.
Dimensions and Data SheetBRILIAN SUKSES MANDIRIStopple Plugging MachineApproximate Dimensions for Determining Machine ClearancesSizeInchesDNA B Inches MmInchesmmCLInches mmInches 2335918PT. Brilian Sukses mandiri manufactures a complete High Pressure PipePlugging System for the temporary blockage of and pipe a valve is not ourstandards system is designed for 1000 psig differential across plugging head.PT. Brilian Suskses Mandiri expert is the enhancement and refinementwith placed around Indonesia to cover all sizes of pipes.We will be there on time and get the job done.
Line Stop ProcedureBRILIAN SUKSES MANDIRIPlugging Without Shutdown1. Weld Fittings3. Line Plug2. Make Taps4. Recover Valves
Line Stop ProcedureLine Stop Stopple PlugBRILIAN SUKSES MANDIRIStep 1AFTER A HOT TAP MAKES IT’S LIVE HOLE IN THE PIPE. A LINESTOPPING MACHINE IS BOLTED TO THE TAPPING VALVE.Step 2THE TAPPING VALVE IS OPENED. PIPE CONTENTS ENTER THE LINESTOP MACHINE.Step 3THE LINE STOP MACHINE ACTUATOR INSERTS A HIGH - PRESSURESTEEL PLUGGING HEAD DOWN THROUGH THE OPEN VALVE ANDINTO THE PIPE THROUGH THE HOLE.Step 4.WHERE A ROLLER CONTACTS THE PIPE INNER WALL, AND THEPLUGGING HEAD WALKS AND PIVOTS INTO THE SEALING POSITION.Step 5THE PLUGGING HEAD’S FIBER - REINFORCED ELASTOMETRIC SEALING ELEMENT IS NOW TEMPORARILY PLUGGING THE PIPE. DOWNSTREAM OF THE PLUG, THE PIPE CAN BE DEPRESSURIZED, DRAINEDAND MODIFIED OR REPAIRED.ONCE WORK ONE THE PIPE IS COMPLETED. THE DOWNSTREAM ISREPRESSURIZED AND THE PLUGGING HEAD REMOVED.
Line Stop ProcedureBRILIAN SUKSES MANDIRIInstalling a Completion Plug01.After a Line Stop job is done, a Completion Plug setting machine isattached to the tapping valve, and a Completion Plug is loweredthrough the valve into the throat of our special completion flange.02.Next, high speed steel retainer segments are advanced from insidethe flange, into a deep groove in the steel Completion Plug.03.With the plug’s massive O-Ring sealing the flange bore, the tappingvalve and machinery can be depressurized and removed.
Line Stop ProcedureBRILIAN SUKSES MANDIRIStopple Plugging Machine1. Operating ConsiderationsTapping The LineA.Tap with the line flowing to disperse chips cut from the line. Follow instructionsprovided in tapping machine manual.B.Use only STOPPLE fittings for installation. SADWICH Valves are recommended toassure proper alignment and sufficient bore clearance for STOPPLE cutters, STOPPLE plugging heads, and LOR Plugs.C.Use TDW STOPPLE cutters and corresponding pilots with the tapping machine.Standard cutters are not compatible with STOPPLE operations.D.After mounting the SANDWICH Valve, open and close it to make sure the valvefunctions properly. Consult SANDWICH Valve manual to ensure proper operation.E.Provide connections on the pipeline :1.For pressure relief and/or drain of the isolated section before making repairs.2.For purging and equalizing pressure in the new section of line before retracting the plugging heads.F.Provide a pressure gauge for checking the pressure in the plugging head housing.The gauge may be installed along with the bleeder valve by using a tee in thebleeder valve connection.G.Use a crane large enough for the weight of the machinery to be lifted.WARNING:All components of the plugging machine are extremely heavy. Make sure the craneused has an adequate lifting capability to avoid possible injury to personnel or equipment.
Line Stop ProcedureBRILIAN SUKSES MANDIRIStopple Plugging Machine2. PREPARATIONS FOR USE2.1 Preparing the Plugging MachineA.Inspect the O-ring on top of the housing to make sure it is clean and undamaged.Mount the STOPPLE cylinder on the plugging head housing with cylinder controlvalve and housing equalization connection facing the same direction.B.Place the STOPPLE cylinder and plugging head housing in a level (horizontal) position with equalization connection facing up. Support the upper end of the cylinderadequately. Block the housing flange to prevent rolling.C.Connect hydraulic hoses from the power unit to the control valve.D.Start the power unit. Conduct prestart checks, starting and operating procedures,as contained in the appropriate operator’s manual.E.Extend the control bar by moving the control valve handle to the down position.Do not overextend the control bar. Stop extension when end of bar is flush withplugging head housing or just enough to install the plugging head.F.To install the plugging head to the control bar, support the plugging head level onthe same center as the control bar. Nosepiece of the plugging head must face thesame direction as the control valve and equalization connection.G.Attach plugging head to control bar with the two special bolts and nuts provided.
Line Stop ProcedureBRILIAN SUKSES MANDIRIStopple Plugging Machine2. PREPARATIONS FOR USE2.2 Preparing the Plugging HeadA.Extend plugging head to permit nose removal. Top of control bar head should remain inside of housing to help support plugging head weight.B.Remove the nose bolts and nosepiece from the yoke.C.Inspect plugging head components and perform necessarymaintenance as follows.D.Install the sealing element.1. Position the sealing element on the yoke evenly. It should fit snugly over theface of the yoke, and bolt holes should align. The element may hove some curvature to it and may not lay flat. This will cause some misalignment of holesuntil the cup is pressed flat by the nosepiece.2. Position the nosepiece on the element. Start all bolts by hand, and threadeach down snugly again the nosepiece.3. Refer to Table 4, “Torque Table” and find the recommended torque rangesfor the size of plugging head being used. Minimum torque must always be applied. The need to apply additional torque depends on several varying factors,such as the condition of threads, compressibility of the sealing element andfriction on the bolt wearing surfaces.4. Tighten the nose bolts gradually. Tighten one bolt until it is snug, then moveto a blot on the opposite side of the nosepiece to tightened. Keep movingback and forth across the face of the nosepiece, from one bolt to another until the element has expanded evenly and is tight.5. Visually check around the face of the yoke making sure the sealing element isuniformly centered and no part of the sealing ring is visible. If the sealing element is not on correctly, disassemble the plugging head and start again.6. Coat the sealing element lip thoroughly with heavy grease before using.7. Retract plugging head carefully making sure sealing element goes into housing uniformly without binding. Use screwdrivers to guide each side of thesealing element into the housing, to prevent the lip from pulling inside-out,while retracting plugging head.
Line Stop ProcedureBRILIAN SUKSES MANDIRIStopple Plugging Machine2. PREPARATIONS FOR USE2.3 Install MachineA.Before listing machine, consider the total length and weight of the STOPPLE cylinder and housing and make sure weight handling equipment has the capacity to liftit.B.Center Machine on SANDWICH Valve and install with equalization connection facing the section to be isolated. The equalization connections on the machine and onthe pipe need to be in alignment with each other.C.Install bleeder valve on STOPPLE plugging head housing. Make up piping connection for refilling and pressure equalization.D.Picture below shows the arrangement of the equipment installed on a doubleSTOPPLE operation with a temporary bypass.
Line Stop ProcedureBRILIAN SUKSES MANDIRIStopple Plugging Machine3. SETTING THE PLUGGING HEAD3.1 On-Stream ApplicationThe following precautions must be observed for an on-stream application:A.Before lowering plugging head into line, temporary bypass must be open.B.Lower and set downstream plugging head into line.C.Lower and set upstream plugging head into line.D.When job is complete, equalize pressure form upstream (high pressure) side.E.Retract upstream plugging head first.F.If using STOPPLE Plugging Machine, or Machines, without a bypass, flow in thepipeline must be stopped prior to setting the plugging heads.3.2 Setting the Plugging HeadA.Open internal bypass on SANDWICH Tapping Valve.B.Purge air from STOPPLE plugging head housing through bleeder valve. Closebleeder valve when purge complete.WARNING:Vent pressure bleed valve away form work area and personnel. Stand clear ofvent when bleeder valve is opened. Otherwise, personal injury may result formblowing material.C. Leave internal bypass on SANDWICH Valve open to equalize pressure on both sideof the disc.D.Open SANDWICH Valve. When fully opened, close internal bypass.E.Set downstream plugging machine first. Extend stopple plugging head into sealing position slowly by moving control lever down. The sealing element has reachedfull set position when the number on the control bar, as observed through the observation hole, corresponds with the predetermined travel distance.
Line Stop ProcedureBRILIAN SUKSES MANDIRIStopple Plugging Machine3. SETTING THE PLUGGING HEAD3.2 Setting the Plugging HeadF.If control bar stalls before measured position is reached, raising and lowering thecontrol bar one or two inches may be necessary to reach full position.G.When the plugging head is set, return the control valve lever to neutral position,and hole to make sure it corresponds with the calculated distance required to setthe plugging head.H.Tighten the cap screws on the bar-lock clamp using the hex wrench provided.Torque the cap screws as follows :6” to 12” size - 50 ft. lbs.14” to 34” size - 100 ft. lbs.36” to 48” size - 125 ft. lbs.G.Set the upstream plugging machine by lowering plugging head into line.H.After both plugging head are positioned in the line, recheck the number (calculated distance) inthe observation hole of each plugging machine. The exact number, or fraction thereof, must bein the same position as originally viewed before the pressure in isolated section can be relieved.If the number has moved UP in the observation hole, connect hydraulic hoses, loosen clamps,and lower the plugging head until the measured distance is reached.I.The section between the two machines is now isolated. Close the valves on the equalizationlines. Vent and drain the isolated section of pipe completely.J.Verify the seal of the plugging head through a valve connection before starting the work on theisolated section if there is any leakage, repeat the plugging head setting procedures and verifythe seal. If leakage continues, remove the STOPPLE Plugging Machine, install a new sealing element, and reset the plugging head.K.If the isolated section of the line is to be cut. However, if flame cutting is used, and when welding in the new section is planned, make sure the cut is no closer to the fitting than three pipe diameters, and a minimum of 2 feet.
Line Stop ProcedureBRILIAN SUKSES MANDIRIStopple Plugging Machine4. REMOVING THE PLUGGING HEAD4.1 Equalizing PressureA.When equalizing pressure with the line shut down, always fill and equalize fromthe side of the job with the highest static pressure. Retract the high-pressure sideplugging machine first.B.For an on-stream operation, equalize from the upstream side and retract upstreammachine first.CAUTION:Pressure must be equalized across the plugging head before the head can be withdrawn. Ifa line pressure differential exists, the plugging head will remain locked in the line. Attempts to retract will result in damage to the machine. Equalize pressure before retracting, keep it equalized.4.2 Retract Plugging HeadA.Connect hydraulic hoses.B.Retract plugging head by moving control valve up slowly. Continue retracting untilzero appears in the observation hole.C.Close SANDWICH Tapping Valve.D.Close equalization valve.E.Open bleeder valve and bleed all pressure from housing.WARNING:Vent pressure bleed valve away from work area and personnel. Stand clear of vent when bleeder valve is opened. Otherwise, personal injury may result from blowing material.F.Remove plugging machine. Drain housing before removal.G.Install LOR Plug.
line stop stopple plug brilian sukses mandiri step 1 after a hot tap makes it’s live hole in the pipe. a line stopping machine is bolted to the tapping valve. step 2 the tapping valve is opened. pipe contents enter the line stop machine. step 3 the line stop machine actuator inserts a high - pressure