Transcription
HotRunnerHot Runner User ManualTroubleshooting Guideversion 1Original Instructions
iTable of ContentsSection 1 - Troubleshooting.1-11.1 Moisture Related Issues.1-11.1.1 Resin Moisture Contamination.1-11.1.2 Resin Drying Issues.1-11.1.3 Importance of Pre-Drying Resin.1-21.2 Pre-Molding Precautions.1-21.2.1 History.1-21.2.2 Material.1-21.2.3 Hardware.1-21.2.4 Settings.1-31.3 Establishing Root Cause.1-31.4 Fault Identification.1-31.5 Defect Types, Causes and Remedies Index.1-41.6 Troubleshooting Typical Problems.1-51.6.1 Dark Specks.1-51.6.2 Blisters or Bubbles.1-61.6.3 Flow Marks.1-71.6.4 Burn Marks.1-81.6.5 Delaminating Parts.1-91.6.6 Dimensional Irregularities.1-101.6.7 Discolored Parts. 1-111.6.8 Flash.1-121.6.9 Jetting.1-131.6.10 Pitted Parts.1-141.6.11 Rough Surface.1-151.6.12 Parts Sticking to Cavity.1-161.6.13 Parts Sticking to Core.1-171.6.14 Short Parts.1-181.6.15 Sinks or Voids.1-191.6.16 Splay.1-201.6.17 Streaks.1-211.6.18 Stringing.1-221.6.19 Warped Parts.1-23 2020 Mold-Masters (2007) Limited. All Rights Reserved.Hot Runner Troubleshooting Guide
TROUBLESHOOTING1-1Section 1 - TroubleshootingWARNING - HOT SURFACES xtreme heat. Avoid contact with heated surfaces. To avoid serious burnsEwear safety clothing consisting of a protective heat resistant coat and heatresistant gloves. Use adequate ventilation for fumes. Failure to do so canresult in a serious injury.WARNING - LOCKOUT / TAGOUTMake sure the machine has been locked out and tagged out in accordanceto the machines documented procedures. Failure to do so may lead toserious injury or death.This troubleshooting information assumes that the Hot Runner has beenoperational.Basic rules for troubleshooting are: Define the problem; what is seen is only a symptom of the underlyingproblem. Develop a method to isolate the problem. Test one item at a time to verify results. Monitor the final solution to verify that the problem has been solved.Repeat occurrences of the same symptom may indicate other problems. Document the solution so that a repeat occurrence can be solved quickly. Consult other resources to augment the troubleshooting information inthis manual. One of the best resources may be your resin supplier.1.1 Moisture Related IssuesMany common molding issues can be directly attributed to moisturecontamination of the production resin. Generally, manufacturing resinis supplied from the manufacturer in ready to process pellets that are insealed, airtight containers. Follow manufacturers storage instructions,keeping containers sealed until ready to use. Prior to using pellets, follow thedrying instructions, as provided by the resin supplier and molding machinemanufacturer, if applicable.1.1.1 Resin Moisture ContaminationMoisture can be introduced into the resin in many ways: During transportation Environmental exposure (aging) Malfunctioning heater / dryer Extreme humidity in atmosphere Inadequate or malfunctioning facility HVAC1.1.2 Resin Drying IssuesDuring the drying stage of the resin (if applicable), ensure that: The resin pellets are not overpacked 2020 Mold-Masters (2007) Limited. All Rights Reserved.Hot Runner Troubleshooting Guide
1-2TROUBLESHOOTING Adequate air circulation is present The drying system is properly sealed, according to manufacturersinstructions1.1.3 Importance of Pre-Drying ResinThermoplastic resins can be hygroscopic, able to absorb moisture from theair. Under normal processing conditions, this can lead to degradation of thepolymer during molding. Breakage of polymer chains changes the properties,resulting in possible blisters, streaks, splay or other defects described in thissection.Recycled resins can have higher hygroscopic properties due to greatersurface area and should be dried separately from fresh resins.If moisture issues are ruled out, continue with the troubleshooting tables inthe following pages.1.2 Pre-Molding PrecautionsPrior to commencing production, ensure that the following conditions havebeen met. This will greatly reduce any future need to troubleshoot defectiveproduction.1.2.1 History Review any documentation associated with your batch job regardingthe recipe using the mold, molding machine, thermoplastic resin,environmental setting, etc. Review comments, notes, logbooks, blogs, and anything other resourcematerial that pertains to the batch job. Verify that all settings such as all time, temperature, pressure, material,etc. are correct.1.2.2 Material Ensure that the thermoplastic resin to be used is the right grade, and hasbeen stored and / or prepared/dried, etc, according to manufacturer’sspecifications. Verify that the pigment / dye to be used meets manufacturer’sspecifications, and is compatible with the resin / molding machine / mold. Verify the correct recycle ratio and adjust settings accordingly.1.2.3 HardwareHot Runner Troubleshooting Guide Make sure the mold has been properly stored, and is dry, clean, free ofrust, dirt, moisture, residual resin, pigment and any protective coating. Check that the temperature controller meets requirements, and is fully 2020 Mold-Masters (2007) Limited. All Rights Reserved.
TROUBLESHOOTING1-3tested and operational. The injection molding machine has been properly maintained, cleaned,lubricated; tolerances and dimensions verified. Make sure that the nozzles, cylinders, valves, gates, and any othervariable that is appropriate for the batch job has been chosen.1.2.4 SettingsEnsure that all batch job parameters are correct: Temperatures Pressures Injection Speed Back Pressure1.3 Establishing Root CauseThis section is to be used as a reference tool only.When a system that has been set up according to specification and wasfunctioning normally suddenly produces sub-standard parts, the data inthe following pages may be used to determine the possible cause, but onlyshould be used as a guide.A correct set up procedure that has been proven in will produce partsthat meet design tolerances and specifications. A sudden change in anyparameter indicates a possible fault. Rather than modify other settings tocompensate for this variation, it is advisable to determine which of the originalsettings has changed.1.4 Fault IdentificationThe operator will need to evaluate all the possible conditions which may havecaused the defect. Identify the problem Determine the frequency Is the problem random or in the same location Review past history logs for similar occurrences and resolutions.Review the machine settings to ensure that there is no variation from theoriginal set-up which was producing standard parts.injection speedmelt heatingscrew speedlockingmelt temperaturecushionback pressuremold heatingFor a more thorough analysis of the defect, refer to the TroubleshootingSection in the following pages. 2020 Mold-Masters (2007) Limited. All Rights Reserved.Hot Runner Troubleshooting Guide
TROUBLESHOOTING1-41.5 Defect Types, Causes and Remedies IndexDark Specks.19-5Blisters or Bubbles.19-6Flow Marks.19-7Burn Marks.19-8Delaminating.19-9Dimensional Irregularities.19-10Discolored. 19-11Flash.19-12Jetting.19-13Pitted Parts.19-14Rough Surface.19-15Parts Sticking to Cavity.19-16Parts Sticking to Core.19-17Short Parts.19-18Sinks or Warped Parts.19-23Weld Lines.19-24Hot Runner Troubleshooting Guide 2020 Mold-Masters (2007) Limited. All Rights Reserved.
TROUBLESHOOTING1-51.6 Troubleshooting Typical Problems1.6.1 Dark SpecksThe finished product contains dark specks. Usually occurs when transparentresins are used.Probable Cause:1. Molding Machine Off-line for extended period Barrel off-line for extended period Barrel improperly purged Contamination in plasticizer Wrong nozzle Use of wrong screw2. Mold Gate and / or runner has dead spots3. Material Physical contamination of raw material Chemical contamination of raw material Particulate contamination from machine barrelSolution (in sequence):1.2.3.4.5.Purge system with appropriate materialTrace source of contamination and repair, remove or discardAdjust melt temperature if necessaryInspect for dead spots: gates, runners, nozzle, back flow valveInspect feed screw for degradation 2020 Mold-Masters (2007) Limited. All Rights Reserved.Hot Runner Troubleshooting Guide
TROUBLESHOOTING1-61.6.2 Blisters or BubblesThe finished product contains small gas or air filled pockets or cooling voids.Probable Cause:1. Molding Machine Low injection pressure Back flow valve malfunctioning Decompression cycle too long Rapid plasticizing Trapped air in feed Feed error2. Mold Trapped or volatile gas Low mold temperature Poor thin/thick transition phase Inadequate venting3. Material Overheating of resinSolution (in sequence):1.2.3.4.5.6.7.Hot Runner Troubleshooting GuideVerify control and / or holding pressureIncrease back pressureIncrease mold temperatureInspect back flow valveEnsure proper ventingIncrease gate sizeDecrease vent land length 2020 Mold-Masters (2007) Limited. All Rights Reserved.
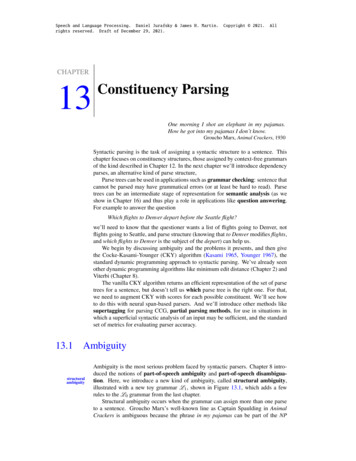
TROUBLESHOOTING1-71.6.3 Flow MarksThe finished product exhibits blush and flow marks, due to variations inmaterial temperature from gradients between the machine nozzle and moldsprue bushing. Cold material in the nozzle tip section results in a halo aroundthe direct sprue.Probable Cause:1. Molding Machine Wrong injection speed Wrong injection pressure Hold pressure too long2. Mold Insufficient mold cooling Temperature of mold too high around the gate Temperature of mold too cool Gate size is too small Gate is in wrong location Land length of gate is too long Incorrect Hot Runner system3. Material Melt temperature is too lowSolution (in sequence):1.2.3.4.5.Adjust injection speedAdd a large cold slug area Add cold wells at the end of the runner systemUse hot sprue bushingIdentify and eliminate dead pockets / sections 2020 Mold-Masters (2007) Limited. All Rights Reserved.Hot Runner Troubleshooting Guide
TROUBLESHOOTING1-81.6.4 Burn MarksThe finished product display brown streaks. This is from the material beingoverheated due to trapped air (diesel effect), which can lighten or darken thecolor.Probable Cause:1. Molding Machine High injection speed Backflow / check ring valve malfunctioning High back pressure2. Mold Trapped or volatile gas Burning due to friction Incorrect sprue diameter3. Material Overheated / underheated melt, possible shearSolution (in sequence):1. Clear blocked vent channels2. Lower injection speed3. Lower injection pressure4. Check heater functionality5. Check thermocouple functionality6. Reduce feed screw rotation7. Reduce melt temperature8. Increase mold cavity venting9. Enlarge gate10. Change gate position and / or sizeHot Runner Troubleshooting Guide 2020 Mold-Masters (2007) Limited. All Rights Reserved.
TROUBLESHOOTING1-91.6.5 Delaminating PartsThe finished product is separating into layers that can be peeled off; surfacelayers are flaking off. Insufficient layer bonding as a result of high shearstresses; non homogeneous material.Probable Cause:1. Molding Machine High injection speed2. Mold Cold mold Gate has sharp corners Sharp corners causing shear heat3. Material Physical contamination of raw material Chemical contamination of raw material Melt too hot / poor melt Incompatible color dye High percentage of recycled materialSolution (in sequence):1.2.3.4.5.6.7.8.Increase melt temperatureIncrease mold temperatureDecrease injection speedEliminate contaminationAdjust regrind ratioAdjust or change resin moisture contentPurge systemReduce sharp corners at gate 2020 Mold-Masters (2007) Limited. All Rights Reserved.Hot Runner Troubleshooting Guide
TROUBLESHOOTING1-101.6.6 Dimensional IrregularitiesThe finished product is of a different dimensional value than originallydesigned or previous production.Probable Cause:1. Molding Machine Low injection pressure Short hold pressure time Damaged backflow / check ring valve Short cycle time Cylinder clearance too big Nozzle heaters malfunctioning2. Mold Temperature setting too high Small gate size resulting in wrong pressure Incorrect gate location Incorrect mold configuration / size3. Material Generally not a material related issue unless excessive regrind isusedSolution (in sequence):1. Increase injection pressure2. Increase cooling time3. Increase mold temperature4. Ensure cycle time is consistent5. Monitor molding machine for irregularities6. Balance regrind ratio7. Increase gate size8. Decrease gate land length9. Balance the runner and / or gate system10. Decrease cavity quantityHot Runner Troubleshooting Guide 2020 Mold-Masters (2007) Limited. All Rights Reserved.
TROUBLESHOOTING1-111.6.7 Discolored PartsThe finished product varies in color on different surfaces.Probable Cause:1. Molding Machine Contamination2. Mold Incorrect sprue diameter Inadequate venting3. Material Physical contamination of raw material Chemical contamination of raw material Melt too hot / poor melt Incompatible color dye Residence time too highSolution (in sequence):1. Purge heating cylinder2. Lower resin temperature by: reducing cylinder temperature reducing screw speed reducing back pressure3. Decrease nozzle temperature4. Adjust residence time5. Adjust regrind ratio6. Adjust cycle time7. Check for external contamination sources8. Ensure proper cooling in all areas9. Increase mold venting 2020 Mold-Masters (2007) Limited. All Rights Reserved.Hot Runner Troubleshooting Guide
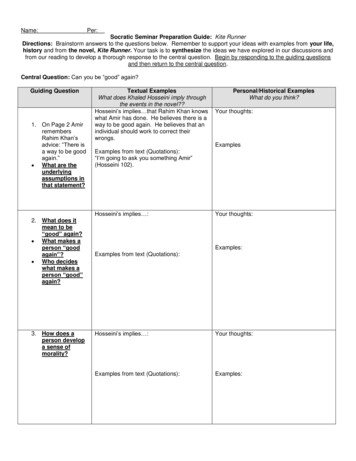
TROUBLESHOOTING1-121.6.8 FlashAlso known as “fins” or “spew”. The finished product contains a thin film ofmaterial attached at the mold parting line.Probable Cause:1. Molding Machine Low clamping pressure High injection pressure High injection speed2. Mold Inadequate mold supports Low clamping force Damaged mold Projected area too large for machine capacity3. Material Low melt viscosity High melt temperatureSolution (in sequence):1. Reduce the injection speed2. Reduce the injection pressure3. Reduce the injection time4. Increase clamping force5. Inspect the mold for irregularities6. Reduce the melt temperature7. Inspect vent depth8. Switch to higher tonnage clamping machine9. Establish correct transfer position10. Reduce hold pressureHot Runner Troubleshooting Guide 2020 Mold-Masters (2007) Limited. All Rights Reserved.
TROUBLESHOOTING1-131.6.9 JettingThe finished product exhibits serpentine flow patterns on the surface as aresult of the melt cooling prior to complete filling of the mold.Probable Cause:1. Molding Machine High injection speed2. Mold Cold mold Small gate Wrong gate land length Wrong gate location3. Material Cold meltSolution (in sequence):1.2.3.4.5.6.Decrease injection speedVerify nozzle temperatureIncrease mold temperatureIncrease melt temperatureIncrease gate sizeModify gate location 2020 Mold-Masters (2007) Limited. All Rights Reserved.Hot Runner Troubleshooting Guide
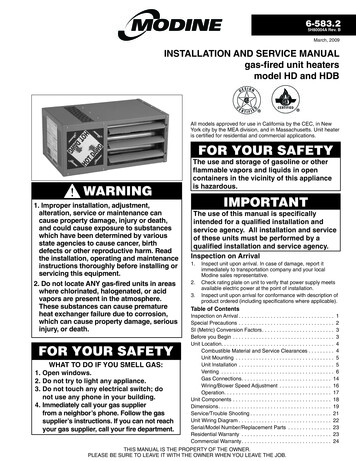
TROUBLESHOOTING1-141.6.10 Pitted PartsThe finished product contains unmelted particles or small holes on thesurface.Probable Cause:1. Molding Machine Improper or worn out feed screw Low melt temperature Low injection speed2. Mold Gating shear Sharp corners3. Material Resin used is not homogeneous External contaminationSolution (in sequence):1.2.3.4.5.6.7.Hot Runner Troubleshooti
polymer during molding. Breakage of polymer chains changes the properties, resulting in possible blisters, streaks, splay or other defects described in this section. Recycled resins can have higher hygroscopic properties due to greater surfa