Transcription
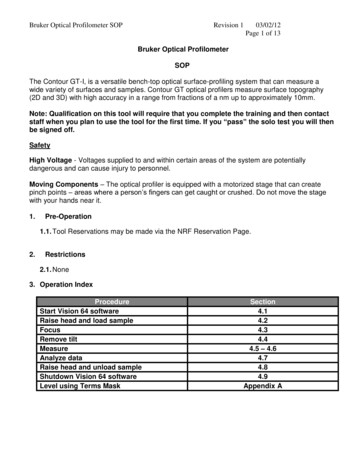
Simon Fraser University 8888 University Drive, Burnaby, B.C. V5A 1S6E info@4dlabs.ca T 778.782.8158 F 778.782.3765 www.4dlabs.caBruker Contour GT-K ProfilometerStandard Operating ProcedureRevision: 1.1 – Last Updated: January 10/2019, Revised by Christopher BalickiOverviewThis document will provide a detailed operation procedure of the Bruker Contour GT-K opticalprofilometer. Formal training is required for all users prior to using the system.Revision History#Revised by:DateModification1Rene Rao05/24/18Initial Release2Christopher Balicki01/10/19Minor Update345Document No. 4DSOP000X
Simon Fraser University 8888 University Drive, Burnaby, B.C. V5A 1S6E info@4dlabs.ca T 778.782.8158 F 778.782.3765 www.4dlabs.caTable of ContentsGeneral Information . 3Measurement Modes. 3Measurement Parameters . 4Operation . 51. System Startup and Sample Loading . 52. Taking a Scan . 63. Data Analysis. 74. Data Saving and Export. 95. Unloading Sample and Shutdown . 96. Other Features . 106.1 Stitching . 10References and Files . 11Contact Information . 11Appendix . 12A.1 Level Using Terms Mask . 12A.2 Changing Objectives . 14A.3 Storing Objective 1X . 15A.4 Storing Objective 5X . 17A.5 Fix Squeaky Noise from Lead Screw (STAFF ONLY) . 172
Simon Fraser University 8888 University Drive, Burnaby, B.C. V5A 1S6E info@4dlabs.ca T 778.782.8158 F 778.782.3765 www.4dlabs.caGeneral InformationThe Contour GT-K is a versatile bench-top optical surface-profiling system that can measure step-heights,film stress, roughness, and other parameters. It measures surface topography with a 1-2um x-y resolutionand 1nm vertical resolution.Measurement ModesThere are two measurement modes: Vertical Scanning interferometry (VSI) and Phase-ShiftingInterferometry (PSI).VSI uses a broadband (normally white) light source. It is effective for measuring objects with roughsurfaces, as well as those with adjacent pixel-height differences greater than 135 nm. The internaltranslator moves the objective while the camera periodically records frames. As each point on the surfacecomes into focus, the modulation on that point reaches a maximum, and then tapers off as the objective3
Simon Fraser University 8888 University Drive, Burnaby, B.C. V5A 1S6E info@4dlabs.ca T 778.782.8158 F 778.782.3765 www.4dlabs.capasses through focus. By recording the height of the translator at maximum modulation, the system candetermine the height of each pixel.PSI uses a narrowband (normally green) light source. It is typically used to test smooth surfaces such asmirrors, optics or highly polished samples. It is very accurate, resulting in vertical measurements with subnanometer resolution. However, PSI cannot obtain a correct profile for objects that have large step-likeheight changes. The internal translator precisely alters the optical path length of the test beam. Eachoptical path change causes a shift in the fringe pattern. The shifted fringes are periodically recorded by thecamera, producing a series of interferograms. Computerized calculations combine these interferograms todetermine the surface height profile.Measurement Parameters1. Speed4 Speed at which the scan head will move. Resolution decreases as speed increases.
Simon Fraser University 8888 University Drive, Burnaby, B.C. V5A 1S6E info@4dlabs.ca T 778.782.8158 F 778.782.3765 www.4dlabs.ca2. Backscan The distance that the system moves backward before it begins a scan. Set the backscan large enough to account for the greatest possible variation in feature height3. Length The vertical length that the system will scan during a measurement. To determine the appropriate length, estimate the peak-to-valley height of the step/surfacethat you are measuring, and then set the length 10% to 20% higher.4. Threshold Percentage value to determine the acceptable signal-to-noise level for which a given pixel isconsidered valid. Too low threshold will consider poor-quality data points. Too high threshold will eliminate high-quality data points.Operation1. System Startup and Sample Loading5 Ensure the system is powered on by looking at the controller to the left of the computer. Start the Vision 64 software. Click Initialize Z. Click Unload XY. Click Initialize X/Y.Place the sample once the stage moves to the front.
Simon Fraser University 8888 University Drive, Burnaby, B.C. V5A 1S6E info@4dlabs.ca T 778.782.8158 F 778.782.3765 www.4dlabs.ca Select the Measurement Type (VSI or PSI), Objective (1X or 5X) and Field of View (0.55X, 1X or2X). Set the measurement parameters.2. Taking a Scan Lower the objective until it’s a few millimeters above the sample by pulling down the redindicator in the z-control window. Left click and drag the red dot in the XY control window tomove your sample beneath the objective. Control the speed by how far low you pull theindicator and by the SLOW, MED, FAST buttons. Ensure the objective does not strike thesample.6 Turn the auto intensity on by clicking Auto in the intensity control window. Raise/lower the objective till the sample feature is sharp on the Video window.
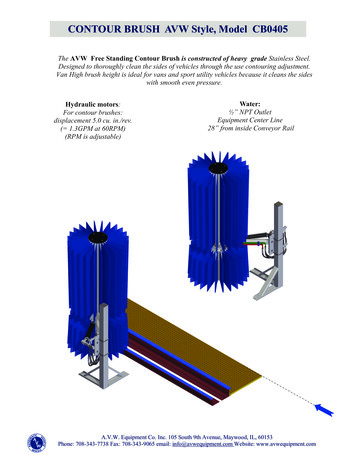
Simon Fraser University 8888 University Drive, Burnaby, B.C. V5A 1S6E info@4dlabs.ca T 778.782.8158 F 778.782.3765 www.4dlabs.ca Slowly raise the objective until fringes appear in the Video Window. Turn off the Auto intensityToo Low Too HighOptimumFringes need to be aligned along the x-axis and only 3-5 fringes should appear on the VideoWindow. Turn the tip and tilt stage knobs on the device to adjust the fringes. Press the Single Acquisition buttonon the ribbon at the top to start the scan.3. Data Analysis 72D Plotin the Data Analysis window will be displayed on completion of the scan.
Simon Fraser University 8888 University Drive, Burnaby, B.C. V5A 1S6E info@4dlabs.ca T 778.782.8158 F 778.782.3765 www.4dlabs.ca Move X and Y cursors to get corresponding line plots. Move the R cursor to a baseline location and the M cursor to a step height to acquire thedesired measurements. Expand the cursors to cover a larger area. Right-click on the plot and select Two-Point Linear Fit. Alternatively, right-click on TermsRemoval (F-Operator), click on Edit Settings, select Two-Point Linear Fit and click Calculate.8 Click Data in the Data Analyzer window to select other analysis tools. Click 3D Plot buttonto see the 3D image.
Simon Fraser University 8888 University Drive, Burnaby, B.C. V5A 1S6E info@4dlabs.ca T 778.782.8158 F 778.782.3765 www.4dlabs.ca4. Data Saving and Export Click the Save button Data can be exported by right-clicking on the plot and selecting Export. Multiple scans can be done at the same time and can be selected in the Active Gallery windowto save the file as an .opdx file.at the bottom.5. Unloading Sample and Shutdown9 Click Initialize Zto raise the objective. Click Unload XYto move the stage front. Remove the sample. Click Initialize X/Y. Close the Vision 64 software. Leaving the software open will reduce the equipment’s lifetime.
Simon Fraser University 8888 University Drive, Burnaby, B.C. V5A 1S6E info@4dlabs.ca T 778.782.8158 F 778.782.3765 www.4dlabs.ca6. Other Features6.1 Stitching Click the Stitching button in the Measurement Setup Window. Select the Enable Stitching check box. Select the shape of the area that needs to be stitched. If the area of the sample is unknown, click the Teach button and follow the instructions on thescreen to define an area for stitching. Click the Set Reference Point and Traversal button to open the Reference Point and TraversalSetup dialog box. Select a reference point, and then indicate the traversal pattern to befollowed during the stitching operation. In the Overlap Area field, enter the percentage area that the system needs to overlap onstitched scans to level them. A higher overlap percentage produces a better fit but requiresmore scans. The actual overlap may be higher than the set percentage as the system spacesthe scans evenly. 10Select Autofocus to be Off and enter Delay After Movement if required
Simon Fraser University 8888 University Drive, Burnaby, B.C. V5A 1S6E info@4dlabs.ca T 778.782.8158 F 778.782.3765 www.4dlabs.ca Select Overlap Region Fit Type – either All Data or Flat Data. When Flat Data is selected, setthe Lowest Slope Data % to choose the amount of flat data to use. Click the Measurement button The stitched 2D plot will open in the Data Analysis window. To save the dataset, click File and select Save Dataset As.to stitch data.References and FilesBruker Contour GT-K Manual and Vision 64 Help ContentContact InformationQuestions or comments in regard to this document should be directed towards Nathanael Sieb(sieb@4dlabs.ca) in 4D LABS at Simon Fraser University, Burnaby, BC, Canada.11
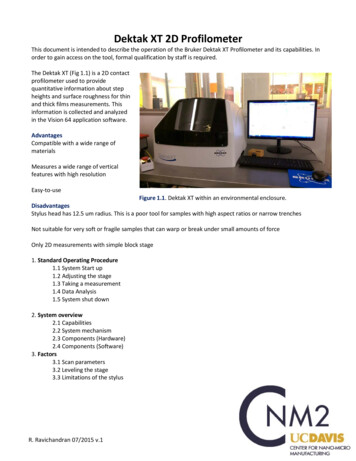
Simon Fraser University 8888 University Drive, Burnaby, B.C. V5A 1S6E info@4dlabs.ca T 778.782.8158 F 778.782.3765 www.4dlabs.caAppendixA.1 Level Using Terms Mask Right-click on Terms Removal (F Operator) in the Data Analyzer and then click on Edit Settings. Select Tilt Only and check Use Terms Mask, then click Edit Mask to open the Mask EditorWindow. Draw a box on the area that needs to be considered in the levelling process. Under Region,check the Inside box. 12Do this for a few regions and they will be grayed out.
Simon Fraser University 8888 University Drive, Burnaby, B.C. V5A 1S6E info@4dlabs.ca T 778.782.8158 F 778.782.3765 www.4dlabs.ca13 Click Invert Mask to make the selected areas active. Click OK and the sample should be levelled using the masked data.
Simon Fraser University 8888 University Drive, Burnaby, B.C. V5A 1S6E info@4dlabs.ca T 778.782.8158 F 778.782.3765 www.4dlabs.caA.2 Changing Objectives Handle the objectives with extreme care. Hold the current objective (attached to the profilometer) with one hand and move the lever tothe right with your free-hand to unlock it. Remove this objective and store it in its storage container. (Refer Appendix A.3 and A.4) Hold the new objective in one hand and align the pin on the top with the hole in theprofilometer’s objective holder. 14Move the lever to the left with your free-hand to lock it.
Simon Fraser University 8888 University Drive, Burnaby, B.C. V5A 1S6E info@4dlabs.ca T 778.782.8158 F 778.782.3765 www.4dlabs.caA.3 Storing Objective 1X15 Remove the mount from the plastic container. Unscrew the mount and place the objective in the slot. While holding the objective with one hand, tighten the screws.
Simon Fraser University 8888 University Drive, Burnaby, B.C. V5A 1S6E info@4dlabs.ca T 778.782.8158 F 778.782.3765 www.4dlabs.ca 16Place the mount and the objective in the plastic container and close the lid.
Simon Fraser University 8888 University Drive, Burnaby, B.C. V5A 1S6E info@4dlabs.ca T 778.782.8158 F 778.782.3765 www.4dlabs.caA.4 Storing Objective 5X Place the objective in the plastic box. Close the lid with the small foam piece placed on top of the objective.A.5 Fix Squeaky Noise from Lead Screw (STAFF ONLY) Squeaking sounds would be produced if the lead screw is bent. Remove the objective and store it in its container to ensure it’s not damaged during themaintenance. 17Loosen the 4 screws at base of the lead screw just enough for the black plate to slightly move.
Simon Fraser University 8888 University Drive, Burnaby, B.C. V5A 1S6E info@4dlabs.ca T 778.782.8158 F 778.782.3765 www.4dlabs.ca Run the optics up and down a few times for the plate to shift into a better centered positionand stops producing the noise. If the noise still exists, manually adjust the black plate and run the optics up and down a fewtimes. Once the noise stops, tighten the 4 screws and place the objective back in the profilometer’sholder.18
Bruker Contour GT-K Profilometer Standard Operating Procedure Revision: 1.1 – Last Updated: January 10/2019, Revised by Christopher Balicki Overview This document will provide a detailed operation procedure of the Bruker Contour GT-K optical profilometer. Formal training is required