Transcription
OPERATINGINSTRUCTIONSVetter Mini-Lifting Bags 8.0 barItem No.9987 0153 01 Vetter GmbHState: 08/08
Vetter Mini-Lifting Bags 8.0 barPage:2ContentsPreliminary remarksPage3Safety instructionsPage3Correct usePage4Inventory of itemsProduct descriptionPagePage45,6Preparations for usePage7Application instructionsPage7a) Mini Lifting BagsPage7b) Inflation hosesPage7c) Dual deadman controller 8 bar in plasticPage8Page8Page8f) Dual controller 8 bar, fittingPage9g) Single controller 8 bar, fittingPage9The Vetter safety coupling systemPage9Operation with compressed air bottlesPage10Description of the sethousingd) Dual deadman controller 8 bar,aluminiume) Single deadman controller 8 bar,aluminiumOperation with the SAG 8Page10Operation with other compressed air suppliesPage10,11Additional accessoriesPage12Trouble-shooting for faultsPage13Repetitive testsPage13,14Limit for the period of usePage14Care and storagePage15Data from the manufacturerPage16Technical data about STEEL CORD bagsTechnical data about ARAMIDE bagsPagePage1617,19Diagrams Force vs. StrokePage18,19List of possible dangersPage20Declaration of conformityPage21
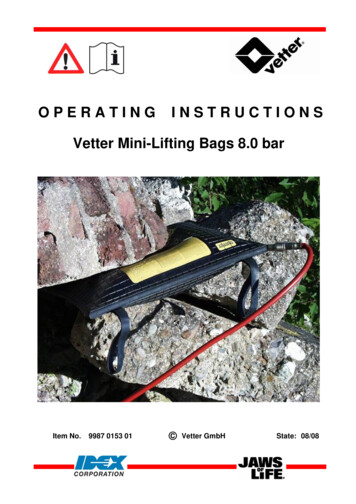
Vetter Mini-Lifting Bags 8.0 barPage:Preliminary remarksOnly knowledge and the exact observance of this operating manual guarantee correctand reliable operation, achieve the best possible usage and ensure any claims madewithin the framework of the Vetter guarantee.Only staff are to use Vetter mini-lifting bags who have been instructed in their use bythe manufacturer's operating manual and operating instructions.Safety instructionsOnly prespecified protective clothing is to be worn during operation. The nationalregulations are to be observed in connection with lifting bag systems and their use.Mini-lifting bags must only be used with compressed air. It is imperative that noinflammable or aggressively acting gases be used.Mini-lifting bags must only be inflated with original Vetter fittings due to the fact thatthese have been subjected to an acceptance test.The lifting bag system is to be inspected before and after operation to see that itis in a correct and perfect condition.Never place more than 2 Mini-Lifting Bagsover each other.Ensure against slippage.Continually prop up loads being lifted during the lifting procedure.Always ensure that the substructure material is in a stable conditionwhen constructing the support.The support must at least cover the whole bag area and shouldbe larger in length and width than in height !Danger of slippage !During support construction never place metal on metal !3
Vetter Mini-Lifting Bags 8.0 barPage:4With slippery ground (ice, snow, clay etc.) place stones, branchessimilar objects underneath the bag in order to increase ground or grip.Avoid pointed objects, such as screws, spikes etc.Never place bags on sharp edges or objects which are hot. Use suitablelayers of lining and cover the complete positioning area of the bag.Protect the bag from sparks coming from welding or cutting work.Do not subject bags to heavy loads such as hydraulic stamps, winchesor falling objects.Do not stay underneath a load being lifted, never hold or touchthe load from lifted, never hold or touch underneath !Remain at a safe distance from the load !Avoid shearing effects by squeezing the bag during deflation!Never stand in front of the load but always at the side of it becauseunder unfavourable conditions it may swing out!Correct useThe Mini-Lifting Bag is primarily a pneumatic (normally with air) rescue device usedby the rescue services (e.g. fire services) with which trapped people can be freed,access gained for rescue and many other tasks.The Mini-Lifting Bag can also be used as a working device in order to lift or move loads.Mini-Lifting Bags meet the requirements for fire services as specified in GUV-G 9102.Additional instructions are to be found in the user's own operating instructions.Inventory of itemsAn inventory and check of all items in the delivery package is to be made according tothe delivery documentation when acceptance of the Mini-Lifting Bag equipment iscarried out.A visual check and function check is also to be made as specified in the operating manual.
Vetter Mini-Lifting Bags 8.0 barPage:5Product descriptionAll Vetter Mini-Lifting Bags 8.0 bar are produced by hand in a layer structure and are madeof high quality raw material so that a seamless bag is created as the finished product.This danger only exists when the surface of the bag is damaged so that the supportingcord comes through. This is the reason why a visual check should be made afteroperation for the following types of damage:Damage typesDamage causedDamage causedDamage causedDamage causedby separationby cutsby punctureby heat and acidsThe bag must be immediately discarded if, during inspection,established that there is damage and that the support cord(steel or ARAMIDE) shows through. Repair is not possible.Danger of bursting !Lifting bags with side wall (e.g. Vetter Lifting Bag 1.0 bar) achieve their maximumheight by the expansion of the side wall material.Mini-Lifting Bags do not have a side wall and therefore achieve their lifting effect by ashape change, i.e. both surfaces curve outwards.In order to use maximum lift strength, the whole effectivearea, i.e. the complete area minus the edge zone, must becompletely under the load to be lifted and the maximumoperating pressure applied. A Mini-Lifting Bag develops themaximum lifting power at the beginning of the lift path!The bag develops a spherical shape as the lift heightincreases. This is the reason why the contact area withthe load decreases until at a max. bag curvature this willwill be almost zero. The largest lift height of the MiniLifting Bag will only be reached in the unloaded state.
Vetter Mini-Lifting Bags 8.0 barPage:6Load path diagram for the individual Mini-Lifting-Bagsare given on request. The lift power (resulting fromcontacting surface and pressure) is only available whenthe first bag curvature contacts the load.The lower the space distance between load andMini-Lifting Bag, the greater the lift power. In orderto fully use the strengths of the Mini-Lifting Bag, thedistance between load and bag should be at a minimum.The under-support must be at least as large as theapplied Mini-Lifting Bag and must not be higherthan the smallest side length.In case the lift power produced by one Mini-Lifting Bagis not sufficient then a number of bags can be positionednext to each other when the load is slip-free.However, a separate controller must be used for eachbag.If the lift power of only one Mini-Lifting Bag is not sufficientthen a maximum of two bags can be placed on top of eachother when the load is slip-free.This configuration has an additive effect for the lift heightof both Mini-Lifting BagsThe lift power only corresponds to that of the smaller bag!Never position 3 or more bags on top of each other !A Mini-Lifting Bag under load reacts the same as aspring under tension !As soon as the Mini-Lifting Bag is quickly relieved of theof the load, e. g. slipping, load breakage etc., then theMini-Lifting Bag will be rapidly catapulted outwards !Never stand in front of the Mini-Lifting Bag !Danger area !
Vetter Mini-Lifting Bags 8.0 barPage:7Preparations for useRemove a set of lifting bags from the ve Prepare the inflation device.Ensure sufficient air supply.Only perfectly operating and inspected Mini-Lifting Bag systemsare to be used.The method and type of application is to be decided from case to case by the operationleader with his own area of responsibility as well as the operating instructions of the user.Application instructionsMove the lifting bag to a suitable position so that at least 75% of the supporting bagarea is under the load.Continually built up the under-support for maintaining contact when the load islifted during the lifting procedure.Never stand in front of the bag during operation but to the side of the Mini-Lifting Bagbecause it could be catapulted outwards under unfavourable conditions.Description of the seta)Mini-Lifting BagsBag size selection is made according to the taskThere are 16 different sizes from 1.1 t to 67.7 tonswith a choice of steel cord or aramide reinforcement.There is no difference in performance between MiniLifting Bags having the same size with steelcord andthose with Aramide. Aramide bags are lighter thanLifting bags made of steel cord (when comparing bagsin the same size).b) Inflation hosesThere are inflation hoses available (5 m and 10 m in length)which enable the user to control the Mini-Lifting Bags froma safe position.The colours of the hoses, RED and YELLOW, avoid anyconfusion during control of the different sides (inlets andoutlets) of mini-Lifting Bags.
Vetter Mini-Lifting Bags 8,0 barc)Page:8Dual deadman controller 8 bar in plastic housingConnect the inflation hoses to the outlet coupling on therear side of the controller.Connect the air supply to the inlet coupling.Move the control lever to the front in order to inflate the MiniLifting Bag.In doing this, observe the corresponding manometer and load.Release the control lever, thus ending the inflation process, when the required operatingrequired operating pressure for the lift power or lift height is reached. The control leverautomatically returns to the center position (zero) when released (deadman switched).The built-in safety valve automatically activates when the bag is unintentionally over-ininflated above the maximum operating pressure of 8 bar or when there is an increase inpressure of 8 bar or when there is an increase in pressure in the bag due to a unforeseenloading of the bag.The activation tolerance for opening and closing of the safety valve can be /- 10 %.Press the control lever in the opposite direction in order to deflate the bag or to reduce the load.d)Dual deadman controller 8 bar, aluminiumPress down the lower button (1) in order to inflate the bag.Inflation is stopped when the button is released and it returns2back to the zero position.The bag is released by pressing the upper button (2).1e)Single deadman controller 8 bar, aluminiumThe single deadman controller, on the left, can be used whenonly one Mini-Lifting Bag is to be used.
Vetter Mini-Lifting Bags 8.0 barPage:9The single and dual controllers in the 8 bar fitting version do not correspondto the requirements of the Fire Service standard DIN EN 13 731.f)Dual controller 8 bar, fittingController with inflation regulator using a ball valve without1deadman switching.To empty the bag, open the head of the safety valve (1) byturning to the left.Close the safety valve by turning to the right after deflation.g)Single controller 8 bar, fittingThe same version as described in e) but used for the controlof only one Mini-Lifting Bag.The Vetter safety coupling systema)Inlet coupling controllerConnect the air supply hose, resp. Connection hose of thepressure reducer, to the plug nipple of the inlet coupling onthe controller. In doing this, firmly press the nipple into thethe coupling until it latches in. Turn the brass sleeve of thecoupling opposite to the safety pin for additional safety.b)8 bar inflation couplingFirmly press the hose, resp. bag nipple, into the coupling until itlatches in order to connect the inflation hose with the correspondingcontroller, resp. with the Mini-Lifting Bag. The coupling sleeve mustlay on the support ring without any gap (1).1The nipple must be firmly pressed against the spring pressure in thecoupling in order to release the connection (only in pressure-freecondition). At the same time, the coupling sleeve must be pulled back.The connection is then released.
Vetter Mini-Lifting Bags 8.0 barPage:10Operation with compressed air bottles4Connect the pressure reducer to the compressed6air bottle (200 or 300 bar) using the T-Screw (1).3Close the valve of the reducer (2).2Open the valve on the bottle (3).The manometer (4) indicates the pressure1in the bottle.5Adjust the backpressure to approximately 10 bar using the regulator lever (5)(indication of reduced pressure on the backpressure manometer (6)).Connect air hose of the pressure reducer to the controller. Open the valve onthe pressure reducer (2). The system is ready for operation.Operation with the SAG 8The rapid reaction SAG 8 is a compact, portableinflation and operating station for Mini-Lifting Bags8 bar.It is quickly operational:Open bottle valve, pull out inflation hose fromthe reel, connect bag and readyHow it works can be seen in thespecial operating manual for eachequipment.Operation with other compressed air suppliesBasically, any air supply which is available can be used for operationof Mini-Lifting Bags as long as the pressure does not exceed 10 barand the air is free of oil.
Vetter Mini-Lifting Bags 8.0 barPage:The transition set (B.-Nr.: 1600 0125 00) can be used with any other airsupplies and has the following adapters:87921)1543 6Truck compressed air connection, dual brake system.For tapping air out of the trailer coupling head.2.)Dummy couplingSeals off the control line of the brake systemRemember !Ensure that the truck does not roll, use brake blocks !3.)Truck tyre inflation device adapterFor tapping off air from the so-called tyre inflation bottle nearthe brake.Remember !The tyre inflation connection must be ensured by a safety valve4.)as a standard (blow-off pressure approximately 7.5 bar) !Truck tyre valveInflation with a normal hand or foot pump as well as otherair supplies for tyre inflation.5.)Truck tyre valve connection, can be clamped6)For extracting air for the spare tyre.Adapter for the local air pressure network.7)Air supply hose, 10 m, green.8)Air supply hose, 10 m, green, with blocking valve.9)Case, red.11
Vetter Mini-Lifting Bags 8.0 barPage:Additional accessoriesPos.5Item No.Description1600 0105 00Comp. air bottle 10 l / 200 bar1600 0091 00Comp. air bottle 6 l / 300 bar1600 0101 00Comp. air bottle 1 l / 200 bar561600 0084 001600 0091 00Dual connector 200 barDual connector 300 bar71600 0116 00Safety carrier rack6(without bottles)781600 0118 00Trolley for safety carrier rack(shown with 2 x Pos. 7)(without bottles)891091600 0087 00Hand pump101600 0094 00Foot pump111600 0145 00Pressure regulator121600 0120 00Adapter for construction site11compressor1212
Vetter Mini-Lifting Bags 8.0 barPage:Trouble-shooting for faultsIf the safety valve blows too early because of foreign body penetration caughtup inside then the blow-off valve is to be fully opened on the head of safetyvalve by turning counter-clockwise so that the compressed air can escape.If, due to this, the foreign body is not removed then the upper part of the safetyvalve is to be unscrewed when the safety valve is disassembled.To do this, position the pipe wrench in the centre and unscrew by turning tothe left.Carefully take out the valve ball and remove foreign body.Firmly screw on the upper part of the valve again, assemble the safety valveand check operation. The set pressure must not be changed.Should the sealing or sealing plate on the upper partof the valve be removed then correct operation canno longer be guaranteed.The safety valve is to be exchanged.If operational faults occur on the pressure reducer or controller dueto icing at high air humidity in connection with low temperaturesthen a normal defrosting agent (the same as in cars) should be used.Repetitive testsLifting bag systems are to be subjected to the following repetitivetests:A)Testing on acceptanceTesting for completeness by the person/people delegatedby the user.Visual check and operation test by a trained person accordingto the operation manual.B)Visual check and operation test after each application / use bya trained person.This test is to be documented.C)The lifting bag system is to be subjected at least once every yearto a visual check and operation test by a trained person accordingto the following check list.This test is to be documented.13
Vetter Mini-Lifting Bags 8.0 barD)Page:The lifting bag system is to be given a pressure test, by user ormanufacturer, according to DIN EN 13 731 and recommendation of themanufacturer, every 5 years or if there is any doubt about the safety orreliability.The responsibility for correct execution of repetitive testing lieswith the user.Lifting bags or lifting bag systems are not subject to the requirementsof EC guideline 97/123/EC (refer to Point: 3.15).Limit for the period of useMini-Lifting Bags are subject, the same as other rubber products, to natural aging.The first sign of material aging is the loss of flexibility, this is especially seen in theformation of "age cracks". If these cracks propagate so far along the upper layerso that the supporting cord layer (steel or Aramide) is no longer fully insulated thenthis can quickly limit the tear resistance of the bag wall.This can cause wall tearing and thus lead of bursting.Caution !Danger of bursting !The experiences over the past decade have clearly shown that the failure rate ingeneral for rubber products considerably increases with application periodsexceeding 15 years.Therefore Mini-Lifting Bags should be replaced after 15 to 17 years of use atthe latest. The danger for operational services using over-aged Mini-LiftingBags must never be under-estimated, alone due to the consideration aspect.Although at present there is no regulation about the time limit for the maximumperiod of use, the responsibility for this lies wholy and soly with the user, resp.the person who has been commissioned by him to carry out testing.14
Vetter Mini-Lifting Bags 8.0 barPage:Care and storageThe lifting bag equipment is to be cleaned after each operation.Cleaning is normally carried out with warm water and a detergent.Cleaning must never be carried out with a chemicalcleaning agent and never with high-pressure hotwater devices.Drying is made at normal room temperature.DIN 7716 is to be observed with long storage periodsAll rights are reserved for technical changeswithin the scope of product improvement.Vetter GmbHA Unit of IDEX CorporationBlatzheimer Str. 10-12D-53909 ZülpichFon: 49 (0) 2252-3008-60FAX: 49 (0) otes:15
Vetter Mini-Lifting Bags 8.0 barPage:Technical dataMini- Lifting Bags steelcord reinforcementTypeV 10Item No.V 12V 18V 201310 0006 00 1310 0010 00 1310 0011 00 1314 0021 00Lift power,maxto9,612,017,719,4Lift height, maxcm20,3202728,0Sizecm37x3732x5247x52Insertion heightcm2,52,52,52,548x58Nom. contentl9,210,721,724,9Air capacityl82,896,3195,3224,1Operatingbar8888Test pressurebar16161616Burst pressurebar48,371,354,755,3Weightkg5,06,08,58,7V 24V 24 LV 31pressure max.TypeItem No.V 35 L1310 0012 00 1310 0013 00 1310 0014 00 1310 00082 00Lift power,maxto24,024,031,435,8Lift height, maxcm30,620,13731,0Sizecm52x6231x10265x69Insertion heightcm2,52,52,52,5Nom. contentl32,923,557,538,8Air capacityl296,1211,5517,5349,4Operatingpressure max.bar8888Test pressurebar16161616Burst pressurebar6574,34437,0Weightkg1211,51715,8V 40V 54V 68TypeItem No.1310 0015 00 1310 0016 00 1310 0017 00Lift power,maxto39,654,467,7Lift height, maxcm40,247,852,0Sizecm78x6986x8695x95Insertion heightcm2,52,52,5Nom. contentl75,0124,2161,9Air capacityl675,01.117,81.457,1Operatingpressure max.bar888Test pressurebar161616Burst pressurebar3535,534,7Weightkg203138,543x11516
Vetter Mini-Lifting Bags 8.0 barPage:Technical dataMini- Lifting Bags aramide reinforcementTypeV 10Item No.V 12V 18V 201314 0022 00 1314 0024 00 1314 0025 00 1314 0034 00Lift power,maxto9,612,017,719,4Lift height, maxcm20,3202728,0Sizecm37x3732x5247x52Insertion heightcm2,52,52,52,548x58Nom. contentl9,210,721,724,9Air capacityl82,896,3195,3224,1Operatingbar8888Test pressurebar12121212Burst pressurebar737362,553,1Weightkg3,254,05,85,8V 24V 24 LV 31pressure max.TypeItem No.V 35 L1314 0026 00 1314 0027 00 1314 0028 00 1314 0183 00Lift power,maxto24,024,031,435,8Lift height, maxcm30,620,13731,0Sizecm52x6231x10265x69Insertion heightcm2,52,5
Mini-lifting bags must only be used with compressed air. It is imperative that no: inflammable or aggressively acting gases be used. Mini-lifting bags must only be inflated with original Vetter fittings due to the fac